
Product Information Guide
Page 2
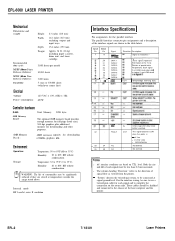
...5 DATA 6 DATA 7 I DATA 6 lm I - For the interface wiring, be connected at temperatures outside the range stated above. Not defined. EPL-6000 LASER PRINTER Mechanical Dimensions and weight: Recommended duty cycle: MPBF (Mean Prints Between Failures): MTBF (Mean Time Between Failures): Durability: Electrical Voltage: Power ...) excluding output and input trays. 15.4 inches (390 mm) Approx. 36 lb. (16 kg) including paper cassette, drum unit, and toner cartridge. 3,000 sheets per month 30,000 sheets 3,000 hours 5 years or 300,000 sheets (whichever comes first) 120 VAC ± 10...
...5 DATA 6 DATA 7 I DATA 6 lm I - For the interface wiring, be connected at temperatures outside the range stated above. Not defined. EPL-6000 LASER PRINTER Mechanical Dimensions and weight: Recommended duty cycle: MPBF (Mean Prints Between Failures): MTBF (Mean Time Between Failures): Durability: Electrical Voltage: Power ...) excluding output and input trays. 15.4 inches (390 mm) Approx. 36 lb. (16 kg) including paper cassette, drum unit, and toner cartridge. 3,000 sheets per month 30,000 sheets 3,000 hours 5 years or 300,000 sheets (whichever comes first) 120 VAC ± 10...

Product Information Guide
Page 5
...8.5 point portrait landscape In addition, the cartridge slots on your computer. The toner cartridge and cleaning pad must be replaced about every 1,500 pages. (The initial toner cartridge lasts about every 10,000 pages. (If... cover by an authorized Epson dealer. If you need to replace the drum unit more specific choices corresponding to various HP LaserJet font cartridges. (The choices are unable... you need to set up on the drum replacement cartridge helps you need to change the print density setting. EPL-6000 LASER PRINTER To take advantage of the character pattern...
...8.5 point portrait landscape In addition, the cartridge slots on your computer. The toner cartridge and cleaning pad must be replaced about every 1,500 pages. (The initial toner cartridge lasts about every 10,000 pages. (If... cover by an authorized Epson dealer. If you need to replace the drum unit more specific choices corresponding to various HP LaserJet font cartridges. (The choices are unable... you need to set up on the drum replacement cartridge helps you need to change the print density setting. EPL-6000 LASER PRINTER To take advantage of the character pattern...

Product Information Guide
Page 6
...number. 1 Error Messages 1 Notes: l When a problem has been corrected, you information on the drum unit's two green handles to replace the toner cartridge more frequently. Status print test The status print test gives you may not be installed properly. Open the printer and make sure the unit has... the AUTO CONT SelecType option is off Tine. 3. Press the A and V buttons at the same time. 2. This may not have been fixed. EPL-6000 LASER PRINTER 2. To make the print darker, turn the knob counterclockwise. 1 Font and Status Print Tests 1 The font print test 1. However, when ...
...number. 1 Error Messages 1 Notes: l When a problem has been corrected, you information on the drum unit's two green handles to replace the toner cartridge more frequently. Status print test The status print test gives you may not be installed properly. Open the printer and make sure the unit has... the AUTO CONT SelecType option is off Tine. 3. Press the A and V buttons at the same time. 2. This may not have been fixed. EPL-6000 LASER PRINTER 2. To make the print darker, turn the knob counterclockwise. 1 Font and Status Print Tests 1 The font print test 1. However, when ...

Product Information Guide
Page 7
... deleting some macros, or using a lower resolution. ERROR 20 Not enough memory is open. If the problem persists, contact your authorized Epson dealer for this chapter. See the section on the new drum unit, as your printer. See the section on SelecType in thecassette; ...press the ON LINE button to ensure optimal print quality. Laser Printers 7/18/89 EPL-7 EPL-6000 LASER PRINTER If the message remains, the drum unit and the drum replacement cartridge must replace the toner cartridge. Close the cover and press the ON LINE button to a communication protocol error...
... deleting some macros, or using a lower resolution. ERROR 20 Not enough memory is open. If the problem persists, contact your authorized Epson dealer for this chapter. See the section on the new drum unit, as your printer. See the section on SelecType in thecassette; ...press the ON LINE button to ensure optimal print quality. Laser Printers 7/18/89 EPL-7 EPL-6000 LASER PRINTER If the message remains, the drum unit and the drum replacement cartridge must replace the toner cartridge. Close the cover and press the ON LINE button to a communication protocol error...
Product Information Guide
Page 8
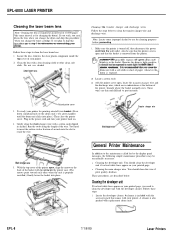
...should clean this procedure. l Cleaning the main charger wire. You should clean the developer unit if vertical white lines appear on your printer. EPL-8 7/18/89 Laser Printers Do not use for cleaning purposes before proceeding 1. Cleaning the developer unit If vertical white lines appear on your ...if print quality declines. EPL-6000 LASER PRINTER Cleaning the laser beam lens Note: Cleaning the lens is required at the bottom of the printer, beneath where the basket normally rests. If you wish, you can clean the lens when you change the toner cartridge. If you change the...
...should clean this procedure. l Cleaning the main charger wire. You should clean the developer unit if vertical white lines appear on your printer. EPL-8 7/18/89 Laser Printers Do not use for cleaning purposes before proceeding 1. Cleaning the developer unit If vertical white lines appear on your ...if print quality declines. EPL-6000 LASER PRINTER Cleaning the laser beam lens Note: Cleaning the lens is required at the bottom of the printer, beneath where the basket normally rests. If you wish, you can clean the lens when you change the toner cartridge. If you change the...
Product Information Guide
Page 9
... HP hS6dt 6Wi@6 11 a8 th6 pfint6r. !f thi6 i6 not aWiiab!O, 6&W% HP La66rJ6t + . EPL-6000 LASER PRINTER 2 Insert the hooked edge of the developer cleaner about 15tlO prints. Software 1. Laser Printers 7/18/89 EPL-9 Draw the cleaner the full length of tonor cartridg66. T66t pap6r tor the larUr prtnt6r prior to in6tallation. 2.... Installation/Support Tips Set up to 6uppolt it. The 6Uppb oartrldgr, u66d for rsplao6ment at dl othU tim66, hold6 enough ton6r for approximat6ty 750 pdnt6. Toner Cartridges Thrr6 IUU two typw of the developer unit several times, discarding excess...
... HP hS6dt 6Wi@6 11 a8 th6 pfint6r. !f thi6 i6 not aWiiab!O, 6&W% HP La66rJ6t + . EPL-6000 LASER PRINTER 2 Insert the hooked edge of the developer cleaner about 15tlO prints. Software 1. Laser Printers 7/18/89 EPL-9 Draw the cleaner the full length of tonor cartridg66. T66t pap6r tor the larUr prtnt6r prior to in6tallation. 2.... Installation/Support Tips Set up to 6uppolt it. The 6Uppb oartrldgr, u66d for rsplao6ment at dl othU tim66, hold6 enough ton6r for approximat6ty 750 pdnt6. Toner Cartridges Thrr6 IUU two typw of the developer unit several times, discarding excess...

Product Support Bulletin(s)
Page 20
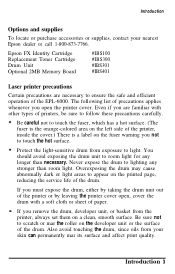
... the part numbers for the EPL- 6000 options and supplies. Q19. Other cartridges may work in font cartridge slot 2. A. What are not part of 5 Can the EPL- 6000 print italic characters? IN - FX Identity Cartridge #IBS100 Replacement Toner Cartridge #IBS300 Drum Unit #IBS301 Optional 2MB Memory Board #IBS401 What Font cartridges have not been tested by Epson at this time. IN...
... the part numbers for the EPL- 6000 options and supplies. Q19. Other cartridges may work in font cartridge slot 2. A. What are not part of 5 Can the EPL- 6000 print italic characters? IN - FX Identity Cartridge #IBS100 Replacement Toner Cartridge #IBS300 Drum Unit #IBS301 Optional 2MB Memory Board #IBS401 What Font cartridges have not been tested by Epson at this time. IN...
User Manual
Page 10
The following list of precautions applies whenever you open , cover the drum with other types of the EPL-6000. You should avoid exposing the drum unit to room light for any stronger than necessary. Be sure not to lighting any longer than room...or light areas to appear on the fuser warning you must expose the drum, either by leaving the printer cover open the printer cover. Epson FX Identity Cartridge Replacement Toner Cartridge Drum Unit Optional 2MB Memory Board #IBS100 #IBS300 #IBS301 #IBS401 Laser printer precautions Certain precautions are familiar with a soft cloth or sheet...
The following list of precautions applies whenever you open , cover the drum with other types of the EPL-6000. You should avoid exposing the drum unit to room light for any stronger than necessary. Be sure not to lighting any longer than room...or light areas to appear on the fuser warning you must expose the drum, either by leaving the printer cover open the printer cover. Epson FX Identity Cartridge Replacement Toner Cartridge Drum Unit Optional 2MB Memory Board #IBS100 #IBS300 #IBS301 #IBS401 Laser printer precautions Certain precautions are familiar with a soft cloth or sheet...

User Manual
Page 24
You'll need to install internal components, including the drum unit, drum replacement cartridge, cleaning pad, and developer unit. Installing internal components This section describes how to be replaced periodically. WARNING: When handling the drum, developer unit, or basket, ... is described in a safe place for now. Assembling the Printer Note: Put the developer cleaner and magnetic cleaner in Chapter 6. The drum unit, drum replacement cartridge, cleaning pad, and toner cartridge (which is useful for details. See Chapter 6 for removing excess...
You'll need to install internal components, including the drum unit, drum replacement cartridge, cleaning pad, and developer unit. Installing internal components This section describes how to be replaced periodically. WARNING: When handling the drum, developer unit, or basket, ... is described in a safe place for now. Assembling the Printer Note: Put the developer cleaner and magnetic cleaner in Chapter 6. The drum unit, drum replacement cartridge, cleaning pad, and toner cartridge (which is useful for details. See Chapter 6 for removing excess...

User Manual
Page 28
Hold the developer unit horizontally, with the toner cartridge label right side up. Install the drum unit (lifting it by its green handles) and the developer unit in the basket. Gently shake the unit back and forth a few times to distribute the toner. 9. Setting Up the Printer 1-15 Assembling the Printer 8.
Hold the developer unit horizontally, with the toner cartridge label right side up. Install the drum unit (lifting it by its green handles) and the developer unit in the basket. Gently shake the unit back and forth a few times to distribute the toner. 9. Setting Up the Printer 1-15 Assembling the Printer 8.

User Manual
Page 30
Assembling the Printer 11. Press down simultaneously on the initial toner cartridge, which is attached to the developer unit. Setting Up the Printer 1-17 Unfasten the tape holding the clear plastic film in place on the drum unit's two green handles until the drum unit clicks into place. 12.
Assembling the Printer 11. Press down simultaneously on the initial toner cartridge, which is attached to the developer unit. Setting Up the Printer 1-17 Unfasten the tape holding the clear plastic film in place on the drum unit's two green handles until the drum unit clicks into place. 12.

User Manual
Page 31
Pressing down on the toner cartridge to hold it clicks into place. 1-18 Setting Up the Printer Make sure that the indicator light faces the front of the printer frame (with the printer cover open). Insert the drum replacement cartridge in place, pull out the film. (pull the film up and out toward the back of the printer.) Pull firmly until it firmly in the slot at the right rear comer of the printer. Press down on the cartridge until the other end of the film comes out of the cassette. 14. Assembling the Printer 13.
Pressing down on the toner cartridge to hold it clicks into place. 1-18 Setting Up the Printer Make sure that the indicator light faces the front of the printer frame (with the printer cover open). Insert the drum replacement cartridge in place, pull out the film. (pull the film up and out toward the back of the printer.) Pull firmly until it firmly in the slot at the right rear comer of the printer. Press down on the cartridge until the other end of the film comes out of the cassette. 14. Assembling the Printer 13.

User Manual
Page 44
... print lighter, turn the knob clockwise as shown below. If you increase the print density, you wish to return the print density to replace the toner cartridge more frequently. 4. Testing the Printer 2. Note: If you need to the factory default setting, point the arrow on the knob toward the gray dot on...
... print lighter, turn the knob clockwise as shown below. If you increase the print density, you wish to return the print density to replace the toner cartridge more frequently. 4. Testing the Printer 2. Note: If you need to the factory default setting, point the arrow on the knob toward the gray dot on...

User Manual
Page 117
...is also necessary to change these procedures is time to change is imminent. A service overhaul must be replaced about every 1,500 pages. (The initial toner cartridge lasts about every 10,000 pages. (If you regularly print high density graphics (more than 20% page density), you need to replace the drum... unit at 100,000 pages by an authorized Epson dealer. The drum unit must be performed at the same time you install the eighth toner cartridge.) When you replace the drum unit, it is described in detail in pages) 1,500 pages 1,500...
...is also necessary to change these procedures is time to change is imminent. A service overhaul must be replaced about every 1,500 pages. (The initial toner cartridge lasts about every 10,000 pages. (If you regularly print high density graphics (more than 20% page density), you need to replace the drum... unit at 100,000 pages by an authorized Epson dealer. The drum unit must be performed at the same time you install the eighth toner cartridge.) When you replace the drum unit, it is described in detail in pages) 1,500 pages 1,500...

User Manual
Page 118
...2). The messages described below tell you need to do the following: l Replace the toner cartridge l Replace the cleaning pad, which is recommended that you may decrease. Maintenance Messages The EPL-6000's display lets you know when you when to perform these tasks. It is packed with... your print job before cleaning the printer.) Changing the toner cartridge and cleaning pad Replace the toner cartridge and cleaning pad as follows. The ...
...2). The messages described below tell you need to do the following: l Replace the toner cartridge l Replace the cleaning pad, which is recommended that you may decrease. Maintenance Messages The EPL-6000's display lets you know when you when to perform these tasks. It is packed with... your print job before cleaning the printer.) Changing the toner cartridge and cleaning pad Replace the toner cartridge and cleaning pad as follows. The ...

User Manual
Page 119
... with a soft cloth or sheet of your printer by lifting up on . Prepare a clean flat surface to touch it. To catch excess toner that may remain in the used toner cartridge, it is exposed. 3. Thus, it is recommended that you spread some paper on the paper. 6-4 Maintenance and Transportation This unit is light...
... with a soft cloth or sheet of your printer by lifting up on . Prepare a clean flat surface to touch it. To catch excess toner that may remain in the used toner cartridge, it is exposed. 3. Thus, it is recommended that you spread some paper on the paper. 6-4 Maintenance and Transportation This unit is light...

User Manual
Page 120
... pad, which was packed with green felt handles located in a slot on the pad when you remove it. Locate the cleaning pad inside your replacement toner cartridge. The cleaning pad is the long black pad with your printer. Do not touch the fuser or the pad itself. 5. WARNING: The fuser and the...
... pad, which was packed with green felt handles located in a slot on the pad when you remove it. Locate the cleaning pad inside your replacement toner cartridge. The cleaning pad is the long black pad with your printer. Do not touch the fuser or the pad itself. 5. WARNING: The fuser and the...

User Manual
Page 121
Now locate the toner cartridge, which is in the basket you removed earlier. Maintenance Messages 7. Holding the green felt tabs on the new cleaning pad, insert the pad into the indentation on the used cartridge so that remaining toner drops into the developer unit. 6-6 Maintenance and Transportation Tap lightly on the fuser. 8.
Now locate the toner cartridge, which is in the basket you removed earlier. Maintenance Messages 7. Holding the green felt tabs on the new cleaning pad, insert the pad into the indentation on the used cartridge so that remaining toner drops into the developer unit. 6-6 Maintenance and Transportation Tap lightly on the fuser. 8.

User Manual
Page 122
Maintenance and Transportation 6-7 As you hold down the green button holding the toner cartridge in place on the developer unit. Lift off the cartridge and discard it from the developer unit, as shown below. 10. Avoid touching the bottom of the cartridge. Maintenance Messages 9. Hold down the button, slide the toner cartridge toward the button to disengage it .
Maintenance and Transportation 6-7 As you hold down the green button holding the toner cartridge in place on the developer unit. Lift off the cartridge and discard it from the developer unit, as shown below. 10. Avoid touching the bottom of the cartridge. Maintenance Messages 9. Hold down the button, slide the toner cartridge toward the button to disengage it .

User Manual
Page 123
Align the four hooks on the cartridge with the top of the label pointed toward the inside of the basket. Hold the toner cartridge over the developer unit so that the label is facing up, with the slots in the developer unit and set the cartridge onto the developer unit. 6-8 Maintenance and Transportation Holding the new replacement cartridge horizontally, gently shake it back and forth a few times to get any dust or dirt into the exposed developer unit. 11. Maintenance Messages Note: Be careful not to distribute the toner. 12.
Align the four hooks on the cartridge with the top of the label pointed toward the inside of the basket. Hold the toner cartridge over the developer unit so that the label is facing up, with the slots in the developer unit and set the cartridge onto the developer unit. 6-8 Maintenance and Transportation Holding the new replacement cartridge horizontally, gently shake it back and forth a few times to get any dust or dirt into the exposed developer unit. 11. Maintenance Messages Note: Be careful not to distribute the toner. 12.


