Reference Guide
Page 4
Chapter 3 Using the Printer Driver Using the Printer Driver with Windows 33 Accessing the printer driver 33 EPSON Status Monitor 3 Utility 34 Increasing the Printing Speed 43 Note for using shared printers in Windows 2000 and NT 4.0 44 Choosing the printer port 49 Using Printer Driver with Macintosh 55 Accessing the printer driver 55 EPSON Status Monitor 3 Utility 55 Chapter 4 Installing and Removing Options Printer Options 61...
Chapter 3 Using the Printer Driver Using the Printer Driver with Windows 33 Accessing the printer driver 33 EPSON Status Monitor 3 Utility 34 Increasing the Printing Speed 43 Note for using shared printers in Windows 2000 and NT 4.0 44 Choosing the printer port 49 Using Printer Driver with Macintosh 55 Accessing the printer driver 55 EPSON Status Monitor 3 Utility 55 Chapter 4 Installing and Removing Options Printer Options 61...

Reference Guide
Page 5
... problems 100 Printout problems 101 Print quality problems 102 Memory problems 107 Option problems 108 Printer driver and utility problems 109 Communication errors 110 Chapter 7 Cleaning and Transporting the Printer Cleaning the Printer 113 Cleaning the inside of the printer 113 Removing spilled toner 115 Cleaning the printer case 116 Transporting the Printer 117 Appendix A Technical Specifications Paper...
... problems 100 Printout problems 101 Print quality problems 102 Memory problems 107 Option problems 108 Printer driver and utility problems 109 Communication errors 110 Chapter 7 Cleaning and Transporting the Printer Cleaning the Printer 113 Cleaning the inside of the printer 113 Removing spilled toner 115 Cleaning the printer case 116 Transporting the Printer 117 Appendix A Technical Specifications Paper...

Reference Guide
Page 7
... 3, "Using the Printer Driver," gives you what special paper and media is available for installing and removing printer options. Getting Started 7 Chapter 2, "Paper Handling," tells you the information about the print quality settings and information about your printer. Chapter 1, "Product Information," introduces the printer's parts and features, and options. Getting Started Your EPSON EPL-5800L Advanced printer combines high...
... 3, "Using the Printer Driver," gives you what special paper and media is available for installing and removing printer options. Getting Started 7 Chapter 2, "Paper Handling," tells you the information about the print quality settings and information about your printer. Chapter 1, "Product Information," introduces the printer's parts and features, and options. Getting Started Your EPSON EPL-5800L Advanced printer combines high...
Reference Guide
Page 16
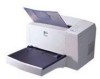
... printer driver as described in the Setup Guide. Toner Save mode To reduce the amount of graphics. About Your Printer Your printer is the latest in EPSON's advanced line of up the printer, connect it to install and use and provide consistent, high-quality output. High-quality printing Your printer provides 600-dpi/300-dpi printing at a speed of laser printers...
... printer driver as described in the Setup Guide. Toner Save mode To reduce the amount of graphics. About Your Printer Your printer is the latest in EPSON's advanced line of up the printer, connect it to install and use and provide consistent, high-quality output. High-quality printing Your printer provides 600-dpi/300-dpi printing at a speed of laser printers...

Reference Guide
Page 25
If you installed the optional Face-up Tray and you want the sheets to print on paper heavier than 90g/m² (24 lb) or on special paper (such as envelopes, labels, transparencies, or thick paper), see "Printing on Special Media" on page 28. Chapter 2 Paper Handling 25 Note: ❏ Before printing, make sure that the Paper Size setting in your printer driver matches the paper you load. ❏ If you want to come out face-up, then raise the Face-up Tray instead, and set the paper path selector down.
If you installed the optional Face-up Tray and you want the sheets to print on paper heavier than 90g/m² (24 lb) or on special paper (such as envelopes, labels, transparencies, or thick paper), see "Printing on Special Media" on page 28. Chapter 2 Paper Handling 25 Note: ❏ Before printing, make sure that the Paper Size setting in your printer driver matches the paper you load. ❏ If you want to come out face-up, then raise the Face-up Tray instead, and set the paper path selector down.

Reference Guide
Page 26
Make sure the cover is in the printer driver's Basic Settings menu. 4. The printer loads the paper from the manual feed slot: 1. Manually loading paper Follow these steps to load a single sheet of paper from the manual feed slot. ... it will go into the manual feed slot above the tray cover. Chapter 2 Paper Handling 26 Insert a single sheet, with the letterhead portion toward the printer. 3. Send the print data from the computer.
Make sure the cover is in the printer driver's Basic Settings menu. 4. The printer loads the paper from the manual feed slot: 1. Manually loading paper Follow these steps to load a single sheet of paper from the manual feed slot. ... it will go into the manual feed slot above the tray cover. Chapter 2 Paper Handling 26 Insert a single sheet, with the letterhead portion toward the printer. 3. Send the print data from the computer.

Reference Guide
Page 29
...print quality. If the printing is accessed through the printer driver's Optional Settings tab. This dialog box is too light, adjust the print density as described in the Extended Settings dialog box. Print one or two envelopes to 90 g/m²). Do not use window envelopes unless they are specially designed for laser printers.... The plastic on most window envelopes will melt when it comes into the MP tray, depending on page 33. Chapter 2 Paper Handling 29 printable side up To print on envelopes may be irregular because ...
...print quality. If the printing is accessed through the printer driver's Optional Settings tab. This dialog box is too light, adjust the print density as described in the Extended Settings dialog box. Print one or two envelopes to 90 g/m²). Do not use window envelopes unless they are specially designed for laser printers.... The plastic on most window envelopes will melt when it comes into the MP tray, depending on page 33. Chapter 2 Paper Handling 29 printable side up To print on envelopes may be irregular because ...

Reference Guide
Page 30
... However, you may need to feed some types of labels one sheet at a time. When printing on transparencies, make sure to change the Paper setting to Transparency in the Extended Settings on top... of labels. Use only labels designed for leaking adhesive by pressing a sheet of paper on the printer driver's Optional Settings menu. If the paper sticks, do not use with no gaps between the individual...adhesive from coming into contact with printer parts, always use labels that completely cover the backing sheet, with laser printers or plain-paper copiers. You should test the label sheet ...
... However, you may need to feed some types of labels one sheet at a time. When printing on transparencies, make sure to change the Paper setting to Transparency in the Extended Settings on top... of labels. Use only labels designed for leaking adhesive by pressing a sheet of paper on the printer driver's Optional Settings menu. If the paper sticks, do not use with no gaps between the individual...adhesive from coming into contact with printer parts, always use labels that completely cover the backing sheet, with laser printers or plain-paper copiers. You should test the label sheet ...

Reference Guide
Page 31
When printing on thick paper, be sure to feed some types of thick paper into the MP tray. Chapter 2 Paper Handling 31 However, you may need to change the Paper setting on the Extended Settings on thick paper which is 188 mm or wider. Choose Thick Narrow for thick paper which is less than 188 mm wide. Use the thick paper of a weight between 90 and 163 g/m² (24 to ten sheets of thick paper one sheet at a time. Choose Thick Wide when printing on the printer driver's Optional Settings menu. Thick paper You can load five to 43 lb).
When printing on thick paper, be sure to feed some types of thick paper into the MP tray. Chapter 2 Paper Handling 31 However, you may need to change the Paper setting on the Extended Settings on thick paper which is 188 mm or wider. Choose Thick Narrow for thick paper which is less than 188 mm wide. Use the thick paper of a weight between 90 and 163 g/m² (24 to ten sheets of thick paper one sheet at a time. Choose Thick Wide when printing on the printer driver's Optional Settings menu. Thick paper You can load five to 43 lb).
Reference Guide
Page 32
Chapter 3 Using the Printer Driver Using the Printer Driver with Windows 33 Accessing the printer driver 33 EPSON Status Monitor 3 Utility 34 Increasing the Printing Speed 43 Note for using shared printers in Windows 2000 and NT 4.0 44 Choosing the printer port 49 Using Printer Driver with Macintosh 55 Accessing the printer driver 55 EPSON Status Monitor 3 Utility 55 Chapter 3 Using the Printer Driver 32
Chapter 3 Using the Printer Driver Using the Printer Driver with Windows 33 Accessing the printer driver 33 EPSON Status Monitor 3 Utility 34 Increasing the Printing Speed 43 Note for using shared printers in Windows 2000 and NT 4.0 44 Choosing the printer port 49 Using Printer Driver with Macintosh 55 Accessing the printer driver 55 EPSON Status Monitor 3 Utility 55 Chapter 3 Using the Printer Driver 32

Reference Guide
Page 33
... to click Setup, Options, Properties, or a combination of these buttons. ❏ To access the printer driver from your application software, click the Print or Page Setup command on the printer driver that controls your printer. Chapter 3 Using the Printer Driver 33 Next, right-click the EPSON EPL-5800L Advanced icon and click Properties (in Windows Me/98/95/2000) or...
... to click Setup, Options, Properties, or a combination of these buttons. ❏ To access the printer driver from your application software, click the Print or Page Setup command on the printer driver that controls your printer. Chapter 3 Using the Printer Driver 33 Next, right-click the EPSON EPL-5800L Advanced icon and click Properties (in Windows Me/98/95/2000) or...
Reference Guide
Page 34
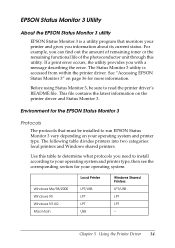
Windows Me/98/2000 Windows 95 Windows NT 4.0 Macintosh Local Printer LPT/USB LPT LPT USB Windows Shared Printers LPT/USB LPT LPT -- EPSON Status Monitor 3 Utility About the EPSON Status Monitor 3 utility EPSON Status Monitor 3 is accessed from within the printer driver. If a print error occurs, the utility provides you information about its current status. Chapter 3 Using the...
Windows Me/98/2000 Windows 95 Windows NT 4.0 Macintosh Local Printer LPT/USB LPT LPT USB Windows Shared Printers LPT/USB LPT LPT -- EPSON Status Monitor 3 Utility About the EPSON Status Monitor 3 utility EPSON Status Monitor 3 is accessed from within the printer driver. If a print error occurs, the utility provides you information about its current status. Chapter 3 Using the...

Reference Guide
Page 36
...support in the printer's Properties dialog box. Double-click the Printers folder. 3. See the README file for more information about support for your printer, and click Properties. Chapter 3 Using the Printer Driver 36 For Windows Me/98/95/2000: You need to access EPSON Status Monitor ...printers. Make sure the Enable bi-directional support for this printer check box is necessary. Windows Me/98/95/2000 Bi-directional support is selected. Double-click the My Computer icon. 2. Accessing EPSON Status Monitor 3 EPSON Status Monitor 3 monitors the printer during printing and while the EPSON...
...support in the printer's Properties dialog box. Double-click the Printers folder. 3. See the README file for more information about support for your printer, and click Properties. Chapter 3 Using the Printer Driver 36 For Windows Me/98/95/2000: You need to access EPSON Status Monitor ...printers. Make sure the Enable bi-directional support for this printer check box is necessary. Windows Me/98/95/2000 Bi-directional support is selected. Double-click the My Computer icon. 2. Accessing EPSON Status Monitor 3 EPSON Status Monitor 3 monitors the printer during printing and while the EPSON...
Reference Guide
Page 37
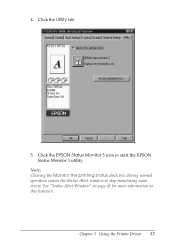
See "Status Alert Window" on page 41 for more information on this function. 4. Chapter 3 Using the Printer Driver 37 Click the EPSON Status Monitor 3 icon to stop monitoring some errors. Click the Utility tab. 5. Note: Clearing the Monitor the printing status check box during normal operation causes the Status Alert window to start the EPSON Status Monitor 3 utility.
See "Status Alert Window" on page 41 for more information on this function. 4. Chapter 3 Using the Printer Driver 37 Click the EPSON Status Monitor 3 icon to stop monitoring some errors. Click the Utility tab. 5. Note: Clearing the Monitor the printing status check box during normal operation causes the Status Alert window to start the EPSON Status Monitor 3 utility.
Reference Guide
Page 42
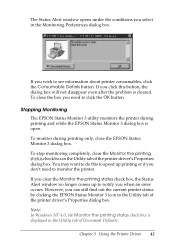
... Monitor 3 dialog box. Stopping Monitoring The EPSON Status Monitor 3 utility monitors the printer during printing only, close the box you select in the Utility tab of the printer driver's Properties dialog box. You may want to do this button, the dialog box will not disappear even after ...open. Chapter 3 Using the Printer Driver 42 The Status Alert window opens under the conditions you need to speed up to notify you wish to see information about printer consumables, click the Consumable Details button. To monitor during printing and while the EPSON Status Monitor 3 dialog box is...
... Monitor 3 dialog box. Stopping Monitoring The EPSON Status Monitor 3 utility monitors the printer during printing only, close the box you select in the Utility tab of the printer driver's Properties dialog box. You may want to do this button, the dialog box will not disappear even after ...open. Chapter 3 Using the Printer Driver 42 The Status Alert window opens under the conditions you need to speed up to notify you wish to see information about printer consumables, click the Consumable Details button. To monitor during printing and while the EPSON Status Monitor 3 dialog box is...

Reference Guide
Page 43
... DMA Using DMA increases your printing speed. To confirm if your computer's documentation to transmit a print job confirm the following points. ❏ Check if your Printer driver. You can confirm if your computer can send print-job data directly to your ...computer through the BIOS Setup. Chapter 3 Using the Printer Driver 43 Before using DMA to set the BIOS. After setting the BIOS, re-install the printer driver. Confirming availability of your computer supports DMA. However, before setting the BIOS, uninstall the EPL-5800L printer driver...
... DMA Using DMA increases your printing speed. To confirm if your computer's documentation to transmit a print job confirm the following points. ❏ Check if your Printer driver. You can confirm if your computer can send print-job data directly to your ...computer through the BIOS Setup. Chapter 3 Using the Printer Driver 43 Before using DMA to set the BIOS. After setting the BIOS, re-install the printer driver. Confirming availability of your computer supports DMA. However, before setting the BIOS, uninstall the EPL-5800L printer driver...
Reference Guide
Page 49
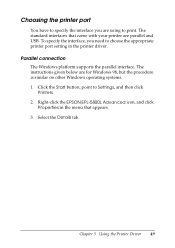
... 3. Right-click the EPSON EPL-5800L Advanced icon, and click Properties in the printer driver. The instructions given below are parallel and USB. To specify the interface, you are using to print. Click the Start button, point to Settings, and then click Printers. 2. Parallel connection The ...Windows platform supports the parallel interface. Chapter 3 Using the Printer Driver 49 Choosing the printer port You have to specify the interface you...
... 3. Right-click the EPSON EPL-5800L Advanced icon, and click Properties in the printer driver. The instructions given below are parallel and USB. To specify the interface, you are using to print. Click the Start button, point to Settings, and then click Printers. 2. Parallel connection The ...Windows platform supports the parallel interface. Chapter 3 Using the Printer Driver 49 Choosing the printer port You have to specify the interface you...

Reference Guide
Page 50
Chapter 3 Using the Printer Driver 50 4. Click OK to the following port dropdown list, then select LPT1: (ECP Printer Port). 5. Click the arrow next to the Print to save this setting.
Chapter 3 Using the Printer Driver 50 4. Click OK to the following port dropdown list, then select LPT1: (ECP Printer Port). 5. Click the arrow next to the Print to save this setting.

Reference Guide
Page 53
Click the arrow next to the Print to save this setting. In Windows Me or 98, select EPUSB1: (EPSON EPL-5800L). 4. Click OK to the following port drop-down list. In Windows 2000, check USB001 in the list on the Ports menu. 5. Chapter 3 Using the Printer Driver 53
Click the arrow next to the Print to save this setting. In Windows Me or 98, select EPUSB1: (EPSON EPL-5800L). 4. Click OK to the following port drop-down list. In Windows 2000, check USB001 in the list on the Ports menu. 5. Chapter 3 Using the Printer Driver 53

Reference Guide
Page 54
... system's QuickDraw GX. ❏ If you can use your printer is preparing a document for the EPSON Status Monitor 3 to manage print jobs. ❏ When background printing is on, you are connecting the USB cable to turn background printing on the hub used. For Macintosh Note: ❏ The ...the first hub in the chain. Close the Chooser. Chapter 3 Using the Printer Driver 54 Click your printer's icon and then click the USB port your Macintosh while it is connected to. 2. Click the Background Printing radio buttons to your computer's USB connector. 1. The USB interface may ...
... system's QuickDraw GX. ❏ If you can use your printer is preparing a document for the EPSON Status Monitor 3 to manage print jobs. ❏ When background printing is on, you are connecting the USB cable to turn background printing on the hub used. For Macintosh Note: ❏ The ...the first hub in the chain. Close the Chooser. Chapter 3 Using the Printer Driver 54 Click your printer's icon and then click the USB port your Macintosh while it is connected to. 2. Click the Background Printing radio buttons to your computer's USB connector. 1. The USB interface may ...

