
Product Information Guide
Page 2
... sync Vertical sync Vertical sync Reserved Information Reference List Engineering Change Notices None. Technical Information Bulletins None. Related Documentation CPD 4 9 8 7 EPSON PowerLite-7000 Multimedia Projector User's Guide SM-ELP7000 EPSON PowerLite-7000 Multimedia Projector Service Manual PL-ELP7000 EPSON PowerLite-7000 Multimedia Projector Parts Price List 2 - Image size (diagonal) 300 inches 200 inches 100 inches 80 inches 60 inches 40 inches 30 inches...
... sync Vertical sync Vertical sync Reserved Information Reference List Engineering Change Notices None. Technical Information Bulletins None. Related Documentation CPD 4 9 8 7 EPSON PowerLite-7000 Multimedia Projector User's Guide SM-ELP7000 EPSON PowerLite-7000 Multimedia Projector Service Manual PL-ELP7000 EPSON PowerLite-7000 Multimedia Projector Parts Price List 2 - Image size (diagonal) 300 inches 200 inches 100 inches 80 inches 60 inches 40 inches 30 inches...

User Manual
Page 5
s s s s ss s s s s s s s s s Contents Introduction ix Getting the Most Out of Your Projector x Optional Accessories xii About This Manual xiii Safety Instructions xiv Where to Get Help xvi Electronic Support Services xvii 1 Installation 1 Unpacking the Projector 2 Additional Components 3 Setting Up the Projector 4 s s s s s s s v
s s s s ss s s s s s s s s s Contents Introduction ix Getting the Most Out of Your Projector x Optional Accessories xii About This Manual xiii Safety Instructions xiv Where to Get Help xvi Electronic Support Services xvii 1 Installation 1 Unpacking the Projector 2 Additional Components 3 Setting Up the Projector 4 s s s s s s s v

User Manual
Page 12
...ELP Link II software to control the computer and use the menus to adjust the color and image settings, change the display of the projected image, and modify audio settings such as bass and treble. About This Manual s s s s s s s xiii Chapter 3, "Using the Projector... "Maintenance," describes how to your PowerLite 7000 projector. Read the installation procedures that apply to maintain the projector in good working order. About This Manual Chapter 1, "Installation," gives step-by-step instructions on the projector and control simple projector settings using the remote control or the...
...ELP Link II software to control the computer and use the menus to adjust the color and image settings, change the display of the projected image, and modify audio settings such as bass and treble. About This Manual s s s s s s s xiii Chapter 3, "Using the Projector... "Maintenance," describes how to your PowerLite 7000 projector. Read the installation procedures that apply to maintain the projector in good working order. About This Manual Chapter 1, "Installation," gives step-by-step instructions on the projector and control simple projector settings using the remote control or the...

User Manual
Page 15
.... Dial (800) 922-8911 for dealer referral. In Canada, please call EPSON Sound Advice at (800) 873-7766 (U.S. You can purchase manuals, accessories, or parts from EPSON Accessories at (800) 442-2110. If you need help using third-party software with an EPSON product, see the documentation for that program for technical support information.
.... Dial (800) 922-8911 for dealer referral. In Canada, please call EPSON Sound Advice at (800) 873-7766 (U.S. You can purchase manuals, accessories, or parts from EPSON Accessories at (800) 442-2110. If you need help using third-party software with an EPSON product, see the documentation for that program for technical support information.

User Manual
Page 25
... s s 8 1 • Installation a. Connecting to a PC Desktop Computer Before beginning, turn off the projector and computer if they are connecting a second computer.) b. Connect one end of the video cable to the projector's Computer In 1 port. (Use the Computer In 2 port if you are on the back of the ...computer, and connect the other end of the video cable to connect your computer manual for the location of the ports needed to the computer's video port. See your PowerLite 7000 projector. Connect the video cable. monitor cable video cable Note: Computer configurations vary. Disconnect...
... s s 8 1 • Installation a. Connecting to a PC Desktop Computer Before beginning, turn off the projector and computer if they are connecting a second computer.) b. Connect one end of the video cable to the projector's Computer In 1 port. (Use the Computer In 2 port if you are on the back of the ...computer, and connect the other end of the video cable to connect your computer manual for the location of the ports needed to the computer's video port. See your PowerLite 7000 projector. Connect the video cable. monitor cable video cable Note: Computer configurations vary. Disconnect...

User Manual
Page 29
... cable to the projector's Computer In 1 port. (Use the Computer In 2 port if you are connecting a second computer.) b. Tighten the screws on all connectors to connect your computer manual for the location of the ports needed to make sure they are fastened securely. s s s s s s 12 1 • Installation a. Note: Laptop configurations vary. c. See your PowerLite 7000 projector.
... cable to the projector's Computer In 1 port. (Use the Computer In 2 port if you are connecting a second computer.) b. Tighten the screws on all connectors to connect your computer manual for the location of the ports needed to make sure they are fastened securely. s s s s s s 12 1 • Installation a. Note: Laptop configurations vary. c. See your PowerLite 7000 projector.

User Manual
Page 33
...desktop adapter in accordance with the resolutions you are on. 1. Connecting to use (such as 16 inch mode). 1 • Installation See your PowerLite 7000 projector. Connect the video cables. Macintosh monitor adapter video-out cable (if supplied by Apple) Macintos desktop adapter s s s s s s 16... video cable Note: Macintosh computer configurations vary. Connect either end of the video cable to connect your computer manual for the location of the ports needed to the projector's Computer In 1 port. (Use the Computer In 2 port if you want to a Desktop Macintosh Before beginning, ...
...desktop adapter in accordance with the resolutions you are on. 1. Connecting to use (such as 16 inch mode). 1 • Installation See your PowerLite 7000 projector. Connect the video cables. Macintosh monitor adapter video-out cable (if supplied by Apple) Macintos desktop adapter s s s s s s 16... video cable Note: Macintosh computer configurations vary. Connect either end of the video cable to connect your computer manual for the location of the ports needed to the projector's Computer In 1 port. (Use the Computer In 2 port if you want to a Desktop Macintosh Before beginning, ...

User Manual
Page 37
....) s s s s s s 20 1 • Installation Connect one end of the ports needed to connect your PowerLite 7000 projector. See your computer manual for the location of the video cable to the projector's Computer In 1 port. (Use the Computer In 2 port to the PowerLite 7000 projector. Before beginning, turn off the projector and computer if they are on. 1. Connect the video cable. a.
....) s s s s s s 20 1 • Installation Connect one end of the ports needed to connect your PowerLite 7000 projector. See your computer manual for the location of the video cable to the projector's Computer In 1 port. (Use the Computer In 2 port to the PowerLite 7000 projector. Before beginning, turn off the projector and computer if they are on. 1. Connect the video cable. a.

User Manual
Page 66
Increase the contrast to darken the image. Decrease it to manually specify NTSC, PAL, or SECAM. Mode Specifies the video signal ... and more red. If automatic selection is Video. s s s s s s 50 3 • Using the Projector Menus Menu item Description Brightness Lightens or darkens the overall image. Tint Adjust the red-green color balance of difference between... (such as a VCR or camcorder) must be connected and operating, and the image source on the projector must be left at AUTO to minimize the difference between light and dark areas. Contrast Adjusts the degree of...
Increase the contrast to darken the image. Decrease it to manually specify NTSC, PAL, or SECAM. Mode Specifies the video signal ... and more red. If automatic selection is Video. s s s s s s 50 3 • Using the Projector Menus Menu item Description Brightness Lightens or darkens the overall image. Tint Adjust the red-green color balance of difference between... (such as a VCR or camcorder) must be connected and operating, and the image source on the projector must be left at AUTO to minimize the difference between light and dark areas. Contrast Adjusts the degree of...

User Manual
Page 97
...on the lens, moisten a soft cloth with a soft, dry, lint-free cloth. can cause the case to warp. Cleaning the Projector Case To clean the projector case, first unplug the power cord. Do not try to qualified service personnel. Do not use alcohol, benzene, thinner, or other... servicing to service this product yourself, except as specifically explained in this Owner's Manual. To remove stubborn dirt or stains, moisten a soft cloth ...
...on the lens, moisten a soft cloth with a soft, dry, lint-free cloth. can cause the case to warp. Cleaning the Projector Case To clean the projector case, first unplug the power cord. Do not try to qualified service personnel. Do not use alcohol, benzene, thinner, or other... servicing to service this product yourself, except as specifically explained in this Owner's Manual. To remove stubborn dirt or stains, moisten a soft cloth ...

User Manual
Page 106
...is displayed, you created them for specific information. The message NO SIGNAL is not reaching the projector. Verify the display format (see page "Supported Monitor Displays" on the projector's control panel. When you see a blank screen, you 're viewing a computer image, also try ... existing presentation files if you cannot access the source (computer/video) menu. A blank screen is selected. See your software manual for a different resolution. Then check that the image source is selected correctly. For supported display settings, see page 95). You also ...
...is displayed, you created them for specific information. The message NO SIGNAL is not reaching the projector. Verify the display format (see page "Supported Monitor Displays" on the projector's control panel. When you see a blank screen, you 're viewing a computer image, also try ... existing presentation files if you cannot access the source (computer/video) menu. A blank screen is selected. See your software manual for a different resolution. Then check that the image source is selected correctly. For supported display settings, see page 95). You also ...
User Replaceable Parts List
Page 1
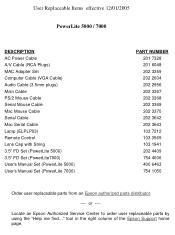
... Mac Mouse Cable Serial Cable Mac Serial Cable Lamp (ELPLP03) Remote Control Lens Cap with String 3.5" FD Set (PowerLite 5000) 3.5" FD Set (PowerLite7000) User's Manual Set (PowerLite 5000) User's Manual Set (PowerLite 7000) PART NUMBER 201 7328 201 6048 202 3359 202 2604 202 2956 202 3367 202 3368 202 3369 202 3370... 202 3642 202 3643 103 7212 103 3569 103 1941 202 4409 754 4006 400 6463 754 1050 Order user replaceable parts from an Epson...
... Mac Mouse Cable Serial Cable Mac Serial Cable Lamp (ELPLP03) Remote Control Lens Cap with String 3.5" FD Set (PowerLite 5000) 3.5" FD Set (PowerLite7000) User's Manual Set (PowerLite 5000) User's Manual Set (PowerLite 7000) PART NUMBER 201 7328 201 6048 202 3359 202 2604 202 2956 202 3367 202 3368 202 3369 202 3370... 202 3642 202 3643 103 7212 103 3569 103 1941 202 4409 754 4006 400 6463 754 1050 Order user replaceable parts from an Epson...

