Users Guide
Page 3
... Advanced Settings Tab 57 3 Contents DS-530 User's Guide ...7 Scanner Basics...8 Scanner Parts Locations ...8 Scanner Parts...8 Scanner Buttons and Lights...11 User Replaceable Epson Scanner Parts and Accessories 12 Changing the...Network Interface Unit ...38 Network Interface Unit Control Panel 38 Connecting the Network Interface Unit 39 Setting Up Network Scanning ...39 Scanning to Network Computers from the Network Interface Unit 42 Scanning ...43 Starting a Scan...43 Starting a Scan from a Scanner Button 43 Assigning Start Button Settings or Scan Jobs 44 Starting a Scan Using the Epson...
... Advanced Settings Tab 57 3 Contents DS-530 User's Guide ...7 Scanner Basics...8 Scanner Parts Locations ...8 Scanner Parts...8 Scanner Buttons and Lights...11 User Replaceable Epson Scanner Parts and Accessories 12 Changing the...Network Interface Unit ...38 Network Interface Unit Control Panel 38 Connecting the Network Interface Unit 39 Setting Up Network Scanning ...39 Scanning to Network Computers from the Network Interface Unit 42 Scanning ...43 Starting a Scan...43 Starting a Scan from a Scanner Button 43 Assigning Start Button Settings or Scan Jobs 44 Starting a Scan Using the Epson...
Users Guide
Page 12
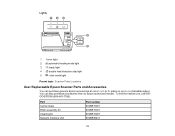
To find the nearest one, call 800GO-EPSON (800-463-7766). error light 2 automatic feeding mode light 3 ready light 4 double feed detection skip light 5 slow mode light Parent topic: Scanner Parts Locations User Replaceable Epson Scanner Parts and Accessories You can also purchase accessories from an Epson authorized reseller. Part Carrier sheet Roller assembly kit Cleaning kit Network Interface Unit Part number B12B819051 B12B819031 B12B819291 B12B808441 12 Lights 1 ! sales) or epson.ca (Canadian sales). You can purchase genuine Epson accessories at epson.com (U.S.
To find the nearest one, call 800GO-EPSON (800-463-7766). error light 2 automatic feeding mode light 3 ready light 4 double feed detection skip light 5 slow mode light Parent topic: Scanner Parts Locations User Replaceable Epson Scanner Parts and Accessories You can also purchase accessories from an Epson authorized reseller. Part Carrier sheet Roller assembly kit Cleaning kit Network Interface Unit Part number B12B819051 B12B819031 B12B819291 B12B808441 12 Lights 1 ! sales) or epson.ca (Canadian sales). You can purchase genuine Epson accessories at epson.com (U.S.
Users Guide
Page 38
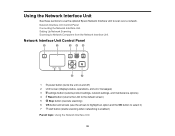
... LCD to the default screen) 5 Stop button (cancels scanning) 6 OK button and arrows (use the optional Epson Network Interface Unit to select it) 7 start button (starts scanning when networking is enabled) Parent topic: Using the Network Interface Unit 38 Using the Network Interface Unit See these sections to use the arrows to highlight an option and the OK button to scan...
... LCD to the default screen) 5 Stop button (cancels scanning) 6 OK button and arrows (use the optional Epson Network Interface Unit to select it) 7 start button (starts scanning when networking is enabled) Parent topic: Using the Network Interface Unit 38 Using the Network Interface Unit See these sections to use the arrows to highlight an option and the OK button to scan...
Users Guide
Page 39
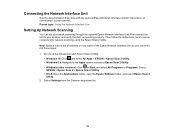
...; Windows 8.x: Navigate to your scanner. Do one of the Epson Network Interface Unit so you can set up network scanning through the optional Epson Network Interface Unit. Then follow the instructions here to your scanner and verify that came with the optional Epson Network Interface Unit for network scanning using the Epson Scan 2 Utility. Connecting the Network Interface Unit See the documentation that both are working properly. Select...
...; Windows 8.x: Navigate to your scanner. Do one of the Epson Network Interface Unit so you can set up network scanning through the optional Epson Network Interface Unit. Then follow the instructions here to your scanner and verify that came with the optional Epson Network Interface Unit for network scanning using the Epson Scan 2 Utility. Connecting the Network Interface Unit See the documentation that both are working properly. Select...
Users Guide
Page 41
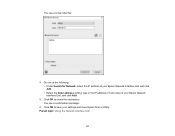
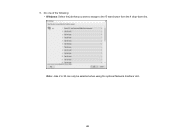
You see a confirmation message. 6. Do one of the following: • Under Search for Network, select the IP address of your Epson Network Interface Unit and click Add. • Select the Enter address setting, type in the IP address or host name of your settings and close Epson Scan 2 Utility. You see a screen like this: 4. Click OK to check the connection. Click OK to save your Epson Network Interface Unit, and click Add. 5. Parent topic: Using the Network Interface Unit 41
You see a confirmation message. 6. Do one of the following: • Under Search for Network, select the IP address of your Epson Network Interface Unit and click Add. • Select the Enter address setting, type in the IP address or host name of your settings and close Epson Scan 2 Utility. You see a screen like this: 4. Click OK to check the connection. Click OK to save your Epson Network Interface Unit, and click Add. 5. Parent topic: Using the Network Interface Unit 41
Users Guide
Page 42
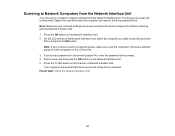
... or it will not appear on the Network Interface Unit. 2. Select a scan job and press the OK button on the scanner or Network Interface Unit. Press the start button on the Network Interface Unit. 5. Parent topic: Using the Network Interface Unit 42 You first set up correctly in Document Capture Pro before scanning with the Network Interface Unit. 1. Note: If your scan job settings are...
... or it will not appear on the Network Interface Unit. 2. Select a scan job and press the OK button on the scanner or Network Interface Unit. Press the start button on the Network Interface Unit. 5. Parent topic: Using the Network Interface Unit 42 You first set up correctly in Document Capture Pro before scanning with the Network Interface Unit. 1. Note: If your scan job settings are...
Users Guide
Page 45
Do one of the following: • Windows: Select the job that you want to assign to 30 can only be selected when using the optional Network Interface Unit. 45 5. Note: Jobs 2 to the start button from the 1 drop-down list.
Do one of the following: • Windows: Select the job that you want to assign to 30 can only be selected when using the optional Network Interface Unit. 45 5. Note: Jobs 2 to the start button from the 1 drop-down list.
Users Guide
Page 104
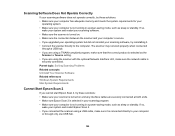
...so, wake your system and restart your scanning software. • Make sure the scanner is turned on and any interface cables are securely connected at both ends. • Make sure Epson Scan 2 is selected in your scanning program. • Make sure your computer is not running in a power-...your system and restart Epson Scan 2. • If you are using a TWAIN-compliant program, make sure the network cable is selected as sleep or standby. If so, wake your computer or through a USB hub. • If you are using the scanner with the optional Network Interface Unit, make sure that the...
...so, wake your system and restart your scanning software. • Make sure the scanner is turned on and any interface cables are securely connected at both ends. • Make sure Epson Scan 2 is selected in your scanning program. • Make sure your computer is not running in a power-...your system and restart Epson Scan 2. • If you are using a TWAIN-compliant program, make sure the network cable is selected as sleep or standby. If so, wake your computer or through a USB hub. • If you are using the scanner with the optional Network Interface Unit, make sure that the...
Users Guide
Page 105
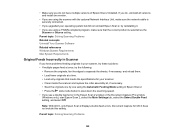
... If you have multiple versions of Epson Scan 2 installed. Document Capture for your scanner. • Clean inside the scanner and replace the roller assembly kit, if necessary. • Scan the originals one by one version. • If you are using the scanner with the optional Network Interface Unit, make sure that the correct product...
... If you have multiple versions of Epson Scan 2 installed. Document Capture for your scanner. • Clean inside the scanner and replace the roller assembly kit, if necessary. • Scan the originals one by one version. • If you are using the scanner with the optional Network Interface Unit, make sure that the correct product...


