Basics
Page 3
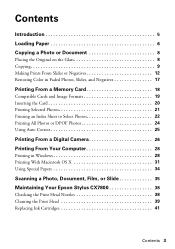
...Paper 6 Copying a Photo or Document 8 Placing the Original on the Glass 8 Copying 9 Making Prints From Slides or Negatives 12 Restoring Color in Faded Photos, Slides, and Negatives 17 Printing From a Memory Card 18 Compatible Cards and Image Formats 19 Inserting the Card 20 ...Printing From a Digital Camera 26 Printing From Your Computer 28 Printing in Windows 28 Printing With Macintosh OS X 31 Using Special Papers 34 Scanning a Photo, Document, Film, or Slide 35 Maintaining Your Epson Stylus CX7800 38 Checking the Print Head Nozzles 38 Cleaning the Print Head 39 Replacing...
...Paper 6 Copying a Photo or Document 8 Placing the Original on the Glass 8 Copying 9 Making Prints From Slides or Negatives 12 Restoring Color in Faded Photos, Slides, and Negatives 17 Printing From a Memory Card 18 Compatible Cards and Image Formats 19 Inserting the Card 20 ...Printing From a Digital Camera 26 Printing From Your Computer 28 Printing in Windows 28 Printing With Macintosh OS X 31 Using Special Papers 34 Scanning a Photo, Document, Film, or Slide 35 Maintaining Your Epson Stylus CX7800 38 Checking the Print Head Nozzles 38 Cleaning the Print Head 39 Replacing...

Basics
Page 5
... on the Start Here sheet, turn here to: ■ Load paper ■ Make a quick copy of a document or photo ■ Restore color from faded photos, slides, and negatives ■ Print photos stored on a memory card ■ Print photos directly from your camera ■ Print...: Cautions must be observed to avoid damage to your Windows® or Macintosh® computer. Tip: Tips contain hints for it to your equipment. Introduction After you have set up your Epson Stylus® CX7800 as you read your Epson Stylus CX7800 instructions: Warning: Warnings must be followed carefully to avoid...
... on the Start Here sheet, turn here to: ■ Load paper ■ Make a quick copy of a document or photo ■ Restore color from faded photos, slides, and negatives ■ Print photos stored on a memory card ■ Print photos directly from your camera ■ Print...: Cautions must be observed to avoid damage to your Windows® or Macintosh® computer. Tip: Tips contain hints for it to your equipment. Introduction After you have set up your Epson Stylus® CX7800 as you read your Epson Stylus CX7800 instructions: Warning: Warnings must be followed carefully to avoid...

Basics
Page 28
...in these sections: ■ "Printing in Windows" (below) ■ "Printing With Macintosh OS X" on page 31 ■ "Using Special Papers" on the Start Here sheet. Before you start, make sure you've installed your printer software and connected the Epson Stylus CX7800 to your computer as described on page 34... Printing in your printer software 28 Printing From Your Computer You see page 6). 2. Load paper (see a window like this one: Select EPSON Stylus CX7800 Series Click here to use the right paper and select the correct paper type setting in the printer driver. (See page 34...
...in these sections: ■ "Printing in Windows" (below) ■ "Printing With Macintosh OS X" on page 31 ■ "Using Special Papers" on the Start Here sheet. Before you start, make sure you've installed your printer software and connected the Epson Stylus CX7800 to your computer as described on page 34... Printing in your printer software 28 Printing From Your Computer You see page 6). 2. Load paper (see a window like this one: Select EPSON Stylus CX7800 Series Click here to use the right paper and select the correct paper type setting in the printer driver. (See page 34...

Basics
Page 31
Click OK to print. 1. Open the File menu and select Page Setup. Make the following settings: Select Stylus CX7800 Select your Paper Size* Select your paper size (US Letter, 8 x 10, 5 x 7, or 4 x 6). 4. You see page 6). 2. Printing With Macintosh OS X If you'... to close the Page Setup window. 5. Borderless) option in your application. 3. Open the photo or document in the Paper Size list for your document or image orientation * For borderless printing, choose the (Sheet Feeder - Load paper (see a window like this one: Select Stylus CX7800 Select Print Settings Printing From ...
Click OK to print. 1. Open the File menu and select Page Setup. Make the following settings: Select Stylus CX7800 Select your Paper Size* Select your paper size (US Letter, 8 x 10, 5 x 7, or 4 x 6). 4. You see page 6). 2. Printing With Macintosh OS X If you'... to close the Page Setup window. 5. Borderless) option in your application. 3. Open the photo or document in the Paper Size list for your document or image orientation * For borderless printing, choose the (Sheet Feeder - Load paper (see a window like this one: Select Stylus CX7800 Select Print Settings Printing From ...

Basics
Page 33
When you can reuse them as a group so you 're finished, close the printer window or Print Center. Select Print Quality and other options as necessary Note: For more information on advanced settings, or instructions on the bottom of your ... job, click the printer icon when it appears in the Printer List window. Click Print. 10. Click the Advanced button to change additional settings. If you're using OS X 10.2.x, click the Print Center icon instead, then double-click Stylus CX7800 in the dock on saving them later, click ?. 9. 8. To monitor the progress...
When you can reuse them as a group so you 're finished, close the printer window or Print Center. Select Print Quality and other options as necessary Note: For more information on advanced settings, or instructions on the bottom of your ... job, click the printer icon when it appears in the Printer List window. Click Print. 10. Click the Advanced button to change additional settings. If you're using OS X 10.2.x, click the Print Center icon instead, then double-click Stylus CX7800 in the dock on saving them later, click ?. 9. 8. To monitor the progress...

Basics
Page 36
...the original or film holder. 3. Then open the File menu, choose Import or Acquire, and select Epson Stylus CX7800. Do one of the following to start your desktop. ■ Macintosh: Double-click EPSON Scan in the upper right corner is set to scan a thick document, you can raise the ...; You see page 9. 2. Close the document cover gently so you are scanning from an application, start EPSON Scan: ■ Windows: Double-click the EPSON Scan icon on your application. see the EPSON Scan standby window: 4. Note: If you need to Full Auto Mode, click the Scan button. 36 Scanning a Photo,...
...the original or film holder. 3. Then open the File menu, choose Import or Acquire, and select Epson Stylus CX7800. Do one of the following to start your desktop. ■ Macintosh: Double-click EPSON Scan in the upper right corner is set to scan a thick document, you can raise the ...; You see page 9. 2. Close the document cover gently so you are scanning from an application, start EPSON Scan: ■ Windows: Double-click the EPSON Scan icon on your application. see the EPSON Scan standby window: 4. Note: If you need to Full Auto Mode, click the Scan button. 36 Scanning a Photo,...
Product Brochure
Page 2
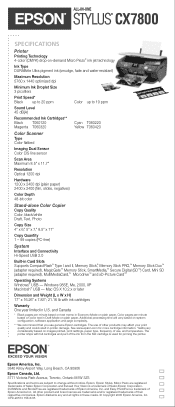
...x W x H) 17" x 16.26" x 7.83"; 21.16 lb with full cartridges and part of Epson America, Inc. Yields vary considerably based on plain paper. Epson, Epson Stylus, Micro Piezo are subject to 19 ppm Sound Level 45 dB(A) Recommended Ink Cartridges** Black T060120 Magenta T060320 Cyan ...of the ink from the first cartridge is a trademark of Seiko Epson Corporation. Epson disclaims any and all rights in U.S. Windows 98SE, Me, 2000, XP Macintosh® USB - CX7800 SPECIFICATIONS Printer Printing Technology 4-color (CMYK) drop-on-demand Micro Piezo® ink jet technology...
...x W x H) 17" x 16.26" x 7.83"; 21.16 lb with full cartridges and part of Epson America, Inc. Yields vary considerably based on plain paper. Epson, Epson Stylus, Micro Piezo are subject to 19 ppm Sound Level 45 dB(A) Recommended Ink Cartridges** Black T060120 Magenta T060320 Cyan ...of the ink from the first cartridge is a trademark of Seiko Epson Corporation. Epson disclaims any and all rights in U.S. Windows 98SE, Me, 2000, XP Macintosh® USB - CX7800 SPECIFICATIONS Printer Printing Technology 4-color (CMYK) drop-on-demand Micro Piezo® ink jet technology...

Product Information Guide
Page 13
... it will be scanned. You see a different EPSON Scan settings window. (You can leave the document cover open folder. 8/05 Epson Stylus CX7800 - 13 Select a file format in the film holder. 2. Note: If you need to automatically restore a color photo, film, or slide as ArcSoft PhotoImpression™-using EPSON Scan. If the Mode setting in the upper...
... it will be scanned. You see a different EPSON Scan settings window. (You can leave the document cover open folder. 8/05 Epson Stylus CX7800 - 13 Select a file format in the film holder. 2. Note: If you need to automatically restore a color photo, film, or slide as ArcSoft PhotoImpression™-using EPSON Scan. If the Mode setting in the upper...

Product Information Guide
Page 16
.... Replace any other cartridges that need to clean the print head. 1. Aligning the Print Head If your cartridges are low on . Epson Stylus CX7800 8/05 Close the ink cartridge cover and press it until it from the package. 9. Note: Banding may need to the previous mode...Turn on the cartridge; Epson Stylus CX7800 5. Do not touch the green chip on your taskbar (in the lower right corner of your Epson Stylus CX7800 in the printer list, click OK, and select Print Head Alignment. 16 - Load several sheets of the cartridge. Windows: Right-click the printer ...
.... Replace any other cartridges that need to clean the print head. 1. Aligning the Print Head If your cartridges are low on . Epson Stylus CX7800 8/05 Close the ink cartridge cover and press it until it from the package. 9. Note: Banding may need to the previous mode...Turn on the cartridge; Epson Stylus CX7800 5. Do not touch the green chip on your taskbar (in the lower right corner of your Epson Stylus CX7800 in the printer list, click OK, and select Print Head Alignment. 16 - Load several sheets of the cartridge. Windows: Right-click the printer ...
Product Information Guide
Page 17
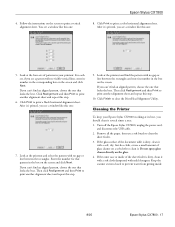
... to prevent water from getting inside of the document table is dirty, clean it 's printed, you see a window like this step. 10. Click Print to print a color horizontal alignment sheet. After it with a soft cloth dampened with no gap or line between the rectangles. Then ... should clean it with no visible vertical lines, enter its best, you can 't find an aligned pattern, choose the one : Epson Stylus CX7800 8. Turn off the Epson Stylus CX7800, unplug the power cord, and disconnect the USB cable. 2. Do not spray glass cleaner directly on the screen to print another ...
... to prevent water from getting inside of the document table is dirty, clean it 's printed, you see a window like this step. 10. Click Print to print a color horizontal alignment sheet. After it with a soft cloth dampened with no gap or line between the rectangles. Then ... should clean it with no visible vertical lines, enter its best, you can 't find an aligned pattern, choose the one : Epson Stylus CX7800 8. Turn off the Epson Stylus CX7800, unplug the power cord, and disconnect the USB cable. 2. Do not spray glass cleaner directly on the screen to print another ...

Start Here Card
Page 5
...click Cancel and disconnect the USB cable. 6 Install Software Your software works with Windows® 98SE, Me, 2000, and XP, and Macintosh® OS X 10.2.x or higher. Windows 1 Make sure the Epson Stylus CX7800 is turned on -screen instructions. continue Note: If you see a screen ...like this screen, make sure your Epson Stylus CX7800 is NOT CONNECTED to your software that way. 2 Insert the Epson Stylus CX7800 Software CD. 3 Click Install and ...
...click Cancel and disconnect the USB cable. 6 Install Software Your software works with Windows® 98SE, Me, 2000, and XP, and Macintosh® OS X 10.2.x or higher. Windows 1 Make sure the Epson Stylus CX7800 is turned on -screen instructions. continue Note: If you see a screen ...like this screen, make sure your Epson Stylus CX7800 is NOT CONNECTED to your software that way. 2 Insert the Epson Stylus CX7800 Software CD. 3 Click Install and ...

Start Here Card
Page 6
... port on your Macintosh. Macintosh 1 Insert the Epson Stylus CX7800 Software CD. 2 Open the Epson CD-ROM desktop icon, then double-click the Epson icon. 3 Click Install and follow the on the Epson Stylus CX7800. 7 When you're done, remove the CD and restart your computer. If necessary, close any open windows on your screen to return to the...
... port on your Macintosh. Macintosh 1 Insert the Epson Stylus CX7800 Software CD. 2 Open the Epson CD-ROM desktop icon, then double-click the Epson icon. 3 Click Install and follow the on the Epson Stylus CX7800. 7 When you're done, remove the CD and restart your computer. If necessary, close any open windows on your screen to return to the...


