Product Information Guide
Page 4
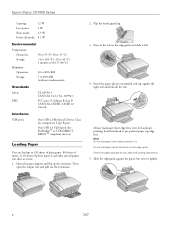
... Then open the output tray and pull out the extensions. 2. Always load paper short edge first, even for any additional loading instructions. 5. Check the paper package for landscape printing. Flip the feeder guard up the extension. Press in it left. 4. Insert ...4 7/07 Type B port One USB 1.1 Full-Speed (for computers); Note: Do not load paper with holes punched in the tab on the edge guide. Epson Stylus CX7400 Series Copying: 12 W Low power: 3 W Sleep mode: 2.5 W Power-off mode: 0.2 W Environmental Temperature Operation: Storage: Humidity Operation: Storage: 50 to...
... Then open the output tray and pull out the extensions. 2. Always load paper short edge first, even for any additional loading instructions. 5. Check the paper package for landscape printing. Flip the feeder guard up the extension. Press in it left. 4. Insert ...4 7/07 Type B port One USB 1.1 Full-Speed (for computers); Note: Do not load paper with holes punched in the tab on the edge guide. Epson Stylus CX7400 Series Copying: 12 W Low power: 3 W Sleep mode: 2.5 W Power-off mode: 0.2 W Environmental Temperature Operation: Storage: Humidity Operation: Storage: 50 to...
Product Information Guide
Page 5
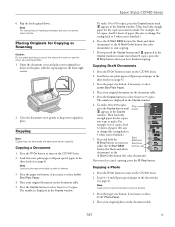
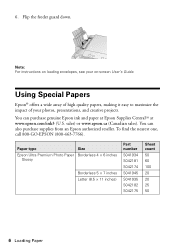
Note: For instructions on loading envelopes, see page 4). Load letter-size plain paper or Epson special paper in the sheet feeder (see page 4). 3. For example, for 12 copies, load 12 sheets of paper. (Be sure to change this setting back... appeared in the Copies window. 6. Press the paper size button, if necessary, to start copying. 7. Then load only enough paper for color documents) to select Letter Size Plain Paper. 4. Epson Stylus CX7400 Series 6. Flip the feeder guard down. Copying Note: Copies may not be exactly the same size as you 're finished.) Start 7. ...
Note: For instructions on loading envelopes, see page 4). Load letter-size plain paper or Epson special paper in the sheet feeder (see page 4). 3. For example, for 12 copies, load 12 sheets of paper. (Be sure to change this setting back... appeared in the Copies window. 6. Press the paper size button, if necessary, to start copying. 7. Then load only enough paper for color documents) to select Letter Size Plain Paper. 4. Epson Stylus CX7400 Series 6. Flip the feeder guard down. Copying Note: Copies may not be exactly the same size as you 're finished.) Start 7. ...
Product Information Guide
Page 6
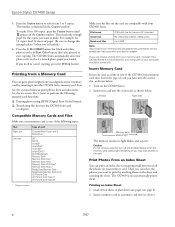
...for the copies you want to 999 Note: Also consult your memory card and adapter documentation for any special use instructions for your card or adapter. For example, for color photos) to cancel copying, press the y Stop button. See the on the card. If you will only be... below to print photos from 1 to your computer (or your computer should be printing from your memory card, it into the CX7400 Series memory card slots. Epson Stylus CX7400 Series 5. Print Photos From an Index Sheet You can print photos right from your digital camera's memory card by marking them ....
...for the copies you want to 999 Note: Also consult your memory card and adapter documentation for any special use instructions for your card or adapter. For example, for color photos) to cancel copying, press the y Stop button. See the on the card. If you will only be... below to print photos from 1 to your computer (or your computer should be printing from your memory card, it into the CX7400 Series memory card slots. Epson Stylus CX7400 Series 5. Print Photos From an Index Sheet You can print photos right from your digital camera's memory card by marking them ....
Product Information Guide
Page 7
... the Print from any additional index sheets. Use a dark pen or pencil to 30 photos per page. See the on-screen User's Guide for instructions on the first index sheet, up to fill in the lower right corner so that the top of the sheet is aligned against the right.... 4. Place the index sheet face-down on the glass, in the circles on each photo you want to cancel printing, press the y Stop button. Epson Stylus CX7400 Series 3. Print Index Sheet button 4. Note: If you can remove your computer. Now you need to print the date the photo was taken on the...
... the Print from any additional index sheets. Use a dark pen or pencil to 30 photos per page. See the on-screen User's Guide for instructions on the first index sheet, up to fill in the lower right corner so that the top of the sheet is aligned against the right.... 4. Place the index sheet face-down on the glass, in the circles on each photo you want to cancel printing, press the y Stop button. Epson Stylus CX7400 Series 3. Print Index Sheet button 4. Note: If you can remove your computer. Now you need to print the date the photo was taken on the...
Product Information Guide
Page 8
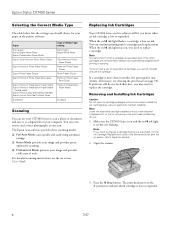
Epson Stylus CX7400 Series Selecting the Correct Media Type The table below lists the settings you should choose for your paper in the printer software: Paper Plain paper Epson Bright White Paper Epson Presentation Paper Matte Epson Ultra Premium Photo Paper Glossy Epson Premium Photo Paper Glossy Epson Photo Paper Glossy Epson Premium Photo Paper Semi-gloss Epson Premium Presentation Paper...
Epson Stylus CX7400 Series Selecting the Correct Media Type The table below lists the settings you should choose for your paper in the printer software: Paper Plain paper Epson Bright White Paper Epson Presentation Paper Matte Epson Ultra Premium Photo Paper Glossy Epson Premium Photo Paper Glossy Epson Photo Paper Glossy Epson Premium Photo Paper Semi-gloss Epson Premium Presentation Paper...
Product Information Guide
Page 10
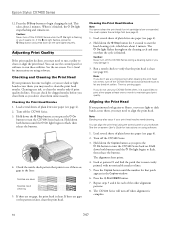
... start the head cleaning cycle, which lasts about 2 minutes. If the B ink light flashes, press the y Stop button and press down the y Stop button for instructions on using software. 1. You can check for that prints to clean or align the print head. Hold down both buttons until the number for clogged... complete. 10 7/07 Hold down the Copies button as you press the P On button to flash, then release the buttons. 4. Note: If you see page 8). 1. Epson Stylus CX7400 Series 12.
... start the head cleaning cycle, which lasts about 2 minutes. If the B ink light flashes, press the y Stop button and press down the y Stop button for instructions on using software. 1. You can check for that prints to clean or align the print head. Hold down both buttons until the number for clogged... complete. 10 7/07 Hold down the Copies button as you press the P On button to flash, then release the buttons. 4. Note: If you see page 8). 1. Epson Stylus CX7400 Series 12.

Quick Reference Guide
Page 3
...Scan a document or photo and restore or correct the color, if necessary ■ Perform routine maintenance ■ Solve simple problems This book tells you how to your Windows® or Macintosh® computer. For additional instructions, see the on-screen User's Guide by double-... more when you connect it on your desktop. Note: Notes contain important information about your CX7400 Series. Introduction After you have set up your Epson Stylus® CX7400 Series all-in-one as you read your CX7400 Series instructions: Warning: Warnings must be followed carefully to your equipment.
...Scan a document or photo and restore or correct the color, if necessary ■ Perform routine maintenance ■ Solve simple problems This book tells you how to your Windows® or Macintosh® computer. For additional instructions, see the on-screen User's Guide by double-... more when you connect it on your desktop. Note: Notes contain important information about your CX7400 Series. Introduction After you have set up your Epson Stylus® CX7400 Series all-in-one as you read your CX7400 Series instructions: Warning: Warnings must be followed carefully to your equipment.
Quick Reference Guide
Page 6
... your on loading envelopes, see your photos, presentations, and creative projects. To find the nearest one, call 800-GO-EPSON (800-463-7766). Note: For instructions on -screen User's Guide. Paper type Size Epson Ultra Premium Photo Paper Borderless 4 × 6 inches Glossy Borderless 5 × 7 inches Letter (8.5 × 11 inches) Part number S041934 S042181...
... your on loading envelopes, see your photos, presentations, and creative projects. To find the nearest one, call 800-GO-EPSON (800-463-7766). Note: For instructions on -screen User's Guide. Paper type Size Epson Ultra Premium Photo Paper Borderless 4 × 6 inches Glossy Borderless 5 × 7 inches Letter (8.5 × 11 inches) Part number S041934 S042181...

Quick Reference Guide
Page 8
Close the cover gently so you don't move the original. 8 Copying a Document or Photo Open the document cover and place your originals correctly on the glass and make color or black and white copies. Placing the Original on the glass, with the top facing into the front right corner. Move the photo or document slightly away from the edges. 2. Copying a Document or Photo Follow the instructions in this section to position your original face-down on the Glass 1.
Close the cover gently so you don't move the original. 8 Copying a Document or Photo Open the document cover and place your originals correctly on the glass and make color or black and white copies. Placing the Original on the glass, with the top facing into the front right corner. Move the photo or document slightly away from the edges. 2. Copying a Document or Photo Follow the instructions in this section to position your original face-down on the Glass 1.
Quick Reference Guide
Page 12
Printing From a Memory Card or Digital Camera The Epson Stylus CX7400 Series all-in-one of the memory card slots and you... (see below) ■ Your camera itself (see page 18) Printing From a Memory Card The CX7400 Series lets you print color photos directly from your CX7400 Series and a computer or other device. 12 Printing From a Memory Card or Digital Camera Then,... when you insert the card in Your Camera (DPOF)" on page 17 See the User's Guide for instructions...
Printing From a Memory Card or Digital Camera The Epson Stylus CX7400 Series all-in-one of the memory card slots and you... (see below) ■ Your camera itself (see page 18) Printing From a Memory Card The CX7400 Series lets you print color photos directly from your CX7400 Series and a computer or other device. 12 Printing From a Memory Card or Digital Camera Then,... when you insert the card in Your Camera (DPOF)" on page 17 See the User's Guide for instructions...
Quick Reference Guide
Page 15
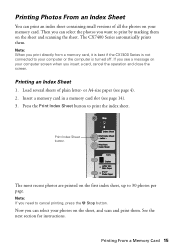
...1. Now you can select the photos you want to 30 photos per page. See the next section for instructions. or A4-size paper (see page 14). 3. Printing From a Memory Card 15 Note: If you see... select your computer screen when you print directly from a memory card, it is best if the CX7400 Series is turned off. Print Index Sheet button The most recent photos are printed on the first ...index sheet, up to print by marking them . The CX7400 Series automatically prints them on your computer or the computer is not connected to your memory card...
...1. Now you can select the photos you want to 30 photos per page. See the next section for instructions. or A4-size paper (see page 14). 3. Printing From a Memory Card 15 Note: If you see... select your computer screen when you print directly from a memory card, it is best if the CX7400 Series is turned off. Print Index Sheet button The most recent photos are printed on the first ...index sheet, up to print by marking them . The CX7400 Series automatically prints them on your computer or the computer is not connected to your memory card...
Quick Reference Guide
Page 17
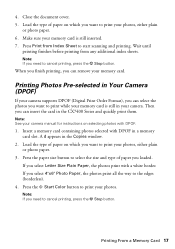
Press Print from any additional index sheets. Press the x Start Color button to the edges (borderless). 4. Printing From a Memory Card...document cover. 5. Printing Photos Pre-selected in your photos, either plain or photo paper. 3. A d appears in the CX7400 Series and quickly print them. Note: If you want to start scanning and printing. Make sure your photos. When you...the card in the Copies window. 2. Load the type of paper you can remove your camera manual for instructions on which you select 4"x6" Photo Paper, the photos print all the way to print your memory ...
Press Print from any additional index sheets. Press the x Start Color button to the edges (borderless). 4. Printing From a Memory Card...document cover. 5. Printing Photos Pre-selected in your photos, either plain or photo paper. 3. A d appears in the CX7400 Series and quickly print them. Note: If you want to start scanning and printing. Make sure your photos. When you...the card in the Copies window. 2. Load the type of paper you can remove your camera manual for instructions on which you select 4"x6" Photo Paper, the photos print all the way to print your memory ...

Quick Reference Guide
Page 18
... to see page 4). 5. Remove any cameras. Check your CX7400 Series is compatible. If you connect your camera, make sure your camera manual to select your photos and settings, and print them. Follow the instructions that came with a white border. When you loaded. Note: Epson cannot guarantee the compatibility of your camera to select...
... to see page 4). 5. Remove any cameras. Check your CX7400 Series is compatible. If you connect your camera, make sure your camera manual to select your photos and settings, and print them. Follow the instructions that came with a white border. When you loaded. Note: Epson cannot guarantee the compatibility of your camera to select...
Quick Reference Guide
Page 19
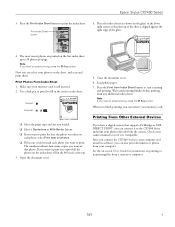
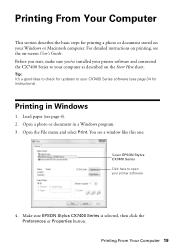
...3. Load paper (see the on-screen User's Guide. Open a photo or document in Windows 1. Printing From Your Computer 19 Make sure EPSON Stylus CX7400 Series is selected, then click the Preferences or Properties button. Tip: It's a good idea to check for updates to your printer software ...4. You see a window like this one: Select EPSON Stylus CX7400 Series Click here to your Windows or Macintosh computer. For detailed instructions on printing, see page 4). 2. Open the File menu and select Print. Printing From Your Computer ...
...3. Load paper (see the on-screen User's Guide. Open a photo or document in Windows 1. Printing From Your Computer 19 Make sure EPSON Stylus CX7400 Series is selected, then click the Preferences or Properties button. Tip: It's a good idea to check for updates to your printer software ...4. You see a window like this one: Select EPSON Stylus CX7400 Series Click here to your Windows or Macintosh computer. For detailed instructions on printing, see page 4). 2. Open the File menu and select Print. Printing From Your Computer ...
Quick Reference Guide
Page 24
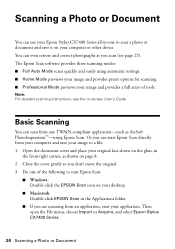
... it on page 8. 2. Then open the File menu, choose Import or Acquire, and select Epson Stylus CX7400 Series. 24 Scanning a Photo or Document Scanning a Photo or Document You can use your Epson Stylus CX7400 Series all-in-one of tools. Or you scan (see the on your desktop. ■... in the Applications folder. ■ If you don't move the original. 3. Note: For detailed scanning instructions, see page 25). You can start Epson Scan directly from an application, start Epson Scan: ■ Windows: Double-click the EPSON Scan icon on -screen User's Guide. Do one to a file. 1.
... it on page 8. 2. Then open the File menu, choose Import or Acquire, and select Epson Stylus CX7400 Series. 24 Scanning a Photo or Document Scanning a Photo or Document You can use your Epson Stylus CX7400 Series all-in-one of tools. Or you scan (see the on your desktop. ■... in the Applications folder. ■ If you don't move the original. 3. Note: For detailed scanning instructions, see page 25). You can start Epson Scan directly from an application, start Epson Scan: ■ Windows: Double-click the EPSON Scan icon on -screen User's Guide. Do one to a file. 1.
Quick Reference Guide
Page 25
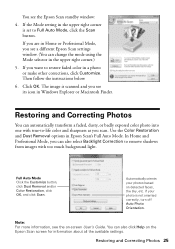
... Help on the Epson Scan screen for information about all the available settings. Use the Color Restoration and Dust Removal options in the upper right corner.) 5. If you see its icon in a photo or make other corrections, click Customize. Then follow the instructions below. 6. Click... OK. Restoring and Correcting Photos 25 The image is scanned and you scan. In Home and Professional Mode, you can automatically transform a faded, dusty, or badly exposed color photo into one with too much background ...
... Help on the Epson Scan screen for information about all the available settings. Use the Color Restoration and Dust Removal options in the upper right corner.) 5. If you see its icon in a photo or make other corrections, click Customize. Then follow the instructions below. 6. Click... OK. Restoring and Correcting Photos 25 The image is scanned and you scan. In Home and Professional Mode, you can automatically transform a faded, dusty, or badly exposed color photo into one with too much background ...
Quick Reference Guide
Page 26
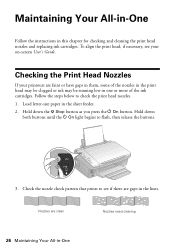
... clean Nozzles need cleaning 26 Maintaining Your All-in the sheet feeder. 2. Load letter-size paper in -One Maintaining Your All-in-One Follow the instructions in one or more of the ink cartridges. To align the print head, if necessary, see if there are faint or have gaps in them...
... clean Nozzles need cleaning 26 Maintaining Your All-in the sheet feeder. 2. Load letter-size paper in -One Maintaining Your All-in-One Follow the instructions in one or more of the ink cartridges. To align the print head, if necessary, see if there are faint or have gaps in them...
Quick Reference Guide
Page 28
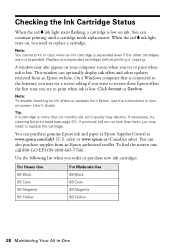
... (Canadian sales). You can optionally display ink offers and other cartridges are not expended. This window can also purchase supplies from Epson, see the instructions in -One Click Accept or Decline. Replace any expended cartridges before printing or copying. Tip: If a cartridge is expended even if the other updates retrieved ...
... (Canadian sales). You can optionally display ink offers and other cartridges are not expended. This window can also purchase supplies from Epson, see the instructions in -One Click Accept or Decline. Replace any expended cartridges before printing or copying. Tip: If a cartridge is expended even if the other updates retrieved ...
Quick Reference Guide
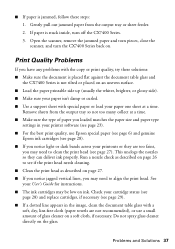
Page 37
...: 1. Remove sheets from the output tray or sheet feeder. 2. This unclogs the nozzles so they are not recommended), or use Epson special paper (see page 6) and genuine Epson ink cartridges (see page 28). ■ If you notice light or dark bands across your cartridge status (see page 28) and..., turn the CX7400 Series back on. Check your printouts or they can deliver ink properly. If paper is not tilted or placed on an uneven surface. ■ Load the paper printable side up (usually the whiter, brighter, or glossy side). ■ Make sure your User's Guide for instructions. ■ ...
...: 1. Remove sheets from the output tray or sheet feeder. 2. This unclogs the nozzles so they are not recommended), or use Epson special paper (see page 6) and genuine Epson ink cartridges (see page 28). ■ If you notice light or dark bands across your cartridge status (see page 28) and..., turn the CX7400 Series back on. Check your printouts or they can deliver ink properly. If paper is not tilted or placed on an uneven surface. ■ Load the paper printable side up (usually the whiter, brighter, or glossy side). ■ Make sure your User's Guide for instructions. ■ ...

Quick Reference Guide
Page 40
...9632; Leave enough room around the CX7400 Series for sufficient ventilation. Do not block or cover openings in your Epson Stylus CX7400 Series all-in-one, read and follow these safety instructions: ■ Be sure to follow all warnings and instructions marked on the CX7400 Series. ■ Use only the... type of power source indicated on the CX7400 Series. ■ Except as...
...9632; Leave enough room around the CX7400 Series for sufficient ventilation. Do not block or cover openings in your Epson Stylus CX7400 Series all-in-one, read and follow these safety instructions: ■ Be sure to follow all warnings and instructions marked on the CX7400 Series. ■ Use only the... type of power source indicated on the CX7400 Series. ■ Except as...


