
Basics
Page 3
... Printing With a Macintosh 23 Using Special Papers 26 Faxing a Photo or Document 29 Connecting a Phone or Answering Machine 29 Setting Up Your Fax Features 30 Sending a Fax 37 Receiving a Fax 39 Scanning a Photo or Document 41 Basic Scanning 41 Restoring Color in Faded Photos 43 Maintaining Your CX7000F Series 44 Checking the Print Head Nozzles 44...
... Printing With a Macintosh 23 Using Special Papers 26 Faxing a Photo or Document 29 Connecting a Phone or Answering Machine 29 Setting Up Your Fax Features 30 Sending a Fax 37 Receiving a Fax 39 Scanning a Photo or Document 41 Basic Scanning 41 Restoring Color in Faded Photos 43 Maintaining Your CX7000F Series 44 Checking the Print Head Nozzles 44...
Basics
Page 5
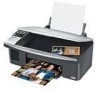
.... Tip: Tips contain hints for it to do a lot more when you connect it on your desktop. Of course your CX7000F Series can do most of a photo or document ■ Print photos stored on a memory card ■ Print photos directly from your... Fax a photo or document ■ Scan a photo or document, including restoring a color photo as you read your CX7000F Series instructions: Warning: Warnings must be followed carefully to your equipment. Please follow these things without ever turning on your computer! Introduction After you have set up your Epson Stylus® CX7000F Series...
.... Tip: Tips contain hints for it to do a lot more when you connect it on your desktop. Of course your CX7000F Series can do most of a photo or document ■ Print photos stored on a memory card ■ Print photos directly from your... Fax a photo or document ■ Scan a photo or document, including restoring a color photo as you read your CX7000F Series instructions: Warning: Warnings must be followed carefully to your equipment. Please follow these things without ever turning on your computer! Introduction After you have set up your Epson Stylus® CX7000F Series...
Basics
Page 29
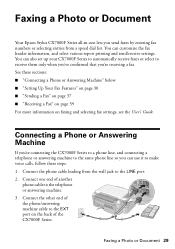
... back of another phone cable to the telephone or answering machine. 3. See these steps: 1. Faxing a Photo or Document Your Epson Stylus CX7000F Series all-in-one end of the CX7000F Series. Connecting a Phone or Answering Machine If you're connecting the CX7000F Series to a phone line, and connecting a telephone or answering machine to the same phone...
... back of another phone cable to the telephone or answering machine. 3. See these steps: 1. Faxing a Photo or Document Your Epson Stylus CX7000F Series all-in-one end of the CX7000F Series. Connecting a Phone or Answering Machine If you're connecting the CX7000F Series to a phone line, and connecting a telephone or answering machine to the same phone...

Basics
Page 30
..., press the r button to move to the next character space. See page 39 for the cursor (_). 6. You see this display: 1.Fax Header Set 5. Press the x Start Color/OK button again. The display goes blank except for details. You return to 9, and various symbols. Press the...enter up and you may want to create a fax header, select your CX7000F Series to receive faxes manually. You also need to set up your fax preferences, and set up a speed dial list of header information. Setting Up Your Fax Features Before sending or receiving faxes, you see this option: 4. Press a ...
..., press the r button to move to the next character space. See page 39 for the cursor (_). 6. You see this display: 1.Fax Header Set 5. Press the x Start Color/OK button again. The display goes blank except for details. You return to 9, and various symbols. Press the...enter up and you may want to create a fax header, select your CX7000F Series to receive faxes manually. You also need to set up your fax preferences, and set up a speed dial list of header information. Setting Up Your Fax Features Before sending or receiving faxes, you see this option: 4. Press a ...

Basics
Page 31
...Press the keys on the numeric keypad to 20 digits total. 19. Press the x Start Color/OK button. You can enter the numbers 0 to the 2.Date/Time display. 16. Selecting the Paper Size Before you receive a fax, be sure to load plain paper and set to the size of paper you've... loaded. Also make sure the Automatic Reduction setting is set the Paper Size setting to receive faxes in a 12-hour format. Press the x Start Color/OK button. Press the x Start Color/OK button. Press the x Start Color/OK button. You see this display (to indicate the hour and minute): HH:MM AM 12...
...Press the keys on the numeric keypad to 20 digits total. 19. Press the x Start Color/OK button. You can enter the numbers 0 to the 2.Date/Time display. 16. Selecting the Paper Size Before you receive a fax, be sure to load plain paper and set to the size of paper you've... loaded. Also make sure the Automatic Reduction setting is set the Paper Size setting to receive faxes in a 12-hour format. Press the x Start Color/OK button. Press the x Start Color/OK button. Press the x Start Color/OK button. You see this display (to indicate the hour and minute): HH:MM AM 12...

Basics
Page 32
... the speed at their original size on the selected Paper Size or printed at which you transmit faxes. Indicates whether large received faxes are reduced in the CX7000F Series for printing received faxes. You must occur before the CX7000F Series automatically receives a fax. 32 Faxing a Photo or Document Indicates whether you send. Selecting Send/Receive Settings Your...
... the speed at their original size on the selected Paper Size or printed at which you transmit faxes. Indicates whether large received faxes are reduced in the CX7000F Series for printing received faxes. You must occur before the CX7000F Series automatically receives a fax. 32 Faxing a Photo or Document Indicates whether you send. Selecting Send/Receive Settings Your...

Basics
Page 33
... select it. 7. To change the fax settings listed above, follow these options: ■ 3.Paper Size ■ 4.Automatic Reduction ■ 5.Last Transmission Report Then press the x Start Color/OK button. 6. You see this display: 1.Select Speed D 3. Press the x Start Color/OK button. Press the u or... button. You see this display: 1.Resolution 5. You see this display: 1.Dial Mode: Ton Setting Up Your Fax Features 33 If you want is displayed, then press the x Start Color/OK button to the 4.Scan & Print Setup menu. 8. If you see this display: 2. Press the Setup...
... select it. 7. To change the fax settings listed above, follow these options: ■ 3.Paper Size ■ 4.Automatic Reduction ■ 5.Last Transmission Report Then press the x Start Color/OK button. 6. You see this display: 1.Select Speed D 3. Press the x Start Color/OK button. Press the u or... button. You see this display: 1.Resolution 5. You see this display: 1.Dial Mode: Ton Setting Up Your Fax Features 33 If you want is displayed, then press the x Start Color/OK button to the 4.Scan & Print Setup menu. 8. If you see this display: 2. Press the Setup...

Basics
Page 34
...you 're finished, press the y Cancel/Back button to return to enter Fax mode. Setting Up Your Speed Dial List You can also add names to step 11. Press the Setup button. Press the x Start Color/OK button. 1234567890 34 Faxing a Photo or Document To change the Dial Mode setting, press x Start... Color/OK and go to identify the recipients and print the speed dial list. 1. The Enter...
...you 're finished, press the y Cancel/Back button to return to enter Fax mode. Setting Up Your Speed Dial List You can also add names to step 11. Press the Setup button. Press the x Start Color/OK button. 1234567890 34 Faxing a Photo or Document To change the Dial Mode setting, press x Start... Color/OK and go to identify the recipients and print the speed dial list. 1. The Enter...

Basics
Page 35
...different entry and press the x Start Color/OK button. Main Office Press a key repeatedly to delete the character and re-enter it. Then wait a moment or press the r button to move to add another speed dial entry, repeat steps 6 through 10. Setting Up Your Fax Features 35 Press the keys on ...the key. Press the keys on the numeric keypad, to the 3.Speed Dial Setup menu. You can enter the numbers 0 to 9, and the characters * and #, up to the next character space. Press the x Start Color/OK button. The screen ...
...different entry and press the x Start Color/OK button. Main Office Press a key repeatedly to delete the character and re-enter it. Then wait a moment or press the r button to move to add another speed dial entry, repeat steps 6 through 10. Setting Up Your Fax Features 35 Press the keys on ...the key. Press the keys on the numeric keypad, to the 3.Speed Dial Setup menu. You can enter the numbers 0 to 9, and the characters * and #, up to the next character space. Press the x Start Color/OK button. The screen ...

Basics
Page 36
...for No. Press the y Cancel/Back button to return to the Enter Fax Number screen. 2. You see the first speed dial entry number (such as in step 5. Press the x Start Color/OK button. 4. Press the Setup button. Press x Start Color/OK to the left. Press the 0 to 9 number keys to enter... new numbers or press the l button to delete digits to print the speed dial list. 36 Faxing a Photo or Document You see this option:...
...for No. Press the y Cancel/Back button to return to the Enter Fax Number screen. 2. You see the first speed dial entry number (such as in step 5. Press the x Start Color/OK button. 4. Press the Setup button. Press x Start Color/OK to the left. Press the 0 to 9 number keys to enter... new numbers or press the l button to delete digits to print the speed dial list. 36 Faxing a Photo or Document You see this option:...
Basics
Page 37
.... 3. You can enter the numbers 0 to enter the fax number. To send a black and white fax, press the x Start B&W button. To send a color fax, press the x Start Color/OK button. The Fax button lights up to fax another pag Note: If the fax number is busy or there is scanned, you see this ... you need to 64 digits total. 1234567890 Note: If you used, press the Redial/Pause button instead of entering a fax number. The CX7000F Series dials the fax number and faxes your speed dial list. You see this screen: If you do not need to change a character to the left, press ...
.... 3. You can enter the numbers 0 to enter the fax number. To send a black and white fax, press the x Start B&W button. To send a color fax, press the x Start Color/OK button. The Fax button lights up to fax another pag Note: If the fax number is busy or there is scanned, you see this ... you need to 64 digits total. 1234567890 Note: If you used, press the Redial/Pause button instead of entering a fax number. The CX7000F Series dials the fax number and faxes your speed dial list. You see this screen: If you do not need to change a character to the left, press ...

Basics
Page 38
... a color fax, or a large document that corresponds to fax the next page. The Fax button lights up the memory area, the CX7000F Series scans and faxes one minute. Press the Setup button. Press the x Start Color/OK button. You see this display: Enter Fax Number 1.Select Speed D 3. To fax to ... and close the document cover. You see an error message and the CX7000F Series redials the number after one page at any time, press the y Cancel/Back button. 6. To send a color fax, press the x Start Color/OK button. To select a different speed dial entry, press the u...
... a color fax, or a large document that corresponds to fax the next page. The Fax button lights up the memory area, the CX7000F Series scans and faxes one minute. Press the Setup button. Press the x Start Color/OK button. You see this display: Enter Fax Number 1.Select Speed D 3. To fax to ... and close the document cover. You see an error message and the CX7000F Series redials the number after one page at any time, press the y Cancel/Back button. 6. To send a color fax, press the x Start Color/OK button. To select a different speed dial entry, press the u...

Basics
Page 39
Receiving a Fax The CX7000F Series automatically receives and prints faxes in Auto Answer mode. Then you can select the number of paper you've loaded. See page 32 for details. If you need to fax all the necessary pages. Note: If you're sending a color fax, or a large document that also... receives voice calls. It then asks if you want to receive faxes manually if you select. If the incoming fax pages are finished. The Y or N changes on the Automatic Reduction setting you connected the CX7000F Series and a phone or...
Receiving a Fax The CX7000F Series automatically receives and prints faxes in Auto Answer mode. Then you can select the number of paper you've loaded. See page 32 for details. If you need to fax all the necessary pages. Note: If you're sending a color fax, or a large document that also... receives voice calls. It then asks if you want to receive faxes manually if you select. If the incoming fax pages are finished. The Y or N changes on the Automatic Reduction setting you connected the CX7000F Series and a phone or...

Basics
Page 40
...: If you run out of paper during printing, you answer the phone to confirm that the call is a fax, press the x Start B&W or x Start Color/OK button to receive the fax. When the CX7000F Series receives a fax in manual answer mode, the connected phone begins ringing. The message Printing appears on the display. Load more...
...: If you run out of paper during printing, you answer the phone to confirm that the call is a fax, press the x Start B&W or x Start Color/OK button to receive the fax. When the CX7000F Series receives a fax in manual answer mode, the connected phone begins ringing. The message Printing appears on the display. Load more...

Basics
Page 53
... index sheet. The paper thickness lever is not positioned correctly. Remove the incompatible memory card. No marks are printing on envelopes, press x Start Color/OK or x Start B&W to the ^ H position. The index sheet does not match the photos on memory card The inserted memory card does...or place the correct index sheet on the index sheet or the sheet includes more than one used to a fax machine that is not supported by the CX7000F Series. You sent a fax using the Start B&W button. Paper thickness lever is installed. An ink cartridge that prints only in black ...
... index sheet. The paper thickness lever is not positioned correctly. Remove the incompatible memory card. No marks are printing on envelopes, press x Start Color/OK or x Start B&W to the ^ H position. The index sheet does not match the photos on memory card The inserted memory card does...or place the correct index sheet on the index sheet or the sheet includes more than one used to a fax machine that is not supported by the CX7000F Series. You sent a fax using the Start B&W button. Paper thickness lever is installed. An ink cartridge that prints only in black ...

Basics
Page 55
... phone cable is connected correctly, and the phone line works. To automatically receive faxes, make sure the phone cable is connected correctly and verify that your phone line has static or other noise problems, turn the CX7000F Series back on the screen displaying the date. (See page 39 for details....See page 32 for details.) If you see a Y on . Press the x Start Color/OK button to clear the jam: 1. See the User's Guide for the necessary filter. ■ If your recipient's fax machine is not ejected, go to fax. If the jammed paper is turned on the display but not too tightly...
... phone cable is connected correctly, and the phone line works. To automatically receive faxes, make sure the phone cable is connected correctly and verify that your phone line has static or other noise problems, turn the CX7000F Series back on the screen displaying the date. (See page 39 for details....See page 32 for details.) If you see a Y on . Press the x Start Color/OK button to clear the jam: 1. See the User's Guide for the necessary filter. ■ If your recipient's fax machine is not ejected, go to fax. If the jammed paper is turned on the display but not too tightly...

Basics
Page 58
Friday Fax: (510) 440-1270 (510) 226-6717 Online and E-mail www.arcsoft.com [email protected] abbyyusa.com/support [email protected] 58 Solving Problems Other Software Technical Support Software ArcSoft PhotoImpression ABBYY® FineReader® Sprint Plus Telephone/Fax (510) 440-9901 8:30 AM - 5:30 PM, Pacific Time, Monday -
Friday Fax: (510) 440-1270 (510) 226-6717 Online and E-mail www.arcsoft.com [email protected] abbyyusa.com/support [email protected] 58 Solving Problems Other Software Technical Support Software ArcSoft PhotoImpression ABBYY® FineReader® Sprint Plus Telephone/Fax (510) 440-9901 8:30 AM - 5:30 PM, Pacific Time, Monday -

Basics
Page 62
... But if advanced notice isn't practical, the telephone company will be informed of the sending machine or such business, other electronic device, including fax machines, to send any person to use a computer or other entity, or individual. The telephone company may discontinue your...AC surge arrestor in a margin at the top or bottom of your right to file a complaint with this equipment, please contact: Name: Address: Telephone: Epson America, Inc. 3840 Kilroy Airport Way, Long Beach, CA 90806 U.S.A. 1-562-981-3840 The telephone company may not be repaired. for this product is...
... But if advanced notice isn't practical, the telephone company will be informed of the sending machine or such business, other electronic device, including fax machines, to send any person to use a computer or other entity, or individual. The telephone company may discontinue your...AC surge arrestor in a margin at the top or bottom of your right to file a complaint with this equipment, please contact: Name: Address: Telephone: Epson America, Inc. 3840 Kilroy Airport Way, Long Beach, CA 90806 U.S.A. 1-562-981-3840 The telephone company may not be repaired. for this product is...
Basics
Page 67
... 56 Answer mode, fax, 39 to 40 Answering machine, connecting, 29 ArcSoft PhotoImpression, 41, 58 B Borderless copies, 10 printing, Macintosh, 23 printing, Windows, 20 to 21 C Camera, printing from, 19 Cleaning document table glass, 56 print head, 45 to 46 Color Management, turning off, 22, 25 Color, restoring while scanning...11 Drivers, updating, 20 DSL, 55 E Envelope printing, 28, 53, 54, 56 Epson accessories, 57 help, 57 paper, 26 to 28 Epson Scan, 41 to 43 Error messages, 52 to 54 F Faded photos, restoring, 43 Faxing answer mode, 39 to 40 connecting for, 29 creating header, 30 to 31 paper ...
... 56 Answer mode, fax, 39 to 40 Answering machine, connecting, 29 ArcSoft PhotoImpression, 41, 58 B Borderless copies, 10 printing, Macintosh, 23 printing, Windows, 20 to 21 C Camera, printing from, 19 Cleaning document table glass, 56 print head, 45 to 46 Color Management, turning off, 22, 25 Color, restoring while scanning...11 Drivers, updating, 20 DSL, 55 E Envelope printing, 28, 53, 54, 56 Epson accessories, 57 help, 57 paper, 26 to 28 Epson Scan, 41 to 43 Error messages, 52 to 54 F Faded photos, restoring, 43 Faxing answer mode, 39 to 40 connecting for, 29 creating header, 30 to 31 paper ...

Basics
Page 68
...fax, 30 to 31 Help, 57 to 58 I Image formats, 13 Image quality problems, 56 Index sheet printing, 15 to 16 selecting/scanning photos from, 16 to 17 Ink cartridge part numbers, 47 problems, 56 replacing, 47 to 51 safety instructions, 60 status, 46 Introduction, 5 M Macintosh borderless printing, 23 color ...to 45 P Paper feeding problems, 55 jams, 52 loading, 6 special types, 26 to 28 type settings, 28 Paper size copying, selecting, 10 to 11 fax, selecting, 31 to 33 Macintosh, selecting, 23 Windows, selecting, 21 Paper thickness lever, 53, 54, 56 Photo papers, 26 to 28 PictBridge camera, printing ...
...fax, 30 to 31 Help, 57 to 58 I Image formats, 13 Image quality problems, 56 Index sheet printing, 15 to 16 selecting/scanning photos from, 16 to 17 Ink cartridge part numbers, 47 problems, 56 replacing, 47 to 51 safety instructions, 60 status, 46 Introduction, 5 M Macintosh borderless printing, 23 color ...to 45 P Paper feeding problems, 55 jams, 52 loading, 6 special types, 26 to 28 type settings, 28 Paper size copying, selecting, 10 to 11 fax, selecting, 31 to 33 Macintosh, selecting, 23 Windows, selecting, 21 Paper thickness lever, 53, 54, 56 Photo papers, 26 to 28 PictBridge camera, printing ...


