

Product Information Guide
Page 3
... 10 cpi 81 51 Set right margin 82 52 International character set 38 26 Define user-defined characters 42 2A Select graphics mode 45 2D Turn underlining on /off 47 2F Select vertical tab channel 4x 30 Select l/X-Inch line spacing 4', 31 Select 7/72-Inch line spacing 50 32 Select 1 /h-tnch... 8-14 8-14 8-25 8-19 8-34 8-30 8-30 DFX - 5000 DOT - ESC @ ESC A ESC B ESC C ESC CO ESC D ESC E ESC F ESC G ESC H ESC I ASCII D e c Hex Description BEL BS HT LF VT FF CR SO ESC SO SI ESC SI DC1 DC2 DC3 DC4 CAN ESC SP ESC ! MATRIX PRINTER ESC T ESC U ESC W ESC Y ESC Z ESC \ ESC...
... 10 cpi 81 51 Set right margin 82 52 International character set 38 26 Define user-defined characters 42 2A Select graphics mode 45 2D Turn underlining on /off 47 2F Select vertical tab channel 4x 30 Select l/X-Inch line spacing 4', 31 Select 7/72-Inch line spacing 50 32 Select 1 /h-tnch... 8-14 8-14 8-25 8-19 8-34 8-30 8-30 DFX - 5000 DOT - ESC @ ESC A ESC B ESC C ESC CO ESC D ESC E ESC F ESC G ESC H ESC I ASCII D e c Hex Description BEL BS HT LF VT FF CR SO ESC SO SI ESC SI DC1 DC2 DC3 DC4 CAN ESC SP ESC ! MATRIX PRINTER ESC T ESC U ESC W ESC Y ESC Z ESC \ ESC...

Product Support Bulletin(s)
Page 1
...rotate and find the initial and final platen gap (PG) values. These clutch plates must be determined as the unit ages, it is to turn than other small gear. 5. Remove the interlock switch before lifting the mechanism out. 2. Remove the E ring (563) and spring (614)...final platen gap values cannot be removed, cleaned, lubricated and reinstalled. The printer would stay loaded. Product Support Bulletin Subject: DFX-5000 paper loading problems. Date: 01/04/94 Page(s): 1 of 2 PSB No: P-0102 Originator: SEK EPSON The purpose of this problem. Resolution: On each side of the CGS...
...rotate and find the initial and final platen gap (PG) values. These clutch plates must be determined as the unit ages, it is to turn than other small gear. 5. Remove the interlock switch before lifting the mechanism out. 2. Remove the E ring (563) and spring (614)...final platen gap values cannot be removed, cleaned, lubricated and reinstalled. The printer would stay loaded. Product Support Bulletin Subject: DFX-5000 paper loading problems. Date: 01/04/94 Page(s): 1 of 2 PSB No: P-0102 Originator: SEK EPSON The purpose of this problem. Resolution: On each side of the CGS...
User Manual
Page 5
... be determined by turning the equipment off and on, the user is encouraged to try to correct the interference by one interface connector, do not leave cables connected to unused interfaces. While every precaution has been taken in Subpart J of Part 15 of Seiko Epson Corporation. Copyright &#...errors or omissions. It has been type tested and found to comply with the limits for a Class B computing device in accordance with Epson printers. FCC COMPLIANCE STATEMENT FOR AMERICAN USERS This equipment generates and uses radio frequency energy and if not installed and used properly, that one ...
... be determined by turning the equipment off and on, the user is encouraged to try to correct the interference by one interface connector, do not leave cables connected to unused interfaces. While every precaution has been taken in Subpart J of Part 15 of Seiko Epson Corporation. Copyright &#...errors or omissions. It has been type tested and found to comply with the limits for a Class B computing device in accordance with Epson printers. FCC COMPLIANCE STATEMENT FOR AMERICAN USERS This equipment generates and uses radio frequency energy and if not installed and used properly, that one ...

User Manual
Page 14
Removing the protective materials The printer is protected during shipping by several pieces of the printer. These protective items must be removed before you turn on the printer. Setting Up the Printer 1-3 After removing the protective materials as described below, store them with the other packaging material. 1. Using the cross-head screwdriver, remove the carriage support bar and slide the print head to the middle of foam packaging, two brackets, and a carriage support bar. Open the printer's top cover and remove the foam packaging material. 2.
Removing the protective materials The printer is protected during shipping by several pieces of the printer. These protective items must be removed before you turn on the printer. Setting Up the Printer 1-3 After removing the protective materials as described below, store them with the other packaging material. 1. Using the cross-head screwdriver, remove the carriage support bar and slide the print head to the middle of foam packaging, two brackets, and a carriage support bar. Open the printer's top cover and remove the foam packaging material. 2.

User Manual
Page 15
...for your printed output. l Leave plenty of room around the printer for the Printer When you turn on a flat, stable surface. Choosing a Place for your front and rear stacks of the printer. do not use an adapter plug. 1-4 Setting Up the Printer WARNING: Be sure to remove all protective materials before you select...for its cable to remove the two screws and the two locking brackets from the inside of continuous paper as well as your printer, keep the following in mind: l Place the printer on the printer. l Use a grounded outlet; 3. Use the cross-head screwdriver to reach.
...for your printed output. l Leave plenty of room around the printer for the Printer When you turn on a flat, stable surface. Choosing a Place for your front and rear stacks of the printer. do not use an adapter plug. 1-4 Setting Up the Printer WARNING: Be sure to remove all protective materials before you select...for its cable to remove the two screws and the two locking brackets from the inside of continuous paper as well as your printer, keep the following in mind: l Place the printer on the printer. l Use a grounded outlet; 3. Use the cross-head screwdriver to reach.

User Manual
Page 21
...and attach the power cord. Assembling the Printer Since the printer comes almost completely assembled from you have been using the printer, the print head may be hot; Installing the ribbon cartridge Before installing the ribbon cartridge, make sure the printer is turned off. Open the top cover by lifting... its box and plastic wrapper and then follow these steps to do is turned on because this can damage the printer. let it cool for a few minutes before touching it...
...and attach the power cord. Assembling the Printer Since the printer comes almost completely assembled from you have been using the printer, the print head may be hot; Installing the ribbon cartridge Before installing the ribbon cartridge, make sure the printer is turned off. Open the top cover by lifting... its box and plastic wrapper and then follow these steps to do is turned on because this can damage the printer. let it cool for a few minutes before touching it...

User Manual
Page 22
Remove the plastic separator from the middle of the ribbon cartridge. (You will not need the separator again and can discard it.) Next, detach the ribbon guide from the cartridge and turn the ribbon-tightening knob in the ribbon. 2. Slide the print head to the middle of the arrow to take up any slack in the direction of the printer. 3.
Remove the plastic separator from the middle of the ribbon cartridge. (You will not need the separator again and can discard it.) Next, detach the ribbon guide from the cartridge and turn the ribbon-tightening knob in the ribbon. 2. Slide the print head to the middle of the arrow to take up any slack in the direction of the printer. 3.

User Manual
Page 24
The smaller end of the guide should be on each side of the print head as shown below. 6. Insert the ribbon guide over the metal pins on top, with its angled edge toward the platen. Turn the ribbon-tightening knob again to see that it moves smoothly and that the ribbon is not twisted or creased. Slide the print head from side to side to remove any slack in the ribbon. 7.
The smaller end of the guide should be on each side of the print head as shown below. 6. Insert the ribbon guide over the metal pins on top, with its angled edge toward the platen. Turn the ribbon-tightening knob again to see that it moves smoothly and that the ribbon is not twisted or creased. Slide the print head from side to side to remove any slack in the ribbon. 7.

User Manual
Page 26
... performing the test, you can use your printer's built-in your dealer for information. Setting Up the Printer 1-15 Plugging in the printer: 1. See your printer and load paper. Plug the power cable into a properly grounded electrical outlet. Make sure the printer is turned off. (The zero (0) on the printer's rear panel. Note: If you move to...
... performing the test, you can use your printer's built-in your dealer for information. Setting Up the Printer 1-15 Plugging in the printer: 1. See your printer and load paper. Plug the power cable into a properly grounded electrical outlet. Make sure the printer is turned off. (The zero (0) on the printer's rear panel. Note: If you move to...
User Manual
Page 27
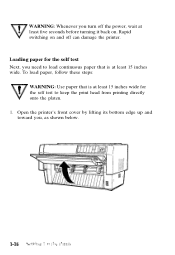
the self test to load continuous paper that is at least 15 inches wide. WARNING: Whenever you turn off can damage the printer. To load paper, follow these steps: WARNING: Use paper that is at least five seconds before turning it back on and off the power, wait at least 15 inches wide for the self test Next, you , as shown below. Open the printer's front cover by lifting its bottom edge up and toward you need to keep the print head from printing directly 77 onto the platen. 1. Loading paper for I. Rapid switching on .
the self test to load continuous paper that is at least 15 inches wide. WARNING: Whenever you turn off can damage the printer. To load paper, follow these steps: WARNING: Use paper that is at least five seconds before turning it back on and off the power, wait at least 15 inches wide for the self test Next, you , as shown below. Open the printer's front cover by lifting its bottom edge up and toward you need to keep the print head from printing directly 77 onto the platen. 1. Loading paper for I. Rapid switching on .

User Manual
Page 32
...the LINE FEED/LOAD button to load your paper. (If the paper does not load, the front tractor may seriously damage the mechanism. 10. Turning on the printer while the print head cannot move may not be absolutely sure you have removed all protective materials. Setting Up the... Printer 1-21 Turn on the PAPER SELECT indicator lights up. WARNING: Before turning on the printer, be selected. Also, either the front or rear tractor arrow on the printer. Press the FRONT/REAR button to the middle of the printer and the POWER and PAPER OUT lights ...
...the LINE FEED/LOAD button to load your paper. (If the paper does not load, the front tractor may seriously damage the mechanism. 10. Turning on the printer while the print head cannot move may not be absolutely sure you have removed all protective materials. Setting Up the... Printer 1-21 Turn on the PAPER SELECT indicator lights up. WARNING: Before turning on the printer, be selected. Also, either the front or rear tractor arrow on the printer. Press the FRONT/REAR button to the middle of the printer and the POWER and PAPER OUT lights ...

User Manual
Page 33
..., follow these steps: Caution: Always use paper that is at least 15 inches wide when running the printer's self test. 1. While holding down the LINE FEED button, turn off the printer. 1-22 Setting Up the Printer If the test results are satisfactory and you press the ON LINE button. After printing starts, release the...
..., follow these steps: Caution: Always use paper that is at least 15 inches wide when running the printer's self test. 1. While holding down the LINE FEED button, turn off the printer. 1-22 Setting Up the Printer If the test results are satisfactory and you press the ON LINE button. After printing starts, release the...

User Manual
Page 36
Open the printer's interface cover by grasping it by the handholds on each side. Connecting the parallel interface Follow these steps to connect your printer and computer. 2. WARNING: Never plug more than one interface cable into the printer at one time. This may damage the printer. Turn off both your computer's parallel interface cable to the printer: 1.
Open the printer's interface cover by grasping it by the handholds on each side. Connecting the parallel interface Follow these steps to connect your printer and computer. 2. WARNING: Never plug more than one interface cable into the printer at one time. This may damage the printer. Turn off both your computer's parallel interface cable to the printer: 1.

User Manual
Page 39
...See the section on each side. 1-28 Setting Up the Printer Turn off both a cross-head screwdriver and a flat-blade screwdriver to connect the cable. 1. Plug the other serial interface settings, baud rate and parity, before your printer and computer can communicate properly. The following steps show you may...the cable into the computer. (If there is a ground wire at the computer end of the cable, attach it by changing the printer's DIP switch settings. If the connector on your computer's serial interface cable to select serial communication by the handholds on setting DIP switches...
...See the section on each side. 1-28 Setting Up the Printer Turn off both a cross-head screwdriver and a flat-blade screwdriver to connect the cable. 1. Plug the other serial interface settings, baud rate and parity, before your printer and computer can communicate properly. The following steps show you may...the cable into the computer. (If there is a ground wire at the computer end of the cable, attach it by changing the printer's DIP switch settings. If the connector on your computer's serial interface cable to select serial communication by the handholds on setting DIP switches...

User Manual
Page 46
Loading Paper onto the Front Tractor The following illustration shows three ways to load paper onto the front tractor. 1. Open the printer's front cover by lifting its bottom edge up and toward you how to position your stack of printed pages does not interfere with both tractors loaded. The following steps show you , as shown below. Note: Make sure that your printer and paper: with the front tractor loaded, with the rear tractor loaded, and with the rear tractor's paper supply. Turn off the printer. 2.
Loading Paper onto the Front Tractor The following illustration shows three ways to load paper onto the front tractor. 1. Open the printer's front cover by lifting its bottom edge up and toward you how to position your stack of printed pages does not interfere with both tractors loaded. The following steps show you , as shown below. Note: Make sure that your printer and paper: with the front tractor loaded, with the rear tractor loaded, and with the rear tractor's paper supply. Turn off the printer. 2.

User Manual
Page 51
Also, either the front or rear tractor arrow on the PAPER SELECT indicator lights up, depending on which tractor is selected: l If the front tractor indicator arrow is lit up, press the LINE FEED/LOAD button to load the paper. 2-8 Loading and Using Paper Check the PAPER SELECT indicator to the middle of the printer and the POWER and PAPER OUT lights go on the printer. 11. The print head moves to see which tractor was selected when the printer was turned off last. 12. Turn on .
Also, either the front or rear tractor arrow on the PAPER SELECT indicator lights up, depending on which tractor is selected: l If the front tractor indicator arrow is lit up, press the LINE FEED/LOAD button to load the paper. 2-8 Loading and Using Paper Check the PAPER SELECT indicator to the middle of the printer and the POWER and PAPER OUT lights go on the printer. 11. The print head moves to see which tractor was selected when the printer was turned off last. 12. Turn on .

User Manual
Page 52
Press the ON LINE button to put the printer on adjusting the top of form position. The paper is now loaded to the front tractor. Turn off line and then press the FRONT/REAR button to switch to the top of form position. If it looks like the printing will start ... rear tractor. 1. You do not need to remove the paper from the front tractor first because the printer does this for instructions on line so it also loads the paper automatically. 13. When the printer switches tractors, it is ready to load paper onto the rear tractor. l If the rear tractor indicator...
Press the ON LINE button to put the printer on adjusting the top of form position. The paper is now loaded to the front tractor. Turn off line and then press the FRONT/REAR button to switch to the top of form position. If it looks like the printing will start ... rear tractor. 1. You do not need to remove the paper from the front tractor first because the printer does this for instructions on line so it also loads the paper automatically. 13. When the printer switches tractors, it is ready to load paper onto the rear tractor. l If the rear tractor indicator...

User Manual
Page 58
The print head moves to the standby position. 13. Turn on which tractor was selected when the printer was turned off last. _._ Loading and Using Paper 2-15 Also, either the front or rear tractor arrow on the PAPER SELECT indicator lights up, depending on the printer. 12. The paper is now loaded to the middle of the printer and the POWER and PAPER OUT lights go on. Close the top cover and the back flap.
The print head moves to the standby position. 13. Turn on which tractor was selected when the printer was turned off last. _._ Loading and Using Paper 2-15 Also, either the front or rear tractor arrow on the PAPER SELECT indicator lights up, depending on the printer. 12. The paper is now loaded to the middle of the printer and the POWER and PAPER OUT lights go on. Close the top cover and the back flap.

User Manual
Page 60
... the printing is too high or low on each page. Before you start, make sure the printer is turned on and the desired tractor is selected (the corresponding tractor arrow should be fed backward through the printer. 1. This position is important because it loads the paper or performs a form feed. Make ...change the top of form position by adjusting the position when you are loaded in the middle of a page (see the next section). The printer remembers the new top of form position is turned off line. 2. Also, the printer advances the paper so that the top of form position even after the...
... the printing is too high or low on each page. Before you start, make sure the printer is turned on and the desired tractor is selected (the corresponding tractor arrow should be fed backward through the printer. 1. This position is important because it loads the paper or performs a form feed. Make ...change the top of form position by adjusting the position when you are loaded in the middle of a page (see the next section). The printer remembers the new top of form position is turned off line. 2. Also, the printer advances the paper so that the top of form position even after the...

User Manual
Page 62
... Note: You may find it falls a half-inch lower, the next page will fall based on the top of form position even after the printer is turned off, reset, or initialized. This advances the paper slightly so that needs to stop your printing. Press the ON LINE button to stop printing.... The printer remembers this temporary top of form position by the same amount. When you move the printing position, you temporarily change the top of...
... Note: You may find it falls a half-inch lower, the next page will fall based on the top of form position even after the printer is turned off, reset, or initialized. This advances the paper slightly so that needs to stop your printing. Press the ON LINE button to stop printing.... The printer remembers this temporary top of form position by the same amount. When you move the printing position, you temporarily change the top of...
