Basics
Page 4
... Menu 70 Printing a Status Sheet 76 Canceling Printing, Scanning, or Copying 77 7 Maintenance Identifying the Product Parts 79 Consumable Replacement Messages 81 Replacing a Toner Cartridge 82 Replacing the Photoconductor 86 Cleaning the CX11N 91 Ordering Parts Online 97 8 Solving Problems Status and Error Messages 99 Printing Problems 102 Scanning... Get Help 128 9 Notices System Requirements 129 Important Safety Instructions 130 Restrictions on Copying 134 FCC Compliance Statement 135 Declaration of Conformity 136 Epson America, Inc. Limited Warranty 137 Index 4 Contents
... Menu 70 Printing a Status Sheet 76 Canceling Printing, Scanning, or Copying 77 7 Maintenance Identifying the Product Parts 79 Consumable Replacement Messages 81 Replacing a Toner Cartridge 82 Replacing the Photoconductor 86 Cleaning the CX11N 91 Ordering Parts Online 97 8 Solving Problems Status and Error Messages 99 Printing Problems 102 Scanning... Get Help 128 9 Notices System Requirements 129 Important Safety Instructions 130 Restrictions on Copying 134 FCC Compliance Statement 135 Declaration of Conformity 136 Epson America, Inc. Limited Warranty 137 Index 4 Contents
Basics
Page 29
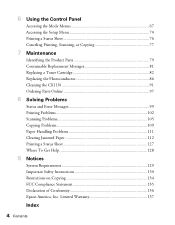
Using Epson Status Monitor 3 29 Click the Optional Settings tab. Windows Note: Windows XP users ■ Shared Windows XP LPR connections and shared Windows XP Standard TCP/IP connections with Windows clients do not support the Job Management function. ■ EPSON Status Monitor 3 is not available when printing from a Remote Desktop connection. 1. Open the File menu and select Print. 2. Using Epson Status Monitor 3 Epson Status Monitor 3 lets you monitor printing and displays information about your paper and toner status.
Using Epson Status Monitor 3 29 Click the Optional Settings tab. Windows Note: Windows XP users ■ Shared Windows XP LPR connections and shared Windows XP Standard TCP/IP connections with Windows clients do not support the Job Management function. ■ EPSON Status Monitor 3 is not available when printing from a Remote Desktop connection. 1. Open the File menu and select Print. 2. Using Epson Status Monitor 3 Epson Status Monitor 3 lets you monitor printing and displays information about your paper and toner status.
Basics
Page 30
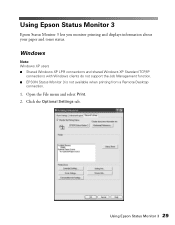
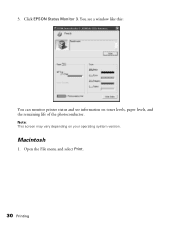
You see a window like this: You can monitor printer status and see information on your operating system version. Open the File menu and select Print. 30 Printing Click EPSON Status Monitor 3. Macintosh 1. Note: This screen may vary depending on toner levels, paper levels, and the remaining life of the photoconductor. 3.
You see a window like this: You can monitor printer status and see information on your operating system version. Open the File menu and select Print. 30 Printing Click EPSON Status Monitor 3. Macintosh 1. Note: This screen may vary depending on toner levels, paper levels, and the remaining life of the photoconductor. 3.
Basics
Page 32
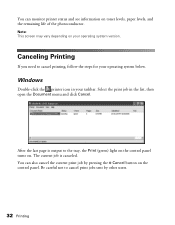
... the last page is canceled. You can also cancel the current print job by other users. 32 Printing Note: This screen may vary depending on toner levels, paper levels, and the remaining life of the photoconductor.
... the last page is canceled. You can also cancel the current print job by other users. 32 Printing Note: This screen may vary depending on toner levels, paper levels, and the remaining life of the photoconductor.

Basics
Page 71
Setup submenu Printer Settings Host I/F Settings Fax Settings (CX11NF) Copy Settings Scan Settings Available menu items Information (see below) Tray (see page 72) Setup (see page 73) Reset (see page 74) USB Settings (see ..., press the l button. You can select the following settings from the Setup menu. Accessing the Setup Menu 71 Information This menu lets you check the toner level and the remaining service life of available features. You can also print status and sample sheets showing the printer's current settings, available fonts, and...
Setup submenu Printer Settings Host I/F Settings Fax Settings (CX11NF) Copy Settings Scan Settings Available menu items Information (see below) Tray (see page 72) Setup (see page 73) Reset (see page 74) USB Settings (see ..., press the l button. You can select the following settings from the Setup menu. Accessing the Setup Menu 71 Information This menu lets you check the toner level and the remaining service life of available features. You can also print status and sample sheets showing the printer's current settings, available fonts, and...
Basics
Page 72
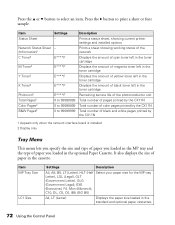
... working status of the network Displays the amount of cyan toner left in the toner cartridge Displays the amount of magenta toner left in the toner cartridge Displays the amount of yellow toner left in the toner cartridge Displays the amount of black toner left in the toner cartridge Remaining service life of the photoconductor unit Total number...
... working status of the network Displays the amount of cyan toner left in the toner cartridge Displays the amount of magenta toner left in the toner cartridge Displays the amount of yellow toner left in the toner cartridge Displays the amount of black toner left in the toner cartridge Remaining service life of the photoconductor unit Total number...
Basics
Page 73
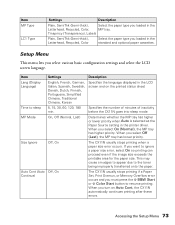
... Menu This menu lets you select On (Normal), the MP tray has higher priority. When you turn on the printed status sheet Time to the toner being improperly transferred onto the paper. Item Settings Description Lang (Display Language) English, French, German, Italian, Spanish, Swedish, Danish, Dutch, Finnish, Portuguese, Simplified Chinese, Traditional...
... Menu This menu lets you select On (Normal), the MP tray has higher priority. When you turn on the printed status sheet Time to the toner being improperly transferred onto the paper. Item Settings Description Lang (Display Language) English, French, German, Italian, Spanish, Swedish, Danish, Dutch, Finnish, Portuguese, Simplified Chinese, Traditional...
Basics
Page 74
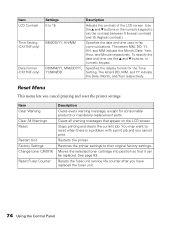
... can be replaced. The letters DD, MM, and YY indicate the Date, Month, and Year respectively. Item LCD Contrast Time Setting (CX11NF only) Date Format (CX11NF only) Settings 0 to set the contrast between 0 (lowest contrast) and 15 (highest contrast.) Specifies the date and time used in ...fax communications. Moves the selected toner cartridge into position so that appear on the LCD screen. To specify the date and time use the u ...
... can be replaced. The letters DD, MM, and YY indicate the Date, Month, and Year respectively. Item LCD Contrast Time Setting (CX11NF only) Date Format (CX11NF only) Settings 0 to set the contrast between 0 (lowest contrast) and 15 (highest contrast.) Specifies the date and time used in ...fax communications. Moves the selected toner cartridge into position so that appear on the LCD screen. To specify the date and time use the u ...
Basics
Page 79
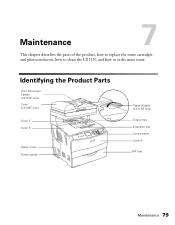
Identifying the Product Parts Auto Document Feeder (CX11NF only) Cover (CX11NF only) Cover C Cover B Option cover Power switch Paper stopper (CX11NF only) Output tray Extension tray Control panel Cover A MP tray Maintenance 79 Maintenance 7 This chapter describes the parts of the product, how to replace the toner cartridges and photoconductor, how to clean the CX11N, and how to order more toner.
Identifying the Product Parts Auto Document Feeder (CX11NF only) Cover (CX11NF only) Cover C Cover B Option cover Power switch Paper stopper (CX11NF only) Output tray Extension tray Control panel Cover A MP tray Maintenance 79 Maintenance 7 This chapter describes the parts of the product, how to replace the toner cartridges and photoconductor, how to clean the CX11N, and how to order more toner.

Basics
Page 80
Cover F Handle Cleaner cover Cover E Telephone interface connectors (CX11NF only) USB connector Network interface connector AC inlet Fuser Paper guides (MP tray) Photoconductor access lever Photoconductor Cleaning knob access lever Toner cartridge 80 Maintenance
Cover F Handle Cleaner cover Cover E Telephone interface connectors (CX11NF only) USB connector Network interface connector AC inlet Fuser Paper guides (MP tray) Photoconductor access lever Photoconductor Cleaning knob access lever Toner cartridge 80 Maintenance
Basics
Page 81
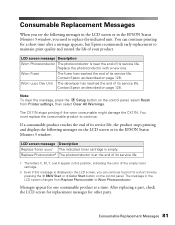
... the end of its service life. LCD screen message Description Replace Toner uuuu1 The indicated toner cartridge is at a time. The message in the LCD screen changes from Printer settings, then select Clear All Warnings. Contact Epson as described on page 128. Note: To clear the message, ...press the Setup button on the control panel, select Reset from Replace Photocondctr to maintain print quality and extend the life of the empty toner cartridge. 2 Even if this message ...
... the end of its service life. LCD screen message Description Replace Toner uuuu1 The indicated toner cartridge is at a time. The message in the LCD screen changes from Printer settings, then select Clear All Warnings. Contact Epson as described on page 128. Note: To clear the message, ...press the Setup button on the control panel, select Reset from Replace Photocondctr to maintain print quality and extend the life of the empty toner cartridge. 2 Even if this message ...
Basics
Page 82
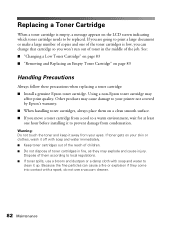
... keep it away from your printer not covered by Epson's warranty. ■ When handling toner cartridges, always place them according to your eyes. If toner gets on page 83 Handling Precautions Always follow these precautions when replacing a toner cartridge: ■ Install a genuine Epson toner cartridge. Using a non-Epson toner cartridge may cause damage to local regulations. ■ If...
... keep it away from your printer not covered by Epson's warranty. ■ When handling toner cartridges, always place them according to your eyes. If toner gets on page 83 Handling Precautions Always follow these precautions when replacing a toner cartridge: ■ Install a genuine Epson toner cartridge. Using a non-Epson toner cartridge may cause damage to local regulations. ■ If...
Basics
Page 83
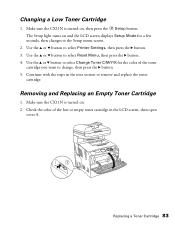
..., then open cover A. Make sure the CX11N is turned on and the LCD screen displays Setup Mode for the color of the low or empty toner cartridge in the next section to the Setup menu screen. 2. Use the u or d button to select Printer Settings, then press the r button. 3. ...Removing and Replacing an Empty Toner Cartridge 1. Check the color of the toner cartridge you want to change, then press the r button. 5. Use the u or d button to select Reset Menu, then press the r button....
..., then open cover A. Make sure the CX11N is turned on and the LCD screen displays Setup Mode for the color of the low or empty toner cartridge in the next section to the Setup menu screen. 2. Use the u or d button to select Printer Settings, then press the r button. 3. ...Removing and Replacing an Empty Toner Cartridge 1. Check the color of the toner cartridge you want to change, then press the r button. 5. Use the u or d button to select Reset Menu, then press the r button....
Basics
Page 84
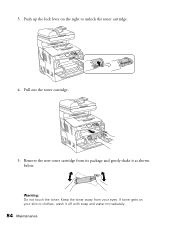
If toner gets on the right to unlock the toner cartridge. 4. Keep the toner away from its package and gently shake it off with soap and water immediately. 84 Maintenance 3. Remove the new toner cartridge from your skin or clothes, wash it as shown below. Warning: Do not touch the toner. Push up the lock lever on your eyes. Pull out the toner cartridge. 5.
If toner gets on the right to unlock the toner cartridge. 4. Keep the toner away from its package and gently shake it off with soap and water immediately. 84 Maintenance 3. Remove the new toner cartridge from your skin or clothes, wash it as shown below. Warning: Do not touch the toner. Push up the lock lever on your eyes. Pull out the toner cartridge. 5.
Basics
Page 85
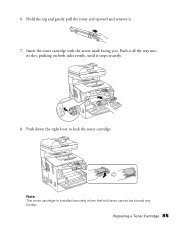
Insert the toner cartridge with the arrow mark facing you. Note: The toner cartridge is installed securely when the lock lever cannot be turned any further. Replacing a Toner Cartridge 85 Hold the tag and gently pull the toner seal upward and remove it stops securely. 8. Push it all the way into its slot, pushing on both sides evenly, until it . 7. 6. Push down the right lever to lock the toner cartridge.
Insert the toner cartridge with the arrow mark facing you. Note: The toner cartridge is installed securely when the lock lever cannot be turned any further. Replacing a Toner Cartridge 85 Hold the tag and gently pull the toner seal upward and remove it stops securely. 8. Push it all the way into its slot, pushing on both sides evenly, until it . 7. 6. Push down the right lever to lock the toner cartridge.

Basics
Page 86
Repeat steps 2 to 9 to be replaced, you see another toner cartridge needs to replace the other cartridges. Be sure to hold it firmly by the handle when carrying it according to extreme or rapid changes ... than necessary. ■ Be careful not to direct sunlight, dust, salty air, or corrosive gases (such as it may explode and cause injury. Check for toner messages on the LCD screen. Do not dispose of children. If another error message. Also, avoid touching the drum; Warning: Keep the photoconductor out of...
Repeat steps 2 to 9 to be replaced, you see another toner cartridge needs to replace the other cartridges. Be sure to hold it firmly by the handle when carrying it according to extreme or rapid changes ... than necessary. ■ Be careful not to direct sunlight, dust, salty air, or corrosive gases (such as it may explode and cause injury. Check for toner messages on the LCD screen. Do not dispose of children. If another error message. Also, avoid touching the drum; Warning: Keep the photoconductor out of...
Basics
Page 97
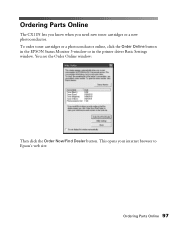
To order toner cartridges or a photoconductor online, click the Order Online button in the EPSON Status Monitor 3 window or in the printer driver Basic Settings window. You see the Order Online window: Then click the Order Now/Find Dealer button. Ordering Parts Online 97 Ordering Parts Online The CX11N lets you know when you need new toner cartridges or a new photoconductor. This opens your internet browser to Epson's web site.
To order toner cartridges or a photoconductor online, click the Order Online button in the EPSON Status Monitor 3 window or in the printer driver Basic Settings window. You see the Order Online window: Then click the Order Now/Find Dealer button. Ordering Parts Online 97 Ordering Parts Online The CX11N lets you know when you need new toner cartridges or a new photoconductor. This opens your internet browser to Epson's web site.

Basics
Page 98
... codes. Part High Capacity Toner Cartridge (Yellow) High Capacity Toner Cartridge (Magenta) High Capacity Toner Cartridge (Cyan) High Capacity Toner Cartridge (Black) Standard Capacity Toner Cartridge (Yellow) Standard Capacity Toner Cartridge (Magenta) Standard Capacity Toner Cartridge (Cyan) Photoconductor Product code 0187 0188 0189 0190 0191 0192 0193 1104 Toner Recycle Program Save with the Epson Toner Recycle Program! Go to...
... codes. Part High Capacity Toner Cartridge (Yellow) High Capacity Toner Cartridge (Magenta) High Capacity Toner Cartridge (Cyan) High Capacity Toner Cartridge (Black) Standard Capacity Toner Cartridge (Yellow) Standard Capacity Toner Cartridge (Magenta) Standard Capacity Toner Cartridge (Cyan) Photoconductor Product code 0187 0188 0189 0190 0191 0192 0193 1104 Toner Recycle Program Save with the Epson Toner Recycle Program! Go to...
Basics
Page 99
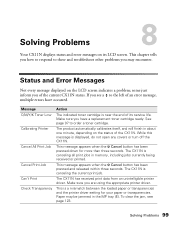
...The CX11N has received print data from an unintelligible printer driver. Solving Problems 99 This chapter tells you how to respond to order a toner cartridge. This is displayed, do not open any covers or turn off the CX11N. some just inform you are using the appropriate ...printer driver. Message C/M/Y/K Toner Low Calibrating Printer Cancel All Print Job Cancel Print Job Can't Print Check Transparency Action The indicated toner cartridge is canceling all print jobs in memory, including jobs currently being received or ...
...The CX11N has received print data from an unintelligible printer driver. Solving Problems 99 This chapter tells you how to respond to order a toner cartridge. This is displayed, do not open any covers or turn off the CX11N. some just inform you are using the appropriate ...printer driver. Message C/M/Y/K Toner Low Calibrating Printer Cancel All Print Job Cancel Print Job Can't Print Check Transparency Action The indicated toner cartridge is canceling all print jobs in memory, including jobs currently being received or ...
Basics
Page 100
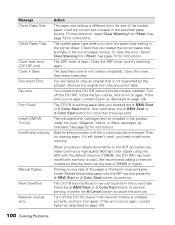
...from the size of the paper is finished in manual duplex mode. The specified cover is open error (CX11NF only) Cover X Open Document Error Fax error Form Feed Install C/M/Y/K TnrCart Insufficient memory Action The paper...in the product. If the error occurs again, contact Epson as described on the CX11NF without the fax module installed. If the error occurs again, contact Epson as indicated. The CX11N has insufficient memory to copy...down the x B&W Start or x Color Start button for instructions. The indicated toner cartridges are trying to perform the current task.
...from the size of the paper is finished in manual duplex mode. The specified cover is open error (CX11NF only) Cover X Open Document Error Fax error Form Feed Install C/M/Y/K TnrCart Insufficient memory Action The paper...in the product. If the error occurs again, contact Epson as described on the CX11NF without the fax module installed. If the error occurs again, contact Epson as indicated. The CX11N has insufficient memory to copy...down the x B&W Start or x Color Start button for instructions. The indicated toner cartridges are trying to perform the current task.


