Basics
Page 81
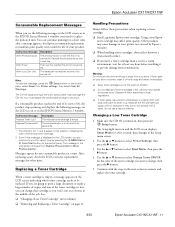
... the LCD screen or in the EPSON Status Monitor 3 window. Contact Epson as described on the control panel, select Reset from Replace Photocondctr to replace the indicated unit. If a consumable product reaches the end of your product. The message in the LCD screen, you need to Worn Photoconductor. Consumable Replacement Messages 81 Messages appear...
... the LCD screen or in the EPSON Status Monitor 3 window. Contact Epson as described on the control panel, select Reset from Replace Photocondctr to replace the indicated unit. If a consumable product reaches the end of your product. The message in the LCD screen, you need to Worn Photoconductor. Consumable Replacement Messages 81 Messages appear...

Basics
Page 139
...93 Color Balance 57 copy setting 38 EPSON Scan 56 to 58 Image Type setting 49 Management (Macintosh) ...... 25 Management (Windows) ........22 matching problems 108 Restoration 56 ColorSync 25 Consumables ordering 97 replacement messages 81 replacing photoconductor .......86 replacing toner 82 Contrast 38... Control panel Cancel button 77 Copy mode 68 copying 35 Fax mode 69 messages 81, 99 mode menus, accessing ...........67 Print mode 68 Reset menu 77 Scan mode 69 scanning...
...93 Color Balance 57 copy setting 38 EPSON Scan 56 to 58 Image Type setting 49 Management (Macintosh) ...... 25 Management (Windows) ........22 matching problems 108 Restoration 56 ColorSync 25 Consumables ordering 97 replacement messages 81 replacing photoconductor .......86 replacing toner 82 Contrast 38... Control panel Cancel button 77 Copy mode 68 copying 35 Fax mode 69 messages 81, 99 mode menus, accessing ...........67 Print mode 68 Reset menu 77 Scan mode 69 scanning...
Basics
Page 142
... .....33 to 34 problems 102 settings (Macintosh 26 settings (Windows 21 142 Index Problems color matching 108 copy quality 109 copying 109 EPSON Scan 106 paper handling 111 print quality 103 printing 102 scan quality 106 scanning 105 Product cleaning 91 parts 79 Professional Mode color, adjusting... 58 marquee, adjusting 54 previewing 51 resolution 50 scan area 51 scan size 59 selecting settings 46 to 61 R Replacing photoconductor 86 to 91 toner cartridges 82 to 86 Reset copy settings 41, 76 menu 74, 77 Resolution, selecting 50 Restrictions on copying 134 RGB color 38
... .....33 to 34 problems 102 settings (Macintosh 26 settings (Windows 21 142 Index Problems color matching 108 copy quality 109 copying 109 EPSON Scan 106 paper handling 111 print quality 103 printing 102 scan quality 106 scanning 105 Product cleaning 91 parts 79 Professional Mode color, adjusting... 58 marquee, adjusting 54 previewing 51 resolution 50 scan area 51 scan size 59 selecting settings 46 to 61 R Replacing photoconductor 86 to 91 toner cartridges 82 to 86 Reset copy settings 41, 76 menu 74, 77 Resolution, selecting 50 Restrictions on copying 134 RGB color 38
Product Information Guide
Page 9
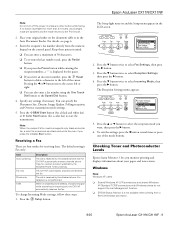
... in the LCD screen. 2. Press the d button twice to select Fax Settings, then press the r button. 3. Checking Toner and Photoconductor Levels Epson Status Monitor 3 lets you press the x Color Start button. Pressing the l or r button moves the cursor left of the mode ... a Remote Desktop connection. 8/05 Epson AcuLaser CX11N/CX11NF - 9 Press the u or d button to select the reception mode you enter an incorrect number, press the Reset button to delete a character to the Print mode. 2. For details, see page 6. 3. The call , the CX11NF automatically receives the fax. Press the...
... in the LCD screen. 2. Press the d button twice to select Fax Settings, then press the r button. 3. Checking Toner and Photoconductor Levels Epson Status Monitor 3 lets you press the x Color Start button. Pressing the l or r button moves the cursor left of the mode ... a Remote Desktop connection. 8/05 Epson AcuLaser CX11N/CX11NF - 9 Press the u or d button to select the reception mode you enter an incorrect number, press the Reset button to delete a character to the Print mode. 2. For details, see page 6. 3. The call , the CX11NF automatically receives the fax. Press the...
Product Information Guide
Page 11
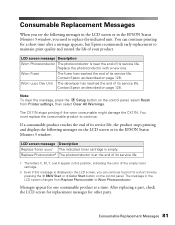
... Handling Precautions Always follow these precautions when replacing a toner cartridge: ❏ Install a genuine Epson toner cartridge. You must replace the consumable product to select Reset Menu, then press the r button. 4. LCD screen message Replace Toner uuuu1 Replace Photocondctr2 Description...to continue. Epson AcuLaser CX11N/CX11NF Consumable Replacement Messages When you see the following messages on the LCD screen or in the EPSON Status Monitor 3 window. You can cause a fire or explosion if they may affect print quality. LCD screen message Worn Photoconductor Worn Fuser...
... Handling Precautions Always follow these precautions when replacing a toner cartridge: ❏ Install a genuine Epson toner cartridge. You must replace the consumable product to select Reset Menu, then press the r button. 4. LCD screen message Replace Toner uuuu1 Replace Photocondctr2 Description...to continue. Epson AcuLaser CX11N/CX11NF Consumable Replacement Messages When you see the following messages on the LCD screen or in the EPSON Status Monitor 3 window. You can cause a fire or explosion if they may affect print quality. LCD screen message Worn Photoconductor Worn Fuser...
Start Here Card
Page 3
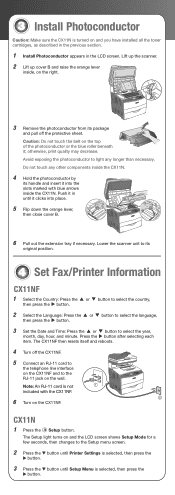
Avoid exposing the photoconductor to the Setup menu screen. 2 Press the ▼ button until Printer Settings is selected, then press the button. 3 Press the ▼ button until it clicks into the slots marked with the CX11NF. 6 Turn on the CX11NF. The CX11NF then resets itself and reboots. 4 Turn off the protective sheet. Note... than necessary. Push it ; Lift up the scanner. 2 Lift up cover B and raise the orange lever inside the CX11N. 4 Hold the photoconductor by its package and pull off the CX11NF. 5 Connect an RJ-11 cord to the telephone line interface on the top of the...
Avoid exposing the photoconductor to the Setup menu screen. 2 Press the ▼ button until Printer Settings is selected, then press the button. 3 Press the ▼ button until it clicks into the slots marked with the CX11NF. 6 Turn on the CX11NF. The CX11NF then resets itself and reboots. 4 Turn off the protective sheet. Note... than necessary. Push it ; Lift up the scanner. 2 Lift up cover B and raise the orange lever inside the CX11N. 4 Hold the photoconductor by its package and pull off the CX11NF. 5 Connect an RJ-11 cord to the telephone line interface on the top of the...
