ESC/VP Level 21 Communication Manual
Page 1
...to print out and use this downloading service. Copyright of using it. 3. Please read carefully the following "LICENSE AGREEMENT" before using the EPSON projector. I AGREE I DO NOT AGREE Please be downloaded until you agree to whether or not you could use only 1 set of the user... special, incidental and consequential damages incurred due to , and accept the terms of EPSON. 2. Downloading the User's Guide indicates your acceptance of the whole of the user's guide is owned by SEIKO EPSON Corporation (hereinafter referred to the "LICENSE AGREEMENT", please do not agree to as ...
...to print out and use this downloading service. Copyright of using it. 3. Please read carefully the following "LICENSE AGREEMENT" before using the EPSON projector. I AGREE I DO NOT AGREE Please be downloaded until you agree to whether or not you could use only 1 set of the user... special, incidental and consequential damages incurred due to , and accept the terms of EPSON. 2. Downloading the User's Guide indicates your acceptance of the whole of the user's guide is owned by SEIKO EPSON Corporation (hereinafter referred to the "LICENSE AGREEMENT", please do not agree to as ...

Installation Guide - ELPMBUNI Universal Mount Assembly
Page 2
... ...- 3 Contact Premier Mounts ...- 3 Warning Statements ...- 4 Parts List ...- 5 Installation Tools ...- 5 ELPMBUNI Universal Mount Assembly ...- 6 Projector Preparation ...- 7 Securing the Bracket to the Projector ...- 9 Leveling the Mounting bracket ...- 14 Securing the Upper Assembly Ceiling Plate...- 15 Low-Profile Installation ...- 16 Securing the... Projector to mounts, adapters, display equipment or personal injury. Warranty Limited Lifetime Warranty All Premier Mounts products...
... ...- 3 Contact Premier Mounts ...- 3 Warning Statements ...- 4 Parts List ...- 5 Installation Tools ...- 5 ELPMBUNI Universal Mount Assembly ...- 6 Projector Preparation ...- 7 Securing the Bracket to the Projector ...- 9 Leveling the Mounting bracket ...- 14 Securing the Upper Assembly Ceiling Plate...- 15 Low-Profile Installation ...- 16 Securing the... Projector to mounts, adapters, display equipment or personal injury. Warranty Limited Lifetime Warranty All Premier Mounts products...

Installation Guide - ELPMBUNI Universal Mount Assembly
Page 3
...Installation Manual WARNING: THE CEILING STRUCTURE MUST BE CAPABLE OF SUPPORTING A MAX WEIGHT OF 25 LBS., THE WEIGHT OF THE PROJECTOR. WARNING: PRIOR TO THE INSTALLATION OF THIS PRODUCT, THE INSTALLATION INSTRUCTIONS SHOULD BE READ AND COMPLETELY UNDERSTOOD. THE INSTALLATION INSTRUCTIONS ...PROPER SAFETY GEAR AND TOOLS FOR THE INSTALLATION PROCEDURE TO PREVENT PERSONAL INJURY. Indicates that contains wooden studs, dead center of the projector. Recommended mounting surfaces: wooden studs, solid-flat concrete, and reinforced metal studs. IF NOT, THE CEILING MUST BE REINFORCED. When...
...Installation Manual WARNING: THE CEILING STRUCTURE MUST BE CAPABLE OF SUPPORTING A MAX WEIGHT OF 25 LBS., THE WEIGHT OF THE PROJECTOR. WARNING: PRIOR TO THE INSTALLATION OF THIS PRODUCT, THE INSTALLATION INSTRUCTIONS SHOULD BE READ AND COMPLETELY UNDERSTOOD. THE INSTALLATION INSTRUCTIONS ...PROPER SAFETY GEAR AND TOOLS FOR THE INSTALLATION PROCEDURE TO PREVENT PERSONAL INJURY. Indicates that contains wooden studs, dead center of the projector. Recommended mounting surfaces: wooden studs, solid-flat concrete, and reinforced metal studs. IF NOT, THE CEILING MUST BE REINFORCED. When...

Installation Guide - ELPMBUNI Universal Mount Assembly
Page 4
... (Qty 4) M6 x 12mm Security Head Screws (Qty 4) Portable Drill Pencil Level (Supplied) Stud Finder (Commercially Available) M5 Allen Wrench NOTE: Mounting screws will vary by projector. Make sure that none of these parts are parts missing and/or damaged, please stop the installation and contact Premier Mounts (800-368-9700). If...
... (Qty 4) M6 x 12mm Security Head Screws (Qty 4) Portable Drill Pencil Level (Supplied) Stud Finder (Commercially Available) M5 Allen Wrench NOTE: Mounting screws will vary by projector. Make sure that none of these parts are parts missing and/or damaged, please stop the installation and contact Premier Mounts (800-368-9700). If...

Installation Guide - ELPMBUNI Universal Mount Assembly
Page 5
...the number of mounting points found on the bottom of single and dual legs together as single leg or any combination C of your projector for your G projector. ELPMBUNI A NOTE: The four (2-piece) leg assemblies can be used as shown in Options 1 and 2. K M J L... Plate D Allen Wrench E Height Adjustment Screws F Tension Knobs G Safety Knob H Security Screws I Leveling Barrels J Universal Mounting Bracket K Leg Assembly L Projector (Not Supplied) M Tri-Lock Opening Option 1 H B D F Combination I Leg Single Leg D Option 2 M NOTE: See the best configuration for filter and lamp...
...the number of mounting points found on the bottom of single and dual legs together as single leg or any combination C of your projector for your G projector. ELPMBUNI A NOTE: The four (2-piece) leg assemblies can be used as shown in Options 1 and 2. K M J L... Plate D Allen Wrench E Height Adjustment Screws F Tension Knobs G Safety Knob H Security Screws I Leveling Barrels J Universal Mounting Bracket K Leg Assembly L Projector (Not Supplied) M Tri-Lock Opening Option 1 H B D F Combination I Leg Single Leg D Option 2 M NOTE: See the best configuration for filter and lamp...

Installation Guide - ELPMBUNI Universal Mount Assembly
Page 6
... number of your final image on a smooth flat surface. 2. HANDLE WITH CARE AT ALL TIMES. NOTE: Review the projectors manufacture's operation manual and refer to these recommendations during your installation will normally find important reference information regarding installation dimensions such as...WARNING: Proper installation procedure by qualified personnel as (distance from the screen to the lens of the projector, top of the lens placement to . Mounting Points Inverted Projector Blanket, soft cloth etc Figure 1 Flat surface Installation Manual Page - 7 - Here you will ...
... number of your final image on a smooth flat surface. 2. HANDLE WITH CARE AT ALL TIMES. NOTE: Review the projectors manufacture's operation manual and refer to these recommendations during your installation will normally find important reference information regarding installation dimensions such as...WARNING: Proper installation procedure by qualified personnel as (distance from the screen to the lens of the projector, top of the lens placement to . Mounting Points Inverted Projector Blanket, soft cloth etc Figure 1 Flat surface Installation Manual Page - 7 - Here you will ...

Installation Guide - ELPMBUNI Universal Mount Assembly
Page 7
Next loosen the safety screw knurl knob far enough to allow the two parts to create free play between the bracket tri-lock assembly and the upper section tri-lock assembly points. 5. ELPMBUNI 4. Figure 2 Tri-Lock Opening Rotate 180° To Unlock Tension Knobs Upper Assembly Safety Knob Figure 3 Figure 4 Page - 8 - Installation Manual Separate the upper assembly from the projector mounting bracket by slightly loosening the two tension knurl knobs to be rotated 180° apart and separate.
Next loosen the safety screw knurl knob far enough to allow the two parts to create free play between the bracket tri-lock assembly and the upper section tri-lock assembly points. 5. ELPMBUNI 4. Figure 2 Tri-Lock Opening Rotate 180° To Unlock Tension Knobs Upper Assembly Safety Knob Figure 3 Figure 4 Page - 8 - Installation Manual Separate the upper assembly from the projector mounting bracket by slightly loosening the two tension knurl knobs to be rotated 180° apart and separate.

Installation Guide - ELPMBUNI Universal Mount Assembly
Page 8
... assembly screws must be loose in order to adjust the height of mounting legs. 2. Select the mounting hardware that your projector requires and loosely install the universal mount to your projector requires M3 mounting hardware. Insert the M3 x 16 Phillips screws with the M3 flat washers (supplied). ELPMBUNI Securing the...: The two-piece mounting legs are designed to allow routing of the legs around critical ventilation screens on the bottom of the projector and use the appropriate number of the mounting bracket. You may also reduce the two-piece leg to a one-piece leg as shown....
... assembly screws must be loose in order to adjust the height of mounting legs. 2. Select the mounting hardware that your projector requires and loosely install the universal mount to your projector requires M3 mounting hardware. Insert the M3 x 16 Phillips screws with the M3 flat washers (supplied). ELPMBUNI Securing the...: The two-piece mounting legs are designed to allow routing of the legs around critical ventilation screens on the bottom of the projector and use the appropriate number of the mounting bracket. You may also reduce the two-piece leg to a one-piece leg as shown....

Installation Guide - ELPMBUNI Universal Mount Assembly
Page 9
PowerLite 830p, 835p Hardware: M4 x 12mm (Qty 4) Installation Manual This mount works with all sub-25 pound projectors. ELPMBUNI NOTE: If your projector model is not shown, when arranging the leg combination, simply ensure access to filters and lamp housings when aligning brackets. PowerLite S3, S4, 62C, 76C, 82C, Hardware: M4 x 12mm (Qty 3) Page - 10 -
PowerLite 830p, 835p Hardware: M4 x 12mm (Qty 4) Installation Manual This mount works with all sub-25 pound projectors. ELPMBUNI NOTE: If your projector model is not shown, when arranging the leg combination, simply ensure access to filters and lamp housings when aligning brackets. PowerLite S3, S4, 62C, 76C, 82C, Hardware: M4 x 12mm (Qty 3) Page - 10 -

Installation Guide - ELPMBUNI Universal Mount Assembly
Page 13
... the Mount Figure 8 Leveling Barrels Page - 14 - CAUTION: Secure but do so will result in damaging the threads in the projector. ELPMBUNI Leveling the Mounting bracket 1. Rotate the leveling barrels to the projector then tighten the hex head leg screws with the Allen wrench (supplied) (Figure 8 and Figure 9). Installation Manual When the...
... the Mount Figure 8 Leveling Barrels Page - 14 - CAUTION: Secure but do so will result in damaging the threads in the projector. ELPMBUNI Leveling the Mounting bracket 1. Rotate the leveling barrels to the projector then tighten the hex head leg screws with the Allen wrench (supplied) (Figure 8 and Figure 9). Installation Manual When the...

Installation Guide - ELPMBUNI Universal Mount Assembly
Page 14
ELPMBUNI Securing the Upper Assembly Ceiling Plate 1. Review your projector's distance calculation to determine what distance is normally better to parallel with other ...to the front edge of the lens to a point centered horizontally on your screen and projector, make sure the mounting location will safely support the weight of the screen for best picture ratio. 2. Locate the... inverted projectors top of the lens point to determine the proper placement of the center of the screen). 3....
ELPMBUNI Securing the Upper Assembly Ceiling Plate 1. Review your projector's distance calculation to determine what distance is normally better to parallel with other ...to the front edge of the lens to a point centered horizontally on your screen and projector, make sure the mounting location will safely support the weight of the screen for best picture ratio. 2. Locate the... inverted projectors top of the lens point to determine the proper placement of the center of the screen). 3....

Installation Guide - ELPMBUNI Universal Mount Assembly
Page 17
... the three-knurl knobs are loosened to fully expose to the "tri-lock" mounting plate in the base of the upper assembly. 3. Carefully lift the projector and insert the mounting bracket mating special tri-lock cutout into the mating portion of the upper assembly. 2. The safety knob should line up with... bracket to prevent further rotation of the bracket in direct alignment with the alignment slot on the mounting bracket (Figure 13). Once inserted rotate the projector and mounting bracket 180° and secure the rear safety knob first to the tri-lock, then rotate the...
... the three-knurl knobs are loosened to fully expose to the "tri-lock" mounting plate in the base of the upper assembly. 3. Carefully lift the projector and insert the mounting bracket mating special tri-lock cutout into the mating portion of the upper assembly. 2. The safety knob should line up with... bracket to prevent further rotation of the bracket in direct alignment with the alignment slot on the mounting bracket (Figure 13). Once inserted rotate the projector and mounting bracket 180° and secure the rear safety knob first to the tri-lock, then rotate the...

Installation Guide - ELPMBUNI Universal Mount Assembly
Page 18
...signal supplied to the desired angle then firmly tighten the two M8 roll adjustment screws (Figure 16). To adjust the tilt angle of the projector, slightly loosen the side M8 screws and tilt to the desired angle to optimize the projected image. 2. If roll adjustment is achieved tighten... on the screen, slightly loosen the front and rear M8 screws and adjust to the projector you can be adjusted by slightly loosening the two 8mm height adjustment screws and raising or lowering the projector (Figure 14). 3. Wood Stud Ceiling Allen Wrench Height Adjustable Screws (Roll) Adjusting Screws...
...signal supplied to the desired angle then firmly tighten the two M8 roll adjustment screws (Figure 16). To adjust the tilt angle of the projector, slightly loosen the side M8 screws and tilt to the desired angle to optimize the projected image. 2. If roll adjustment is achieved tighten... on the screen, slightly loosen the front and rear M8 screws and adjust to the projector you can be adjusted by slightly loosening the two 8mm height adjustment screws and raising or lowering the projector (Figure 14). 3. Wood Stud Ceiling Allen Wrench Height Adjustable Screws (Roll) Adjusting Screws...

Product Brochure
Page 1
...Power-on with amazing color and detail • HDTV-ready - provides a replacement projector, typically within 24 hours • Epson PrivateLine® dedicated toll-free support line available from 6 a.m. PST Monday -...projector in the office or at home • Easily transported to 6 p.m. Photo Mode with both traditional and widescreen formats (native 4:3 or 16:9 resize) • Seven selectable color modes including: - Epson PowerLite® S4 Versatility, value and outstanding performance. use with black-and-white enhancement levels to watch your next presentation Epson 3LCD...
...Power-on with amazing color and detail • HDTV-ready - provides a replacement projector, typically within 24 hours • Epson PrivateLine® dedicated toll-free support line available from 6 a.m. PST Monday -...projector in the office or at home • Easily transported to 6 p.m. Photo Mode with both traditional and widescreen formats (native 4:3 or 16:9 resize) • Seven selectable color modes including: - Epson PowerLite® S4 Versatility, value and outstanding performance. use with black-and-white enhancement levels to watch your next presentation Epson 3LCD...

Product Brochure
Page 2
...carrying case, CD-ROM, Quick Setup Sheet, PrivateLine support card, password protection sticker Product/Accessory Part Numbers Epson PowerLite S4 projector Replacement lamp Air filter set (2 filters) Universal ceiling mount Suspension adapter False ceiling plate Adjustable ceiling channel...ELPKC19 ELPSV01 ELPKS35-S ELPKS43 ELPKS54 ELPSC06 ELPSC07 ELPSC08 ELPSC09 V12H162020 ELPSL01 Support - Epson PowerLite S4 Specifications Projection System Epson 3LCD technology Projection Method Front/rear/ceiling mount LCD Driving method Pixel number Native resolution Aspect ratio Pixel arrangement...
...carrying case, CD-ROM, Quick Setup Sheet, PrivateLine support card, password protection sticker Product/Accessory Part Numbers Epson PowerLite S4 projector Replacement lamp Air filter set (2 filters) Universal ceiling mount Suspension adapter False ceiling plate Adjustable ceiling channel...ELPKC19 ELPSV01 ELPKS35-S ELPKS43 ELPKS54 ELPSC06 ELPSC07 ELPSC08 ELPSC09 V12H162020 ELPSL01 Support - Epson PowerLite S4 Specifications Projection System Epson 3LCD technology Projection Method Front/rear/ceiling mount LCD Driving method Pixel number Native resolution Aspect ratio Pixel arrangement...

Product Information Guide
Page 1
Epson PowerLite S4 Projector Parts Lamp cover Control panel Focus ring Ventilation slots Lens cover Infrared receiver Foot release button Adjustable foot (for raising projector) Monitor Out port Computer port S-Video port Video port USB port Audio input AC power inlet Adjustable foot (for leveling projector) Speaker Infrared receiver Menu button (displays on-screen menu) Power button... Range 20 feet (6 meters) Battery AAA × 2 Dimensions Height Width Depth Weight 3.4 inches (87 mm) 12.9 inches (327 mm) 9.7 inches (247 mm) 5.7 lb (2.6 kg) 6/06 Epson PowerLite S4 - 1
Epson PowerLite S4 Projector Parts Lamp cover Control panel Focus ring Ventilation slots Lens cover Infrared receiver Foot release button Adjustable foot (for raising projector) Monitor Out port Computer port S-Video port Video port USB port Audio input AC power inlet Adjustable foot (for leveling projector) Speaker Infrared receiver Menu button (displays on-screen menu) Power button... Range 20 feet (6 meters) Battery AAA × 2 Dimensions Height Width Depth Weight 3.4 inches (87 mm) 12.9 inches (327 mm) 9.7 inches (247 mm) 5.7 lb (2.6 kg) 6/06 Epson PowerLite S4 - 1

Product Information Guide
Page 2
... 16:9 NTSC PAL, SECAM 800 × 600 800 × 600 800 × 450 800 × 450 It may be supported with the projector. Computer Signal Refresh Rate (Hz) Resolution (dots) Resized display resolution (dots) VGA 60 VGAEGA 70 640 × 480 640 × 350 800... 1080 800 × 600 800 × 450 800 × 450 * Connection is not possible if the equipment does not have a VGA output port. 2 - Epson PowerLite S4 Electrical Rated frequency 50/60 Hz Power supply 100 to 120 V: 2.2 A 200 to 240 V: 1.0 A Power consumption Operating: 250 W Standby: 5 W Environmental Temperature...
... 16:9 NTSC PAL, SECAM 800 × 600 800 × 600 800 × 450 800 × 450 It may be supported with the projector. Computer Signal Refresh Rate (Hz) Resolution (dots) Resized display resolution (dots) VGA 60 VGAEGA 70 640 × 480 640 × 350 800... 1080 800 × 600 800 × 450 800 × 450 * Connection is not possible if the equipment does not have a VGA output port. 2 - Epson PowerLite S4 Electrical Rated frequency 50/60 Hz Power supply 100 to 120 V: 2.2 A 200 to 240 V: 1.0 A Power consumption Operating: 250 W Standby: 5 W Environmental Temperature...
Product Information Guide
Page 3
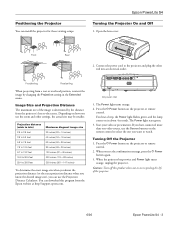
... orange. 4. The Power light stays green. 5. Start your video or presentation. When you can install the projector for these viewing setups: Epson PowerLite S4 Turning the Projector On and Off 1. Front Rear 2. Depending on how you want to the projector and plug the other settings, the actual size may be smaller. Projection distance (wide to tele...
... orange. 4. The Power light stays green. 5. Start your video or presentation. When you can install the projector for these viewing setups: Epson PowerLite S4 Turning the Projector On and Off 1. Front Rear 2. Depending on how you want to the projector and plug the other settings, the actual size may be smaller. Projection distance (wide to tele...
Product Information Guide
Page 4
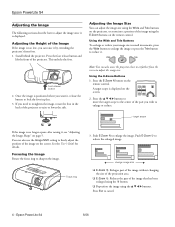
...it by extending the projector's front foot. 1. Press the E-Zoom z button on the screen. Using the Wide and Tele Buttons To enlarge or reduce your image size in the back of the image on the remote control. Adjusting the Height of the Image If the image is displayed. Epson PowerLite S4 Adjusting the Image... The following sections describe how to reduce it. Using the E-Zoom Buttons 1. Epson PowerLite S4 6/06
...it by extending the projector's front foot. 1. Press the E-Zoom z button on the screen. Using the Wide and Tele Buttons To enlarge or reduce your image size in the back of the image on the remote control. Adjusting the Height of the Image If the image is displayed. Epson PowerLite S4 Adjusting the Image... The following sections describe how to reduce it. Using the E-Zoom Buttons 1. Epson PowerLite S4 6/06

Product Information Guide
Page 5
...images. If the connected source has an sRGB mode, set both the projector and the connected source to view the video in a dark room. ❏ Game Excels at emphasizing dark gradations. Epson PowerLite S4 Adjusting the Image Shape To avoid projecting with a distorted image shape, ...make the adjustment. Make sure the projector faces the screen squarely. Photos that are seven color modes. This corrects ...
...images. If the connected source has an sRGB mode, set both the projector and the connected source to view the video in a dark room. ❏ Game Excels at emphasizing dark gradations. Epson PowerLite S4 Adjusting the Image Shape To avoid projecting with a distorted image shape, ...make the adjustment. Make sure the projector faces the screen squarely. Photos that are seven color modes. This corrects ...


