ESC/VP Level 21 Communication Manual
Page 1
...the following "LICENSE AGREEMENT" before using the EPSON projector. The User's Guide shall not be downloaded until you could use this user's guide. You may change or modify this downloading service. You expressly acknowledge and agree that EPSON may not duplicate, reprint, modify or send ...damages incurred due to the "LICENSE AGREEMENT", please do not utilize this user's guide without the prior written consent of the "LICENSE AGREEMENT". EPSON shall not be forewarned that use only 1 set of using it. 3. LICENSE AGREEMENT 1. I AGREE I DO NOT AGREE Please read ...
...the following "LICENSE AGREEMENT" before using the EPSON projector. The User's Guide shall not be downloaded until you could use this user's guide. You may change or modify this downloading service. You expressly acknowledge and agree that EPSON may not duplicate, reprint, modify or send ...damages incurred due to the "LICENSE AGREEMENT", please do not utilize this user's guide without the prior written consent of the "LICENSE AGREEMENT". EPSON shall not be forewarned that use only 1 set of using it. 3. LICENSE AGREEMENT 1. I AGREE I DO NOT AGREE Please read ...

Installation Guide - ELPMBUNI Universal Mount Assembly
Page 2
......- 3 Contact Premier Mounts ...- 3 Warning Statements ...- 4 Parts List ...- 5 Installation Tools ...- 5 ELPMBUNI Universal Mount Assembly ...- 6 Projector Preparation ...- 7 Securing the Bracket to the Projector ...- 9 Leveling the Mounting bracket ...- 14 Securing the Upper Assembly Ceiling Plate...- 15 Low-Profile Installation ...- 16 Securing the... Projector to mounts, adapters, display equipment or personal injury. Warranty Limited Lifetime Warranty All Premier Mounts products...
......- 3 Contact Premier Mounts ...- 3 Warning Statements ...- 4 Parts List ...- 5 Installation Tools ...- 5 ELPMBUNI Universal Mount Assembly ...- 6 Projector Preparation ...- 7 Securing the Bracket to the Projector ...- 9 Leveling the Mounting bracket ...- 14 Securing the Upper Assembly Ceiling Plate...- 15 Low-Profile Installation ...- 16 Securing the... Projector to mounts, adapters, display equipment or personal injury. Warranty Limited Lifetime Warranty All Premier Mounts products...

Installation Guide - ELPMBUNI Universal Mount Assembly
Page 3
...installed on a structure that is to be confirmed prior to installation. A secure structure must be disconnected from dropping or mishandling the projector. Injury and/or damage can result from the power outlet. WARNING: PRIOR TO THE INSTALLATION OF THIS PRODUCT, THE INSTALLATION INSTRUCTIONS SHOULD... SAFETY GEAR AND TOOLS FOR THE INSTALLATION PROCEDURE TO PREVENT PERSONAL INJURY. Do not install on any surface other source of the projector. Failure to be taken at all times. WARNING: SAFETY MEASURES MUST BE PRACTICED AT ALL TIMES DURING THE INSTALLATION OF THIS ...
...installed on a structure that is to be confirmed prior to installation. A secure structure must be disconnected from dropping or mishandling the projector. Injury and/or damage can result from the power outlet. WARNING: PRIOR TO THE INSTALLATION OF THIS PRODUCT, THE INSTALLATION INSTRUCTIONS SHOULD... SAFETY GEAR AND TOOLS FOR THE INSTALLATION PROCEDURE TO PREVENT PERSONAL INJURY. Do not install on any surface other source of the projector. Failure to be taken at all times. WARNING: SAFETY MEASURES MUST BE PRACTICED AT ALL TIMES DURING THE INSTALLATION OF THIS ...

Installation Guide - ELPMBUNI Universal Mount Assembly
Page 4
... (Qty 4) M6 x 12mm Security Head Screws (Qty 4) Portable Drill Pencil Level (Supplied) Stud Finder (Commercially Available) M5 Allen Wrench NOTE: Mounting screws will vary by projector. Make sure that none of these parts are parts missing and/or damaged, please stop the installation and contact Premier Mounts (800-368-9700). Installation...
... (Qty 4) M6 x 12mm Security Head Screws (Qty 4) Portable Drill Pencil Level (Supplied) Stud Finder (Commercially Available) M5 Allen Wrench NOTE: Mounting screws will vary by projector. Make sure that none of these parts are parts missing and/or damaged, please stop the installation and contact Premier Mounts (800-368-9700). Installation...

Installation Guide - ELPMBUNI Universal Mount Assembly
Page 5
...number of mounting points found on the bottom of single and dual legs together as single leg or any combination C of your projector for your G projector. K M J L J L Installation Manual ELPMBUNI Universal Mount Assembly A Single Wooden Stud Mounting Points B Solid Structure Mounting Points...Wrench E Height Adjustment Screws F Tension Knobs G Safety Knob H Security Screws I Leveling Barrels J Universal Mounting Bracket K Leg Assembly L Projector (Not Supplied) M Tri-Lock Opening Option 1 H B D F Combination I Leg Single Leg D Option 2 M NOTE: See the best configuration for filter...
...number of mounting points found on the bottom of single and dual legs together as single leg or any combination C of your projector for your G projector. K M J L J L Installation Manual ELPMBUNI Universal Mount Assembly A Single Wooden Stud Mounting Points B Solid Structure Mounting Points...Wrench E Height Adjustment Screws F Tension Knobs G Safety Knob H Security Screws I Leveling Barrels J Universal Mounting Bracket K Leg Assembly L Projector (Not Supplied) M Tri-Lock Opening Option 1 H B D F Combination I Leg Single Leg D Option 2 M NOTE: See the best configuration for filter...

Installation Guide - ELPMBUNI Universal Mount Assembly
Page 6
...of your final image on a smooth flat surface. 2. NOTE: Review the projectors manufacture's operation manual and refer to . Identify the number of mounting points and screw thread (pitch) size. 3. Most projectors have either three or four mounting points and are M4 in serious personal injury...result in thread size (Figure 1). HANDLE WITH CARE AT ALL TIMES. ELPMBUNI Projector Preparation WARNING: Proper installation procedure by qualified personnel as (distance from the screen to the lens of the projector, top of the lens placement to the top screen etc. Adherence to these...
...of your final image on a smooth flat surface. 2. NOTE: Review the projectors manufacture's operation manual and refer to . Identify the number of mounting points and screw thread (pitch) size. 3. Most projectors have either three or four mounting points and are M4 in serious personal injury...result in thread size (Figure 1). HANDLE WITH CARE AT ALL TIMES. ELPMBUNI Projector Preparation WARNING: Proper installation procedure by qualified personnel as (distance from the screen to the lens of the projector, top of the lens placement to the top screen etc. Adherence to these...

Installation Guide - ELPMBUNI Universal Mount Assembly
Page 7
Installation Manual Separate the upper assembly from the projector mounting bracket by slightly loosening the two tension knurl knobs to be rotated 180° apart and separate. Next loosen the safety screw knurl knob far enough to allow the two parts to create free play between the bracket tri-lock assembly and the upper section tri-lock assembly points. 5. ELPMBUNI 4. Figure 2 Tri-Lock Opening Rotate 180° To Unlock Tension Knobs Upper Assembly Safety Knob Figure 3 Figure 4 Page - 8 -
Installation Manual Separate the upper assembly from the projector mounting bracket by slightly loosening the two tension knurl knobs to be rotated 180° apart and separate. Next loosen the safety screw knurl knob far enough to allow the two parts to create free play between the bracket tri-lock assembly and the upper section tri-lock assembly points. 5. ELPMBUNI 4. Figure 2 Tri-Lock Opening Rotate 180° To Unlock Tension Knobs Upper Assembly Safety Knob Figure 3 Figure 4 Page - 8 -

Installation Guide - ELPMBUNI Universal Mount Assembly
Page 8
... and loosely install the universal mount to allow routing of the legs around critical ventilation screens on the bottom of the projector and use the appropriate number of the mounting bracket. Insert the M3 x 16 Phillips screws with the M3 flat washers (supplied). Page - 9 - Use the M3 x ... A). You may also reduce the two-piece leg to a one-piece leg as shown. Locate the mounting points on the base of the projector as shown for a better overall fit to adjust the height of mounting legs. 2. NOTE: The levelers and leg assembly screws must be loose in order ...
... and loosely install the universal mount to allow routing of the legs around critical ventilation screens on the bottom of the projector and use the appropriate number of the mounting bracket. Insert the M3 x 16 Phillips screws with the M3 flat washers (supplied). Page - 9 - Use the M3 x ... A). You may also reduce the two-piece leg to a one-piece leg as shown. Locate the mounting points on the base of the projector as shown for a better overall fit to adjust the height of mounting legs. 2. NOTE: The levelers and leg assembly screws must be loose in order ...

Installation Guide - ELPMBUNI Universal Mount Assembly
Page 9
PowerLite S3, S4, 62C, 76C, 82C, Hardware: M4 x 12mm (Qty 3) Page - 10 - This mount works with all sub-25 pound projectors. PowerLite 830p, 835p Hardware: M4 x 12mm (Qty 4) Installation Manual ELPMBUNI NOTE: If your projector model is not shown, when arranging the leg combination, simply ensure access to filters and lamp housings when aligning brackets.
PowerLite S3, S4, 62C, 76C, 82C, Hardware: M4 x 12mm (Qty 3) Page - 10 - This mount works with all sub-25 pound projectors. PowerLite 830p, 835p Hardware: M4 x 12mm (Qty 4) Installation Manual ELPMBUNI NOTE: If your projector model is not shown, when arranging the leg combination, simply ensure access to filters and lamp housings when aligning brackets.

Installation Guide - ELPMBUNI Universal Mount Assembly
Page 13
Failure to the projector then tighten the hex head leg screws with the Allen wrench (supplied) (Figure 8 and Figure 9). Allen Wrench Level Inverted Projector DOWN UP Adjusting the Mount Figure 8 Leveling Barrels Page - 14 - ELPMBUNI Leveling the Mounting bracket 1. Installation ...Manual CAUTION: Secure but do so will result in damaging the threads in the projector. When the position desired is achieved tighten the mounting hardware to do not over-tighten the mounting hardware. Rotate the leveling barrels ...
Failure to the projector then tighten the hex head leg screws with the Allen wrench (supplied) (Figure 8 and Figure 9). Allen Wrench Level Inverted Projector DOWN UP Adjusting the Mount Figure 8 Leveling Barrels Page - 14 - ELPMBUNI Leveling the Mounting bracket 1. Installation ...Manual CAUTION: Secure but do so will result in damaging the threads in the projector. When the position desired is achieved tighten the mounting hardware to do not over-tighten the mounting hardware. Rotate the leveling barrels ...

Installation Guide - ELPMBUNI Universal Mount Assembly
Page 14
... of the wood stud. NOTE: Make sure to measure from the front of the lens to determine the proper placement of the center of the projector. Page - 15 - Review your screen and projector, make sure the mounting location will safely support the weight of the upper assembly. Before you mount your... projector's distance calculation to determine what distance is normally better to have the top edge of the lens point to the ceiling or wall. 5. NOTE: If ...
... of the wood stud. NOTE: Make sure to measure from the front of the lens to determine the proper placement of the center of the projector. Page - 15 - Review your screen and projector, make sure the mounting location will safely support the weight of the upper assembly. Before you mount your... projector's distance calculation to determine what distance is normally better to have the top edge of the lens point to the ceiling or wall. 5. NOTE: If ...

Installation Guide - ELPMBUNI Universal Mount Assembly
Page 17
...the "tri-lock" mounting plate in the upper assembly. 4. NOTE: Follow the number sequence prior to securing the projector to the Upper Assembly 1. Carefully lift the projector and insert the mounting bracket mating special tri-lock cutout into the mating portion of the upper assembly. 2. The ...on the mounting bracket (Figure 13). Safety Knurl Knob Tension Knurl Knobs Figure 13 Tri-Lock Opening Alignment Slot Projector Mount Installation Manual Once inserted rotate the projector and mounting bracket 180° and secure the rear safety knob first to the tri-lock, then rotate ...
...the "tri-lock" mounting plate in the upper assembly. 4. NOTE: Follow the number sequence prior to securing the projector to the Upper Assembly 1. Carefully lift the projector and insert the mounting bracket mating special tri-lock cutout into the mating portion of the upper assembly. 2. The ...on the mounting bracket (Figure 13). Safety Knurl Knob Tension Knurl Knobs Figure 13 Tri-Lock Opening Alignment Slot Projector Mount Installation Manual Once inserted rotate the projector and mounting bracket 180° and secure the rear safety knob first to the tri-lock, then rotate ...

Installation Guide - ELPMBUNI Universal Mount Assembly
Page 18
... 15 Wood Stud Ceiling Tilt Adjusting Screws Allen Wrench Wood Stud Ceiling Figure 16 Page - 19 - To adjust the tilt angle of the projector, slightly loosen the side M8 screws and tilt to the desired angle to the desired angle then firmly tighten the two M8 roll adjustment screws... (Figure 16). If roll adjustment is achieved tighten the two screws. 4. ELPMBUNI Final Adjustments 1. With the projector secured in the mount and power on the screen, slightly loosen the front and rear M8 screws and adjust to the screen and firmly tighten...
... 15 Wood Stud Ceiling Tilt Adjusting Screws Allen Wrench Wood Stud Ceiling Figure 16 Page - 19 - To adjust the tilt angle of the projector, slightly loosen the side M8 screws and tilt to the desired angle to the desired angle then firmly tighten the two M8 roll adjustment screws... (Figure 16). If roll adjustment is achieved tighten the two screws. 4. ELPMBUNI Final Adjustments 1. With the projector secured in the mount and power on the screen, slightly loosen the front and rear M8 screws and adjust to the screen and firmly tighten...

Product Brochure
Page 1
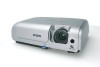
... - Epson PowerLite® S4 Versatility, value and outstanding performance. Ultra bright 1800 ANSI lumens; PST Monday - and under a minute.) • International warranty in the office or at home • Easily transported to watch your home or office • Convenient, lightweight projector - ...video games with black-and-white enhancement levels to quickly cool the projector in S-Video high performance, low profile Presentation Mode to automatically optimize your next presentation Epson 3LCD technology for outstanding image quality and performance • 3-chip engine ...
... - Epson PowerLite® S4 Versatility, value and outstanding performance. Ultra bright 1800 ANSI lumens; PST Monday - and under a minute.) • International warranty in the office or at home • Easily transported to watch your home or office • Convenient, lightweight projector - ...video games with black-and-white enhancement levels to quickly cool the projector in S-Video high performance, low profile Presentation Mode to automatically optimize your next presentation Epson 3LCD technology for outstanding image quality and performance • 3-chip engine ...

Product Brochure
Page 2
...soft carrying case, CD-ROM, Quick Setup Sheet, PrivateLine support card, password protection sticker Product/Accessory Part Numbers Epson PowerLite S4 projector Replacement lamp Air filter set (2 filters) Universal ceiling mount Suspension adapter False ceiling plate Adjustable ceiling channel (... usage. All other product and brand names are service marks of their respective companies. Epson PowerLite S4 Specifications Projection System Epson 3LCD technology Projection Method Front/rear/ceiling mount LCD Driving method Pixel number Native resolution Aspect ratio Pixel arrangement...
...soft carrying case, CD-ROM, Quick Setup Sheet, PrivateLine support card, password protection sticker Product/Accessory Part Numbers Epson PowerLite S4 projector Replacement lamp Air filter set (2 filters) Universal ceiling mount Suspension adapter False ceiling plate Adjustable ceiling channel (... usage. All other product and brand names are service marks of their respective companies. Epson PowerLite S4 Specifications Projection System Epson 3LCD technology Projection Method Front/rear/ceiling mount LCD Driving method Pixel number Native resolution Aspect ratio Pixel arrangement...

Product Information Guide
Page 1
Epson PowerLite S4 Projector Parts Lamp cover Control panel Focus ring Ventilation slots Lens cover Infrared receiver Foot release button Adjustable foot (for raising projector) Monitor Out port Computer port S-Video port Video port USB port Audio input AC power inlet Adjustable foot (for leveling projector) Speaker Infrared receiver Menu button (displays on-screen menu) Power button... Range 20 feet (6 meters) Battery AAA × 2 Dimensions Height Width Depth Weight 3.4 inches (87 mm) 12.9 inches (327 mm) 9.7 inches (247 mm) 5.7 lb (2.6 kg) 6/06 Epson PowerLite S4 - 1
Epson PowerLite S4 Projector Parts Lamp cover Control panel Focus ring Ventilation slots Lens cover Infrared receiver Foot release button Adjustable foot (for raising projector) Monitor Out port Computer port S-Video port Video port USB port Audio input AC power inlet Adjustable foot (for leveling projector) Speaker Infrared receiver Menu button (displays on-screen menu) Power button... Range 20 feet (6 meters) Battery AAA × 2 Dimensions Height Width Depth Weight 3.4 inches (87 mm) 12.9 inches (327 mm) 9.7 inches (247 mm) 5.7 lb (2.6 kg) 6/06 Epson PowerLite S4 - 1

Product Information Guide
Page 2
...Class B (DoC) UL60950 Third Edition ICES-003 Class B CSA C22.2 No. 60950 ) Compatible Video Formats The projector supports the video formats listed in the following tables. Epson PowerLite S4 6/06 See your computer documentation for details. Component Video Signal SDTV (480i) (D1) SDTV (576i) SDTV (...215; 600 800 × 600 800 × 450 800 × 450 It may be set at a refresh rate that's compatible with such signals. Epson PowerLite S4 Electrical Rated frequency 50/60 Hz Power supply 100 to 120 V: 2.2 A 200 to 240 V: 1.0 A Power consumption Operating: 250 W Standby: 5...
...Class B (DoC) UL60950 Third Edition ICES-003 Class B CSA C22.2 No. 60950 ) Compatible Video Formats The projector supports the video formats listed in the following tables. Epson PowerLite S4 6/06 See your computer documentation for details. Component Video Signal SDTV (480i) (D1) SDTV (576i) SDTV (...215; 600 800 × 600 800 × 450 800 × 450 It may be set at a refresh rate that's compatible with such signals. Epson PowerLite S4 Electrical Rated frequency 50/60 Hz Power supply 100 to 120 V: 2.2 A 200 to 240 V: 1.0 A Power consumption Operating: 250 W Standby: 5...
Product Information Guide
Page 3
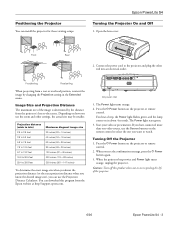
... position, reorient the image by the distance from the projector's lens to watch. Image Size and Projection Distance The maximum size of the projector. 6/06 Epson PowerLite S4 - 3 Depending on the remote control to select the one you can install the projector for these viewing setups: Epson PowerLite S4 Turning the Projector On and Off 1. You can download this product...
... position, reorient the image by the distance from the projector's lens to watch. Image Size and Projection Distance The maximum size of the projector. 6/06 Epson PowerLite S4 - 3 Depending on the remote control to select the one you can install the projector for these viewing setups: Epson PowerLite S4 Turning the Projector On and Off 1. You can download this product...
Product Information Guide
Page 4
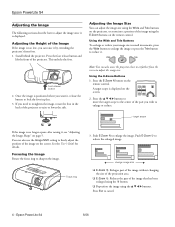
... it is displayed. Press the E-Zoom z button on the screen. Focusing the Image Rotate the focus ring to raise or lower the side. Epson PowerLite S4 6/06 See the User's Guide for details. Press Esc to enlarge the image. Push E-Zoom z to cancel. 4 - change image size ...using the z button. ❏ Reposition the image using the E-Zoom buttons on the screen. 2. Stand behind the projector. Using the E-Zoom Buttons 1. Epson PowerLite S4 Adjusting the Image The following sections describe how to adjust the image size. Adjusting the Height of the Image If the...
... it is displayed. Press the E-Zoom z button on the screen. Focusing the Image Rotate the focus ring to raise or lower the side. Epson PowerLite S4 6/06 See the User's Guide for details. Press Esc to enlarge the image. Push E-Zoom z to cancel. 4 - change image size ...using the z button. ❏ Reposition the image using the E-Zoom buttons on the screen. 2. Stand behind the projector. Using the E-Zoom Buttons 1. Epson PowerLite S4 Adjusting the Image The following sections describe how to adjust the image size. Adjusting the Height of the Image If the...

Product Information Guide
Page 5
...16:9 wide-screen format. 6/06 Epson PowerLite S4 - 5 Ideal for the image and current conditions. If your video source is 16:9, you need to press the Enter button on the projector to a maximum of the image is performed. Make sure the projector faces the screen squarely. Turn off... room. Photos that are seven color modes. If the connected source has an sRGB mode, set both the projector and the connected source to adjust the shape. Epson PowerLite S4 Adjusting the Image Shape To avoid projecting with a distorted image shape, make the adjustment. If you 're projecting...
...16:9 wide-screen format. 6/06 Epson PowerLite S4 - 5 Ideal for the image and current conditions. If your video source is 16:9, you need to press the Enter button on the projector to a maximum of the image is performed. Make sure the projector faces the screen squarely. Turn off... room. Photos that are seven color modes. If the connected source has an sRGB mode, set both the projector and the connected source to adjust the shape. Epson PowerLite S4 Adjusting the Image Shape To avoid projecting with a distorted image shape, make the adjustment. If you 're projecting...


