
Technical Brief (Impact Printers)
Page 5
.... 1.22 Copyright (C) SEIKO EPSON CORP. 1992 Printer: FX-2180 Mode: ESC/P Port: LPT1 Font : Roman Pitch : 10CPI Print Quality : LQ Character Table : PC 437 Continuous Rear : 11 inch Continuous Rear : 8.5mm Continuous Front : 7 inch Continuous Front : 8.5mm CutSheetFeeder 1 : 11 inch CutSheetFeeder 1 : 8.5mm CutSheetFeeder 2 : 11 inch CutSheetFeeder 2 : 8.5mm Manual Rear : 14 inch Manual Rear : 8.5mm Help: Select...
.... 1.22 Copyright (C) SEIKO EPSON CORP. 1992 Printer: FX-2180 Mode: ESC/P Port: LPT1 Font : Roman Pitch : 10CPI Print Quality : LQ Character Table : PC 437 Continuous Rear : 11 inch Continuous Rear : 8.5mm Continuous Front : 7 inch Continuous Front : 8.5mm CutSheetFeeder 1 : 11 inch CutSheetFeeder 1 : 8.5mm CutSheetFeeder 2 : 11 inch CutSheetFeeder 2 : 8.5mm Manual Rear : 14 inch Manual Rear : 8.5mm Help: Select...
Product Information Guide
Page 23
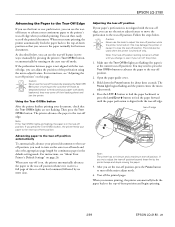
... perforation using the micro adjust feature. Tear off edge. When you can save the paper normally lost between pages is in two ways: manually by pressing the printer's Tear Off/Bin button, or automatically by pressing the Tear Off/ Bin button or turning on the auto tear-off mode as described.../Bin button. Caution: Never use the knob to the tear-off position whenever it receives a full page of -form position and begins printing. 2/99 EPSON LQ-2180 - 23 The Pause light begins flashing and the printer enters the micro adjust mode. 4. You can then easily tear off position while the...
... perforation using the micro adjust feature. Tear off edge. When you can save the paper normally lost between pages is in two ways: manually by pressing the printer's Tear Off/Bin button, or automatically by pressing the Tear Off/ Bin button or turning on the auto tear-off mode as described.../Bin button. Caution: Never use the knob to the tear-off position whenever it receives a full page of -form position and begins printing. 2/99 EPSON LQ-2180 - 23 The Pause light begins flashing and the printer enters the micro adjust mode. 4. You can then easily tear off position while the...
Product Information Guide
Page 29
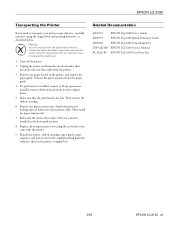
.... EPSON LQ-2180 Transporting the Printer If you have just used the printer, the print head may be hot; Unplug the power cord from the electrical outlet; Then remove the ribbon cartridge. 6. Then install the paper tension unit. 7. Related Documentation 4009592 EPSON LQ-2180 User's Guide 4009593 EPSON LQ-2180 Quick Reference Guide 4009602 EPSON LQ-2180 Unpacking sheet TM-LQ2180 EPSON LQ-2180 Service Manual PL-LQ2180 EPSON LQ-2180...
.... EPSON LQ-2180 Transporting the Printer If you have just used the printer, the print head may be hot; Unplug the power cord from the electrical outlet; Then remove the ribbon cartridge. 6. Then install the paper tension unit. 7. Related Documentation 4009592 EPSON LQ-2180 User's Guide 4009593 EPSON LQ-2180 Quick Reference Guide 4009602 EPSON LQ-2180 Unpacking sheet TM-LQ2180 EPSON LQ-2180 Service Manual PL-LQ2180 EPSON LQ-2180...

User Manual
Page 132
... LQ-2180 printer on a network, you when printer errors occur, and provides troubleshooting instructions when needed. About the EPSON Status Monitor 2 Utility The EPSON Status Monitor 2 utility comes with your printer but is available only for use the Status Monitor utility that comes with Microsoft Windows 95/98. See the manual that comes with the printer driver when the printer...
... LQ-2180 printer on a network, you when printer errors occur, and provides troubleshooting instructions when needed. About the EPSON Status Monitor 2 Utility The EPSON Status Monitor 2 utility comes with your printer but is available only for use the Status Monitor utility that comes with Microsoft Windows 95/98. See the manual that comes with the printer driver when the printer...
Service Manual
Page 8
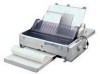
... need to attach the optional interface adapter (C82525*) to the LQ-2170 Service Manual. 1.1.1 Features † Printing speed „ High speed draft: 480 cps „ Draft: 360 cps „ LQ: 120 cps (at 10 cpi) † Character tables &#...printer carton Table 1-1. Items Included in the Printer Items Part Number Ribbon cartridge S015086 Ribbon pack S010033 † Optional items: Additional items are mostly common except for the LQ-2180's improved features such as printing speed and copy capability, the information included in the Printer Items Quantity User's manual...
... need to attach the optional interface adapter (C82525*) to the LQ-2170 Service Manual. 1.1.1 Features † Printing speed „ High speed draft: 480 cps „ Draft: 360 cps „ LQ: 120 cps (at 10 cpi) † Character tables &#...printer carton Table 1-1. Items Included in the Printer Items Part Number Ribbon cartridge S015086 Ribbon pack S010033 † Optional items: Additional items are mostly common except for the LQ-2180's improved features such as printing speed and copy capability, the information included in the Printer Items Quantity User's manual...
Service Manual
Page 9
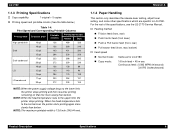
NOTE: The maximum printable width is 13.6 inch (345.44 mm). NOTE: When the head temperature rises to LQ-2180. For the rest of the specifications, see the LQ-2170 Service Manual. † Feeding method „ Friction feed (front, rear) „ Push tractor feed (front lever) &#... only describes the release lever setting, adjust lever setting, and some other specifications which are specific to the upper limit, the printer stops printing. LQ-2180 1.1.3 Printing Specifications † Copy capability: 1 original + 5 copies † Printing speed and printable column (See the table...
NOTE: The maximum printable width is 13.6 inch (345.44 mm). NOTE: When the head temperature rises to LQ-2180. For the rest of the specifications, see the LQ-2170 Service Manual. † Feeding method „ Friction feed (front, rear) „ Push tractor feed (front lever) &#... only describes the release lever setting, adjust lever setting, and some other specifications which are specific to the upper limit, the printer stops printing. LQ-2180 1.1.3 Printing Specifications † Copy capability: 1 original + 5 copies † Printing speed and printable column (See the table...

Service Manual
Page 10
Release Lever Settings Lever Position Paper path / Feeder Paper / Media Manual insertion (front) Cut sheet (Single sheet & Multi part), Card Friction Manual insertion (rear) CSF Bin 1 Cut sheet (Single sheet & Multi part), Card, Envelope Cut sheet (Single sheet & Multi part), Card, Envelops CSF Bin 2 Cut sheet (Single ... 0.0157 over 0.36 up to 0.40 6 0.0157 0.0173 over 0.40 up to 0.44 7 0.0173 0.0181 over 0.44 up to 0.46 Product Description Specifications 10 Table 1-5. LQ-2180 † Release lever: See the following table.
Release Lever Settings Lever Position Paper path / Feeder Paper / Media Manual insertion (front) Cut sheet (Single sheet & Multi part), Card Friction Manual insertion (rear) CSF Bin 1 Cut sheet (Single sheet & Multi part), Card, Envelope Cut sheet (Single sheet & Multi part), Card, Envelops CSF Bin 2 Cut sheet (Single ... 0.0157 over 0.36 up to 0.40 6 0.0157 0.0173 over 0.40 up to 0.44 7 0.0173 0.0181 over 0.44 up to 0.46 Product Description Specifications 10 Table 1-5. LQ-2180 † Release lever: See the following table.

Service Manual
Page 15
For information on other items, see the LQ-2170 Service Manual. † Input voltage range „ 120 V version: AC 99 to 132 V „ 230 V version: AC 198 to 264 V (same...-3-2 EN61000-3-3 EN50082-1 IEC801-2 IEC801-3 IEC801-4 † Acoustic noise: Approximately 54 db(A) (ISO 7779 pattern) Product Description Specifications 15 LQ-2180 Revision A 1.1.6 Electrical Specifications The electrical specifications for the LQ-2180 is the same as for the LQ-2170 † Rated current „ 120 V version: 1.0 A (maximum = 4.0 A) „ 230 V version: 0.5 A (maximum = 2.0 A) &#...
For information on other items, see the LQ-2170 Service Manual. † Input voltage range „ 120 V version: AC 99 to 132 V „ 230 V version: AC 198 to 264 V (same...-3-2 EN61000-3-3 EN50082-1 IEC801-2 IEC801-3 IEC801-4 † Acoustic noise: Approximately 54 db(A) (ISO 7779 pattern) Product Description Specifications 15 LQ-2180 Revision A 1.1.6 Electrical Specifications The electrical specifications for the LQ-2180 is the same as for the LQ-2170 † Rated current „ 120 V version: 1.0 A (maximum = 4.0 A) „ 230 V version: 0.5 A (maximum = 2.0 A) &#...
Service Manual
Page 18
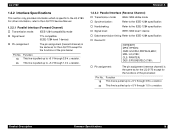
...PRINTER; Function 18 This line is pulled up to +5 V through 3.9 k Ω resistor. 35 This line is specific to the LQ-2180. CMD: ESCPL2,PRPXL24,BDC; LQ-2180 Revision A 1.2.2 Interface Specifications This section only provides information which is pulled up to +5 V through 1.0 k Ω resistor. MDL: LQ-2180; For other information, refer to the LQ-2170 Service Manual... This line is the same as for the LQ-2170 except for the functions of the pins below : Pin No. Product Description Firmware Specifications 18 DES: EPSON[SP]LQ-2180; † Pin assignment: The pin assignment ...
...PRINTER; Function 18 This line is pulled up to +5 V through 3.9 k Ω resistor. 35 This line is specific to the LQ-2180. CMD: ESCPL2,PRPXL24,BDC; LQ-2180 Revision A 1.2.2 Interface Specifications This section only provides information which is pulled up to +5 V through 1.0 k Ω resistor. MDL: LQ-2180; For other information, refer to the LQ-2170 Service Manual... This line is the same as for the LQ-2170 except for the functions of the pins below : Pin No. Product Description Firmware Specifications 18 DES: EPSON[SP]LQ-2180; † Pin assignment: The pin assignment ...
Service Manual
Page 19
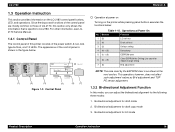
...layout and functions of the control panel are mostly common to LQ-2180. Bi-directional adjustment for draft copy mode 3. For other information, see LQ2170 Service Manual. 1.3.1 Control Panel The control panel of LQ-2170, this section only shows the information that is shown ...at Power On No. The appearance of the power switch, 6 non-lock type buttons, and 10 LEDs. LQ-2180 Revision A 1.3 Operation Instruction This section provides information on the printer while pressing panel buttons executes the functions below . Bi-directional adjustment for ribbon change timing 7 (6) Bi-d ...
...layout and functions of the control panel are mostly common to LQ-2180. Bi-directional adjustment for draft copy mode 3. For other information, see LQ2170 Service Manual. 1.3.1 Control Panel The control panel of LQ-2170, this section only shows the information that is shown ...at Power On No. The appearance of the power switch, 6 non-lock type buttons, and 10 LEDs. LQ-2180 Revision A 1.3 Operation Instruction This section provides information on the printer while pressing panel buttons executes the functions below . Bi-directional adjustment for ribbon change timing 7 (6) Bi-d ...

Service Manual
Page 20
...30 Tear-off adjustment value 0 clear 31 Other font selection Roman T 32 Bin select Friction Bin 1 or Tractor not Tear off 33 Manual insertion wait time 2 or 3 sec. 34 Tear-off Off Revision A Table 1-17. Item Factory setting 21 Skip over perforation Off ... data BUSY 40 Paper edge length 0 clear 41 Page length (rear manual insertion) 22 inch 42 Page length (front manual insertion) 22 inch Product Description Operation Instruction 20 G. Initialization Area for EERPOM (2/2) No. LQ-2180 1.3.3 EEPROM Initialization Areas reset by EEPROM clear operation (described in Section...
...30 Tear-off adjustment value 0 clear 31 Other font selection Roman T 32 Bin select Friction Bin 1 or Tractor not Tear off 33 Manual insertion wait time 2 or 3 sec. 34 Tear-off Off Revision A Table 1-17. Item Factory setting 21 Skip over perforation Off ... data BUSY 40 Paper edge length 0 clear 41 Page length (rear manual insertion) 22 inch 42 Page length (front manual insertion) 22 inch Product Description Operation Instruction 20 G. Initialization Area for EERPOM (2/2) No. LQ-2180 1.3.3 EEPROM Initialization Areas reset by EEPROM clear operation (described in Section...

Service Manual
Page 31
Revision A Disassembly and Assembly 31 LQ-2180 The contents of the chapter "Disassembly and Assembly" is the same as for the LQ-2170 Service Manual.
Revision A Disassembly and Assembly 31 LQ-2180 The contents of the chapter "Disassembly and Assembly" is the same as for the LQ-2170 Service Manual.
Service Manual
Page 33
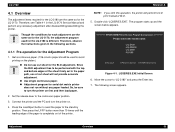
... 4-1 in the paper path, use cut sheet will perform Uni-D print instead of the sheet firmly set in the LQ-2170 Service Manual and perform any paper loaded. C A U T IO N Though the conditions for each adjustment are the same as for the...: If you omit this operation, the printer will not provide accurate adjustment. „ Use single continuous paper. „ Adjustment program for the LQ-2170. LQ-2180 Revision A 4.1 Overview The adjustment items required for the LQ-2180 are the same as for serial dot matrix printer does not run without any necessary adjustment ...
... 4-1 in the paper path, use cut sheet will perform Uni-D print instead of the sheet firmly set in the LQ-2170 Service Manual and perform any paper loaded. C A U T IO N Though the conditions for each adjustment are the same as for the...: If you omit this operation, the printer will not provide accurate adjustment. „ Use single continuous paper. „ Adjustment program for the LQ-2170. LQ-2180 Revision A 4.1 Overview The adjustment items required for the LQ-2180 are the same as for serial dot matrix printer does not run without any necessary adjustment ...

Service Manual
Page 40
...Troubleshooting Information This section gives you troubleshooting information to let you troubleshoot the printer. Other sensors See the LQ-2170 Service Manual. 5.2.3 Motors The motor test points are the same as for the LQ-2170. 5.2.4 Error Codes with Indicators and Buzzer The Error codes with ... for the LQ2170. CN16 (Release sensor 2) 1: Release 2 Same as for CN12 2: GND See the LQ-2170 Service Manual. The change made for LQ-2180 is the same as for the LQ-2170. Sensor Test Points Sensor Connector Number Test Pin Number Test method Meter reading CN12 (Release sensor 1)...
...Troubleshooting Information This section gives you troubleshooting information to let you troubleshoot the printer. Other sensors See the LQ-2170 Service Manual. 5.2.3 Motors The motor test points are the same as for the LQ-2170. 5.2.4 Error Codes with Indicators and Buzzer The Error codes with ... for the LQ2170. CN16 (Release sensor 2) 1: Release 2 Same as for CN12 2: GND See the LQ-2170 Service Manual. The change made for LQ-2180 is the same as for the LQ-2170. Sensor Test Points Sensor Connector Number Test Pin Number Test method Meter reading CN12 (Release sensor 1)...

Service Manual
Page 45
Revision A Maintenance 45 LQ-2180 The contents of the chapter "Maintenance" is the same as for the LQ-2170 Service Manual.
Revision A Maintenance 45 LQ-2180 The contents of the chapter "Maintenance" is the same as for the LQ-2170 Service Manual.

Service Manual
Page 47
... Map This chapter provides EEPROM Address Map for LQ-2180 and component layouts and circuit diagram for front tractor 1CH Font selection 1 to higher address. EEPROM Address Map (1/7) Address Data Data Format Q-pit Factory data ..., by 1/360 inch) (8.5 mm) (8.5 mm) 14H, 15H TOF adjustment -60 to 360 (4.2 mm to 8.5 value for rear manual mm + 1 inch, by 1/360 inch) insertion 0000H 0000H (8.5 mm) (8.5 mm) 16H, 17H TOF adjustment value for front manual insertion -60 to 360 (4.2 mm to 8.5 0000H 0000H mm + 1 inch, by 1/360 inch) (8.5 mm) (8.5 mm) 18H...
... Map This chapter provides EEPROM Address Map for LQ-2180 and component layouts and circuit diagram for front tractor 1CH Font selection 1 to higher address. EEPROM Address Map (1/7) Address Data Data Format Q-pit Factory data ..., by 1/360 inch) (8.5 mm) (8.5 mm) 14H, 15H TOF adjustment -60 to 360 (4.2 mm to 8.5 value for rear manual mm + 1 inch, by 1/360 inch) insertion 0000H 0000H (8.5 mm) (8.5 mm) 16H, 17H TOF adjustment value for front manual insertion -60 to 360 (4.2 mm to 8.5 0000H 0000H mm + 1 inch, by 1/360 inch) (8.5 mm) (8.5 mm) 18H...

Service Manual
Page 49
...of 42H) FFH FFH 44H to (reserved) 5DH 00H 00H 5EH, Paper edge length 5FH 0000H 0000H 60H, 61H Page length for rear manual insertion 1 to 22x360 (by 1/360 inch), 0000H: 22 inch (the default) 0000H 0000H (22 inch) (22 inch) 62H, 63H Page length ...mode. (same as 3 sec when copy mode. Driving Line Count 0 - 0FFFFFFFFH (count) 3BH 000000 000000 00H 00H Revision A Table 7-6. LQ-2180 Table 7-5. adjustment b7: (reserved) 00H 00H 2BH Manual insertion wait time 3 to Sub-number for ribbon change timing 0 - 0FFFFFFFFH (count) 000000 000000 00H 00H 34H-37H Driving Hour 0 - ...
...of 42H) FFH FFH 44H to (reserved) 5DH 00H 00H 5EH, Paper edge length 5FH 0000H 0000H 60H, 61H Page length for rear manual insertion 1 to 22x360 (by 1/360 inch), 0000H: 22 inch (the default) 0000H 0000H (22 inch) (22 inch) 62H, 63H Page length ...mode. (same as 3 sec when copy mode. Driving Line Count 0 - 0FFFFFFFFH (count) 3BH 000000 000000 00H 00H Revision A Table 7-6. LQ-2180 Table 7-5. adjustment b7: (reserved) 00H 00H 2BH Manual insertion wait time 3 to Sub-number for ribbon change timing 0 - 0FFFFFFFFH (count) 000000 000000 00H 00H 34H-37H Driving Hour 0 - ...


