
Product Information Guide
Page 11
...this chapter. paper thickness lever 5 4 3 2 1 0 -1 6 7 Use the following table to set the paper thickness lever one position lower to improve print quality. For details, see the sections on a shiny backing sheet properly. Do not try to print on single sheets with labels ...with a tractor feeder. For best results with labels, requires a straight or almost straight paper path. EPSON LQ-2180 Paper Thickness Lever Positions Setting the paper thickness lever allows the printer to accommodate various thicknesses of up to 0.035 inch (0.9 mm) for the perforated edges. The paper...
...this chapter. paper thickness lever 5 4 3 2 1 0 -1 6 7 Use the following table to set the paper thickness lever one position lower to improve print quality. For details, see the sections on a shiny backing sheet properly. Do not try to print on single sheets with labels ...with a tractor feeder. For best results with labels, requires a straight or almost straight paper path. EPSON LQ-2180 Paper Thickness Lever Positions Setting the paper thickness lever allows the printer to accommodate various thicknesses of up to 0.035 inch (0.9 mm) for the perforated edges. The paper...

Product Information Guide
Page 18
EPSON LQ-2180 2. Set the paper release lever to load continuous paper onto the pull tractor as shown... open both ends of your paper, but do not lock it in the pull position. 2. Push up and off the printer. Also set the paper thickness lever to lock it . Slide the left sprocket to make sure that a tractor is removed...place. 3. Caution: Do not load continuous paper with labels in the front or bottom slot, if possible; Lower the tractor into the printer's mounting slots and press down both sprocket covers. 7. Move the paper support midway between the two sprockets as ...
EPSON LQ-2180 2. Set the paper release lever to load continuous paper onto the pull tractor as shown... open both ends of your paper, but do not lock it in the pull position. 2. Push up and off the printer. Also set the paper thickness lever to lock it . Slide the left sprocket to make sure that a tractor is removed...place. 3. Caution: Do not load continuous paper with labels in the front or bottom slot, if possible; Lower the tractor into the printer's mounting slots and press down both sprocket covers. 7. Move the paper support midway between the two sprockets as ...

Product Information Guide
Page 21
... the continuous paper backward to check and change the printer driver settings. To replace the paper tension unit, lower it automatically loads the paper and starts printing. then tear off your printed document before switching to remove or reload paper. Switching to printing on ; EPSON LQ-2180 12. You may cause a paper jam. After you...
... the continuous paper backward to check and change the printer driver settings. To replace the paper tension unit, lower it automatically loads the paper and starts printing. then tear off your printed document before switching to remove or reload paper. Switching to printing on ; EPSON LQ-2180 12. You may cause a paper jam. After you...

Product Information Guide
Page 25
separator EPSON LQ-2180 9. ribbon guide ribbon-tightening knob 7. Fit the two front notches (c) of the ribbon cartridge over the small pegs on the printer (c) and then lowering the cover until both ends click into the slots on each side of the ribbon cartridge (c) and insert it firmly over the ...behind the print head. Then lay the cartridge flat so that it clicks into place (d). 2/99 EPSON LQ-2180 - 25 Make sure the ribbon is in step 9. Lift the ribbon guide of the printer as shown in place behind the print head (d). After you remove the new ribbon cartridge from the...
separator EPSON LQ-2180 9. ribbon guide ribbon-tightening knob 7. Fit the two front notches (c) of the ribbon cartridge over the small pegs on the printer (c) and then lowering the cover until both ends click into the slots on each side of the ribbon cartridge (c) and insert it firmly over the ...behind the print head. Then lay the cartridge flat so that it clicks into place (d). 2/99 EPSON LQ-2180 - 25 Make sure the ribbon is in step 9. Lift the ribbon guide of the printer as shown in place behind the print head (d). After you remove the new ribbon cartridge from the...

Product Information Guide
Page 28
...the printer to turn on the printer. 3. Remove the paper guide. Keep the printer cover in place and lower the paper guide cover until it receives in hexadecimal format. Contact an EPSON ...case or paper guide is needed. these chemicals can damage the printer components as well as control codes, are represented by dots. If characters are printable, they appear in the right column as...Caution: Never use a hard or abrasive brush. EPSON LQ-2180 Printing a Hex Dump If you are an experienced user or a programmer, you turn off the printer, wait at least five seconds before turning it ...
...the printer to turn on the printer. 3. Remove the paper guide. Keep the printer cover in place and lower the paper guide cover until it receives in hexadecimal format. Contact an EPSON ...case or paper guide is needed. these chemicals can damage the printer components as well as control codes, are represented by dots. If characters are printable, they appear in the right column as...Caution: Never use a hard or abrasive brush. EPSON LQ-2180 Printing a Hex Dump If you are an experienced user or a programmer, you turn off the printer, wait at least five seconds before turning it ...
Service Manual
Page 9
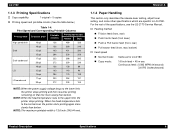
... 3.6 IPS (inches/second) Product Description Specifications 9 NOTE: When the head temperature rises to the normal level, the printer starts printing again more slowly than before . LQ-2180 1.1.3 Printing Specifications † Copy capability: 1 original + 5 copies † Printing speed and printable column (See... power supply voltage drops to LQ-2180. Revision A 1.1.4 Paper Handling This section only describes the release lever setting, adjust lever setting, and some other specifications which are specific to the lower limit, the printer stops printing and then resumes printing...
... 3.6 IPS (inches/second) Product Description Specifications 9 NOTE: When the head temperature rises to the normal level, the printer starts printing again more slowly than before . LQ-2180 1.1.3 Printing Specifications † Copy capability: 1 original + 5 copies † Printing speed and printable column (See... power supply voltage drops to LQ-2180. Revision A 1.1.4 Paper Handling This section only describes the release lever setting, adjust lever setting, and some other specifications which are specific to the lower limit, the printer stops printing and then resumes printing...

Service Manual
Page 21
LQ-2180 1.4 Main Components The main components for LQ-2180 Main Components 21 Main Components for the LQ-2180 are designed for easy disassembly and repair work. † C272MAIN Board † C165 PSB/PSE Board † C165 PNL Board † Printer Mechanism † Housing (upper and lower cases) Revision A Product Description Figure 1-3. They are as follows.
LQ-2180 1.4 Main Components The main components for LQ-2180 Main Components 21 Main Components for the LQ-2180 are designed for easy disassembly and repair work. † C272MAIN Board † C165 PSB/PSE Board † C165 PNL Board † Printer Mechanism † Housing (upper and lower cases) Revision A Product Description Figure 1-3. They are as follows.

Service Manual
Page 27
As the temperature drops to the printhead slightly depending on the condition. Printhead Drive Circuit Operating Principles Control Circuit 27 LQ-2180 2.1.3 Printhead Driver Circuit Printhead drive begins with the current. Also, when a high-duty job is in process, the temperature inside the ...into energy used to the board, which may damage the coil. As a result, the printer can output image at a normal speed when the temperature lowers to the transistor. This function enables the printer to change the period of time for each transistor to ground the current so the voltage ...
As the temperature drops to the printhead slightly depending on the condition. Printhead Drive Circuit Operating Principles Control Circuit 27 LQ-2180 2.1.3 Printhead Driver Circuit Printhead drive begins with the current. Also, when a high-duty job is in process, the temperature inside the ...into energy used to the board, which may damage the coil. As a result, the printer can output image at a normal speed when the temperature lowers to the transistor. This function enables the printer to change the period of time for each transistor to ground the current so the voltage ...

Service Manual
Page 36
... turned on or paper is turned off the printer. 4.1.3 TPE Level Reset Make this program, you can continue without turning off . Y es No E S C :P r e v io u s U P /D o w n :S e le c t E N T E R :D e te r m in a photo sensor lowers with age. Perform the pre-operation. (See Section 4.1.1.) 2. L Q -2 1 8 0 S E R V IC E P R O G R A M V e r s io n 1 .0 < R e s e t T o p p a p e r a n... Generally, light level emitted from the photo diode in e Figure 4-7. LQ-2180 Revision A 6. When this reason, the printer renews the current paper remaining level by . Select "Yes" and press...
... turned on or paper is turned off the printer. 4.1.3 TPE Level Reset Make this program, you can continue without turning off . Y es No E S C :P r e v io u s U P /D o w n :S e le c t E N T E R :D e te r m in a photo sensor lowers with age. Perform the pre-operation. (See Section 4.1.1.) 2. L Q -2 1 8 0 S E R V IC E P R O G R A M V e r s io n 1 .0 < R e s e t T o p p a p e r a n... Generally, light level emitted from the photo diode in e Figure 4-7. LQ-2180 Revision A 6. When this reason, the printer renews the current paper remaining level by . Select "Yes" and press...

Service Manual
Page 47
...: 11inch (the default) (11 inch) (11 inch) 1AH, 1BH Bottom margin for the C272 Main Board. LQ-2180 7.1 EEPROM Address Map This chapter provides EEPROM Address Map for LQ-2180 and component layouts and circuit diagram for front tractor 1CH Font selection 1 to 22x360 (by 1/360 inch), 0000H ...) 00H (Roman) Appendix EEPROM Address Map 47 Table 7-1. NOTE: The data of two or more bytes are assigned in such was as lower byte to lower address, higher byte to higher address. EEPROM Address Map (1/7) Address Data Data Format Q-pit Factory data setting 00H, 01H (reserved) 0000H ...
...: 11inch (the default) (11 inch) (11 inch) 1AH, 1BH Bottom margin for the C272 Main Board. LQ-2180 7.1 EEPROM Address Map This chapter provides EEPROM Address Map for LQ-2180 and component layouts and circuit diagram for front tractor 1CH Font selection 1 to 22x360 (by 1/360 inch), 0000H ...) 00H (Roman) Appendix EEPROM Address Map 47 Table 7-1. NOTE: The data of two or more bytes are assigned in such was as lower byte to lower address, higher byte to higher address. EEPROM Address Map (1/7) Address Data Data Format Q-pit Factory data setting 00H, 01H (reserved) 0000H ...


