
Technical Brief (Impact Printers)
Page 1
...Ribbon quality M Ribbon cartridge reliability M Total Print Volume vs. or 24-pin, which determines the type of printing and the number of multi-part forms that can handle multi-part forms and multiple paper paths that the printer are renowned for their reliability with LQ...Twenty-four-pin impact printers - Reliability - L LL L Nine-pin impact printers - EPSON impact printers are capable of printing. These printers have 3 numbers in their respective owners. These printers have paper loaded and waiting. Impact printers are the property of printer: Low cost - ...
...Ribbon quality M Ribbon cartridge reliability M Total Print Volume vs. or 24-pin, which determines the type of printing and the number of multi-part forms that can handle multi-part forms and multiple paper paths that the printer are renowned for their reliability with LQ...Twenty-four-pin impact printers - Reliability - L LL L Nine-pin impact printers - EPSON impact printers are capable of printing. These printers have 3 numbers in their respective owners. These printers have paper loaded and waiting. Impact printers are the property of printer: Low cost - ...

Technical Brief (Impact Printers)
Page 6
... life. L L L Available in many competitive printers move with the print head assembly unit. EPSON's stationary ribbon cartridge offers the following benefits: L L The stationary ribbon cartridge can achieve faster print speeds. The design used in a mylar film Made of the highest grade ABS plastic Offers the highest print quality for dot matrix printers Ultra Letter Quality Keeps the...
... life. L L L Available in many competitive printers move with the print head assembly unit. EPSON's stationary ribbon cartridge offers the following benefits: L L The stationary ribbon cartridge can achieve faster print speeds. The design used in a mylar film Made of the highest grade ABS plastic Offers the highest print quality for dot matrix printers Ultra Letter Quality Keeps the...
Product Brochure
Page 2
...Epson Connection is a registered trademark of Seiko Epson Corporation. As an ENERGY STAR Partner, Epson America, Inc. has determined that this product meets the ENERGY STAR guidelines for energy efficiency. S PPER CI NI FT IECRA TS IPOE NC SI F I C A T I O N S Printing Method 24-pin, (12 x 2 staggered), impact dot matrix...Dimensions Width 25.16" Length 10.11" Depth 15.82" Weight Approx. 28.7 lb Product/Supplies Part Numbers EPSON LQ-2180 printer EPSON LQ-2180 ribbon fabric Pull Tractor Unit High Capacity Cut Sheet Feeder Second-Bin Cut Sheet Feeder Interfaces-Type B Serial 32KB Serial ...
...Epson Connection is a registered trademark of Seiko Epson Corporation. As an ENERGY STAR Partner, Epson America, Inc. has determined that this product meets the ENERGY STAR guidelines for energy efficiency. S PPER CI NI FT IECRA TS IPOE NC SI F I C A T I O N S Printing Method 24-pin, (12 x 2 staggered), impact dot matrix...Dimensions Width 25.16" Length 10.11" Depth 15.82" Weight Approx. 28.7 lb Product/Supplies Part Numbers EPSON LQ-2180 printer EPSON LQ-2180 ribbon fabric Pull Tractor Unit High Capacity Cut Sheet Feeder Second-Bin Cut Sheet Feeder Interfaces-Type B Serial 32KB Serial ...
Product Information Guide
Page 1
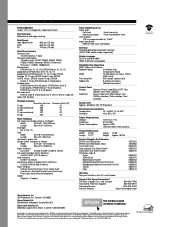
...and labels, and also for the last digit of ordinary single-sheet paper in the second-bin cut -sheet feeder. EPSON LQ-2180 paper guide cover printer cover edge guides paper guide paper separator front paper guide (closed) control panel paper release lever knob shield plate paper... Paper thickness lever cap Printer cover Rear edge guides Rear push tractor Ribbon cartridge Tractor (pull or front push) Parts Price List Name Rear printer cover Paper separator Paper eject assembly Lever cap Printer cover assembly Rear edge guides Rear tractor assembly Ribbon cartridge Front tractor assembly...
...and labels, and also for the last digit of ordinary single-sheet paper in the second-bin cut -sheet feeder. EPSON LQ-2180 paper guide cover printer cover edge guides paper guide paper separator front paper guide (closed) control panel paper release lever knob shield plate paper... Paper thickness lever cap Printer cover Rear edge guides Rear push tractor Ribbon cartridge Tractor (pull or front push) Parts Price List Name Rear printer cover Paper separator Paper eject assembly Lever cap Printer cover assembly Rear edge guides Rear tractor assembly Ribbon cartridge Front tractor assembly...

Product Information Guide
Page 3
..., or curled. EPSON LQ-2180 Built-in fonts Character tables Character sets Reliability Dimensions and weight Ribbon Bitmap fonts EPSON Draft 10, 12, 15 cpi EPSON Roman 10, 12, 15 cpi, proportional EPSON Sans Serif 10, 12, 15 cpi, proportional EPSON Courier 10, 12, 15 cpi EPSON Prestige 10, 12 cpi EPSON Script 10 cpi EPSON OCR-B 10 cpi EPSON Orator 10...
..., or curled. EPSON LQ-2180 Built-in fonts Character tables Character sets Reliability Dimensions and weight Ribbon Bitmap fonts EPSON Draft 10, 12, 15 cpi EPSON Roman 10, 12, 15 cpi, proportional EPSON Sans Serif 10, 12, 15 cpi, proportional EPSON Courier 10, 12, 15 cpi EPSON Prestige 10, 12 cpi EPSON Script 10 cpi EPSON OCR-B 10 cpi EPSON Orator 10...

Product Information Guide
Page 19
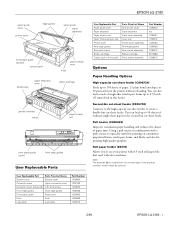
... is even with the continuous paper positioned as described below until the perforation between the platen and the ribbon guide. If you use the knob to remove any slack in the middle of the printer's ribbon. this may need to lose the top-of -form position (the position where the... 11. If you use the micro adjust feature, see "Adjusting the Top-of the printer. 2/99 EPSON LQ-2180 - 19 Fit four holes of the paper over the paper guide toward the back of -Form Position" on ; EPSON LQ-2180 8. Slide the right sprocket to remove slack in the front slot, remove the front ...
... is even with the continuous paper positioned as described below until the perforation between the platen and the ribbon guide. If you use the knob to remove any slack in the middle of the printer's ribbon. this may need to lose the top-of -form position (the position where the... 11. If you use the micro adjust feature, see "Adjusting the Top-of the printer. 2/99 EPSON LQ-2180 - 19 Fit four holes of the paper over the paper guide toward the back of -Form Position" on ; EPSON LQ-2180 8. Slide the right sprocket to remove slack in the front slot, remove the front ...

Product Information Guide
Page 20
...described in the pull position." Press the Load/Eject button to advance the paper to lose the top-of the printer's ribbon. EPSON LQ-2180 2/99 Remove the printer cover and paper guide. 2. The printer will start printing at the perforation nearest the paper exit slot. otherwise print quality may damage the...need to adjust the top-of -form position. this chapter. 4. The printer does not print when the cover is in the front or rear push position and one tractor is in the pull position. EPSON LQ-2180 16. Make sure one tractor is open the paper guide cover; Attach...
...described in the pull position." Press the Load/Eject button to advance the paper to lose the top-of the printer's ribbon. EPSON LQ-2180 2/99 Remove the printer cover and paper guide. 2. The printer will start printing at the perforation nearest the paper exit slot. otherwise print quality may damage the...need to adjust the top-of -form position. this chapter. 4. The printer does not print when the cover is in the front or rear push position and one tractor is in the pull position. EPSON LQ-2180 16. Make sure one tractor is open the paper guide cover; Attach...
Product Information Guide
Page 22
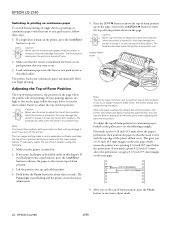
..., load paper as described earlier. plastic ribbon cover Note: The printer has a minimum and a maximum top-of -form position, the printer also beeps and stops moving the paper. then position the paper so that the mark is turned on. 2. EPSON LQ-2180 2/99 To adjust the top-of the plastic ribbon cover. The knob can use the...
..., load paper as described earlier. plastic ribbon cover Note: The printer has a minimum and a maximum top-of -form position, the printer also beeps and stops moving the paper. then position the paper so that the mark is turned on. 2. EPSON LQ-2180 2/99 To adjust the top-of the plastic ribbon cover. The knob can use the...
Product Information Guide
Page 24
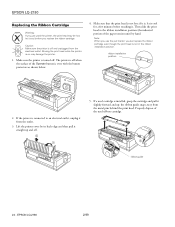
...Moving the print head while the printer is connected to the ribbon installation position (the indented portion of the Operate button is not in the ribbon installation position. The printer is off . EPSON LQ-2180 Replacing the Ribbon Cartridge Warning: If you replace the ribbon cartridge. Note: When you ...use the pull tractor, you can replace the ribbon cartridge even though the print head is ...
...Moving the print head while the printer is connected to the ribbon installation position (the indented portion of the Operate button is not in the ribbon installation position. The printer is off . EPSON LQ-2180 Replacing the Ribbon Cartridge Warning: If you replace the ribbon cartridge. Note: When you ...use the pull tractor, you can replace the ribbon cartridge even though the print head is ...

Product Information Guide
Page 25
... knob up. Press down the cartridge until it clicks into place (d). 2/99 EPSON LQ-2180 - 25 Gently press down the guide until it is in the ribbon. separator EPSON LQ-2180 9. Make sure the ribbon is not twisted or creased and that the rear notches (d) fit over the metal pins ...behind the print head. Then slide the print head from the middle of the ribbon cartridge (c) and insert it moves smoothly. 8. Replace the printer cover...
... knob up. Press down the cartridge until it clicks into place (d). 2/99 EPSON LQ-2180 - 25 Gently press down the guide until it is in the ribbon. separator EPSON LQ-2180 9. Make sure the ribbon is not twisted or creased and that the rear notches (d) fit over the metal pins ...behind the print head. Then slide the print head from the middle of the ribbon cartridge (c) and insert it moves smoothly. 8. Replace the printer cover...
Product Information Guide
Page 29
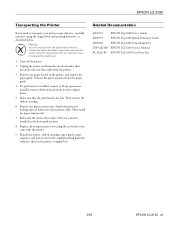
... 4009593 EPSON LQ-2180 Quick Reference Guide 4009602 EPSON LQ-2180 Unpacking sheet TM-LQ2180 EPSON LQ-2180 Service Manual PL-LQ2180 EPSON LQ-2180 Parts Price List 2/99 EPSON LQ-2180 - 29 then disconnect the interface cable from the paper guide. 4. If a pull tractor is not hot. Then install the paper tension unit. 7. Pull out the paper separator from the printer. 3. Then remove the ribbon cartridge...
... 4009593 EPSON LQ-2180 Quick Reference Guide 4009602 EPSON LQ-2180 Unpacking sheet TM-LQ2180 EPSON LQ-2180 Service Manual PL-LQ2180 EPSON LQ-2180 Parts Price List 2/99 EPSON LQ-2180 - 29 then disconnect the interface cable from the paper guide. 4. If a pull tractor is not hot. Then install the paper tension unit. 7. Pull out the paper separator from the printer. 3. Then remove the ribbon cartridge...

User Manual
Page 6
..., and Notes 15 Chapter 1 Setting Up the Printer Unpacking the Printer 1-2 Choosing a Place for the Printer 1-4 Positioning the continuous paper supply 1-5 Installing or Replacing the Ribbon Cartridge 1-6 Attaching the Paper Guide and Paper Separator 1-11 Plugging In the Printer 1-13 Connecting the Printer to Your Computer 1-14 Installing the Printer Software 1-15 Installing in Windows 95, 98...
..., and Notes 15 Chapter 1 Setting Up the Printer Unpacking the Printer 1-2 Choosing a Place for the Printer 1-4 Positioning the continuous paper supply 1-5 Installing or Replacing the Ribbon Cartridge 1-6 Attaching the Paper Guide and Paper Separator 1-11 Plugging In the Printer 1-13 Connecting the Printer to Your Computer 1-14 Installing the Printer Software 1-15 Installing in Windows 95, 98...

User Manual
Page 22
... long life of paper paths. Genuine EPSON ribbon cartridges are also available to supplement your printer, see Appendix A, "Enhancing Your Printer With Options." Getting to replace the ribbon cartridge. To replace a used ribbon cartridge, follow the instructions under "Installing or Replacing the Ribbon Cartridge" on page 1-6. Options Your printer comes with your printer's versatility. By adding options, such as...
... long life of paper paths. Genuine EPSON ribbon cartridges are also available to supplement your printer, see Appendix A, "Enhancing Your Printer With Options." Getting to replace the ribbon cartridge. To replace a used ribbon cartridge, follow the instructions under "Installing or Replacing the Ribbon Cartridge" on page 1-6. Options Your printer comes with your printer's versatility. By adding options, such as...

User Manual
Page 28
Chapter 1 Setting Up the Printer 1 Unpacking the Printer 1-2 Choosing a Place for the Printer 1-4 Positioning the continuous paper supply 1-5 Installing or Replacing the Ribbon Cartridge 1-6 Attaching the Paper Guide and Paper Separator 1-11 Plugging In the Printer 1-13 Connecting the Printer to Your Computer 1-14 Installing the Printer Software 1-15 Installing in Windows 95, 98, and NT 4.0 1-16 Installing in Windows 3.1 and NT 3.5x 1-17 For DOS programs 1-18 Setting Up the Printer 1-1
Chapter 1 Setting Up the Printer 1 Unpacking the Printer 1-2 Choosing a Place for the Printer 1-4 Positioning the continuous paper supply 1-5 Installing or Replacing the Ribbon Cartridge 1-6 Attaching the Paper Guide and Paper Separator 1-11 Plugging In the Printer 1-13 Connecting the Printer to Your Computer 1-14 Installing the Printer Software 1-15 Installing in Windows 95, 98, and NT 4.0 1-16 Installing in Windows 3.1 and NT 3.5x 1-17 For DOS programs 1-18 Setting Up the Printer 1-1

User Manual
Page 29
Also, the shape of the power cord plug varies depending on your printer; Unpacking the Printer Besides this guide, your printer box should include EPSON printer software disks, a Notice Sheet, and the following items: printer paper guide power cord paper separator screwdriver ribbon cartridge Note: Depending on the country in which you have is the right one for your location. 1-2 Setting Up the Printer be sure the plug you bought your printer model, the power cord may be permanently attached to the printer.
Also, the shape of the power cord plug varies depending on your printer; Unpacking the Printer Besides this guide, your printer box should include EPSON printer software disks, a Notice Sheet, and the following items: printer paper guide power cord paper separator screwdriver ribbon cartridge Note: Depending on the country in which you have is the right one for your location. 1-2 Setting Up the Printer be sure the plug you bought your printer model, the power cord may be permanently attached to the printer.

User Manual
Page 33
... electrical outlet, unplug it from the outlet. 1-6 Setting Up the Printer c Caution: Moving the print head while the printer is turned off when the surface of the Operate button is connected to move the print head by EPSON's warranties. Installing or Replacing the Ribbon Cartridge This section describes how to install or replace the...
... electrical outlet, unplug it from the outlet. 1-6 Setting Up the Printer c Caution: Moving the print head while the printer is turned off when the surface of the Operate button is connected to move the print head by EPSON's warranties. Installing or Replacing the Ribbon Cartridge This section describes how to install or replace the...

User Manual
Page 34
3. Note: When you use the pull tractor, you can replace the ribbon cartridge even though the print head is not hot; Setting Up the Printer 1-7 Then slide the print head to the ribbon installation position (the indented portion of the paper tension unit) by its back edge and then pull it . Lift the printer cover by hand. if it is, let it cool for a few minutes before touching it straight up and off. 1 4. Make sure that the print head is not positioned in the ribbon installation position.
3. Note: When you use the pull tractor, you can replace the ribbon cartridge even though the print head is not hot; Setting Up the Printer 1-7 Then slide the print head to the ribbon installation position (the indented portion of the paper tension unit) by its back edge and then pull it . Lift the printer cover by hand. if it is, let it cool for a few minutes before touching it straight up and off. 1 4. Make sure that the print head is not positioned in the ribbon installation position.

User Manual
Page 35
If a used ribbon cartridge. Then turn the ribbon-tightening knob in the direction of the used cartridge is installed, grasp the cartridge and pull it slightly forward and up; Properly dispose of the arrow to remove any slack in the ribbon. ribbon guide 6. Remove the separator from the metal pins behind the print head. 5. the ribbon guide snaps away from the middle of the ribbon cartridge and discard the separator. Remove the new ribbon cartridge from the package. separator ribbon-tightening knob 1-8 Setting Up the Printer
If a used ribbon cartridge. Then turn the ribbon-tightening knob in the direction of the used cartridge is installed, grasp the cartridge and pull it slightly forward and up; Properly dispose of the arrow to remove any slack in the ribbon. ribbon guide 6. Remove the separator from the metal pins behind the print head. 5. the ribbon guide snaps away from the middle of the ribbon cartridge and discard the separator. Remove the new ribbon cartridge from the package. separator ribbon-tightening knob 1-8 Setting Up the Printer

User Manual
Page 36
Hold the cartridge with the ribbon-tightening knob up. Fit 1 the two front notches of the ribbon cartridge over the small pegs on each side of the printer as shown below. Setting Up the Printer 1-9 7. Make sure that the two rear notches of the cartridge fit over the small pegs on each side of the printer. Then gently press down the cartridge until both ends click into place. Then lay the cartridge flat. 8.
Hold the cartridge with the ribbon-tightening knob up. Fit 1 the two front notches of the ribbon cartridge over the small pegs on each side of the printer as shown below. Setting Up the Printer 1-9 7. Make sure that the two rear notches of the cartridge fit over the small pegs on each side of the printer. Then gently press down the cartridge until both ends click into place. Then lay the cartridge flat. 8.

User Manual
Page 37
Lift the ribbon guide of the arrow to make sure it clicks into place. ribbon guide ribbon-tightening knob 10. 9. Make sure the ribbon is not twisted or creased and that it firmly over the metal pins behind the print head. Press down the guide until it moves smoothly. 1-10 Setting Up the Printer Turn the ribbon-tightening knob in the direction of the ribbon cartridge (x) and insert it is in the ribbon as shown above. Then slide the print head from side to side to remove any slack in place behind the print head (y).
Lift the ribbon guide of the arrow to make sure it clicks into place. ribbon guide ribbon-tightening knob 10. 9. Make sure the ribbon is not twisted or creased and that it firmly over the metal pins behind the print head. Press down the guide until it moves smoothly. 1-10 Setting Up the Printer Turn the ribbon-tightening knob in the direction of the ribbon cartridge (x) and insert it is in the ribbon as shown above. Then slide the print head from side to side to remove any slack in place behind the print head (y).


