Product Information Guide
Page 24
... guide 24 - Moving the print head while the printer is turned off . 5. EPSON LQ-2180 2/99 If the printer is even with the button protectors as shown below. 4. Lift the printer cover by hand. Caution: Make sure the printer is off when the surface of the Operate button is connected to the ribbon installation position (the indented portion of...
... guide 24 - Moving the print head while the printer is turned off . 5. EPSON LQ-2180 2/99 If the printer is even with the button protectors as shown below. 4. Lift the printer cover by hand. Caution: Make sure the printer is off when the surface of the Operate button is connected to the ribbon installation position (the indented portion of...
Product Information Guide
Page 29
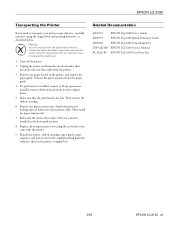
... paper tension unit. Related Documentation 4009592 EPSON LQ-2180 User's Guide 4009593 EPSON LQ-2180 Quick Reference Guide 4009602 EPSON LQ-2180 Unpacking sheet TM-LQ2180 EPSON LQ-2180 Service Manual PL-LQ2180 EPSON LQ-2180 Parts Price List 2/99 EPSON LQ-2180 - 29 Unplug the power cord from the printer. 3. Make sure the tractor that the print head is installed, remove it . 1. Repack the printer, ribbon cartridge, paper guide, paper separator...
... paper tension unit. Related Documentation 4009592 EPSON LQ-2180 User's Guide 4009593 EPSON LQ-2180 Quick Reference Guide 4009602 EPSON LQ-2180 Unpacking sheet TM-LQ2180 EPSON LQ-2180 Service Manual PL-LQ2180 EPSON LQ-2180 Parts Price List 2/99 EPSON LQ-2180 - 29 Unplug the power cord from the printer. 3. Make sure the tractor that the print head is installed, remove it . 1. Repack the printer, ribbon cartridge, paper guide, paper separator...

User Manual
Page 6
... Instructions 11 Print Head Caution Symbol 12 ENERGY STAR Compliance 13 For United Kingdom Users 13 Use of options 13 Safety information 14 How To Use Your Manuals 15 Warnings, Cautions, and Notes 15 Chapter 1 Setting Up the Printer Unpacking the Printer 1-2 Choosing a Place for the Printer 1-4 Positioning the continuous paper supply 1-5 Installing or Replacing...
... Instructions 11 Print Head Caution Symbol 12 ENERGY STAR Compliance 13 For United Kingdom Users 13 Use of options 13 Safety information 14 How To Use Your Manuals 15 Warnings, Cautions, and Notes 15 Chapter 1 Setting Up the Printer Unpacking the Printer 1-2 Choosing a Place for the Printer 1-4 Positioning the continuous paper supply 1-5 Installing or Replacing...

User Manual
Page 22
... cartridge, follow the instructions under "Installing or Replacing the Ribbon Cartridge" on continuous paper and single sheets using a variety of the print head and other printer parts. Optional interface cards are designed and manufactured to work properly with everything necessary to supplement your printer's built-in parallel interface. Genuine EPSON ribbon cartridges are also available...
... cartridge, follow the instructions under "Installing or Replacing the Ribbon Cartridge" on continuous paper and single sheets using a variety of the print head and other printer parts. Optional interface cards are designed and manufactured to work properly with everything necessary to supplement your printer's built-in parallel interface. Genuine EPSON ribbon cartridges are also available...

User Manual
Page 24
... are covered by a 16 Amp circuit breaker. Let the print head cool for a few minutes before you plan to use the printer in performance. if liquid has entered the printer; if the printer has been dropped or the cabinet damaged; Adjust only those controls ... for this symbol. t If you touch any printer part marked with this part may be protected by the operating instructions. t Unplug the printer and refer servicing to Know Your Printer 12 K t Printer parts marked with this printer, the building installation must be hot. K Getting to qualified service personnel...
... are covered by a 16 Amp circuit breaker. Let the print head cool for a few minutes before you plan to use the printer in performance. if liquid has entered the printer; if the printer has been dropped or the cabinet damaged; Adjust only those controls ... for this symbol. t If you touch any printer part marked with this part may be protected by the operating instructions. t Unplug the printer and refer servicing to Know Your Printer 12 K t Printer parts marked with this printer, the building installation must be hot. K Getting to qualified service personnel...

User Manual
Page 33
...: You will need to your printer not covered by EPSON may cause damage to remove the used the printer, the print head may damage the printer. 2. If you need to move the print head by hand to install or replace the ribbon cartridge. The printer is off . c Caution: Moving the print head while the printer is even with a new one...
...: You will need to your printer not covered by EPSON may cause damage to remove the used the printer, the print head may damage the printer. 2. If you need to move the print head by hand to install or replace the ribbon cartridge. The printer is off . c Caution: Moving the print head while the printer is even with a new one...

User Manual
Page 34
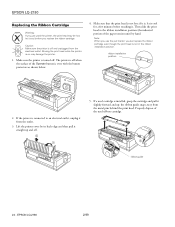
Lift the printer cover by hand. if it is, let it cool for a few minutes before touching it straight up and off. 1 4. 3. Then slide the print head to the ribbon installation position (the indented portion of the paper tension unit) by its back edge and then pull it . Setting Up the Printer 1-7 Make sure that the print head is not positioned in the ribbon installation position. Note: When you use the pull tractor, you can replace the ribbon cartridge even though the print head is not hot;
Lift the printer cover by hand. if it is, let it cool for a few minutes before touching it straight up and off. 1 4. 3. Then slide the print head to the ribbon installation position (the indented portion of the paper tension unit) by its back edge and then pull it . Setting Up the Printer 1-7 Make sure that the print head is not positioned in the ribbon installation position. Note: When you use the pull tractor, you can replace the ribbon cartridge even though the print head is not hot;

User Manual
Page 35
If a used ribbon cartridge. the ribbon guide snaps away from the package. Then turn the ribbon-tightening knob in the direction of the ribbon cartridge and discard the separator. separator ribbon-tightening knob 1-8 Setting Up the Printer ribbon guide 6. Remove the new ribbon cartridge from the metal pins behind the print head. Remove the separator from the middle of the arrow to remove any slack in the ribbon. Properly dispose of the used cartridge is installed, grasp the cartridge and pull it slightly forward and up; 5.
If a used ribbon cartridge. the ribbon guide snaps away from the package. Then turn the ribbon-tightening knob in the direction of the ribbon cartridge and discard the separator. separator ribbon-tightening knob 1-8 Setting Up the Printer ribbon guide 6. Remove the new ribbon cartridge from the metal pins behind the print head. Remove the separator from the middle of the arrow to remove any slack in the ribbon. Properly dispose of the used cartridge is installed, grasp the cartridge and pull it slightly forward and up; 5.

User Manual
Page 155
..." in Chapter 5 or "Using the EPSON Remote! The ribbon is not installed properly. Lines of dots are missing in random positions. c Caution: Never replace the print head yourself; See "About Your Printer's Default Settings" in Chapter 4. Cause What to each line of the printer must be checked when the print head is replaced. 7 All the text is...
..." in Chapter 5 or "Using the EPSON Remote! The ribbon is not installed properly. Lines of dots are missing in random positions. c Caution: Never replace the print head yourself; See "About Your Printer's Default Settings" in Chapter 4. Cause What to each line of the printer must be checked when the print head is replaced. 7 All the text is...

User Manual
Page 166
you cannot use it cool for a few minutes before installing the cut -sheet feeder; Follow the steps below. Note: Before installing the double-bin cut -sheet feeder, see the second-bin cut -sheet feeder in the printer at the same time and easily switch between them. w Warning: You will need to... have just used the printer, the print head may be used only in the cutsheet feeder manual. If you can load up to 150 single sheets of the double-bin cut -sheet feeder, assemble it as described in combination with the highcapacity cut -sheet feeder. Installing the high-capacity or ...
you cannot use it cool for a few minutes before installing the cut -sheet feeder; Follow the steps below. Note: Before installing the double-bin cut -sheet feeder, see the second-bin cut -sheet feeder in the printer at the same time and easily switch between them. w Warning: You will need to... have just used the printer, the print head may be used only in the cutsheet feeder manual. If you can load up to 150 single sheets of the double-bin cut -sheet feeder, assemble it as described in combination with the highcapacity cut -sheet feeder. Installing the high-capacity or ...

User Manual
Page 167
... feeder's notches over the mounting posts on may damage the printer. If you installed the double-bin cutsheet feeder, you need to move the print head to select the paper source (bin 1 or bin 2) as shown below. Enhancing Your Printer With Options A-5 1. A 2. To remove the cut -...moving the print head while the printer is on the printer as described on the printer. 4. To load paper in the pull position, remove it up the tabs on page 2-32. Remove the paper guide and printer cover. You will need to the ribbon installation position before installing the high-capacity ...
... feeder's notches over the mounting posts on may damage the printer. If you installed the double-bin cutsheet feeder, you need to move the print head to select the paper source (bin 1 or bin 2) as shown below. Enhancing Your Printer With Options A-5 1. A 2. To remove the cut -...moving the print head while the printer is on the printer as described on the printer. 4. To load paper in the pull position, remove it up the tabs on page 2-32. Remove the paper guide and printer cover. You will need to the ribbon installation position before installing the high-capacity ...

User Manual
Page 183
..., as described in their original boxes. 5. Cleaning and Transporting the Printer B-3 B If you need to move the print head by hand to transport your printer is installed, remove it as described on both sides of the printer roller. Make sure the tractor that comes with the printer. 9. Unplug the power cord from the electrical outlet; Remove...
..., as described in their original boxes. 5. Cleaning and Transporting the Printer B-3 B If you need to move the print head by hand to transport your printer is installed, remove it as described on both sides of the printer roller. Make sure the tractor that comes with the printer. 9. Unplug the power cord from the electrical outlet; Remove...

User Manual
Page 228
...button, inside front cover light, inside front cover selecting, 5-2-3 Plastic ribbon cover, 2-39 Plugging in the printer, 1-13 Printer cover, inside back cover installing,1-11 removing, 1-7 Printer driver accessing, from NT 3.5x, 4-17-19 from NT 4.0, 4-12-14 from Windows 3.1, 4-8-11 ...3.5x, 4-20-21 for NT 4.0, 4-14-16 for Windows 3.1, 4-10-11 for Windows 95/98, 4-5-8 Printer parts, inside back cover Printer software, 4-2 Printer Status window, 6-9-10 Print head caution symbol, 12 Printing on continuous paper, 2-1-41 continuous paper with labels, 2-5-6 continuous multi-part forms, 2-5 envelopes...
...button, inside front cover light, inside front cover selecting, 5-2-3 Plastic ribbon cover, 2-39 Plugging in the printer, 1-13 Printer cover, inside back cover installing,1-11 removing, 1-7 Printer driver accessing, from NT 3.5x, 4-17-19 from NT 4.0, 4-12-14 from Windows 3.1, 4-8-11 ...3.5x, 4-20-21 for NT 4.0, 4-14-16 for Windows 3.1, 4-10-11 for Windows 95/98, 4-5-8 Printer parts, inside back cover Printer software, 4-2 Printer Status window, 6-9-10 Print head caution symbol, 12 Printing on continuous paper, 2-1-41 continuous paper with labels, 2-5-6 continuous multi-part forms, 2-5 envelopes...

User Setup Information
Page 10
When you use the pull tractor, you can replace the ribbon cartridge even though the print head is not hot; Replacing the Ribbon Cartridge 4 5 Make sure the print head is not in the ribbon installation position. 9 Grasp the used ribbon cartridge and pull it . if it is, let it cool for a few minutes before touching it up and out of the paper tension unit) by hand. Then slide the print head to the ribbon installation position (the indented portion of the printer.
When you use the pull tractor, you can replace the ribbon cartridge even though the print head is not hot; Replacing the Ribbon Cartridge 4 5 Make sure the print head is not in the ribbon installation position. 9 Grasp the used ribbon cartridge and pull it . if it is, let it cool for a few minutes before touching it up and out of the paper tension unit) by hand. Then slide the print head to the ribbon installation position (the indented portion of the printer.


