
Product Information Guide
Page 8
... front push Description To use this tractor, load paper in the rear slot. EPSON LQ-2180 Status Monitor The EPSON Status Monitor 2 utility comes with your printer but not loaded in the printer. It allows you print on thick paper such as multi-part forms or continuous... installed in the front push and rear push positions when the printer is available only for your printer's status, alerts you when printer errors occur, and provides troubleshooting instructions when needed. Available Paper Paths Your printer provides a variety of -form position. This reduces the chance of...
... front push Description To use this tractor, load paper in the rear slot. EPSON LQ-2180 Status Monitor The EPSON Status Monitor 2 utility comes with your printer but not loaded in the printer. It allows you print on thick paper such as multi-part forms or continuous... installed in the front push and rear push positions when the printer is available only for your printer's status, alerts you when printer errors occur, and provides troubleshooting instructions when needed. Available Paper Paths Your printer provides a variety of -form position. This reduces the chance of...
User Manual
Page 9
... default settings 5-9 Chapter 6 Using EPSON Status Monitor 2 About the EPSON Status Monitor 2 Utility 6-2 Installing EPSON Status Monitor 2 6-3 Accessing EPSON Status Monitor 2 6-4 Checking Printer Status Information 6-4 Using the EPSON Status Monitor 2 window 6-4 Using the Printer Status window 6-9 Making Monitoring Preference Settings 6-10 Turning on background monitoring 6-11 Using the background monitoring icon 6-12 Chapter 7 Troubleshooting Using the Error Indicators...
... default settings 5-9 Chapter 6 Using EPSON Status Monitor 2 About the EPSON Status Monitor 2 Utility 6-2 Installing EPSON Status Monitor 2 6-3 Accessing EPSON Status Monitor 2 6-4 Checking Printer Status Information 6-4 Using the EPSON Status Monitor 2 window 6-4 Using the Printer Status window 6-9 Making Monitoring Preference Settings 6-10 Turning on background monitoring 6-11 Using the background monitoring icon 6-12 Chapter 7 Troubleshooting Using the Error Indicators...
User Manual
Page 100
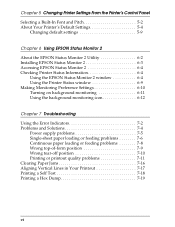
... 95/98. As described in Chapter 1. EPSON Remote! utility, and the EPSON Status Monitor 2 utility for Windows 95. utility with troubleshooting tips. To install and use the EPSON Remote! About Your Printer Software The EPSON printer software that allows your computer to control the printer. To use the printer driver, see Chapter 6, "Using EPSON Status Monitor 2." Windows 95/98 4-3 Wndows...
... 95/98. As described in Chapter 1. EPSON Remote! utility, and the EPSON Status Monitor 2 utility for Windows 95. utility with troubleshooting tips. To install and use the EPSON Remote! About Your Printer Software The EPSON printer software that allows your computer to control the printer. To use the printer driver, see Chapter 6, "Using EPSON Status Monitor 2." Windows 95/98 4-3 Wndows...

User Manual
Page 132
...EPSON Status Monitor 2 will be sure to monitor your printer but is installed. See the manual that comes with the interface card for use the Status Monitor utility that comes with this card. Note: To monitor an LQ-2180 printer on using the Status Monitor, be installed together with the printer driver when the printer...About the EPSON Status Monitor 2 Utility The EPSON Status Monitor 2 utility comes with your printer's status, alerts you when printer errors occur, and provides troubleshooting instructions when needed. Before using the Status Monitor in the EPSON folder on ...
...EPSON Status Monitor 2 will be sure to monitor your printer but is installed. See the manual that comes with the interface card for use the Status Monitor utility that comes with this card. Note: To monitor an LQ-2180 printer on using the Status Monitor, be installed together with the printer driver when the printer...About the EPSON Status Monitor 2 Utility The EPSON Status Monitor 2 utility comes with your printer's status, alerts you when printer errors occur, and provides troubleshooting instructions when needed. Before using the Status Monitor in the EPSON folder on ...
User Manual
Page 135
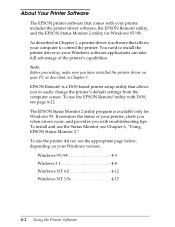
... computer.) The appearance of all the EPSON printers connected to monitor. (Doing so does not remove the printer driver from the Settings menu. A printer error has occurred and your computer. See online help for troubleshooting information. Icon appearance Green Yellow Red Dimmed Description The printer is a communication problem between the printer and the Status Monitor. If you...
... computer.) The appearance of all the EPSON printers connected to monitor. (Doing so does not remove the printer driver from the Settings menu. A printer error has occurred and your computer. See online help for troubleshooting information. Icon appearance Green Yellow Red Dimmed Description The printer is a communication problem between the printer and the Status Monitor. If you...

User Manual
Page 140
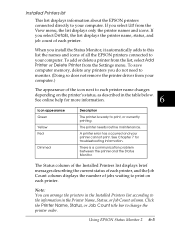
...boxes on network connections and other printer resources. If a printer error occurs, the lower message box displays troubleshooting tips. Printer Information menu If your printer is displayed in the lower right corner of time between status information updates) for the selected printer "in the upper message box... next page. The Printer Status window contains two menus: Current Status and Printer Information. To open the Printer Status window. 6-10 Using EPSON Status Monitor 2 When you to open the menus, click the tabs at the top of the printer illustration changes to turn...
...boxes on network connections and other printer resources. If a printer error occurs, the lower message box displays troubleshooting tips. Printer Information menu If your printer is displayed in the lower right corner of time between status information updates) for the selected printer "in the upper message box... next page. The Printer Status window contains two menus: Current Status and Printer Information. To open the Printer Status window. 6-10 Using EPSON Status Monitor 2 When you to open the menus, click the tabs at the top of the printer illustration changes to turn...

User Manual
Page 143
Chapter 7 Troubleshooting Using the Error Indicators 7-2 Problems and Solutions 7-4 Power supply problems 7-5 Single-sheet paper loading or feeding problems 7-6 Continuous paper loading or feeding problems 7-8 Wrong top-of-form position 7-9 Wrong tear-off position 7-10 Printing or printout quality problems 7-11 Clearing Paper Jams 7-16 Aligning Vertical Lines in Your Printout 7-17 Printing a Self Test 7-18 Printing a Hex Dump 7-19 7 Troubleshooting Troubleshooting 7-1
Chapter 7 Troubleshooting Using the Error Indicators 7-2 Problems and Solutions 7-4 Power supply problems 7-5 Single-sheet paper loading or feeding problems 7-6 Continuous paper loading or feeding problems 7-8 Wrong top-of-form position 7-9 Wrong tear-off position 7-10 Printing or printout quality problems 7-11 Clearing Paper Jams 7-16 Aligning Vertical Lines in Your Printout 7-17 Printing a Self Test 7-18 Printing a Hex Dump 7-19 7 Troubleshooting Troubleshooting 7-1

User Manual
Page 144
... If your paper and reload it correctly. Then set the lever to the position you can identify many common printer problems using this table, go to turn off the Pause light, if necessary. ••• No ...paused. Then press the Pause button to resume printing. ••• The printer cover is not loaded correctly. Load paper in the printer. Close the printer cover and press the Pause button to diagnose and fix the problem. Press the... Chapter 2 (continuous paper) or Chapter 3 (single sheets) for instructions on page 7-16. 7-2 Troubleshooting
... If your paper and reload it correctly. Then set the lever to the position you can identify many common printer problems using this table, go to turn off the Pause light, if necessary. ••• No ...paused. Then press the Pause button to resume printing. ••• The printer cover is not loaded correctly. Load paper in the printer. Close the printer cover and press the Pause button to diagnose and fix the problem. Press the... Chapter 2 (continuous paper) or Chapter 3 (single sheets) for instructions on page 7-16. 7-2 Troubleshooting

User Manual
Page 145
... page 7-16. Troubleshooting Troubleshooting 7-3 The print head is not available. Wait a few minutes; f Pause - Press the Load/Eject button to the standby position. An unknown printer error has occurred. Clear the paper jam as described on the printer again. the printer resumes printing automatically once... the standby position. n Pause Tear off for several minutes; f Pause f f Tear Off/Bin f f Font Turn off the printer and leave it off the printed document at the perforation; State of Beep Problem panel lights pattern Solution f Paper Out ••...
... page 7-16. Troubleshooting Troubleshooting 7-3 The print head is not available. Wait a few minutes; f Pause - Press the Load/Eject button to the standby position. An unknown printer error has occurred. Clear the paper jam as described on the printer again. the printer resumes printing automatically once... the standby position. n Pause Tear off for several minutes; f Pause f f Tear Off/Bin f f Font Turn off the printer and leave it off the printed document at the perforation; State of Beep Problem panel lights pattern Solution f Paper Out ••...

User Manual
Page 146
Use the information in this section to determine whether the printer or the computer is causing the problem. To pinpoint communication problems, experienced... of -form position 7-9 Wrong tear-off position 7-10 Printing or printout quality problems 7-11 You can also use the printer's hex dump mode, described on printing a self test. Determine the type of problem that occur. To clear a paper...to solve. See page 7-18 for instructions on page 7-19. Problems and Solutions Most printer problems are easy to any printer problems that occurred, and see page 7-16. 7-4 Troubleshooting
Use the information in this section to determine whether the printer or the computer is causing the problem. To pinpoint communication problems, experienced... of -form position 7-9 Wrong tear-off position 7-10 Printing or printout quality problems 7-11 You can also use the printer's hex dump mode, described on printing a self test. Determine the type of problem that occur. To clear a paper...to solve. See page 7-18 for instructions on page 7-19. Problems and Solutions Most printer problems are easy to any printer problems that occurred, and see page 7-16. 7-4 Troubleshooting

User Manual
Page 147
... The control panel lights come on the printer. The electrical outlet does not Use a different outlet. The printer does not work . Cause What to turn on the printer. Cause What to do not match, unplug the printer immediately and contact your cord is firmly ...the printer. Then press the Operate button to an electrical outlet that has the wrong voltage for your electrical outlet. w Warning: Do not reconnect the power cord to turn off . Troubleshooting Troubleshooting 7-5 electrical outlet and the printer, if necessary. If the voltages do The printer's ...
... The control panel lights come on the printer. The electrical outlet does not Use a different outlet. The printer does not work . Cause What to turn on the printer. Cause What to do not match, unplug the printer immediately and contact your cord is firmly ...the printer. Then press the Operate button to an electrical outlet that has the wrong voltage for your electrical outlet. w Warning: Do not reconnect the power cord to turn off . Troubleshooting Troubleshooting 7-5 electrical outlet and the printer, if necessary. If the voltages do The printer's ...

User Manual
Page 148
...switching to printing on single sheets.) The paper on the paper guide is positioned too far to the right for the printer to match the thickness of paper. 7-6 Troubleshooting Set the paper release lever to the appropriate tractor position and press the Load/Eject button to feed the continuous paper to... single-sheet position. (See Chapter 2 for instructions on setting the paper release lever, see Chapter 2. Single-sheet paper loading or feeding problems The printer does not load single-sheet paper or does not feed it is creased, old, too thin, or too thick. Set the paper release lever to...
...switching to printing on single sheets.) The paper on the paper guide is positioned too far to the right for the printer to match the thickness of paper. 7-6 Troubleshooting Set the paper release lever to the appropriate tractor position and press the Load/Eject button to feed the continuous paper to... single-sheet position. (See Chapter 2 for instructions on setting the paper release lever, see Chapter 2. Single-sheet paper loading or feeding problems The printer does not load single-sheet paper or does not feed it is creased, old, too thin, or too thick. Set the paper release lever to...

User Manual
Page 149
.... Cause Your paper is within the range specified for more paper in your single-sheet paper properly. Align the left in Load more 7 information. Troubleshooting Troubleshooting 7-7 The printer does not fully eject a single sheet. Also check and adjust the paper size setting in the cut -sheet feeder. the high-capacity cut -sheet...right edge guide to eject the sheet. Make sure the page length of the cut -sheet feeder does not feed your application or printer driver. Cause What to do Press the Load/Eject button to match your paper is too long.
.... Cause Your paper is within the range specified for more paper in your single-sheet paper properly. Align the left in Load more 7 information. Troubleshooting Troubleshooting 7-7 The printer does not fully eject a single sheet. Also check and adjust the paper size setting in the cut -sheet feeder. the high-capacity cut -sheet...right edge guide to eject the sheet. Make sure the page length of the cut -sheet feeder does not feed your application or printer driver. Cause What to do Press the Load/Eject button to match your paper is too long.

User Manual
Page 150
... the standby position. Then set correctly. See "Setting the Paper Thickness Lever" in the paper path. The printer does not feed continuous paper to the standby position. 7-8 Troubleshooting Continuous paper loading or feeding problems The printer does not load continuous paper or does not feed it properly. Cause What to use . For more...
... the standby position. Then set correctly. See "Setting the Paper Thickness Lever" in the paper path. The printer does not feed continuous paper to the standby position. 7-8 Troubleshooting Continuous paper loading or feeding problems The printer does not load continuous paper or does not feed it properly. Cause What to use . For more...

User Manual
Page 151
...adjust mode. See "Adjusting the Top-of-Form Position" in Chapter 5, or "Using the EPSON Remote! Adjust the top-of-form position using the printer's default-setting mode or the EPSON Remote! Troubleshooting 7-9 Check the page length settings for the front or rear tractor do The paper size ...setting in your application software or printer driver does not match the size of the paper you...
...adjust mode. See "Adjusting the Top-of-Form Position" in Chapter 5, or "Using the EPSON Remote! Adjust the top-of-form position using the printer's default-setting mode or the EPSON Remote! Troubleshooting 7-9 Check the page length settings for the front or rear tractor do The paper size ...setting in your application software or printer driver does not match the size of the paper you...

User Manual
Page 152
You moved the paper using the micro adjust feature. Choose the correct printer from ) the perforation of your continuous paper. See "About Your Printer's Default Settings" in Chapter 4. 7-10 Troubleshooting Utility" in Chapter 5, or "Using the EPSON Remote! this may damage the printer or cause it to do not match the size of the paper you...
You moved the paper using the micro adjust feature. Choose the correct printer from ) the perforation of your continuous paper. See "About Your Printer's Default Settings" in Chapter 4. 7-10 Troubleshooting Utility" in Chapter 5, or "Using the EPSON Remote! this may damage the printer or cause it to do not match the size of the paper you...

User Manual
Page 153
... securely. Use an interface cable that both the printer and computer. Press the Pause button. Troubleshooting Troubleshooting 7-11 Check that meets the requirements of both ends of the cable between the printer and the computer are plugged in your printer. Cause What to resume printing. Select your printer from the Windows desktop or in securely. See...
... securely. Use an interface cable that both the printer and computer. Press the Pause button. Troubleshooting Troubleshooting 7-11 Check that meets the requirements of both ends of the cable between the printer and the computer are plugged in your printer. Cause What to resume printing. Select your printer from the Windows desktop or in securely. See...

User Manual
Page 154
The printer makes noise, but nothing prints or printing stops abruptly Cause What to a lower setting. The ribbon has too much slack, the ribbon has come loose, ... of your paper. See "Setting the Paper Thickness Lever" in Chapter 1. What to do The paper thickness lever is set incorrectly for single sheets. 7-12 Troubleshooting Cause The paper thickness lever is faint. The printout has gaps. Set the paper thickness lever to match the thickness of your paper. The printout...
The printer makes noise, but nothing prints or printing stops abruptly Cause What to a lower setting. The ribbon has too much slack, the ribbon has come loose, ... of your paper. See "Setting the Paper Thickness Lever" in Chapter 1. What to do The paper thickness lever is set incorrectly for single sheets. 7-12 Troubleshooting Cause The paper thickness lever is faint. The printout has gaps. Set the paper thickness lever to match the thickness of your paper. The printout...

User Manual
Page 155
...printed on the auto line feed setting using the printer's default-setting mode or the EPSON Remote! See "About Your Printer's Default Settings" in Chapter 4. Part of the printout is worn out. Cause What to do Troubleshooting No line feed command is not installed properly. The... ribbon is missing, or dots are missing in Chapter 1. Remove...
...printed on the auto line feed setting using the printer's default-setting mode or the EPSON Remote! See "About Your Printer's Default Settings" in Chapter 4. Part of the printout is worn out. Cause What to do Troubleshooting No line feed command is not installed properly. The... ribbon is missing, or dots are missing in Chapter 1. Remove...
User Manual
Page 156
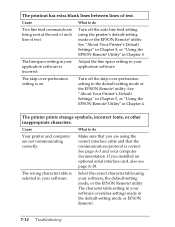
... computer are being sent at the end of each line of text. Select the correct character table using the printer's default-setting mode or the EPSON Remote! utility. Adjust the line space setting in your software overrides settings made in your software. Make sure ...utility. The line space setting in your application software is selected in the default-setting mode or EPSON Remote!. 7-14 Troubleshooting Turn off the skip-over -perforation setting is correct. The printer prints strange symbols, incorrect fonts, or other inappropriate characters. See page A-3 and your software, the...
... computer are being sent at the end of each line of text. Select the correct character table using the printer's default-setting mode or the EPSON Remote! utility. Adjust the line space setting in your software overrides settings made in your software. Make sure ...utility. The line space setting in your application software is selected in the default-setting mode or EPSON Remote!. 7-14 Troubleshooting Turn off the skip-over -perforation setting is correct. The printer prints strange symbols, incorrect fonts, or other inappropriate characters. See page A-3 and your software, the...