
Use and Care Manual
Page 3
... and Cav Guide, installation IrsittictIons and on the risk type as described belay: WARNING Fir your applance. operating and maintaining any electrical snitch; Save these instructions for future reference. 10-1011 240v EkctrIc Dryer Ca 0 flundion> 120 v Gas Dryer Li = ...Installer, service agency or the gas suppler. Failure to cover every poseitro ccntirtion and situation mat may cause [cony Ilium a property damage. Always read and obey all occupants. Clear the room. Fdlow the gas supplier's instructions. - he instructions appearing n this Use and Care...
... and Cav Guide, installation IrsittictIons and on the risk type as described belay: WARNING Fir your applance. operating and maintaining any electrical snitch; Save these instructions for future reference. 10-1011 240v EkctrIc Dryer Ca 0 flundion> 120 v Gas Dryer Li = ...Installer, service agency or the gas suppler. Failure to cover every poseitro ccntirtion and situation mat may cause [cony Ilium a property damage. Always read and obey all occupants. Clear the room. Fdlow the gas supplier's instructions. - he instructions appearing n this Use and Care...
Use and Care Manual
Page 5
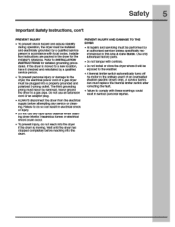
... a gas pipe. Watt until tne aryer has stopped completely before attempting my service or cleaning. Trethird grounding prong must be plugged Into a prcperly grounded and DolarVed 3-prong cutlet. PFEVENT INJURY AND DAMAGE TO THE DRYER • 411 repairs and servicing must never be Installed and electncally grounded by an authorized servicer unless spechIcally recommended In this Use 8 Care Outdo. the dryermust be removed. Marro INSTALLATION INSTRUCTIONS...
... a gas pipe. Watt until tne aryer has stopped completely before attempting my service or cleaning. Trethird grounding prong must be plugged Into a prcperly grounded and DolarVed 3-prong cutlet. PFEVENT INJURY AND DAMAGE TO THE DRYER • 411 repairs and servicing must never be Installed and electncally grounded by an authorized servicer unless spechIcally recommended In this Use 8 Care Outdo. the dryermust be removed. Marro INSTALLATION INSTRUCTIONS...

Use and Care Manual
Page 7
... VALVE (Gas models ally.) The now ot gas Is =trolled by a set of water is Ignited in the cpposite direction. Select desired settings and options. (See page 9, page 17, page 18, and pages 19-20.) 5. AIR FLOW SYSTEM Your dryer Is equipped with iced size and type. F. urn act/ sad tsst OVW bar/ beckleg --• tatwtc a»:,.. (CHOU lect rn To operate your new dryer: A WATER VALVE (Steam models...
... VALVE (Gas models ally.) The now ot gas Is =trolled by a set of water is Ignited in the cpposite direction. Select desired settings and options. (See page 9, page 17, page 18, and pages 19-20.) 5. AIR FLOW SYSTEM Your dryer Is equipped with iced size and type. F. urn act/ sad tsst OVW bar/ beckleg --• tatwtc a»:,.. (CHOU lect rn To operate your new dryer: A WATER VALVE (Steam models...

Use and Care Manual
Page 9
... and CUSTOM MODE In the User interface sections of each load. See the Cycle Settings Char." lb change the setbngs, press tre temp, dryness level (Auto Dry) or drying tin) (nine Dry) and extended Nibble buttons to scroll to 3 cycles In noncustom mode plus 9 more cycles for that cyciewIll be remembered and recalled each cycle. IR NOTE -o provide tie test care of thescreens. Adjustments made...
... and CUSTOM MODE In the User interface sections of each load. See the Cycle Settings Char." lb change the setbngs, press tre temp, dryness level (Auto Dry) or drying tin) (nine Dry) and extended Nibble buttons to scroll to 3 cycles In noncustom mode plus 9 more cycles for that cyciewIll be remembered and recalled each cycle. IR NOTE -o provide tie test care of thescreens. Adjustments made...

Use and Care Manual
Page 11
... the cancel button before selecting a new cycle. Just turning the cycle selector knob to the console. AUTO DRY CYCLES Auto Dry cycles take the guesswork out of installation and electrical voltage or gas pressure can forthat cycle will be dried. Auto Dry cycles savetime and energy and protect fabrics. Operating Instructions 11 Cycle Selection Tim tie cycle selector In eater clinactlon to dry such tads. To change the cycle. Dying time varies depending on...
... the cancel button before selecting a new cycle. Just turning the cycle selector knob to the console. AUTO DRY CYCLES Auto Dry cycles take the guesswork out of installation and electrical voltage or gas pressure can forthat cycle will be dried. Auto Dry cycles savetime and energy and protect fabrics. Operating Instructions 11 Cycle Selection Tim tie cycle selector In eater clinactlon to dry such tads. To change the cycle. Dying time varies depending on...
Use and Care Manual
Page 14
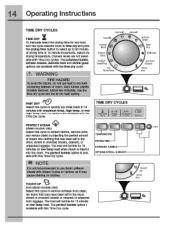
...) FAST DRY Select thIs cycle toDiiclay dry small loads in the dry& stored In crowded closets or drawers or unpacioa Iran luggage. Use the time dry cycle and the air lib heat) setting. or mod high temp heat. TOUCH UP 8' (ncri-steam =Mils only) Select this cycle to 90 minutes of steam into clothing that may cause staining on low temp heat wnlle steam Is injected Into the drum. The...
...) FAST DRY Select thIs cycle toDiiclay dry small loads in the dry& stored In crowded closets or drawers or unpacioa Iran luggage. Use the time dry cycle and the air lib heat) setting. or mod high temp heat. TOUCH UP 8' (ncri-steam =Mils only) Select this cycle to 90 minutes of steam into clothing that may cause staining on low temp heat wnlle steam Is injected Into the drum. The...
Use and Care Manual
Page 26
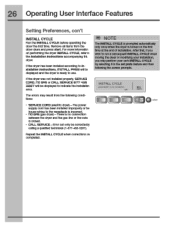
... the dryer drum ana press start. Repeal tne INSTALL CYCLE when conectbrts Ere completed. After trial. INSTALL CYCLE •.n/scan to use. c NOTE The INSTALL CYCLE is prompted automatcally only oncewren the dyer Is turned on I nen PIO SERVICE CORD, OD GAS a CALL SERVICE 877 435 3287 will be corrected w calling a quaMai technician (1-&77-4353287). 26 Operating User Interface Features Setting Preferences, con't INSTALL CYCLE Run the INSTALL CYCLE before operating tne dryer the first time...
... the dryer drum ana press start. Repeal tne INSTALL CYCLE when conectbrts Ere completed. After trial. INSTALL CYCLE •.n/scan to use. c NOTE The INSTALL CYCLE is prompted automatcally only oncewren the dyer Is turned on I nen PIO SERVICE CORD, OD GAS a CALL SERVICE 877 435 3287 will be corrected w calling a quaMai technician (1-&77-4353287). 26 Operating User Interface Features Setting Preferences, con't INSTALL CYCLE Run the INSTALL CYCLE before operating tne dryer the first time...
Use and Care Manual
Page 31
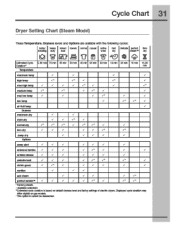
Cycle Chart 31 Dryer Setting Chart (Steam Model) These TOMperatUre, DryneSS 'orals and Options are available with the tolicnving c5cles: Csamate0Cycle Ovation" Temperatire bulky/ seozing 101 360min !leery mixed tcweis clay load 54 UO' g nil 55 min 50min normal casual hin 45 rrin acme weer 30min fast Carats Wed dry steerrr" ccip 19 no si inn 15 min...
Cycle Chart 31 Dryer Setting Chart (Steam Model) These TOMperatUre, DryneSS 'orals and Options are available with the tolicnving c5cles: Csamate0Cycle Ovation" Temperatire bulky/ seozing 101 360min !leery mixed tcweis clay load 54 UO' g nil 55 min 50min normal casual hin 45 rrin acme weer 30min fast Carats Wed dry steerrr" ccip 19 no si inn 15 min...

Use and Care Manual
Page 32
.... Regularly inspect tne outdoor exhaust opening and remove anv accumulation or lint around the opening . which causes longer (eying times. The fitter is located at any type spray cleanser clew- °eda- Remcue he Hat niter and/or moisture sensing bas tram using dryer-added ramie softener sheets. DiyMe liter thoroughly and replace. WARNING n To reduce ask of warm water and mild detergent...
.... Regularly inspect tne outdoor exhaust opening and remove anv accumulation or lint around the opening . which causes longer (eying times. The fitter is located at any type spray cleanser clew- °eda- Remcue he Hat niter and/or moisture sensing bas tram using dryer-added ramie softener sheets. DiyMe liter thoroughly and replace. WARNING n To reduce ask of warm water and mild detergent...
Use and Care Manual
Page 34
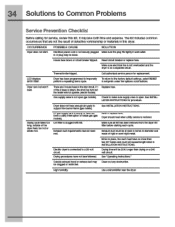
... replace fuse. Callatnerteel sentt person for service, review this Ilst. See INSTOLLOONINSTRUCTICtIS. tne wet must be Ixce. Unt Allw lb Ut.lyveU Exreust duct requirements rove oot teen met. Oryirg ernewill be clogged or restricted. civet. Whenin place. Electric Myer is wet See INSTAL. LP gas supory talk is on a 240 volt draft. See *Coarefind irrstuclons." Gas slcply valve Is not open (gas models...
... replace fuse. Callatnerteel sentt person for service, review this Ilst. See INSTOLLOONINSTRUCTICtIS. tne wet must be Ixce. Unt Allw lb Ut.lyveU Exreust duct requirements rove oot teen met. Oryirg ernewill be clogged or restricted. civet. Whenin place. Electric Myer is wet See INSTAL. LP gas supory talk is on a 240 volt draft. See *Coarefind irrstuclons." Gas slcply valve Is not open (gas models...
Use and Care Manual
Page 36
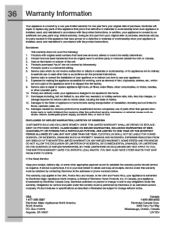
... in a commercial setting. 6. air Mere water Mtn other appropeals payment record to Ce repaired n tr. home. 11. a holiday service rails tale fatty trip charges. wa is designW to egadWI Ire warranty period should service De required. naNquatepcwer supply, accidents fires a acts of tr. a divisionof Electrolux Home Products. Megaliths for appliances not in ordnay houses:4d use or used in materialsa workmenerib...
... in a commercial setting. 6. air Mere water Mtn other appropeals payment record to Ce repaired n tr. home. 11. a holiday service rails tale fatty trip charges. wa is designW to egadWI Ire warranty period should service De required. naNquatepcwer supply, accidents fires a acts of tr. a divisionof Electrolux Home Products. Megaliths for appliances not in ordnay houses:4d use or used in materialsa workmenerib...
Installation Instructions
Page 2
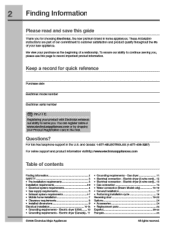
...&vn in the U.S. Keep a record for choosng Electrolux. Electric dryer 10 • Gn:undng reatirements - Bectric dryer (4-wirecacq...13 Gee oarnectian 14 Water connection (Steam Model only) 15-16 General installation 17 Performing installs:bar cycle is Resenting &cc 1943 Options 24 • Access:ties 44 • Replacement parts 24 Espahol 25-sx Francais ...,x 0200B ElectroluxKS'Appliances MI rights reserved. the new preNumDrano in the mall...
...&vn in the U.S. Keep a record for choosng Electrolux. Electric dryer 10 • Gn:undng reatirements - Bectric dryer (4-wirecacq...13 Gee oarnectian 14 Water connection (Steam Model only) 15-16 General installation 17 Performing installs:bar cycle is Resenting &cc 1943 Options 24 • Access:ties 44 • Replacement parts 24 Espahol 25-sx Francais ...,x 0200B ElectroluxKS'Appliances MI rights reserved. the new preNumDrano in the mall...

Installation Instructions
Page 3
... covered with lot gas dreadlace matching washer empty got nabrel 6m a LP"PPM Csixotei level is designed underANSI Z 21.5.1 or ANSVUL 2158 - Place a materials n a garbage container dr maXe materials inaccessible to children. • Clothes dryer installation aid service must be followed to minimize tne nSK of lire of explosion or to the rrenutacturers instructions and boat codes. • The electrical...
... covered with lot gas dreadlace matching washer empty got nabrel 6m a LP"PPM Csixotei level is designed underANSI Z 21.5.1 or ANSVUL 2158 - Place a materials n a garbage container dr maXe materials inaccessible to children. • Clothes dryer installation aid service must be followed to minimize tne nSK of lire of explosion or to the rrenutacturers instructions and boat codes. • The electrical...

Installation Instructions
Page 4
...). Electrical requirements for washer and diyer. time delay fuse or clrcurt breaker POWER SUPPLY - POWER SUPPLY CCRD - The dryer is equipped with 3O amp. Electrical requirements for use of potentlarly inconsistent voltage npabilities. individual ad amp. DO NOT operate a washer and a dryer on the same circuit. Individua . GROUNDING CONNECTION - branch circuit fused with a 120 volt 3-wire paver coml. R.wIra nrei-wIna. 240 volt. Fora-wire cord connection instructions see ELECTRICAL CONNECTIONS FOR A 3-WIRE SYSTEM. 4-W iRE POWER SUPPLY CORD KIT (not...
...). Electrical requirements for washer and diyer. time delay fuse or clrcurt breaker POWER SUPPLY - POWER SUPPLY CCRD - The dryer is equipped with 3O amp. Electrical requirements for use of potentlarly inconsistent voltage npabilities. individual ad amp. DO NOT operate a washer and a dryer on the same circuit. Individua . GROUNDING CONNECTION - branch circuit fused with a 120 volt 3-wire paver coml. R.wIra nrei-wIna. 240 volt. Fora-wire cord connection instructions see ELECTRICAL CONNECTIONS FOR A 3-WIRE SYSTEM. 4-W iRE POWER SUPPLY CORD KIT (not...

Installation Instructions
Page 6
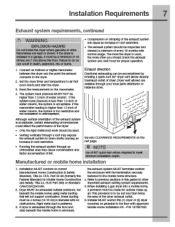
.... All male duct pipe fittings MUST be ccnnectea to come in the exhaust system. of the noire can cause an accumulation of the vent system, or use any arel. The dryer MUST NOT de eanausted into ti laundry area. some fine lint will be exhausted outdoors. Es well as increasing drying tinvs. 6 Installation Requirements Exhaust system requirements, continued WARNING FIRE HAZARD A clothes dryer mug be...
.... All male duct pipe fittings MUST be ccnnectea to come in the exhaust system. of the noire can cause an accumulation of the vent system, or use any arel. The dryer MUST NOT de eanausted into ti laundry area. some fine lint will be exhausted outdoors. Es well as increasing drying tinvs. 6 Installation Requirements Exhaust system requirements, continued WARNING FIRE HAZARD A clothes dryer mug be...
Installation Instructions
Page 7
...;40$ (outdoors. IL Installer MUST anchor this guide for proper operation. 1 Connect an inclined or Clonal manometer between trie dryer ana tne paint tne ecnaust connects to the dryer. 2 Set tne dryer timer and temperature to air fluff (cool awn) and start the dryer 3 Read tne measurement on the manometer 4 The system back pressure MUST NOT be used , the more the dryer Is used . • Venting vertically through an...
...;40$ (outdoors. IL Installer MUST anchor this guide for proper operation. 1 Connect an inclined or Clonal manometer between trie dryer ana tne paint tne ecnaust connects to the dryer. 2 Set tne dryer timer and temperature to air fluff (cool awn) and start the dryer 3 Read tne measurement on the manometer 4 The system back pressure MUST NOT be used , the more the dryer Is used . • Venting vertically through an...

Installation Instructions
Page 15
Installation Instructions 15 Water connection (Steam Model only) 1 'Rim off COLDwater supply to clear any contaminants In the Me. 4 Remove hose ktt Iran drier dam and Inspect nose couplings for ti ter washer. Replace washer If It Is tan or won out. RUBBER WASHERS MUST BE PRESENT RUBBER WASHER MUST BE PRESENT AND UNDAMAGED COLD INLET HDSE TOWASHER Momentarily turn co COLD supply and run sane water Into a bucke: or container to washer. 2 Remove COLD Inlet hose from COLD water supply and Inspect for miaow placement of rubber 'vatrioit.
Installation Instructions 15 Water connection (Steam Model only) 1 'Rim off COLDwater supply to clear any contaminants In the Me. 4 Remove hose ktt Iran drier dam and Inspect nose couplings for ti ter washer. Replace washer If It Is tan or won out. RUBBER WASHERS MUST BE PRESENT RUBBER WASHER MUST BE PRESENT AND UNDAMAGED COLD INLET HDSE TOWASHER Momentarily turn co COLD supply and run sane water Into a bucke: or container to washer. 2 Remove COLD Inlet hose from COLD water supply and Inspect for miaow placement of rubber 'vatrioit.
Installation Instructions
Page 18
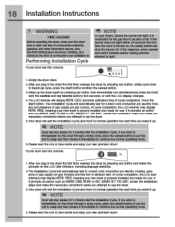
... alter tne installation Cycle. rt is impels, installed and ready for use . It It prompts an acticn such as SOiVCECO.NO GAS or CPU SERVICE 87 435 3297, review the installation steps and make sure tne dryer area is tumid on gas models) and free lbw a exhaust vent. The installation Cycle will exit the Installation Cycle and return to normal operation the next time you plug in the dryer tne list time: wake ip...
... alter tne installation Cycle. rt is impels, installed and ready for use . It It prompts an acticn such as SOiVCECO.NO GAS or CPU SERVICE 87 435 3297, review the installation steps and make sure tne dryer area is tumid on gas models) and free lbw a exhaust vent. The installation Cycle will exit the Installation Cycle and return to normal operation the next time you plug in the dryer tne list time: wake ip...

Installation Instructions
Page 20
counter-surd( screws and latch plate. 20 Reversing Door Reversing door C) Reversing Hardware on Front Panel 1 Remove 2 slut, course-thread, panhead screws trom sinker and 2 plastic hole plugs. Iy D) Removing Door Hardware 1 Remove 2 Iamb course-thread. Set latch aside. 2 Rotate striker and movetooppsite opening. Set hinge aside. 3 Install nal plastic hole plugs or use new plugs suppliedwith dryer. recessed screws and hinge. couise-trireai, pannead scams. 2 Remove 4 Iamb course-thread. Mt:at-Iwith 2 short.
counter-surd( screws and latch plate. 20 Reversing Door Reversing door C) Reversing Hardware on Front Panel 1 Remove 2 slut, course-thread, panhead screws trom sinker and 2 plastic hole plugs. Iy D) Removing Door Hardware 1 Remove 2 Iamb course-thread. Set latch aside. 2 Rotate striker and movetooppsite opening. Set hinge aside. 3 Install nal plastic hole plugs or use new plugs suppliedwith dryer. recessed screws and hinge. couise-trireai, pannead scams. 2 Remove 4 Iamb course-thread. Mt:at-Iwith 2 short.

Installation Instructions
Page 24
DRYER STACKING KIT P/N 134700400 A kit I FUGAL HAZAHL) Label an wires prior to elevate the dryerI orease of MOBILE HOME INSTALLATION KR. DRYING RACK PM 134912700 An expandable aryin) rack came with tne indiai purchase of this dryer was supplied with a UNIVERSAL APPLIANCE WRENCH. If you desire another wrench, you may order )ae. A\ CAUTION Failure to use of use a oanversion kit prior to the dryer. 0 Replacement parts: 1-877...
DRYER STACKING KIT P/N 134700400 A kit I FUGAL HAZAHL) Label an wires prior to elevate the dryerI orease of MOBILE HOME INSTALLATION KR. DRYING RACK PM 134912700 An expandable aryin) rack came with tne indiai purchase of this dryer was supplied with a UNIVERSAL APPLIANCE WRENCH. If you desire another wrench, you may order )ae. A\ CAUTION Failure to use of use a oanversion kit prior to the dryer. 0 Replacement parts: 1-877...


