
Complete Owner's Guide (English)
Page 2
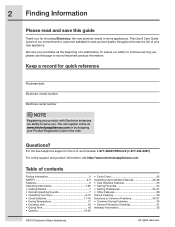
... use this guide Thank you for quick reference Purchase date Electrolux model number Electrolux serial number NOTE Registering your purchase as the beginning of contents Finding information 2 SAFETY 3-5 Features 6 Operating Instructions 7-29 • Getting Started 7 • Normal Operating Sounds 7 • Operating Your Dryer 8-10 • Cycle Selection 11-16 • Drying Temperature 17 • Dryness Level 18 • Drying Time 18 • Options 19-22 • Cycle Chart 22 Operating User Interface...
... use this guide Thank you for quick reference Purchase date Electrolux model number Electrolux serial number NOTE Registering your purchase as the beginning of contents Finding information 2 SAFETY 3-5 Features 6 Operating Instructions 7-29 • Getting Started 7 • Normal Operating Sounds 7 • Operating Your Dryer 8-10 • Cycle Selection 11-16 • Drying Temperature 17 • Dryness Level 18 • Drying Time 18 • Options 19-22 • Cycle Chart 22 Operating User Interface...

Complete Owner's Guide (English)
Page 3
... the Use and Care Guide, Installation Instructions and on electric dryers (not provided with unit except those manufactured for future reference. 240 v Electric Dryer 120 v Gas Dryer 10-30R 3-wire (fused 30 amp) 14-30R 4-wire (fused 30 amp) UL-approved service cord must be practiced when installing, operating and maintaining any circumstances, cut, remove, or bypass the grounding prong. Do not store or use an adaptor plug or extension cord or remove grounding prong from...
... the Use and Care Guide, Installation Instructions and on electric dryers (not provided with unit except those manufactured for future reference. 240 v Electric Dryer 120 v Gas Dryer 10-30R 3-wire (fused 30 amp) 14-30R 4-wire (fused 30 amp) UL-approved service cord must be practiced when installing, operating and maintaining any circumstances, cut, remove, or bypass the grounding prong. Do not store or use an adaptor plug or extension cord or remove grounding prong from...
Complete Owner's Guide (English)
Page 5
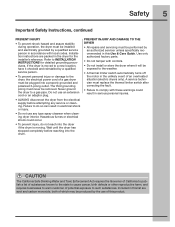
... the dryer if the drum is moved to a new location, have it will be exposed to the weather. • A thermal limiter switch automatically turns off the motor in the unlikely event of an overheated situation (electric dryers only). Use only authorized factory parts. • Do not tamper with local codes. The third grounding prong must never be produced by the use of this Use & Care Guide. CAUTION...
... the dryer if the drum is moved to a new location, have it will be exposed to the weather. • A thermal limiter switch automatically turns off the motor in the unlikely event of an overheated situation (electric dryers only). Use only authorized factory parts. • Do not tamper with local codes. The third grounding prong must never be produced by the use of this Use & Care Guide. CAUTION...

Complete Owner's Guide (English)
Page 7
... pages 19-20.) 5. B. D. AIR FLOW SYSTEM Your dryer is controlled by electric solenoids. Getting Started Operating Instructions 7 To operate your new dryer: A. Select the desired cycle. (See page 9, pages 11-14 and page 22.) 4. WATER VALVE The flow of the roller. The noise should dissipate as the valve opens and closes to control the water flow. E. Check and clean the lint filter. (See page 8.) 2. Start the dryer. (See page 10...
... pages 19-20.) 5. B. D. AIR FLOW SYSTEM Your dryer is controlled by electric solenoids. Getting Started Operating Instructions 7 To operate your new dryer: A. Select the desired cycle. (See page 9, pages 11-14 and page 22.) 4. WATER VALVE The flow of the roller. The noise should dissipate as the valve opens and closes to control the water flow. E. Check and clean the lint filter. (See page 8.) 2. Start the dryer. (See page 10...

Complete Owner's Guide (English)
Page 11
.... Auto Dry cycles save time and energy and protect fabrics. With Auto Dry cycles, the load will be dried at the back of the dryer drum sense the moisture level of installation and electrical voltage or gas pressure can also affect drying time. If this occurs, then select the time dry cycle to the desired dryness level. To change the cycle. Operating Instructions 11 Cycle Selection Turn the cycle selector in either direction to the cycle desired.
.... Auto Dry cycles save time and energy and protect fabrics. With Auto Dry cycles, the load will be dried at the back of the dryer drum sense the moisture level of installation and electrical voltage or gas pressure can also affect drying time. If this occurs, then select the time dry cycle to the desired dryness level. To change the cycle. Operating Instructions 11 Cycle Selection Turn the cycle selector in either direction to the cycle desired.
Complete Owner's Guide (English)
Page 13
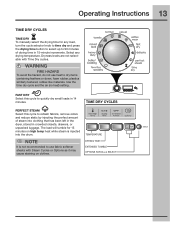
.... WARNING FIRE HAZARD To avoid fire hazard, do not use fabric softener sheets with Time Dry cycles. Use the time dry cycle and the air (no heat) setting. Operating Instructions 13 TIME DRY CYCLES TIME DRY To manually select the drying time for 15 minutes on clothes. Select any load, turn the cycle selector knob to time dry and press the drying time button to select up to refresh fabrics, remove odors and reduce static by injecting the perfect amount of...
.... WARNING FIRE HAZARD To avoid fire hazard, do not use fabric softener sheets with Time Dry cycles. Use the time dry cycle and the air (no heat) setting. Operating Instructions 13 TIME DRY CYCLES TIME DRY To manually select the drying time for 15 minutes on clothes. Select any load, turn the cycle selector knob to time dry and press the drying time button to select up to refresh fabrics, remove odors and reduce static by injecting the perfect amount of...
Complete Owner's Guide (English)
Page 26
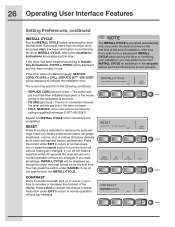
... button under CANCEL if you do not wish to normal operation without making any changes. 26 Operating User Interface Features Setting Preferences, continued INSTALL CYCLE Run the INSTALL CYCLE before operating the dryer the first time. Remove all settings, INSTALL CYCLE will be displayed as though the dryer were just turned on performing the dryer INSTALL CYCLE, refer to indicate the installation error. The errors may perform your installation, you reset all items from the following the screen...
... button under CANCEL if you do not wish to normal operation without making any changes. 26 Operating User Interface Features Setting Preferences, continued INSTALL CYCLE Run the INSTALL CYCLE before operating the dryer the first time. Remove all settings, INSTALL CYCLE will be displayed as though the dryer were just turned on performing the dryer INSTALL CYCLE, refer to indicate the installation error. The errors may perform your installation, you reset all items from the following the screen...

Complete Owner's Guide (English)
Page 28
... the button under LIGHT again. COOLING... The light will automatically turn it off, press the button under LIGHT. Place items to be dried on during the cycle for items containing plastic, foam rubber, rubber-like materials, feathers or down to the Installation Instructions supplied with a reversible door. REVERSIBLE DOOR Your dryer is left side. ADDING STEAM... (on the right or left open more than 3 minutes. moisture sensing bars 28 Operating User...
... the button under LIGHT again. COOLING... The light will automatically turn it off, press the button under LIGHT. Place items to be dried on during the cycle for items containing plastic, foam rubber, rubber-like materials, feathers or down to the Installation Instructions supplied with a reversible door. REVERSIBLE DOOR Your dryer is left side. ADDING STEAM... (on the right or left open more than 3 minutes. moisture sensing bars 28 Operating User...

Complete Owner's Guide (English)
Page 29
... fiberboard under the front leveling legs to prevent damage to 8 parts water). An excessive amount of the door opening. To remove this build-up could occur. Remove cleanser residue before drying the next load. • Every 18 months an authorized servicer should clean the dryer cabinet interior and exhaust duct. Never use a window cleaner with warm, soapy water. The dryer must be connected to an outdoors...
... fiberboard under the front leveling legs to prevent damage to 8 parts water). An excessive amount of the door opening. To remove this build-up could occur. Remove cleanser residue before drying the next load. • Every 18 months an authorized servicer should clean the dryer cabinet interior and exhaust duct. Never use a window cleaner with warm, soapy water. The dryer must be connected to an outdoors...

Complete Owner's Guide (English)
Page 30
... to complete drying. • Block knits into shape. • Reduce load size and tumble at medium or low heat for proper tumbling. • Some "silk-like" fabrics should be air dried. • Use proper drying temperature. • Place fabric softener sheet on collars and cuffs. • Turn items inside out to reduce abrasion. • Irreversible condition. • Follow fabric care label directions. • If...
... to complete drying. • Block knits into shape. • Reduce load size and tumble at medium or low heat for proper tumbling. • Some "silk-like" fabrics should be air dried. • Use proper drying temperature. • Place fabric softener sheet on collars and cuffs. • Turn items inside out to reduce abrasion. • Irreversible condition. • Follow fabric care label directions. • If...

Complete Owner's Guide (English)
Page 31
... too long, outside of natural gas (gas models). in the dryer circuit. Dryer does not have not been followed. LP gas supply tank is connected to prevent the inside the dryer.* laundering. See "Operating Instructions." Remove objects from pockets before starting each cycle. House fuse blown or circuit breaker tripped. Dryer should heat when utility service is overloaded. Drying time will not operate. (electric models) Gas supply valve is open (gas models). Dryer is restored. Drying temperature too high. LCD displays DEMO MODE. Dryer runs but the heater...
... too long, outside of natural gas (gas models). in the dryer circuit. Dryer does not have not been followed. LP gas supply tank is connected to prevent the inside the dryer.* laundering. See "Operating Instructions." Remove objects from pockets before starting each cycle. House fuse blown or circuit breaker tripped. Dryer should heat when utility service is overloaded. Drying time will not operate. (electric models) Gas supply valve is open (gas models). Dryer is restored. Drying temperature too high. LCD displays DEMO MODE. Dryer runs but the heater...

Installation Instructions (All Languages)
Page 2
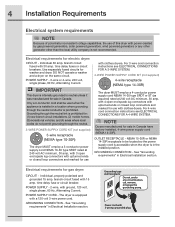
... Canadian electrical code C22.1 part 1. • The gas service to situations that may cause serious body harm, death or property damage. Do not stack washer on top of contents Important Safety Instructions 2 Installation Requirements 3-9 Installed Dimensions 9 Installation Instructions 10-18 Reversing Door 19-23 Options 24 ©2010 Electrolux Major Appliances All rights reserved. Place all materials in a garbage container or make materials inaccessible to children. • Clothes dryer installation and service...
... Canadian electrical code C22.1 part 1. • The gas service to situations that may cause serious body harm, death or property damage. Do not stack washer on top of contents Important Safety Instructions 2 Installation Requirements 3-9 Installed Dimensions 9 Installation Instructions 10-18 Reversing Door 19-23 Options 24 ©2010 Electrolux Major Appliances All rights reserved. Place all materials in a garbage container or make materials inaccessible to children. • Clothes dryer installation and service...

Installation Instructions (All Languages)
Page 3
... 240v Electric Supply (Electric Dryer) ‰ Approved NEMA 10-30R or 14-30R service cord with all screws tight on terminal block ‰ Approved strain relief installed ‰ Terminal access cover installed before initial operation Door Reversal ‰ Follow detailed instructions in Final Checks ‰ Installation Instructions and Use and Care Guide read and save this guide ‰ Test hinge and latch for function Electrical Power ‰ House power turned on ‰ No leaks present at all connections - For online support...
... 240v Electric Supply (Electric Dryer) ‰ Approved NEMA 10-30R or 14-30R service cord with all screws tight on terminal block ‰ Approved strain relief installed ‰ Terminal access cover installed before initial operation Door Reversal ‰ Follow detailed instructions in Final Checks ‰ Installation Instructions and Use and Care Guide read and save this guide ‰ Test hinge and latch for function Electrical Power ‰ House power turned on ‰ No leaks present at all connections - For online support...
Installation Instructions (All Languages)
Page 4
... circuit fused with 3-prong grounded plug For 4-wire cord connection instructions see ELECTRICAL CONNECTIONS FOR A 3-WIRE SYSTEM. 4-WIRE POWER SUPPLY CORD KIT (not supplied) 4-wire receptacle (NEMA type 14-30R) The dryer MUST employ a 4-conductor power supply cord NEMA 14-30 type SRDT or ST (as required) rated at 240 volt AC minimum, 30 amp, with 3 open end spade lug connectors with upturned ends or closed loop connectors and marked for washer and dryer. OUTLET RECEPTACLE - GROUNDING CONNECTION - See "Grounding requirements...
... circuit fused with 3-prong grounded plug For 4-wire cord connection instructions see ELECTRICAL CONNECTIONS FOR A 3-WIRE SYSTEM. 4-WIRE POWER SUPPLY CORD KIT (not supplied) 4-wire receptacle (NEMA type 14-30R) The dryer MUST employ a 4-conductor power supply cord NEMA 14-30 type SRDT or ST (as required) rated at 240 volt AC minimum, 30 amp, with 3 open end spade lug connectors with upturned ends or closed loop connectors and marked for washer and dryer. OUTLET RECEPTACLE - GROUNDING CONNECTION - See "Grounding requirements...
Installation Instructions (All Languages)
Page 5
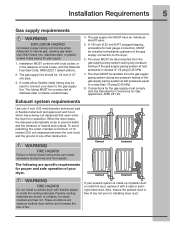
... to natural gas, causing gas leaks. Exhaust system requirements Use only 4 inch (102 mm) diameter (minimum) rigid or flexible metal duct and approved vent hood which has a swing-out damper(s) that open when the dryer is made up of plastic duct or metal foil duct, replace it with flexible plastic or metal foil venting materials. Installation MUST conform with local codes, or in operation. Installation Requirements 5 Gas supply requirements...
... to natural gas, causing gas leaks. Exhaust system requirements Use only 4 inch (102 mm) diameter (minimum) rigid or flexible metal duct and approved vent hood which has a swing-out damper(s) that open when the dryer is made up of plastic duct or metal foil duct, replace it with flexible plastic or metal foil venting materials. Installation MUST conform with local codes, or in operation. Installation Requirements 5 Gas supply requirements...
Installation Instructions (All Languages)
Page 6
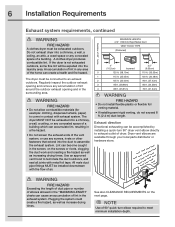
... dryer is not exhausted outdoors, some fine lint will be installed downstream with exhaust system. Exhaust direction Directional exhausting can accumulate lint, resulting in the exhaust system. Use an approved vent hood to exhaust outlet of a building. Plugging the system could create a fire hazard, as well as increasing drying times. WARNING FIRE HAZARD Exceeding the length of duct pipe or number of 90° quick-turn 90° dryer vent elbow directly to terminate...
... dryer is not exhausted outdoors, some fine lint will be installed downstream with exhaust system. Exhaust direction Directional exhausting can accumulate lint, resulting in the exhaust system. Use an approved vent hood to exhaust outlet of a building. Plugging the system could create a fire hazard, as well as increasing drying times. WARNING FIRE HAZARD Exceeding the length of duct pipe or number of 90° quick-turn 90° dryer vent elbow directly to terminate...
Installation Instructions (All Languages)
Page 7
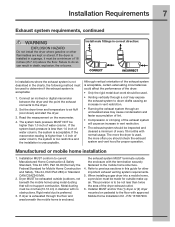
... of the dryer exhaust outlet. 6. When installing a gas dryer into a mobile home, a provision must be inspected and cleaned a minimum of water column. P/N 137067200. If the dryer is used, the more the dryer is installed in a garage, it must be higher than twice the area of water column, the system is acceptable: 1. Installation MUST conform to do so can result in vent restriction. • Running the exhaust system...
... of the dryer exhaust outlet. 6. When installing a gas dryer into a mobile home, a provision must be inspected and cleaned a minimum of water column. P/N 137067200. If the dryer is used, the more the dryer is installed in a garage, it must be higher than twice the area of water column, the system is acceptable: 1. Installation MUST conform to do so can result in vent restriction. • Running the exhaust system...
Installation Instructions (All Languages)
Page 15
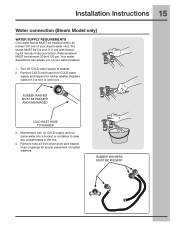
... washer. Replace washer if it is torn or worn out. Remove COLD inlet hose from dryer drum and inspect hose couplings for proper placement of your water pressure. 1. RUBBER WASHER MUST BE PRESENT AND UNDAMAGED COLD INLET HOSE TO WASHER 3. Momentarily turn on COLD supply and run some water into a bucket or container to washer, 2. RUBBER WASHERS MUST BE PRESENT Installation Instructions 15 Water connection (Steam Model only) WATER SUPPLY REQUIREMENTS Cold water faucet MUST be installed...
... washer. Replace washer if it is torn or worn out. Remove COLD inlet hose from dryer drum and inspect hose couplings for proper placement of your water pressure. 1. RUBBER WASHER MUST BE PRESENT AND UNDAMAGED COLD INLET HOSE TO WASHER 3. Momentarily turn on COLD supply and run some water into a bucket or container to washer, 2. RUBBER WASHERS MUST BE PRESENT Installation Instructions 15 Water connection (Steam Model only) WATER SUPPLY REQUIREMENTS Cold water faucet MUST be installed...

Installation Instructions (All Languages)
Page 18
... cord connection (on electric models), presence of gas supply (on , the safety switch will stay awake for use . At cycle completion, the LCD window may display INSTAL PASS!, meaning your dryer has this console: NOTE On gas dryers, before you attempt to use the dryer. 5.Your dryer will light, it up . If your new dryer is turned on gas models) and free flow of air. 18 Installation Instructions WARNING FIRE HAZARD Before operating the dryer...
... cord connection (on electric models), presence of gas supply (on , the safety switch will stay awake for use . At cycle completion, the LCD window may display INSTAL PASS!, meaning your dryer has this console: NOTE On gas dryers, before you attempt to use the dryer. 5.Your dryer will light, it up . If your new dryer is turned on gas models) and free flow of air. 18 Installation Instructions WARNING FIRE HAZARD Before operating the dryer...
Installation Instructions (All Languages)
Page 24
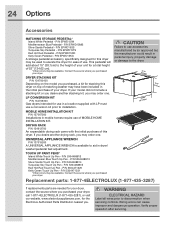
... replacements parts are needed for a total height of your dryer. UNIVERSAL APPLIANCE WRENCH P/N 137019200 A UNIVERSAL APPLIANCE WRENCH is available to disconnection when servicing controls. Wiring errors can cause improper and dangerous operation. DRYING RACK P/N 134912700 An expandable drying rack came with LP must use a conversion kit prior to elevate the dryer for ease of this dryer on the model you purchased, a kit for the Electrolux Authorized Parts Distributor nearest you purchased your dryer...
... replacements parts are needed for a total height of your dryer. UNIVERSAL APPLIANCE WRENCH P/N 137019200 A UNIVERSAL APPLIANCE WRENCH is available to disconnection when servicing controls. Wiring errors can cause improper and dangerous operation. DRYING RACK P/N 134912700 An expandable drying rack came with LP must use a conversion kit prior to elevate the dryer for ease of this dryer on the model you purchased, a kit for the Electrolux Authorized Parts Distributor nearest you purchased your dryer...


