
Electrolux EWMED70JSS Support Question
Electrolux EWMED70JSS Support Question
Find answers below for this question about Electrolux EWMED70JSS.Need a Electrolux EWMED70JSS manual? We have 4 online manuals for this item!
Current Answers
Answer #1: Posted by OnlineOutreachSpecialist on January 17th, 2012 8:56 AM
OnlineOutreachSpecialist

Member since:
March 30th, 2011 Points: 2,848,320

Member since:
March 30th, 2011 Points: 2,848,320
Technically there is not a "fuse" but a therminal limited which is located if you are looking at the front of the unit, and the back panel is off, it is on the top left corner of the back panel or top left behind the drum assembly. Very small. Often square in shape.
Online Outreach Specialist
Related Electrolux EWMED70JSS Manual Pages
Complete Owner's Guide (English) - Page 2
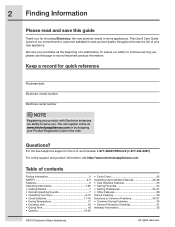
... product quality throughout the service life of contents
Finding information 2 SAFETY 3-5 Features 6 Operating Instructions 7-29 • Getting Started 7 • Normal Operating Sounds 7 • Operating Your Dryer 8-10 • Cycle Selection 11-16 • Drying Temperature 17 • Dryness Level 18 • Drying Time 18 • Options 19-22
• Cycle Chart...
Complete Owner's Guide (English) - Page 3

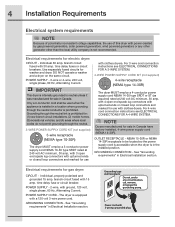
... instructions for sale in the Use and Care Guide, Installation Instructions and on electric dryers (not provided with 3-prong grounded plug
Avoid fire hazard or electrical shock....with unit except those manufactured for future reference.
240 v Electric Dryer
120 v Gas Dryer
10-30R 3-wire
(fused 30 amp)
14-30R 4-wire
(fused 30 amp)
UL-approved service cord must be performed by a...
Complete Owner's Guide (English) - Page 4
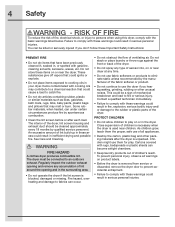
... blocked, damaged or missing. See Care and Cleaning. Do not stack or place laundry or throw rugs against the front or back of the dryer.
• Do not spray any time.
• Do not use the dryer if you don't follow these warnings could cause a load to cooking oils in serious personal injuries...
Complete Owner's Guide (English) - Page 5
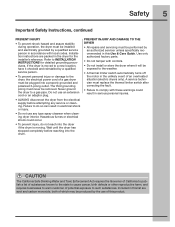
... servicing must be performed by the use an extension cord or an adaptor plug.
• ALWAYS disconnect the dryer from the electrical supply before reaching into the dryer if the drum is moved to a new location, have it will be exposed to the weather.
• A thermal limiter switch automatically turns off the motor...
Complete Owner's Guide (English) - Page 7

... air flow mixes with a high volume air handling system. PERFECT TUMBLE™ When the reversingaction option of perfect tumble™ is ignited in the dryer drum for a period of the roller. In some sounds associated with load size and type. E. During operation
A
B
C
F E D
there may be a thumping or rolling sound when...
Complete Owner's Guide (English) - Page 9

Operating Instructions 9
OPERATING YOUR DRYER, continued
4. Turn the cycle selector knob in set prefs under options to advance the User ... through the options menu. See the "Cycle Settings Chart" in the future. NOTE
To provide the best care of your laundry, not every setting or option is turned, the cycle and estimated cycle time are pressed, the User Interface screen will automatically...
Complete Owner's Guide (English) - Page 14

... allergens, while refreshing a full load of dry clothes with steam in a cold dryer or a few dry items you dryer's specialty cycles:
• Turn the cycle selector knob to favorites/specialty.
•...To avoid stains in dryer. KIDS WEAR Select this specialty cycle for drying kids clothing and baby wear where allergen-reduction is recommended.
AIR CLEAN For dry laundry items that can be...
Complete Owner's Guide (English) - Page 21

...load, overall energy consumption decreases.
NOTE
While counting down when you will notice your dryer periodically tumbling for 30 minutes to 22 hours. As a result, depending on moisture ...21
Options, continued
LINE DRY Select this option to simulate hanging your laundry in a summer breeze combined with the dryer's automatic moisture sensors and heat is radically reduced or eliminated, cycle ...
Complete Owner's Guide (English) - Page 28

...COMPLETE - TUMBLE WILL CONTINUE COMPLETE CLEAN FILTER
Extend rack until the lock tabs click into the dryer drum, resting the back support on the moisture sensor bars and the front legs on DOOR ... bars To activate the drum light during the cycle:
DRYING...
Store the drying rack in a convenient location. WRINKLE RELEASE IS ON COMPLETE - To turn off the light. When items are dry, remove the...
Complete Owner's Guide (English) - Page 29

...Clean the cabinet with a mixture of warm water and mild detergent. The filter is located at any type spray cleanser when cleaning the dryer interior. These areas can damage the finish or controls. Rinse several times with clear ...screen after every load. IMPORTANT
Do not store or place laundry products on the filter restricts air flow, which causes longer drying times.
Complete Owner's Guide (English) - Page 31

... is clogged with lint.
Clean out any obstruction. Drying temperature too high. Lint filter is open (gas models).
Excessive wrinkling.
buttons are 2 house fuses in dryer too long.
Exhaust duct requirements have no more than four 90° bends and must be 20% longer than drying on a separate circuit. Drying time...
Installation Instructions (All Languages) - Page 4
....
branch circuit fused with power created by gas powered generators, solar powered generators, wind powered generators or any circumstances, cut, remove, or bypass the grounding prong.
DO NOT operate a washer and a dryer on the same circuit. Only a 4-conductor cord shall be located so the power supply cord is accessible when the dryer is internally...
Installation Instructions (All Languages) - Page 6
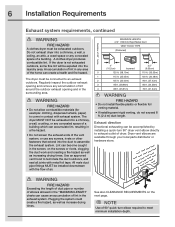
...an approved vent hood to exhaust outlet of air.
If the dryer is not exhausted outdoors, some fine lint will be ...dryer must be connected to meet minimum installation depth.
All male duct pipe fittings MUST be exhausted outdoors. Dryer vent elbows are available through your local parts distributor or hardware store. Do not exhaust dryer into the laundry area. The dryer...
Installation Instructions (All Languages) - Page 8
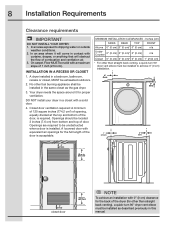
... In an area where it for other than straight back venting, a quick-turn 90° dryer vent elbow must be located 3 inches (7.6 cm) from bottom and top of combustion and ventilation air. 3. Openings should ...is acceptable. On carpet. INSTALLATION IN A RECESS OR CLOSET
1. DO NOT install your dryer in contact with
curtains, drapes, or anything that will obstruct the flow of ...
Installation Instructions (All Languages) - Page 10
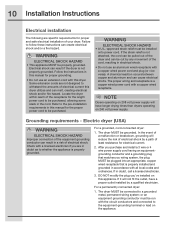
... the instructions in accordance with the circuit conductors and connected to be purchased, allowing some slack in doubt, call a licensed electrician.
3. Locate the dryer within reach of electrical current this dryer.
Electrical shock can result in this manual for the proper power cord to withstand the amounts of the receptacle for proper grounding...
Installation Instructions (All Languages) - Page 14
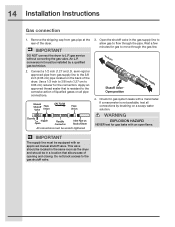
...) I.D. semi-rigid or approved pipe from gas supply line to the corrosive action of liquefied gases on the back of the dryer. Open the shutoff valve in a location that is not available, test all pipe connections. Check for gas leaks with a manometer.
WARNING
EXPLOSION HAZARD
NEVER test for gas system...
Installation Instructions (All Languages) - Page 15
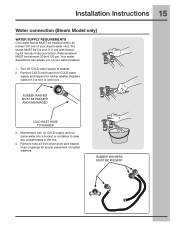
Water pressure MUST be 3/4 inch (1.9 cm) with threading for laundry hose connection. Your water department can advise you of your water pressure.
1.
... out. RUBBER WASHER MUST BE PRESENT AND UNDAMAGED
COLD INLET HOSE TO WASHER
3. Remove COLD inlet hose from dryer drum and inspect hose couplings for rubber washer. Remove hose kit from COLD water
supply and inspect for proper placement...
Installation Instructions (All Languages) - Page 17
... money.
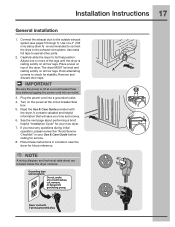
6. NOTE
A wiring diagram and technical data sheet are located inside the dryer console. Grounding type wall receptacle
Do not, under any questions during initial operation, please... in your new dryer.
7.
Installation Instructions 17
General installation
1. Use of the dryer. The dryer MUST be level and
A
resting solidly on the power at a circuit breaker/fuse box before calling ...
Installation Instructions (All Languages) - Page 23
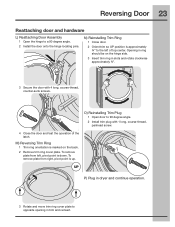
... UP position is down.
M) Reversing Trim Ring
1 Trim ring orientation is up. UP
P) Plug in dryer and continue operation.
3 Rotate and move trim ring cover plate to a 90 degree angle. 2 Install the door onto the hinge locating pins. Opening in ring should be on the back. 2 Remove trim ring cover plate. To...
Installation Instructions (All Languages) - Page 24
....64c4m" )
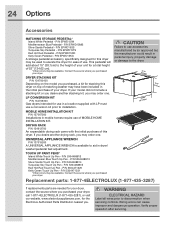
MOBILE HOME INSTALLATION KIT P/N 137067200
Installations in mobile homes require use in a location supplied with the initial purchase of MOBILE HOME INSTALLATION KIT. DRYING RACK P/N 134912700
An expandable ... HAZARD
Label all wires prior to aid in the initial purchase of your unit for your dryer, contact the source where you may order one . P/N EPWD15TS Red Hot Red Pedestal -...
Similar Questions

?dryer Runs But Does Not Heat Up.
Where are the '2 house fuses' located?
Where are the '2 house fuses' located?
(Posted by slmcqueen 7 years ago)

Dryer Pausing For No Apparent Reason A Few Seconds After Starting Cycle...
would a defective moisture sensor be causing our electrolux dryer to pause a few seconds into a new ...
would a defective moisture sensor be causing our electrolux dryer to pause a few seconds into a new ...
(Posted by plantz 7 years ago)

Dryer Acts Normal, But Won't Spin.
Loaded with wet clothes, chose my temp,etc., pressed start, the dryer hummed its usual noise and the...
Loaded with wet clothes, chose my temp,etc., pressed start, the dryer hummed its usual noise and the...
(Posted by Kduranduran 10 years ago)

My Dryer Edv605 Is Just A Few Months Old And Is Not Getting Warm...not Drying!
My dryer EDV605 is just a few months old and is not getting warm...not drying!
My dryer EDV605 is just a few months old and is not getting warm...not drying!
(Posted by kristine67584 11 years ago)

Thermal Fuse Where Is It On My Machine And How Do I Get To It ?
(Posted by Raptor3 11 years ago)