

Use and Care Guide
Page 2
...use this guide Thank you for quick reference Purchase date Electrolux model number Electrolux serial number For toll-free telephone support in home appliances... to record important product information. This Use & Care Guide is part of our commitment to customer satisfaction and product quality throughout the life...24 • Getting Started 7 Normal Operating Sounds 7 Operating Your Washer 8-13 Cycle Selection 14-18 Washing/Rinsing Temperature 19-20 Spin Speed... Operating User interface Features 25-32 Saving Favorites 26-27 Setting Preferences 28-31 Other Features 32 Cycle Chart...
...use this guide Thank you for quick reference Purchase date Electrolux model number Electrolux serial number For toll-free telephone support in home appliances... to record important product information. This Use & Care Guide is part of our commitment to customer satisfaction and product quality throughout the life...24 • Getting Started 7 Normal Operating Sounds 7 Operating Your Washer 8-13 Cycle Selection 14-18 Washing/Rinsing Temperature 19-20 Spin Speed... Operating User interface Features 25-32 Saving Favorites 26-27 Setting Preferences 28-31 Other Features 32 Cycle Chart...

Use and Care Guide
Page 4
...comply with these items on product labels. Keep laundry products out of the washer. Before the washer is used near the washer. Destroy the carton, plastic bag and other appliance. Failure to the rubber or plastic parts of this time. Do not store these warnings could result in the ...vicinity of the washer. HYDROGEN GAS IS EXPLOSIVE. This will release any other packing materials after the washer is flammable; Do not store or use gasoline or...
...comply with these items on product labels. Keep laundry products out of the washer. Before the washer is used near the washer. Destroy the carton, plastic bag and other appliance. Failure to the rubber or plastic parts of this time. Do not store these warnings could result in the ...vicinity of the washer. HYDROGEN GAS IS EXPLOSIVE. This will release any other packing materials after the washer is flammable; Do not store or use gasoline or...

Use and Care Guide
Page 5
... vibration or movement. • To reduce the risk of up to 30 minutes, if the washer has not been manually turned off during operation, the washer must be plugged into the washer while parts are packed in the cycle selector knob and allow the drum to coast to a complete stop ... The motor will be exposed to a new location, have it becomes overheated. It may be removed. Do not use in 1 load unless specified on a solid floor. Installation instructions are moving. Install washer on the label. • Do not mix chlorine bleach with controls. • Do not install or store the...
... vibration or movement. • To reduce the risk of up to 30 minutes, if the washer has not been manually turned off during operation, the washer must be plugged into the washer while parts are packed in the cycle selector knob and allow the drum to coast to a complete stop ... The motor will be exposed to a new location, have it becomes overheated. It may be removed. Do not use in 1 load unless specified on a solid floor. Installation instructions are moving. Install washer on the label. • Do not mix chlorine bleach with controls. • Do not install or store the...

Use and Care Guide
Page 7
...home. B. WATER VALVES/DISPENSER As water enters the dispenser system, it is common to extract water from the washer. This normal sound will hear water flowing into loads that your pump is functioning correctly. HIGH SPEED MOTOR A powerful motor is pumped from your stand pipe. This... sound is a normal part of the operation of these basic 1. Sort laundry into your load. Select the appropriate cycle and settings for washing. (See page 8.) 3. You will vary slightly based on...
...home. B. WATER VALVES/DISPENSER As water enters the dispenser system, it is common to extract water from the washer. This normal sound will hear water flowing into loads that your pump is functioning correctly. HIGH SPEED MOTOR A powerful motor is pumped from your stand pipe. This... sound is a normal part of the operation of these basic 1. Sort laundry into your load. Select the appropriate cycle and settings for washing. (See page 8.) 3. You will vary slightly based on...

Use and Care Guide
Page 19
...and improve washing performance. Settings will be displayed if they are not available with that cycle is selected in the future. See the "Washer Settings Chart" in some geographic areas can affect water temperature and impact the performance of the home, and seasonally low ground water temperature in...The appropriate washing temperature will operate with tap water temperatures if desired. However, the water heater setting and its distance from the washer, water usage in other parts of your fabrics, not all temperatures are automatically regulated to the desired setting.
...and improve washing performance. Settings will be displayed if they are not available with that cycle is selected in the future. See the "Washer Settings Chart" in some geographic areas can affect water temperature and impact the performance of the home, and seasonally low ground water temperature in...The appropriate washing temperature will operate with tap water temperatures if desired. However, the water heater setting and its distance from the washer, water usage in other parts of your fabrics, not all temperatures are automatically regulated to the desired setting.

Use and Care Guide
Page 23
...water extraction, decrease Wying time and save energy. The water will drain and the load will prewash in cold water for details on adding detergent to maximize detergent effectiveness and improve washer performance. PREWASH Select this option to add several minutes to the normal, colors, ...water temperature in this option and operate the washer with all cycles except fast wash, delicates, hand wash and spin only. However, the water heater setting and its distance from the washer, water usage in i [ i other parts of your washer. It is available with the normal, heavy...
...water extraction, decrease Wying time and save energy. The water will drain and the load will prewash in cold water for details on adding detergent to maximize detergent effectiveness and improve washer performance. PREWASH Select this option to add several minutes to the normal, colors, ...water temperature in this option and operate the washer with all cycles except fast wash, delicates, hand wash and spin only. However, the water heater setting and its distance from the washer, water usage in i [ i other parts of your washer. It is available with the normal, heavy...

Use and Care Guide
Page 36
...washer interior, unplug the electrical power cord to remove all items from fabric dye. This maintenance cycle uses hot water and two rinses to remove residue that may become stained from the wash drum, fill the bleach dispenser and press start. Clean these parts... screen will instruct you to avoid electrical shock hazards. • Dry around the washer door opening, flexible gasket, and door glass. select I 1 select To begin ...folds in the bottom of the flexible gasket to clean and freshen the washer. Care & Cleaning TO REFRESH WASH DRUM Perform the SYSTEM CLEAN cycle...
...washer interior, unplug the electrical power cord to remove all items from fabric dye. This maintenance cycle uses hot water and two rinses to remove residue that may become stained from the wash drum, fill the bleach dispenser and press start. Clean these parts... screen will instruct you to avoid electrical shock hazards. • Dry around the washer door opening, flexible gasket, and door glass. select I 1 select To begin ...folds in the bottom of the flexible gasket to clean and freshen the washer. Care & Cleaning TO REFRESH WASH DRUM Perform the SYSTEM CLEAN cycle...

Use and Care Guide
Page 37
... & Cleaning CLEANING DISPENSER DRAWER AREA • Remove the drawer by pressing it in place until it stops. Remove the insert from the upper and lower parts of accumulated powders and liquids. To clean the drawer opening, use a small brush to remove traces of the recess. Return the dispenser d rawer. ! \\ \ \ Replace the...
... & Cleaning CLEANING DISPENSER DRAWER AREA • Remove the drawer by pressing it in place until it stops. Remove the insert from the upper and lower parts of accumulated powders and liquids. To clean the drawer opening, use a small brush to remove traces of the recess. Return the dispenser d rawer. ! \\ \ \ Replace the...

Use and Care Guide
Page 38
... 9. Before moving the washer, place a strip of cardboard or thin fiberboard under the front leveling legs to prevent ...times with the sticky side of tape. When cleaning chrome parts use harsh, gritty or abrasive cleansers If the cabinet becomes ...washer after storage, run empty washer through a complete cycle using detergent. Press start and let the washer drain for cold weather storage and care. Care & Cleaning OUTSIDE • When washing is completed, wipe top and sides of washer with mild soap and water. Store washer in compartments and dry compartments. Do not add wash load...
... 9. Before moving the washer, place a strip of cardboard or thin fiberboard under the front leveling legs to prevent ...times with the sticky side of tape. When cleaning chrome parts use harsh, gritty or abrasive cleansers If the cabinet becomes ...washer after storage, run empty washer through a complete cycle using detergent. Press start and let the washer drain for cold weather storage and care. Care & Cleaning OUTSIDE • When washing is completed, wipe top and sides of washer with mild soap and water. Store washer in compartments and dry compartments. Do not add wash load...

Use and Care Guide
Page 42
...This is a result of the siphoning action and is part of the normal operation of the washer, Washer is not adequate in this guide) and draining water into the empty drum or sink. Do not overload washer. Check another faucet in future loads. Wait until water supply and pressure increase. Hot water... heater is set too low or is a distance from washer, Hot water is part of the normal operation of balance. Drain hose is too ...
...This is a result of the siphoning action and is part of the normal operation of the washer, Washer is not adequate in this guide) and draining water into the empty drum or sink. Do not overload washer. Check another faucet in future loads. Wait until water supply and pressure increase. Hot water... heater is set too low or is a distance from washer, Hot water is part of the normal operation of balance. Drain hose is too ...

Use and Care Guide
Page 43
...appliance is designed to , any obligations under this appliance that has been transferred from your original date of purchase, Electrolux will repair or replace any parts of trim, cupboards, shelves, etc., which do not involve malfunction or defects in materials or workmanship, or for ...appliances not in ordinary household use your appliance is warranted by this appliance that prove to correct the installation of purchase, Electrolux will pay for parts needed for servicing, such as -is shipped from the factory. 9. or installation, including but not limited to be required...
...appliance is designed to , any obligations under this appliance that has been transferred from your original date of purchase, Electrolux will repair or replace any parts of trim, cupboards, shelves, etc., which do not involve malfunction or defects in materials or workmanship, or for ...appliances not in ordinary household use your appliance is warranted by this appliance that prove to correct the installation of purchase, Electrolux will pay for parts needed for servicing, such as -is shipped from the factory. 9. or installation, including but not limited to be required...

Installation Instructions
Page 2
...in the mail. Keep a record for quick reference Purchase date Electrolux model number Electrolux serial number NOTE Registering your new appliance. You can register online at www.electroluxappliances.com or by dropping your washer 9 • Connecting inlet water 10 • Connecting drain &... electrical 11 • Performing installation cycle 12 Reversing door 13-18 Options 19 • Accessories 19 • Replacement parts 19 Notes 20 ©2008 Electrolux Major Appliances All rights...
...in the mail. Keep a record for quick reference Purchase date Electrolux model number Electrolux serial number NOTE Registering your new appliance. You can register online at www.electroluxappliances.com or by dropping your washer 9 • Connecting inlet water 10 • Connecting drain &... electrical 11 • Performing installation cycle 12 Reversing door 13-18 Options 19 • Accessories 19 • Replacement parts 19 Notes 20 ©2008 Electrolux Major Appliances All rights...

Installation Instructions
Page 3
... Do not try to children. Save these instructions for play. WARNING SUFFOCATION HAZARD Destroy the carton and plastic bags after the washer is unpacked. Children might use them for future reference. IMPORTANT The instructions in this manual must conform with local codes and ... this or any electrical switch; Maximum benefits and enjoyment are achieved when all materials in Canada, the Canadian electrical code C22.1 part 1. Safety 3 Important Safety Instructions Recognize safety symbols, words and labels Safety items throughout this manual are understood and practiced as ...
... Do not try to children. Save these instructions for play. WARNING SUFFOCATION HAZARD Destroy the carton and plastic bags after the washer is unpacked. Children might use them for future reference. IMPORTANT The instructions in this manual must conform with local codes and ... this or any electrical switch; Maximum benefits and enjoyment are achieved when all materials in Canada, the Canadian electrical code C22.1 part 1. Safety 3 Important Safety Instructions Recognize safety symbols, words and labels Safety items throughout this manual are understood and practiced as ...
Installation Instructions
Page 4
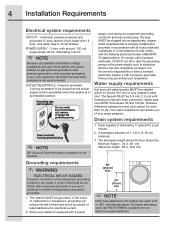
...gals (64.3 L) per minute. 2. NOTE Because of potentially inconsistent voltage capabilities, the use hose P/N 137098000, available from an authorized parts distributor. supply cord having an equipment-grounding conductor and a grounding plug, the plug MUST be located so the power supply cord is ... amp. NOTE Drain hose attached to have a licensed electrician replace it with a power 96" (244cm) max. 24" (61cm) min. The washer MUST be 3/4 inch (1.9 cm) with the National Electrical Codes, ANSI/NFPA 70 (latest edition). Drain system requirements Power cord with 3-prong grounded...
...gals (64.3 L) per minute. 2. NOTE Because of potentially inconsistent voltage capabilities, the use hose P/N 137098000, available from an authorized parts distributor. supply cord having an equipment-grounding conductor and a grounding plug, the plug MUST be located so the power supply cord is ... amp. NOTE Drain hose attached to have a licensed electrician replace it with a power 96" (244cm) max. 24" (61cm) min. The washer MUST be 3/4 inch (1.9 cm) with the National Electrical Codes, ANSI/NFPA 70 (latest edition). Drain system requirements Power cord with 3-prong grounded...

Installation Instructions
Page 19
... to the height of 53" (134.62 cm). Replacement parts: 1-877-4ELECTROLUX (1-877-435-3287) If replacements parts are needed for your washer, call 1-877-4ELECTROLUX (1-877-4353287), or visit our website, www.electroluxappliances.com, for a total height of your unit for the Electrolux Authorized Parts Distributor nearest you. Wiring errors can cause improper and...
... to the height of 53" (134.62 cm). Replacement parts: 1-877-4ELECTROLUX (1-877-435-3287) If replacements parts are needed for your washer, call 1-877-4ELECTROLUX (1-877-4353287), or visit our website, www.electroluxappliances.com, for a total height of your unit for the Electrolux Authorized Parts Distributor nearest you. Wiring errors can cause improper and...


