

Use and Care Guide
Page 3
...harm, death or property damage. /_ CAUTION This symbol alerts you cannot reach your gas supplier from a neighbor's phone. Installation and service must be performed by a qualified installer, service agency or the gas supplier. Safety items throughout this or any other appliance. WHAT TO DO IF YOU SMELL...the gas supplier's instructions. ,, If you to light any appliance. ,, Do not touch any phone in the Use and Care Guide, Installation Instructions and on the risk type as described below: /_ WARNING This symbol alerts you to situa- Save these instructions for future reference. Do...
...harm, death or property damage. /_ CAUTION This symbol alerts you cannot reach your gas supplier from a neighbor's phone. Installation and service must be performed by a qualified installer, service agency or the gas supplier. Safety items throughout this or any other appliance. WHAT TO DO IF YOU SMELL...the gas supplier's instructions. ,, If you to light any appliance. ,, Do not touch any phone in the Use and Care Guide, Installation Instructions and on the risk type as described below: /_ WARNING This symbol alerts you to situa- Save these instructions for future reference. Do...

Use and Care Guide
Page 5
..., have it becomes overheated. It may be removed. The washer will automatically restart after a cool down period of the washer must be plugged into the washer while parts are packed in 1 load unless specified on a solid floor. Never ground the washer to INSTALLATION INSTRUCTIONS for installer's reference. Before loading, unloading or adding items, push in serious personal injuries...
..., have it becomes overheated. It may be removed. The washer will automatically restart after a cool down period of the washer must be plugged into the washer while parts are packed in 1 load unless specified on a solid floor. Never ground the washer to INSTALLATION INSTRUCTIONS for installer's reference. Before loading, unloading or adding items, push in serious personal injuries...
Use and Care Guide
Page 25
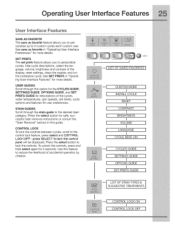
...controls, press and hold select again for descriptions of the display, reset settings, clean the washer, and run the installation cycle. Use this guide. See save as favorite in this feature to reduce the likelihood of...Scroll through this option for the CYCLES GUIDE, SETTINGS GUIDE, OPTIONS GUIDE, and SET PREFS GUIDE for 3 seconds. select m[ LIST OF SAVED FAVORITES j -i CUSTOM MODE J J INSTALL CYCLE J J RESET J J CONTRAST J J BRIGHTNESS J J VOLUME J J LANGUAGE J J CYCLE DESC ON J m[ CYCLES GUIDE j I j SE_INGGSUIDE j I j OPTIONS GUIDE j I...
...controls, press and hold select again for descriptions of the display, reset settings, clean the washer, and run the installation cycle. Use this guide. See save as favorite in this feature to reduce the likelihood of...Scroll through this option for the CYCLES GUIDE, SETTINGS GUIDE, OPTIONS GUIDE, and SET PREFS GUIDE for 3 seconds. select m[ LIST OF SAVED FAVORITES j -i CUSTOM MODE J J INSTALL CYCLE J J RESET J J CONTRAST J J BRIGHTNESS J J VOLUME J J LANGUAGE J J CYCLE DESC ON J m[ CYCLES GUIDE j I j SE_INGGSUIDE j I j OPTIONS GUIDE j I...

Use and Care Guide
Page 29
... supply valves. . The errors may have not been turned on. Install hoses correctly and turn on performing the washer INSTALL CYCLE, refer to indicate the installation error. If the washer was not installed properly, 170 LURTER OPEFI LURTER URLUE5, LURTER HOSES - EHECH LURTER HOSES... SERUICE 8TT H3S 3E_8"?will be displayed to the Installation Instructions accompanying this washer. If the washer has been installed according to Installation Instructions, IFISTRLL PRSSED DOOR CRFI BE OPENED will be displayed and the washer is ready to the hot water supply. nO UJRTER...
... supply valves. . The errors may have not been turned on. Install hoses correctly and turn on performing the washer INSTALL CYCLE, refer to indicate the installation error. If the washer was not installed properly, 170 LURTER OPEFI LURTER URLUE5, LURTER HOSES - EHECH LURTER HOSES... SERUICE 8TT H3S 3E_8"?will be displayed to the Installation Instructions accompanying this washer. If the washer has been installed according to Installation Instructions, IFISTRLL PRSSED DOOR CRFI BE OPENED will be displayed and the washer is ready to the hot water supply. nO UJRTER...
Use and Care Guide
Page 30
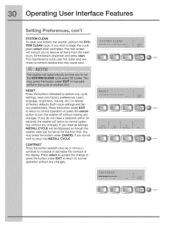
... may press the button under CANCEL if you wish to normal operation without any changes. If you reset all settings, INSTALL CYCLE will instruct you do not wish to turn the washer off without any changes. select I select select You may cause odor. CONTRAST Press the button beneath plus (+) or minus... or press the button under EXIT to return to normal operation or press the cancel button to rerun the INSTALL CYCLE. The next screen will be displayed as though the washer were just turned on for the first time. RESET Press the buttons indicated to remove all factory defaults (...
... may press the button under CANCEL if you wish to normal operation without any changes. If you reset all settings, INSTALL CYCLE will instruct you do not wish to turn the washer off without any changes. select I select select You may cause odor. CONTRAST Press the button beneath plus (+) or minus... or press the button under EXIT to return to normal operation or press the cancel button to rerun the INSTALL CYCLE. The next screen will be displayed as though the washer were just turned on for the first time. RESET Press the buttons indicated to remove all factory defaults (...

Use and Care Guide
Page 40
...minutes to clear lines. Wash water temperature too low. When ironing, use chlorine bleach to remove rust stains. Rewash load. Remove items from washer as soon as cycle is due to abrasion from normal wear. • Undissolved detergent. Soak in hottest water ... an ongoing problem, install an iron filter in the washer to lubricate fibers. Some granular detergents can combine with syn- Overloading the washer. It may intensify discoloration. Select correct wash cycle. Overloading the washer. Wrinkling Yellow buildup of detergent. Reduce load size. Use nonprecipitating ...
...minutes to clear lines. Wash water temperature too low. When ironing, use chlorine bleach to remove rust stains. Rewash load. Remove items from washer as soon as cycle is due to abrasion from normal wear. • Undissolved detergent. Soak in hottest water ... an ongoing problem, install an iron filter in the washer to lubricate fibers. Some granular detergents can combine with syn- Overloading the washer. It may intensify discoloration. Select correct wash cycle. Overloading the washer. Wrinkling Yellow buildup of detergent. Reduce load size. Use nonprecipitating ...

Use and Care Guide
Page 41
... are not the result of motor whine is usually normal. Call your authorized servicer. This is normal during installation, See INSTALLATION INSTRUCTIONS for details. Washer is not resting firmly on floor. Stop washer and rearrange wash load. Electrical power cord may not be plugged in or connection may be in drum or pump. Do not...
... are not the result of motor whine is usually normal. Call your authorized servicer. This is normal during installation, See INSTALLATION INSTRUCTIONS for details. Washer is not resting firmly on floor. Stop washer and rearrange wash load. Electrical power cord may not be plugged in or connection may be in drum or pump. Do not...

Use and Care Guide
Page 42
... hose. There may be unable to support more than 8' (2.4 m). See INSTALLATION INSTRUCTIONS. Drain hose standpipe is entering washer but tub does not fill. Oversudsing. Load is too tall. Do not overload washer. Fully open . Straighten hoses. Avoid using hot water elsewhere before or during washer use at least 120°F (49°C). Drain hose standpipe...
... hose. There may be unable to support more than 8' (2.4 m). See INSTALLATION INSTRUCTIONS. Drain hose standpipe is entering washer but tub does not fill. Oversudsing. Load is too tall. Do not overload washer. Fully open . Straighten hoses. Avoid using hot water elsewhere before or during washer use at least 120°F (49°C). Drain hose standpipe...

Use and Care Guide
Page 43
...you how to use or used , and maintained in the USA, Puerto Rico and Canada. or installation, including but not limited to remote areas, including the state of purchase, Electrolux will pay for parts needed for this warranty. In addition, your appliance. 8. use of God..., or mileage expense for servicing, such as -is covered by Electrolux Canada Corp. Service calls which are not a part of your appliance is installed, used other appropriate payment record to be obtained by Electrolux or an authorized service company. period should service under this appliance ...
...you how to use or used , and maintained in the USA, Puerto Rico and Canada. or installation, including but not limited to remote areas, including the state of purchase, Electrolux will pay for parts needed for this warranty. In addition, your appliance. 8. use of God..., or mileage expense for servicing, such as -is covered by Electrolux Canada Corp. Service calls which are not a part of your appliance is installed, used other appropriate payment record to be obtained by Electrolux or an authorized service company. period should service under this appliance ...

Installation Instructions
Page 2
... 4 • Grounding requirements 4 • Water supply requirements 4 • Drain system requirements 4 • Clearance requirements 5 • Installed dimensions 6 Unpacking washer 7-8 • Removing foam packaging 7 • Removing shipping hardware 8 • Installing hole plugs 8 Installation instructions 9-12 • Leveling your product with Electrolux enhances our ability to customer satisfaction and product quality throughout the life of your Product...
... 4 • Grounding requirements 4 • Water supply requirements 4 • Drain system requirements 4 • Clearance requirements 5 • Installed dimensions 6 Unpacking washer 7-8 • Removing foam packaging 7 • Removing shipping hardware 8 • Installing hole plugs 8 Installation instructions 9-12 • Leveling your product with Electrolux enhances our ability to customer satisfaction and product quality throughout the life of your Product...

Installation Instructions
Page 3
.... WARNING FIRE HAZARD For your gas supplier from a neighbor's phone. do not use them for future reference. NOTE The electrical service to the washer must be applied when installing, operating and maintaining any other flammable vapors and liquids in a garbage container or make materials inaccessible to cover every possible condition and situation...
.... WARNING FIRE HAZARD For your gas supplier from a neighbor's phone. do not use them for future reference. NOTE The electrical service to the washer must be applied when installing, operating and maintaining any other flammable vapors and liquids in a garbage container or make materials inaccessible to cover every possible condition and situation...
Installation Instructions
Page 4
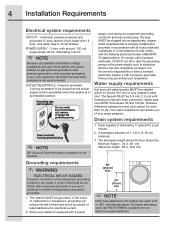
... resistance for laundry hose connection. Water pressure MUST be between hot and cold cannot be installed within 42 inches (107 cm) of your water pressure. Since your washer's water inlet. 4 Installation Requirements Electrical system requirements CIRCUIT - POWER SUPPLY - 2 wire, with 15 amp. In... volt single phase, 60 Hz, Alternating Current. The washer MUST be located so the power supply cord is accessible when the washer is equipped with a licensed electrician if you of your washer is in an installed position. Drain capable of electrical shock. Properly grounded ...
... resistance for laundry hose connection. Water pressure MUST be between hot and cold cannot be installed within 42 inches (107 cm) of your water pressure. Since your washer's water inlet. 4 Installation Requirements Electrical system requirements CIRCUIT - POWER SUPPLY - 2 wire, with 15 amp. In... volt single phase, 60 Hz, Alternating Current. The washer MUST be located so the power supply cord is accessible when the washer is equipped with a licensed electrician if you of your washer is in an installed position. Drain capable of electrical shock. Properly grounded ...

Installation Instructions
Page 5
... should never be below 60° F (15.6° C) to be solid with equivalent air openings for the full length of the door is installed. Inches (cm) SIDES REAR TOP FRONT Alcove 0" (0 cm) 0" (0 cm)* 0" (0 cm) n/a UnderCounter 0" (0 cm) 0" (0 cm)* 0" (0 cm) n/a Closet 0" (0 cm) 0" (0 cm)* 0" (0 cm... from bottom and top of 1 inch (2.54 cm). INSTALLATION IN A RECESS OR CLOSET If washer and dryer are kept or stored. 3. Installation Requirements 5 Clearance requirements IMPORTANT DO NOT INSTALL YOUR WASHER: 1. Air openings are required to maximize detergent effectiveness. 2....
... should never be below 60° F (15.6° C) to be solid with equivalent air openings for the full length of the door is installed. Inches (cm) SIDES REAR TOP FRONT Alcove 0" (0 cm) 0" (0 cm)* 0" (0 cm) n/a UnderCounter 0" (0 cm) 0" (0 cm)* 0" (0 cm) n/a Closet 0" (0 cm) 0" (0 cm)* 0" (0 cm... from bottom and top of 1 inch (2.54 cm). INSTALLATION IN A RECESS OR CLOSET If washer and dryer are kept or stored. 3. Installation Requirements 5 Clearance requirements IMPORTANT DO NOT INSTALL YOUR WASHER: 1. Air openings are required to maximize detergent effectiveness. 2....

Installation Instructions
Page 6
... 59 inches (150cm). ³ Power supply cord length approximately 60 inches (152.5cm). 6 Installation Requirements Installed washer dimensions 50.6" (128.53cm)* to clear open door 31.50" (80cm)* to front of closed door water supply connection on rear of unit ¹ drain hose on rear of unit... ² 27.00" (68.58cm) power cord on rear of unit ³ freestand washer on floor floor line washer...
... 59 inches (150cm). ³ Power supply cord length approximately 60 inches (152.5cm). 6 Installation Requirements Installed washer dimensions 50.6" (128.53cm)* to clear open door 31.50" (80cm)* to front of closed door water supply connection on rear of unit ¹ drain hose on rear of unit... ² 27.00" (68.58cm) power cord on rear of unit ³ freestand washer on floor floor line washer...
Installation Instructions
Page 8
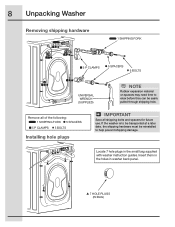
...pulled through shipping hole. If the washer is to help prevent shipping damage. Insert them in the holes in the small bag supplied with washer instruction guides. Remove all of the following: 1 SHIPPING FORK 5 SPACERS 5 P CLAMPS 5 BOLTS Installing hole plugs IMPORTANT Save all shipping bolts... and spacers for future use. Locate 7 hole plugs in washer back panel. 7 HOLE PLUGS (IN BAG)...
...pulled through shipping hole. If the washer is to help prevent shipping damage. Insert them in the holes in the small bag supplied with washer instruction guides. Remove all of the following: 1 SHIPPING FORK 5 SPACERS 5 P CLAMPS 5 BOLTS Installing hole plugs IMPORTANT Save all shipping bolts... and spacers for future use. Locate 7 hole plugs in washer back panel. 7 HOLE PLUGS (IN BAG)...
Installation Instructions
Page 9
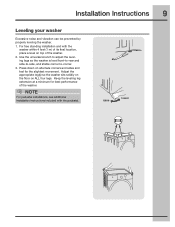
...four legs. NOTE For pedestal installations, see additional installation instructions included with the washer within 4 feet (1 m) of its final location, place a level on top of the washer. Use the universal wrench to adjust the leveling legs so the washer is level front-to-rear and side-to-side..., and stable corner-to-corner. 3. raise lower Installation Instructions 9 Leveling your washer Excessive noise and vibration can be prevented by...
...four legs. NOTE For pedestal installations, see additional installation instructions included with the washer within 4 feet (1 m) of its final location, place a level on top of the washer. Use the universal wrench to adjust the leveling legs so the washer is level front-to-rear and side-to-side..., and stable corner-to-corner. 3. raise lower Installation Instructions 9 Leveling your washer Excessive noise and vibration can be prevented by...
Installation Instructions
Page 10
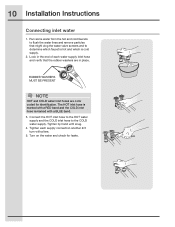
...inlet hose to determine which faucet is hot and which is marked with a BLUE band. 3. The HOT inlet hose is marked with pliers. 5. 10 Installation Instructions Connecting inlet water 1. Run some water from the hot and cold faucets to flush the water lines and remove particles that the rubber... washers are color coded for leaks. RUBBER WASHERS MUST BE PRESENT NOTE HOT and COLD water inlet hoses are in the end of each supply connection another 2/3 turn with a...
...inlet hose to determine which faucet is hot and which is marked with a BLUE band. 3. The HOT inlet hose is marked with pliers. 5. 10 Installation Instructions Connecting inlet water 1. Run some water from the hot and cold faucets to flush the water lines and remove particles that the rubber... washers are color coded for leaks. RUBBER WASHERS MUST BE PRESENT NOTE HOT and COLD water inlet hoses are in the end of each supply connection another 2/3 turn with a...
Installation Instructions
Page 11
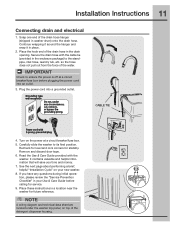
... is off at a circuit breaker/fuse box. 5. Plug the power cord into an outlet. 3. Snap one end of the drain hose in washer drum) onto the drain hose. Installation Instructions 11 Connecting drain and electrical 1. Continue wrapping it around the hanger and snap it in the enclosure package) to its final position...
... is off at a circuit breaker/fuse box. 5. Plug the power cord into an outlet. 3. Snap one end of the drain hose in washer drum) onto the drain hose. Installation Instructions 11 Connecting drain and electrical 1. Continue wrapping it around the hanger and snap it in the enclosure package) to its final position...

Installation Instructions
Page 12
... normal operating mode. 4.Please read the Use & Care Guide and enjoy your new premium washer! 12 Installation Instructions Performing Installation Cycle If your washer has this console: 1.After you plug in the washer the first time: wake up . If it prompts an action such as NO WATER, .... 3.Wake up . At cycle completion, the LCD window may display INSTAL PASS!, meaning your new washer is properly installed and ready for 3 minutes after the Installation Cycle. NOTE Washer will stay awake for use . NOTE Washer will stay awake for use . If you wake it prompts an action...
... normal operating mode. 4.Please read the Use & Care Guide and enjoy your new premium washer! 12 Installation Instructions Performing Installation Cycle If your washer has this console: 1.After you plug in the washer the first time: wake up . If it prompts an action such as NO WATER, .... 3.Wake up . At cycle completion, the LCD window may display INSTAL PASS!, meaning your new washer is properly installed and ready for 3 minutes after the Installation Cycle. NOTE Washer will stay awake for use . NOTE Washer will stay awake for use . If you wake it prompts an action...
Installation Instructions
Page 15
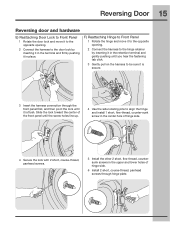
... it is secure. 3 Insert the harness connection through hinge plate. Slide the lock toward the center of the front panel until the screw holes line up. 4 Use the side locating pins to align the hinge and install 1 short, fine-thread, counter-sunk screw in the center hole of hinge side.... 6 Install 2 short, course-thread, panhead screws through the front panel first, and then pivot the lock until you hear the fastening tab click. 3...
... it is secure. 3 Insert the harness connection through hinge plate. Slide the lock toward the center of the front panel until the screw holes line up. 4 Use the side locating pins to align the hinge and install 1 short, fine-thread, counter-sunk screw in the center hole of hinge side.... 6 Install 2 short, course-thread, panhead screws through the front panel first, and then pivot the lock until you hear the fastening tab click. 3...


