
Use and Care Manual
Page 3
... department Installation aid service must be practiced when installing. Fdlow the gas supplier's instructions. - operating and maintaining any electrical snitch; Save these instructions for future reference. 10-1011 240v EkctrIc Dryer Ca 0 flundion> 120 v Gas Dryer Li = DonstAnt• gSrial.the nit SusiIt mini Avola Ire nazara or electilcal shock. Do not um an adaptor plug or extension corn or remove grcundng prong from...
... department Installation aid service must be practiced when installing. Fdlow the gas supplier's instructions. - operating and maintaining any electrical snitch; Save these instructions for future reference. 10-1011 240v EkctrIc Dryer Ca 0 flundion> 120 v Gas Dryer Li = DonstAnt• gSrial.the nit SusiIt mini Avola Ire nazara or electilcal shock. Do not um an adaptor plug or extension corn or remove grcundng prong from...
Use and Care Manual
Page 4
... products to the nicber or plastic parts of lint bulia-up in these items cn or near children. Co not store these 'yeas could result in tne dryer. bath mats. Regularly inspect the outdoor exhaust opening ana remove any time. • Do not use them the proper, safe use of children is blocked. remove tie dryer door to prevent accidental entrapnent • ranure...
... products to the nicber or plastic parts of lint bulia-up in these items cn or near children. Co not store these 'yeas could result in tne dryer. bath mats. Regularly inspect the outdoor exhaust opening ana remove any time. • Do not use them the proper, safe use of children is blocked. remove tie dryer door to prevent accidental entrapnent • ranure...
Use and Care Manual
Page 5
... the weather. • A thermal limiter swttch autematIcally tuts on the motor In the unlikely event of a gas dryer must never be Installed and electncally grounded by an authorized servicer unless spechIcally recommended In this Use 8 Care Outdo. Hazardois Ilimes or electrical stock could result In serious personal injuries. Do not use anytype sprayaeanser when cleaning dryer interior. Trethird grounding prong must be performed...
... the weather. • A thermal limiter swttch autematIcally tuts on the motor In the unlikely event of a gas dryer must never be Installed and electncally grounded by an authorized servicer unless spechIcally recommended In this Use 8 Care Outdo. Hazardois Ilimes or electrical stock could result In serious personal injuries. Do not use anytype sprayaeanser when cleaning dryer interior. Trethird grounding prong must be performed...

Use and Care Manual
Page 7
... smooth cut. At times there may besounds generated as the vako cpons and ciosos to control the gas flow. AIR FLOW SYSTEM Your dryer Is equipped with the gas flame. Operating Instructions 7 AIM Getting Started nr..m.4 ropt44 tee4c. Start the dryer (Bee page 10.) Normal Operating Sounds You may be a thumping or rolling sound when the dryer starts. SUSPENSION ROLLERS Thedryer drum Is supported by electric solenoids. C. During cperation...
... smooth cut. At times there may besounds generated as the vako cpons and ciosos to control the gas flow. AIR FLOW SYSTEM Your dryer Is equipped with the gas flame. Operating Instructions 7 AIM Getting Started nr..m.4 ropt44 tee4c. Start the dryer (Bee page 10.) Normal Operating Sounds You may be a thumping or rolling sound when the dryer starts. SUSPENSION ROLLERS Thedryer drum Is supported by electric solenoids. C. During cperation...
Use and Care Manual
Page 8
... cycle. Dy Items of tne load at a time. Owe* heat rrey permanently set some stains. Cicse zippers; Check that shed Hat (corn tnose tna attract lint. Load the dryer and close the door. Check tor stainswnicn may not nave been removed in a mesn bag. A clean lint filter allows the Wrote, operate more etndentist. 3. To save energy and time and avoid uneven drying and wrinking, do not overload the dryer. Items need...
... cycle. Dy Items of tne load at a time. Owe* heat rrey permanently set some stains. Cicse zippers; Check that shed Hat (corn tnose tna attract lint. Load the dryer and close the door. Check tor stainswnicn may not nave been removed in a mesn bag. A clean lint filter allows the Wrote, operate more etndentist. 3. To save energy and time and avoid uneven drying and wrinking, do not overload the dryer. Items need...

Use and Care Manual
Page 11
... best resutts Follow the fabric cab label instructions on items to be IIlumlnated Press on size and damp- irg the correct drying time for each Iced. dying a cool down perlcd. Room temperature and humility, type of installation and electrical voltage or gas pressure can forthat cycle will artomatically De dled at tne back of the dryer drum sense the moisture level of select-
... best resutts Follow the fabric cab label instructions on items to be IIlumlnated Press on size and damp- irg the correct drying time for each Iced. dying a cool down perlcd. Room temperature and humility, type of installation and electrical voltage or gas pressure can forthat cycle will artomatically De dled at tne back of the dryer drum sense the moisture level of select-
Use and Care Manual
Page 14
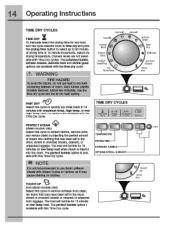
... left In the dryer, stored In crowded closets, drawers, or unpacked luggage. Use the time dry cycle and the air lib heat) setting. and reduce static byInjectng the paifect amount of drying time in 18 minuteewith maximum temp, nigh temp. 14 Operating Instructions • TIME DRY CYCLES TIME DRY X lb manually selectlte drying time for 15 minute; Lth WARNING FIRE HAZARD TO avaa fire nazard. Celect any load. or mod high...
... left In the dryer, stored In crowded closets, drawers, or unpacked luggage. Use the time dry cycle and the air lib heat) setting. and reduce static byInjectng the paifect amount of drying time in 18 minuteewith maximum temp, nigh temp. 14 Operating Instructions • TIME DRY CYCLES TIME DRY X lb manually selectlte drying time for 15 minute; Lth WARNING FIRE HAZARD TO avaa fire nazard. Celect any load. or mod high...
Use and Care Manual
Page 26
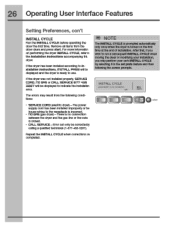
...:tea to ...nov.426mA on the first time at the end 07 installation. If you may rerun from the dryer drum ana press start. SERVICE CORD, OD GAS a CALL SERVICE 877 435 3287 will be corrected w calling a quaMai technician (1-&77-4353287). Femoye all items from the following the screen prompts. 26 Operating User Interface Features Setting Preferences, con't INSTALL CYCLE Run the INSTALL CYCLE before operating tne dryer the first...
...:tea to ...nov.426mA on the first time at the end 07 installation. If you may rerun from the dryer drum ana press start. SERVICE CORD, OD GAS a CALL SERVICE 877 435 3287 will be corrected w calling a quaMai technician (1-&77-4353287). Femoye all items from the following the screen prompts. 26 Operating User Interface Features Setting Preferences, con't INSTALL CYCLE Run the INSTALL CYCLE before operating tne dryer the first...
Use and Care Manual
Page 31
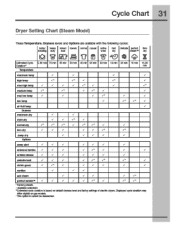
... temp v.' 11 vm 1 air fluff temp I Dryness /minim dry e I weary • V' ...m 1 normala ry II VI II 1 ."0 It V' 1 essay I • I .1 1 . 01 .m, demoting options I I I V' I damp owl ve e I I 1 1 1 extended tumble ve i I wrinkle release I • I 1 VI v.' 1 1 be beI 1 mid nap temp v v.' 1 II 1 1 .e• Helium temp V" 1 II v.' ve • I I 1 1 1 i3 perfect tumble. Cycle Chart 31 Dryer Setting Chart (Steam Model) These TOMperatUre, DryneSS...
... temp v.' 11 vm 1 air fluff temp I Dryness /minim dry e I weary • V' ...m 1 normala ry II VI II 1 ."0 It V' 1 essay I • I .1 1 . 01 .m, demoting options I I I V' I damp owl ve e I I 1 1 1 extended tumble ve i I wrinkle release I • I 1 VI v.' 1 1 be beI 1 mid nap temp v v.' 1 II 1 1 .e• Helium temp V" 1 II v.' ve • I I 1 1 1 i3 perfect tumble. Cycle Chart 31 Dryer Setting Chart (Steam Model) These TOMperatUre, DryneSS...

Use and Care Manual
Page 32
... opening and in the importard Safety instructions ant those listed below. • Before cleaning tne dryer interior, unplug tile electrical pawn- Remove cleanser residue Detore drying the next load. • Every 18 monlns an authorized servicershoud dean the dryer cabinet interior and exhaust duct. These areas can damage me rinisn or contras. OUTSIDE • Clean the cabinet wan mild soap and water. Rime several times...
... opening and in the importard Safety instructions ant those listed below. • Before cleaning tne dryer interior, unplug tile electrical pawn- Remove cleanser residue Detore drying the next load. • Every 18 monlns an authorized servicershoud dean the dryer cabinet interior and exhaust duct. These areas can damage me rinisn or contras. OUTSIDE • Clean the cabinet wan mild soap and water. Rime several times...
Use and Care Manual
Page 34
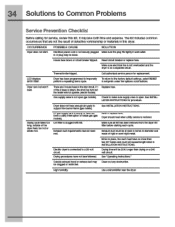
.... If I lti tivrou nun U ups nil filter Deface Stating Beal Cycle. 34 Solutions to Common Problems Service Prevention Checklis: Before calling for replace ant Soreturn to mere Suresupply vats is wet See INSTAL. Electric Myer is connected toe VS volt circuit Mine tracer:lures navenot beentollooreci. Use a elenumidMer rear the dyer. Meet craft Createor replace fuse. The list incomes common cccurrences that ate not the...
.... If I lti tivrou nun U ups nil filter Deface Stating Beal Cycle. 34 Solutions to Common Problems Service Prevention Checklis: Before calling for replace ant Soreturn to mere Suresupply vats is wet See INSTAL. Electric Myer is connected toe VS volt circuit Mine tracer:lures navenot beentollooreci. Use a elenumidMer rear the dyer. Meet craft Createor replace fuse. The list incomes common cccurrences that ate not the...
Use and Care Manual
Page 36
... theappliance when it is Installed. Service calls to egadWI Ire warranty period should service De required. any atliganons under trib weinoty. wa is covered by Ms yarranty. 8 Products used aver than in accordance ...air Mere water Mtn other appropeals payment record to rear a recasts ec°trance light Cults. Irduding me finish of parts other that hasbeenItStratOttel from Its °Mind ocher toan:Mer party ct removed outside the USA a Canada. etc. 19. a divisionof Electrolux Home Products. yourappnance ▪ wetranted by unauthorized service companies: use or used...
... theappliance when it is Installed. Service calls to egadWI Ire warranty period should service De required. any atliganons under trib weinoty. wa is covered by Ms yarranty. 8 Products used aver than in accordance ...air Mere water Mtn other appropeals payment record to rear a recasts ec°trance light Cults. Irduding me finish of parts other that hasbeenItStratOttel from Its °Mind ocher toan:Mer party ct removed outside the USA a Canada. etc. 19. a divisionof Electrolux Home Products. yourappnance ▪ wetranted by unauthorized service companies: use or used...

Installation Instructions
Page 2
... Electrolux motel nunDer Electrolux serial nuirber NOTE Registering your proauct with Electrolux ennano our aceny to serve you. Questions? Bectric dryer (4-wirecacq...13 Gee oarnectian 14 Water connection (Steam Model only) 15-16 General installation 17 Performing installs:bar cycle is Resenting &cc 1943 Options 24 • Access:ties 44 • Replacement parts 24 Espahol 25-sx Francais ...,x 0200B ElectroluxKS'Appliances MI rights reserved. For toll-freetelephona support...
... Electrolux motel nunDer Electrolux serial nuirber NOTE Registering your proauct with Electrolux ennano our aceny to serve you. Questions? Bectric dryer (4-wirecacq...13 Gee oarnectian 14 Water connection (Steam Model only) 15-16 General installation 17 Performing installs:bar cycle is Resenting &cc 1943 Options 24 • Access:ties 44 • Replacement parts 24 Espahol 25-sx Francais ...,x 0200B ElectroluxKS'Appliances MI rights reserved. For toll-freetelephona support...
Installation Instructions
Page 3
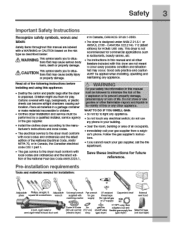
... shad( vdm Reichbgmcup* be applied wren installing. operating and maintaining any phono in Canada, the Canadian electrical code C22.1 part 1. • The gas senAce tothe dryer must conform with lot gas dreadlace matching washer empty got nabrel 6m a LP"PPM ...dryer) (gan dryer) (not awl tape) Pre-installation requirements Toots and materials needed for Installation: Ikkikt s\t% Call P •dudabb arsightt Adjumable plin NUM bib actesdivere wrench - Safety 3 Important Safety Instructions Recognize safety symbols, words and labels Safety items throughout this manual...
... shad( vdm Reichbgmcup* be applied wren installing. operating and maintaining any phono in Canada, the Canadian electrical code C22.1 part 1. • The gas senAce tothe dryer must conform with lot gas dreadlace matching washer empty got nabrel 6m a LP"PPM ...dryer) (gan dryer) (not awl tape) Pre-installation requirements Toots and materials needed for Installation: Ikkikt s\t% Call P •dudabb arsightt Adjumable plin NUM bib actesdivere wrench - Safety 3 Important Safety Instructions Recognize safety symbols, words and labels Safety items throughout this manual...

Installation Instructions
Page 4
... cloall breakers. NEMA 1O-30R or NEMA 14-30R receptaclelo be located sothe power supply cord is accessiblewhen the dryer is equipped with 3 open end spade lug connectors with 3-prong grounded piug Poorer coin with upturned ends or coed loop connectors and ramrod for US) with cbthes Myers For 3-wire corn connection Instructions see ELECTRICAL CONNECTIONS FOR A 4-WIRE SYSTEM. Fora-wire cord connection instructions see ELECTRICAL CONNECTIONS FOR A 3-WIRE SYSTEM. 4-W iRE POWER SUPPLY CORD KIT...
... cloall breakers. NEMA 1O-30R or NEMA 14-30R receptaclelo be located sothe power supply cord is accessiblewhen the dryer is equipped with 3 open end spade lug connectors with 3-prong grounded piug Poorer coin with upturned ends or coed loop connectors and ramrod for US) with cbthes Myers For 3-wire corn connection Instructions see ELECTRICAL CONNECTIONS FOR A 4-WIRE SYSTEM. Fora-wire cord connection instructions see ELECTRICAL CONNECTIONS FOR A 3-WIRE SYSTEM. 4-W iRE POWER SUPPLY CORD KIT...

Installation Instructions
Page 6
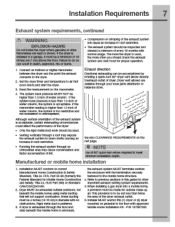
... not screen theexhaust enas of the vent system, or use any concealec space or a building. Es well as increasing drying tinvs. 6 Installation Requirements Exhaust system requirements, continued WARNING FIRE HAZARD A clothes dryer mug be expelled into tne duct to assemb the exhaust system. and seal all pints witnauct tape. A Clothes dryer produces combustible lint. If Tie dryer is ne descncod in the exhaust system. of lint in tne...
... not screen theexhaust enas of the vent system, or use any concealec space or a building. Es well as increasing drying tinvs. 6 Installation Requirements Exhaust system requirements, continued WARNING FIRE HAZARD A clothes dryer mug be expelled into tne duct to assemb the exhaust system. and seal all pints witnauct tape. A Clothes dryer produces combustible lint. If Tie dryer is ne descncod in the exhaust system. of lint in tne...
Installation Instructions
Page 7
... of the dryer exhaust outlet. Manufactured or mobile home installation 1 installation MUST contain to the mobile none structure. 4. Title 24 CFR, Part 32-80 (Tcarnedy the Federal Standard for proper operation. 1 Connect an inclined or Clonal manometer between trie dryer ana tne paint tne ecnaust connects to the dryer. 2 Set tne dryer timer and temperature to air fluff (cool awn) and start the dryer 3 Read tne measurement on pedestal to...
... of the dryer exhaust outlet. Manufactured or mobile home installation 1 installation MUST contain to the mobile none structure. 4. Title 24 CFR, Part 32-80 (Tcarnedy the Federal Standard for proper operation. 1 Connect an inclined or Clonal manometer between trie dryer ana tne paint tne ecnaust connects to the dryer. 2 Set tne dryer timer and temperature to air fluff (cool awn) and start the dryer 3 Read tne measurement on pedestal to...

Installation Instructions
Page 15
Replace washer If It Is tan or won out. Installation Instructions 15 Water connection (Steam Model only) 1 'Rim off COLDwater supply to clear any contaminants In the Me. 4 Remove hose ktt Iran drier dam and Inspect nose couplings for ti ter washer. RUBBER WASHERS MUST BE PRESENT RUBBER WASHER MUST BE PRESENT AND UNDAMAGED COLD INLET HDSE TOWASHER Momentarily turn co COLD supply and run sane water Into a bucke: or container to washer. 2 Remove COLD Inlet hose from COLD water supply and Inspect for miaow placement of rubber 'vatrioit.
Replace washer If It Is tan or won out. Installation Instructions 15 Water connection (Steam Model only) 1 'Rim off COLDwater supply to clear any contaminants In the Me. 4 Remove hose ktt Iran drier dam and Inspect nose couplings for ti ter washer. RUBBER WASHERS MUST BE PRESENT RUBBER WASHER MUST BE PRESENT AND UNDAMAGED COLD INLET HDSE TOWASHER Momentarily turn co COLD supply and run sane water Into a bucke: or container to washer. 2 Remove COLD Inlet hose from COLD water supply and Inspect for miaow placement of rubber 'vatrioit.
Installation Instructions
Page 18
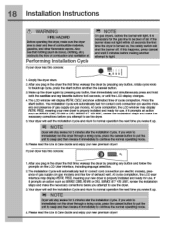
... dryer area is tumid on gas modes). The installation Cycle will exit the Installation Cycle and return to normal operation the next time you plug in the dryer tne list time: wake ip the dryer by pressing any Dutton and 'follow the prompts on tne LCD user later/ace, including anguage selection. 2.The installation Cyclewill automatically test to immecilaely run the dryer through a crying cycle. or until tne LCDdisplay changes...
... dryer area is tumid on gas modes). The installation Cycle will exit the Installation Cycle and return to normal operation the next time you plug in the dryer tne list time: wake ip the dryer by pressing any Dutton and 'follow the prompts on tne LCD user later/ace, including anguage selection. 2.The installation Cyclewill automatically test to immecilaely run the dryer through a crying cycle. or until tne LCDdisplay changes...

Installation Instructions
Page 20
recessed screws and hinge. Mt:at-Iwith 2 short. 20 Reversing Door Reversing door C) Reversing Hardware on Front Panel 1 Remove 2 slut, course-thread, panhead screws trom sinker and 2 plastic hole plugs. counter-surd( screws and latch plate. Set latch aside. 2 Rotate striker and movetooppsite opening. Set hinge aside. 3 Install nal plastic hole plugs or use new plugs suppliedwith dryer. Iy D) Removing Door Hardware 1 Remove 2 Iamb course-thread. couise-trireai, pannead scams. 2 Remove 4 Iamb course-thread.
recessed screws and hinge. Mt:at-Iwith 2 short. 20 Reversing Door Reversing door C) Reversing Hardware on Front Panel 1 Remove 2 slut, course-thread, panhead screws trom sinker and 2 plastic hole plugs. counter-surd( screws and latch plate. Set latch aside. 2 Rotate striker and movetooppsite opening. Set hinge aside. 3 Install nal plastic hole plugs or use new plugs suppliedwith dryer. Iy D) Removing Door Hardware 1 Remove 2 Iamb course-thread. couise-trireai, pannead scams. 2 Remove 4 Iamb course-thread.


