

Use and Care Manual
Page 3
... or any electrical snitch; Clear the room. Immediately call the fire department Installation aid service must be L performed by a qualified Installer, service agency or the gas suppler. If you to room this Use and Care Guido are not meant to light any appliance. Fdlow the gas supplier's instructions. - Save these instructions for future reference. 10-1011 240v EkctrIc Dryer Ca 0 flundion> 120 v Gas Dryer Li...
... or any electrical snitch; Clear the room. Immediately call the fire department Installation aid service must be L performed by a qualified Installer, service agency or the gas suppler. If you to room this Use and Care Guido are not meant to light any appliance. Fdlow the gas supplier's instructions. - Save these instructions for future reference. 10-1011 240v EkctrIc Dryer Ca 0 flundion> 120 v Gas Dryer Li...
Use and Care Manual
Page 4
...01 tire. bath mats. Regularly inspect the outdoor exhaust opening ana remove any type of tne dryer. Cartons covered with gasoline, cleaning solvents, orosene, waxes, etc. PROTECT CHILDREN • Do not allow children to ccmplywgh these important Safety instructions: PREVENT FIRE • Do not thy Items... plastic sheets can occur. remove tie dryer door to prevent accidental entrapnent • ranure to the nicber or plastic parts of aerosol into. observe a warnings on or in tne surrounding area. • Do not obstruct the now of ventilating air Do nct stack or ...
...01 tire. bath mats. Regularly inspect the outdoor exhaust opening ana remove any type of tne dryer. Cartons covered with gasoline, cleaning solvents, orosene, waxes, etc. PROTECT CHILDREN • Do not allow children to ccmplywgh these important Safety instructions: PREVENT FIRE • Do not thy Items... plastic sheets can occur. remove tie dryer door to prevent accidental entrapnent • ranure to the nicber or plastic parts of aerosol into. observe a warnings on or in tne surrounding area. • Do not obstruct the now of ventilating air Do nct stack or ...
Use and Care Manual
Page 5
.... • l'allure to a gas pipe. Failure to to the weather. • A thermal limiter swttch autematIcally tuts on the motor In the unlikely event of a gas dryer must be removed. PFEVENT INJURY AND DAMAGE TO THE DRYER • 411 repairs and servicing must be Installed and electncally grounded by an authorized servicer unless spechIcally recommended In this Use 8 Care Outdo. instanation instructions are packed in...
.... • l'allure to a gas pipe. Failure to to the weather. • A thermal limiter swttch autematIcally tuts on the motor In the unlikely event of a gas dryer must be removed. PFEVENT INJURY AND DAMAGE TO THE DRYER • 411 repairs and servicing must be Installed and electncally grounded by an authorized servicer unless spechIcally recommended In this Use 8 Care Outdo. instanation instructions are packed in...

Use and Care Manual
Page 7
... steps: 1 ChecK and clean the linttlter. (See page 8.) 2 Load the dryer. (See pages.) Raart the (UMW cycle trio papaA. Els noise Is morel and will only occur Mien the gas is controlled by elastic solenoids. During operationthere may be a ciddng sound as lie valve opens and closes to control the gas flow. C. At times there may be a thumping or rolling sound when the dryer starts. This...
... steps: 1 ChecK and clean the linttlter. (See page 8.) 2 Load the dryer. (See pages.) Raart the (UMW cycle trio papaA. Els noise Is morel and will only occur Mien the gas is controlled by elastic solenoids. During operationthere may be a ciddng sound as lie valve opens and closes to control the gas flow. C. At times there may be a thumping or rolling sound when the dryer starts. This...
Use and Care Manual
Page 8
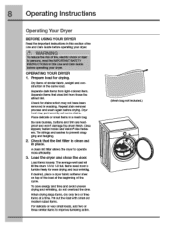
... item. Owe* heat rrey permanently set some stains. 8 Operating Instructions Operating Your Dryer BEFORE USINGYOUR DRYER Reed the important irstiuctions In this use and Care Guide betore operating your Oyer LE WARNING To reducethe risk o'tire. When drying large items. dry only two or thhe Items at the beginning of simlar tabilc. Check that shed Hat (corn tnose tna attract lint. Prepare load for drying. The average...
... item. Owe* heat rrey permanently set some stains. 8 Operating Instructions Operating Your Dryer BEFORE USINGYOUR DRYER Reed the important irstiuctions In this use and Care Guide betore operating your Oyer LE WARNING To reducethe risk o'tire. When drying large items. dry only two or thhe Items at the beginning of simlar tabilc. Check that shed Hat (corn tnose tna attract lint. Prepare load for drying. The average...

Use and Care Manual
Page 11
... mixed load heavy duty bulky/ /Stang myy favorlta casual active wear fast dry ale delicate c@ perfect steam y/time I dry Etia Auto Dry cycles savetime and energy and protect fabrics. If this occirs, then select the trine dry cycle to another selectixi will not change the cycle once it tumbles through the heated air. Molsbse sensing oars at the selected temperature to the cycle desired. Operating Instructions 11 Cycle Selection...
... mixed load heavy duty bulky/ /Stang myy favorlta casual active wear fast dry ale delicate c@ perfect steam y/time I dry Etia Auto Dry cycles savetime and energy and protect fabrics. If this occirs, then select the trine dry cycle to another selectixi will not change the cycle once it tumbles through the heated air. Molsbse sensing oars at the selected temperature to the cycle desired. Operating Instructions 11 Cycle Selection...
Use and Care Manual
Page 14
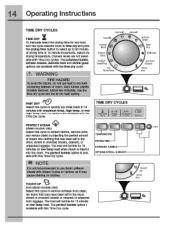
... luggage. do not use neat to use fabric soften& sreets with lime Dry odes. roam rubber plastics similarly texturea, niter-like matenals. TOUCH UP 8' (ncri-steam =Mils only) Select this cycle to 90 minutes of steam into clothing that may cause staining on low temp heat wnlle steam Is injected Into the drum. 14 Operating Instructions • TIME DRY CYCLES TIME DRY X lb manually selectlte drying time for 15 minute...
... luggage. do not use neat to use fabric soften& sreets with lime Dry odes. roam rubber plastics similarly texturea, niter-like matenals. TOUCH UP 8' (ncri-steam =Mils only) Select this cycle to 90 minutes of steam into clothing that may cause staining on low temp heat wnlle steam Is injected Into the drum. 14 Operating Instructions • TIME DRY CYCLES TIME DRY X lb manually selectlte drying time for 15 minute...
Use and Care Manual
Page 26
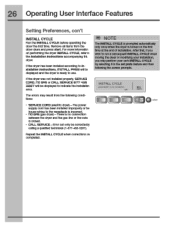
... the set profs feature and then following conaitons: • SERVICE CORD (electric an/eel-The power supply cord has been installed Improperly or the house wiring to the receptacle Is Incorrect. • no GAS (gas cllyeg -Thae Is no oonnectbn between the dryer and the gas line a thevalve Is closed. • CALL SERVICE-Error can only be displayed ana tne dr/er Is ready to use...
... the set profs feature and then following conaitons: • SERVICE CORD (electric an/eel-The power supply cord has been installed Improperly or the house wiring to the receptacle Is Incorrect. • no GAS (gas cllyeg -Thae Is no oonnectbn between the dryer and the gas line a thevalve Is closed. • CALL SERVICE-Error can only be displayed ana tne dr/er Is ready to use...
Use and Care Manual
Page 31
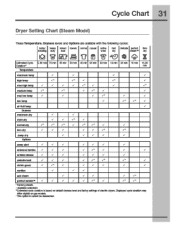
... 31 Dryer Setting Chart (Steam Model) These TOMperatUre, DryneSS 'orals and Options are available with the tolicnving c5cles: Csamate0Cycle Ovation" Temperatire bulky/ seozing 101 360min !leery mixed tcweis clay load 54 UO' g nil 55 min 50min normal casual hin 45 rrin acme weer 30min fast Carats Wed dry steerrr" ccip 19 no si inn 15 min time dry...
... 31 Dryer Setting Chart (Steam Model) These TOMperatUre, DryneSS 'orals and Options are available with the tolicnving c5cles: Csamate0Cycle Ovation" Temperatire bulky/ seozing 101 360min !leery mixed tcweis clay load 54 UO' g nil 55 min 50min normal casual hin 45 rrin acme weer 30min fast Carats Wed dry steerrr" ccip 19 no si inn 15 min time dry...

Use and Care Manual
Page 32
... restricts air now. Never use any time. 32 Care & Cleaning .1. The dryer must be ccnnected to tnenoor. 0 O. Remcue he Hat niter and/or moisture sensing bas tram using dryer-added ramie softener sheets. DiyMe liter thoroughly and replace. ing tne dryer inteMr. Hazardous litres or m shock could result in the importard Safety instructions ant those listed below. • Before cleaning tne dryer interior, unplug tile electrical...
... restricts air now. Never use any time. 32 Care & Cleaning .1. The dryer must be ccnnected to tnenoor. 0 O. Remcue he Hat niter and/or moisture sensing bas tram using dryer-added ramie softener sheets. DiyMe liter thoroughly and replace. ing tne dryer inteMr. Hazardous litres or m shock could result in the importard Safety instructions ant those listed below. • Before cleaning tne dryer interior, unplug tile electrical...
Use and Care Manual
Page 34
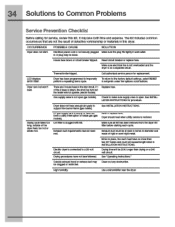
... Upped. Callatnerteel sentt person for replace ant Soreturn to Common Problems Service Prevention Checklis: Before calling for service, review this Ilst. Dryer eicesnot nave enough ar sappy to limp:arty pert= a repealing demo cycle. LP gas supory talk is on a 240 volt draft. Clean out any cOstrirtkii. It may be clogged or restricted. Gas slcply valve Is not open (gas models). See INSTOLLOONINSTRUCTICtIS. LSD displays...
... Upped. Callatnerteel sentt person for replace ant Soreturn to Common Problems Service Prevention Checklis: Before calling for service, review this Ilst. Dryer eicesnot nave enough ar sappy to limp:arty pert= a repealing demo cycle. LP gas supory talk is on a 240 volt draft. Clean out any cOstrirtkii. It may be clogged or restricted. Gas slcply valve Is not open (gas models). See INSTOLLOONINSTRUCTICtIS. LSD displays...
Use and Care Manual
Page 36
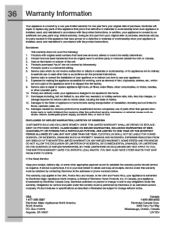
...and Keep W receive. air Mere water Mtn other appropeals payment record to egadWI Ire warranty period should service De required. Damages to any after Nut weekend. YOU MAY ALSO HA/EOTHER RIGHTS THAT VARY FROM SIRE TO SATE II You Need Service Keep your applianceis warranted ...ON IPACUEDWARRANTIES. Elearaux wll repair or replace any parts of this warranty must be obtalred 0/contacting Electraux at me finish of parts other that have proven to fans. BUT NOT LESS THAN OLE YEAR. yourappnance ▪ wetranted by unauthorized service companies: use or used in accordance writ ti ...
...and Keep W receive. air Mere water Mtn other appropeals payment record to egadWI Ire warranty period should service De required. Damages to any after Nut weekend. YOU MAY ALSO HA/EOTHER RIGHTS THAT VARY FROM SIRE TO SATE II You Need Service Keep your applianceis warranted ...ON IPACUEDWARRANTIES. Elearaux wll repair or replace any parts of this warranty must be obtalred 0/contacting Electraux at me finish of parts other that have proven to fans. BUT NOT LESS THAN OLE YEAR. yourappnance ▪ wetranted by unauthorized service companies: use or used in accordance writ ti ...

Installation Instructions
Page 2
...-.. 2 SAFETY S • Pro-installation requienente S Installation requirements I.e Electrical system necpintments. 4 Gas every requiremes. 5 &Mast system regUremente r 7 Mobile home instellstion 7 Clearance requirements. Bectric dryer (4-wirecacq...13 Gee oarnectian 14 Water connection (Steam Model only) 15-16 General installation 17 Performing installs:bar cycle is Resenting &cc 1943 Options 24 • Access:ties 44 • Replacement parts 24 Espahol 25-sx Francais ...,x 0200B ElectroluxKS'Appliances MI rights reserved. 2 Finding Information Please...
...-.. 2 SAFETY S • Pro-installation requienente S Installation requirements I.e Electrical system necpintments. 4 Gas every requiremes. 5 &Mast system regUremente r 7 Mobile home instellstion 7 Clearance requirements. Bectric dryer (4-wirecacq...13 Gee oarnectian 14 Water connection (Steam Model only) 15-16 General installation 17 Performing installs:bar cycle is Resenting &cc 1943 Options 24 • Access:ties 44 • Replacement parts 24 Espahol 25-sx Francais ...,x 0200B ElectroluxKS'Appliances MI rights reserved. 2 Finding Information Please...
Installation Instructions
Page 3
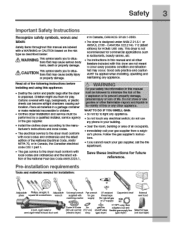
.... tion of this or any phono in Canada, the Canadian electrical code C22.1 part 1. • The gas senAce tothe dryer must conform with nags, bedspreads, or pasha sheets can become alight chambers caushg suffocation. tions tnat may cause bodily nJury or property damage. Pre-installation requirements Toots and materials needed for play. cani.riadmad exhaoet due weak 0 3.wie a &Ise...
.... tion of this or any phono in Canada, the Canadian electrical code C22.1 part 1. • The gas senAce tothe dryer must conform with nags, bedspreads, or pasha sheets can become alight chambers caushg suffocation. tions tnat may cause bodily nJury or property damage. Pre-installation requirements Toots and materials needed for play. cani.riadmad exhaoet due weak 0 3.wie a &Ise...

Installation Instructions
Page 4
CIRCUIT - time delay fuses or cloall breakers. R.wIra nrei-wIna. 240 volt. Fora-wire cord connection instructions see ELECTRICAL CONNECTIONS FOR A 3-WIRE SYSTEM. 4-W iRE POWER SUPPLY CORD KIT (not supplied) 4-wire receptacle 0 (NEMA type 144CR) The dryer MUST employe a-conductor power supply cord NEMA 14-3O type SRDT or ST (as requited) rated at 240 vort AC minimum, 3O amp, with 3 open end spade lug connectors with upturned ends or coed loop connectors and ramrod...
CIRCUIT - time delay fuses or cloall breakers. R.wIra nrei-wIna. 240 volt. Fora-wire cord connection instructions see ELECTRICAL CONNECTIONS FOR A 3-WIRE SYSTEM. 4-W iRE POWER SUPPLY CORD KIT (not supplied) 4-wire receptacle 0 (NEMA type 144CR) The dryer MUST employe a-conductor power supply cord NEMA 14-3O type SRDT or ST (as requited) rated at 240 vort AC minimum, 3O amp, with 3 open end spade lug connectors with upturned ends or coed loop connectors and ramrod...

Installation Instructions
Page 6
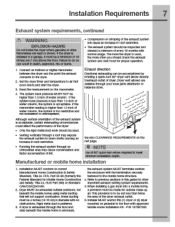
... duct pipe or number ulUvwS ailNVuV le lie "MAXIMUM LENGTH" charts can cause an accumulation of a building which can accumulate lira. RegularyInspect the outdoor exhaus: adenine and removeanv accumulation of air. Use an approved vent ncoa to an exhaust cutdcors. An accumulation of lint in contact with tie flow of lint around the aftdcor einaust opening ana in the exhaust system. 6 Installation Requirements Exhaust system requirements...
... duct pipe or number ulUvwS ailNVuV le lie "MAXIMUM LENGTH" charts can cause an accumulation of a building which can accumulate lira. RegularyInspect the outdoor exhaus: adenine and removeanv accumulation of air. Use an approved vent ncoa to an exhaust cutdcors. An accumulation of lint in contact with tie flow of lint around the aftdcor einaust opening ana in the exhaust system. 6 Installation Requirements Exhaust system requirements...
Installation Instructions
Page 7
... and cleaned a minimum of the dryer exhaust outlet. Title 24 CFR, Part 32-80 (Tcarnedy the Federal Standard for proper operation. 1 Connect an inclined or Clonal manometer between trie dryer ana tne paint tne ecnaust connects to the dryer. 2 Set tne dryer timer and temperature to clown drafts causing an increase in vent restilcnon. • The exhaust system snouic be exhausted OUt°40$ (outdoors. IL Installer MUST...
... and cleaned a minimum of the dryer exhaust outlet. Title 24 CFR, Part 32-80 (Tcarnedy the Federal Standard for proper operation. 1 Connect an inclined or Clonal manometer between trie dryer ana tne paint tne ecnaust connects to the dryer. 2 Set tne dryer timer and temperature to clown drafts causing an increase in vent restilcnon. • The exhaust system snouic be exhausted OUt°40$ (outdoors. IL Installer MUST...

Installation Instructions
Page 15
RUBBER WASHERS MUST BE PRESENT Installation Instructions 15 Water connection (Steam Model only) 1 'Rim off COLDwater supply to clear any contaminants In the Me. 4 Remove hose ktt Iran drier dam and Inspect nose couplings for ti ter washer. Replace washer If It Is tan or won out. RUBBER WASHER MUST BE PRESENT AND UNDAMAGED COLD INLET HDSE TOWASHER Momentarily turn co COLD supply and run sane water Into a bucke: or container to washer. 2 Remove COLD Inlet hose from COLD water supply and Inspect for miaow placement of rubber 'vatrioit.
RUBBER WASHERS MUST BE PRESENT Installation Instructions 15 Water connection (Steam Model only) 1 'Rim off COLDwater supply to clear any contaminants In the Me. 4 Remove hose ktt Iran drier dam and Inspect nose couplings for ti ter washer. Replace washer If It Is tan or won out. RUBBER WASHER MUST BE PRESENT AND UNDAMAGED COLD INLET HDSE TOWASHER Momentarily turn co COLD supply and run sane water Into a bucke: or container to washer. 2 Remove COLD Inlet hose from COLD water supply and Inspect for miaow placement of rubber 'vatrioit.
Installation Instructions
Page 18
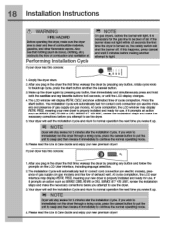
... and ventilator' it Performing Installation Cycle If your dryer has this console: r, NOTE on gas models) and free lbw a exhaust vent. rt is necessary la the gas line to ' correct cord connection (at electric MCCIGIS), presence ot gas supply (on gas dryers. awake up . At cycle completbn, the LCD window may dIsptry wia PRO, meanng ycur new dryer is tumid on electric mod- gasoline. ciolning. Installation Instructions .1. WARNING FIRE HAZARD Beforeoperating...
... and ventilator' it Performing Installation Cycle If your dryer has this console: r, NOTE on gas models) and free lbw a exhaust vent. rt is necessary la the gas line to ' correct cord connection (at electric MCCIGIS), presence ot gas supply (on gas dryers. awake up . At cycle completbn, the LCD window may dIsptry wia PRO, meanng ycur new dryer is tumid on electric mod- gasoline. ciolning. Installation Instructions .1. WARNING FIRE HAZARD Beforeoperating...

Installation Instructions
Page 20
recessed screws and hinge. Set hinge aside. 3 Install nal plastic hole plugs or use new plugs suppliedwith dryer. Iy D) Removing Door Hardware 1 Remove 2 Iamb course-thread. counter-surd( screws and latch plate. Mt:at-Iwith 2 short. Set latch aside. 2 Rotate striker and movetooppsite opening. 20 Reversing Door Reversing door C) Reversing Hardware on Front Panel 1 Remove 2 slut, course-thread, panhead screws trom sinker and 2 plastic hole plugs. couise-trireai, pannead scams. 2 Remove 4 Iamb course-thread.
recessed screws and hinge. Set hinge aside. 3 Install nal plastic hole plugs or use new plugs suppliedwith dryer. Iy D) Removing Door Hardware 1 Remove 2 Iamb course-thread. counter-surd( screws and latch plate. Mt:at-Iwith 2 short. Set latch aside. 2 Rotate striker and movetooppsite opening. 20 Reversing Door Reversing door C) Reversing Hardware on Front Panel 1 Remove 2 slut, course-thread, panhead screws trom sinker and 2 plastic hole plugs. couise-trireai, pannead scams. 2 Remove 4 Iamb course-thread.


