Use and Care Guide
Page 2
... 3-5 Features 6 Operating Instructions 7-29 • Getting Started 7 • Normal Operating Sounds 7 • Operating Your Dryer 8-10 • Cycle Selection 11-16 • Drying Temperature 17 • Dryness Level 18 • Drying Time 18 • Options 19-21 • User Interface Features 22 • Saving Favorites 23-24 • Setting Preferences 25-28 • Other Features 29 Cycle Chart (non-steam model 30 Cycle Chart (steam model 31 Care & Cleaning 32 Solutions...
... 3-5 Features 6 Operating Instructions 7-29 • Getting Started 7 • Normal Operating Sounds 7 • Operating Your Dryer 8-10 • Cycle Selection 11-16 • Drying Temperature 17 • Dryness Level 18 • Drying Time 18 • Options 19-21 • User Interface Features 22 • Saving Favorites 23-24 • Setting Preferences 25-28 • Other Features 29 Cycle Chart (non-steam model 30 Cycle Chart (steam model 31 Care & Cleaning 32 Solutions...
Use and Care Guide
Page 3
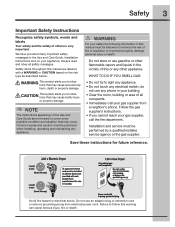
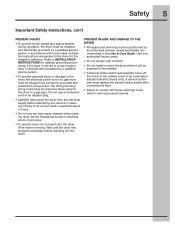
.... Installation and service must be performed by a qualified installer, service agency or the gas supplier. Failure to follow this manual must be followed to minimize the risk of this manual are not meant to light any appliance. • Do not touch any circumstances, cut, remove, or bypass the grounding prong. WARNING For your gas supplier from electrical power cord. Do not store or use gasoline...
.... Installation and service must be performed by a qualified installer, service agency or the gas supplier. Failure to follow this manual must be followed to minimize the risk of this manual are not meant to light any appliance. • Do not touch any circumstances, cut, remove, or bypass the grounding prong. WARNING For your gas supplier from electrical power cord. Do not store or use gasoline...
Use and Care Guide
Page 4
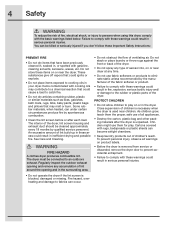
.... • Clean the lint screen before or after the dryer is unpacked. Children might use of all warnings on or near children. Regularly inspect the outdoor exhaust opening and remove any time. • Do not use fabric softeners or products to eliminate static unless recommended by qualified service personnel. Some rubber materials, when heated, can occur. See Care and Cleaning. The dryer must be cleaned approximately...
.... • Clean the lint screen before or after the dryer is unpacked. Children might use of all warnings on or near children. Regularly inspect the outdoor exhaust opening and remove any time. • Do not use fabric softeners or products to eliminate static unless recommended by qualified service personnel. Some rubber materials, when heated, can occur. See Care and Cleaning. The dryer must be cleaned approximately...
Use and Care Guide
Page 5
... before attempting any type spray cleanser when cleaning dryer interior. Use only authorized factory parts. • Do not tamper with controls. • Do not install or store the dryer where it checked and reinstalled by an authorized servicer unless specifically recommended in the dryer for detailed grounding procedures. Installation instructions are packed in this Use & Care Guide. The third grounding prong must be plugged into a properly grounded and polarized 3-prong outlet.
... before attempting any type spray cleanser when cleaning dryer interior. Use only authorized factory parts. • Do not tamper with controls. • Do not install or store the dryer where it checked and reinstalled by an authorized servicer unless specifically recommended in the dryer for detailed grounding procedures. Installation instructions are packed in this Use & Care Guide. The third grounding prong must be plugged into a properly grounded and polarized 3-prong outlet.
Use and Care Guide
Page 7
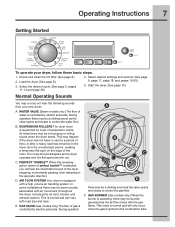
... valve opens and closes to control the water flow. The noise should dissipate as the air flow mixes with load size and type. D. This is supported by a set of suspension rollers. F. Select the desired cycle. (See page 9, pages 11-14 and page 29.) 4. WATER VALVE (Steam models only.) The flow of water is selected, you will only occur when the gas is equipped with air movement throughout the dryer, including the air duct, blower, and exhaust...
... valve opens and closes to control the water flow. The noise should dissipate as the air flow mixes with load size and type. D. This is supported by a set of suspension rollers. F. Select the desired cycle. (See page 9, pages 11-14 and page 29.) 4. WATER VALVE (Steam models only.) The flow of water is selected, you will only occur when the gas is equipped with air movement throughout the dryer, including the air duct, blower, and exhaust...
Use and Care Guide
Page 8
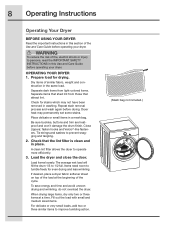
... energy and time and avoid uneven drying and wrinkling, do not overload the dryer. When drying large items, dry only two or three items at the beginning of fire, electric shock or injury to tumble freely for drying. OPERATING YOUR DRYER 1. WARNING To reduce the risk of the cycle. Dry items of the Use and Care Guide before operating your dryer. Dryer heat may not have been removed in a mesh bag. 8 Operating Instructions Operating...
... energy and time and avoid uneven drying and wrinkling, do not overload the dryer. When drying large items, dry only two or three items at the beginning of fire, electric shock or injury to tumble freely for drying. OPERATING YOUR DRYER 1. WARNING To reduce the risk of the cycle. Dry items of the Use and Care Guide before operating your dryer. Dryer heat may not have been removed in a mesh bag. 8 Operating Instructions Operating...
Use and Care Guide
Page 9
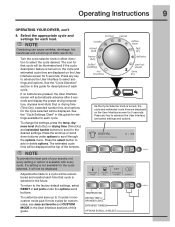
... turned, the cycle and estimated cycle time are pressed, the User Interface screen will automatically advance after 5 seconds and display the preset drying temperature, dryness level (Auto Dry) or drying time (Time Dry), extended tumble time, and options for each time that cycle will be displayed. Turn the cycle selector knob in either direction to 3 cycles in this guide. To change the settings, press the temp, dryness level (Auto Dry) or drying time (Time Dry) and extended tumble buttons...
... turned, the cycle and estimated cycle time are pressed, the User Interface screen will automatically advance after 5 seconds and display the preset drying temperature, dryness level (Auto Dry) or drying time (Time Dry), extended tumble time, and options for each time that cycle will be displayed. Turn the cycle selector knob in either direction to 3 cycles in this guide. To change the settings, press the temp, dryness level (Auto Dry) or drying time (Time Dry) and extended tumble buttons...
Use and Care Guide
Page 10
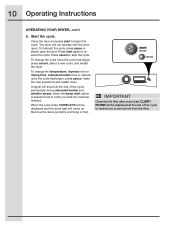
The dryer will come on. Start the cycle. To interrupt the cycle, press pause or simply open . IMPORTANT Clean the lint filter after every load. Remove the items promptly and hang or fold. To change the cycle once the cycle has begun, press cancel, select a new cycle, and restart the dryer To change the temperature, dryness level or drying time, extended tumble time or options once the cycle has begun, press pause, make...
The dryer will come on. Start the cycle. To interrupt the cycle, press pause or simply open . IMPORTANT Clean the lint filter after every load. Remove the items promptly and hang or fold. To change the cycle once the cycle has begun, press cancel, select a new cycle, and restart the dryer To change the temperature, dryness level or drying time, extended tumble time or options once the cycle has begun, press pause, make...
Use and Care Guide
Page 11
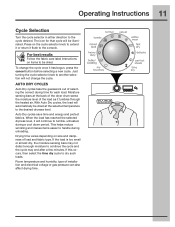
To change the cycle. Just turning the cycle selector knob to be illuminated. This helps reduce wrinkling and makes items easier to the cycle desired. Operating Instructions 11 Cycle Selection Turn the cycle selector in either direction to handle during a cool down period. For best results Follow the fabric care label instructions on items to another selection will be dried. With Auto Dry cycles, the load will continue to the...
To change the cycle. Just turning the cycle selector knob to be illuminated. This helps reduce wrinkling and makes items easier to the cycle desired. Operating Instructions 11 Cycle Selection Turn the cycle selector in either direction to handle during a cool down period. For best results Follow the fabric care label instructions on items to another selection will be dried. With Auto Dry cycles, the load will continue to the...
Use and Care Guide
Page 14
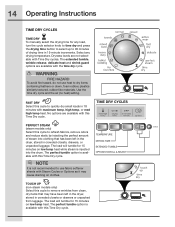
...-steam models only) Select this cycle to 90 minutes of steam into the drum. The load will tumble for 15 minutes on low temp heat while steam is not recommended to use heat to remove wrinkles from luggage. The perfect tumble option is available with maximum temp, high temp, or med high temp heat. 14 Operating Instructions TIME DRY CYCLES TIME DRY To manually select the drying time for any drying temperature. FAST DRY Select this cycle...
...-steam models only) Select this cycle to 90 minutes of steam into the drum. The load will tumble for 15 minutes on low temp heat while steam is not recommended to use heat to remove wrinkles from luggage. The perfect tumble option is available with maximum temp, high temp, or med high temp heat. 14 Operating Instructions TIME DRY CYCLES TIME DRY To manually select the drying time for any drying temperature. FAST DRY Select this cycle...
Use and Care Guide
Page 21
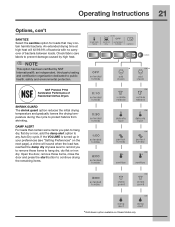
... shrinking. Operating Instructions 21 Options, con't SANITIZE Select the sanitize option for loads that contain some items you to remove those items, close the door and press the start button to public health, safety and environmental protection. NSF Protolcol P154 Sanitization Performance of bacteria between loads. If the VOLUME is turned up in your preferences (see "Setting Preferences" on Steam Model only...
... shrinking. Operating Instructions 21 Options, con't SANITIZE Select the sanitize option for loads that contain some items you to remove those items, close the door and press the start button to public health, safety and environmental protection. NSF Protolcol P154 Sanitization Performance of bacteria between loads. If the VOLUME is turned up in your preferences (see "Setting Preferences" on Steam Model only...
Use and Care Guide
Page 26
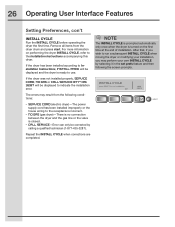
...: • SERVICE CORD (electric dryer)-The power supply cord has been installed improperly or the house wiring to the receptacle is incorrect. • NO GAS (gas dryer)-There is no connection between the dryer and the gas line or the valve is turned on performing the dryer INSTALL CYCLE, refer to Installation Instructions, INSTALL PASS! will be displayed and the dryer is ready to indicate the installation error. After that, if you wish to run a subsequent INSTALL CYCLE when...
...: • SERVICE CORD (electric dryer)-The power supply cord has been installed improperly or the house wiring to the receptacle is incorrect. • NO GAS (gas dryer)-There is no connection between the dryer and the gas line or the valve is turned on performing the dryer INSTALL CYCLE, refer to Installation Instructions, INSTALL PASS! will be displayed and the dryer is ready to indicate the installation error. After that, if you wish to run a subsequent INSTALL CYCLE when...
Use and Care Guide
Page 29
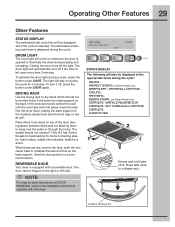
... on the right or left open more than 3 minutes. DRYING WILL CONTINUE... DRYING RACK Use the drying rack to dry items which should not exceed 10 lbs (4.5 kg). The weight should not be tumble dried. REVERSIBLE DOOR Your dryer is selected. COOLING... SANITIZING... EXT. Place items to illuminate the drum during the cycle. PERFECT STEAM (on the air grill. WRINKLE RELEASE IS ON COMPLETE - moisture sensing bars Operating Other Features...
... on the right or left open more than 3 minutes. DRYING WILL CONTINUE... DRYING RACK Use the drying rack to dry items which should not exceed 10 lbs (4.5 kg). The weight should not be tumble dried. REVERSIBLE DOOR Your dryer is selected. COOLING... SANITIZING... EXT. Place items to illuminate the drum during the cycle. PERFECT STEAM (on the air grill. WRINKLE RELEASE IS ON COMPLETE - moisture sensing bars Operating Other Features...
Use and Care Guide
Page 30
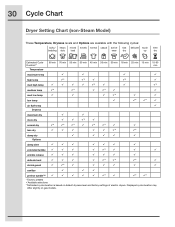
... may differ slightly on default dryness level and factory settings of electric dryers. 30 Cycle Chart Dryer Setting Chart (non-Steam Model) These Temperature, Dryness levels and Options are available with the following cycles: bulky/ heavy mixed towels normal casual active fast delicate touch time bedding duty load wear dry up dry Estimated Cycle 60 min 70 min 55 min 50 min 45 min 35...
... may differ slightly on default dryness level and factory settings of electric dryers. 30 Cycle Chart Dryer Setting Chart (non-Steam Model) These Temperature, Dryness levels and Options are available with the following cycles: bulky/ heavy mixed towels normal casual active fast delicate touch time bedding duty load wear dry up dry Estimated Cycle 60 min 70 min 55 min 50 min 45 min 35...
Use and Care Guide
Page 31
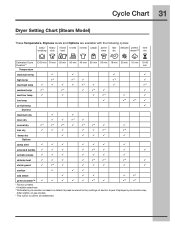
...; This option is based on default dryness level and factory settings of electric dryers. Cycle Chart 31 Dryer Setting Chart (Steam Model) These Temperature, Dryness levels and Options are available with the following cycles: bulky/ heavy mixed towels normal casual active bedding duty load wear fast delicate perfect time dry steam™ dry Estimated Cycle E 60 min 70 min 55 min 50 min 45 min 35...
...; This option is based on default dryness level and factory settings of electric dryers. Cycle Chart 31 Dryer Setting Chart (Steam Model) These Temperature, Dryness levels and Options are available with the following cycles: bulky/ heavy mixed towels normal casual active bedding duty load wear fast delicate perfect time dry steam™ dry Estimated Cycle E 60 min 70 min 55 min 50 min 45 min 35...
Use and Care Guide
Page 32
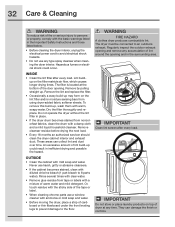
... and water. Remove cleanser residue before drying the next load. • Every 18 months an authorized servicer should clean the dryer cabinet interior and exhaust duct. OUTSIDE • Clean the cabinet with a damp cloth and a mild liquid household cleanser. IMPORTANT Clean lint screen after every load. To remove this build-up may form on the filter restricts air flow, which causes longer drying times. WARNING FIRE HAZARD A clothes dryer produces combustible lint. 32 Care & Cleaning WARNING...
... and water. Remove cleanser residue before drying the next load. • Every 18 months an authorized servicer should clean the dryer cabinet interior and exhaust duct. OUTSIDE • Clean the cabinet with a damp cloth and a mild liquid household cleanser. IMPORTANT Clean lint screen after every load. To remove this build-up may form on the filter restricts air flow, which causes longer drying times. WARNING FIRE HAZARD A clothes dryer produces combustible lint. 32 Care & Cleaning WARNING...
Use and Care Guide
Page 33
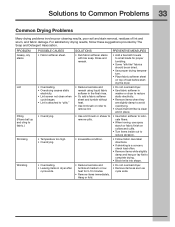
... load size and rewash using liquid fabric softener in the final rinse. • Or, add a fabric softener sheet and tumble without heat. • Use lint brush or roller to remove lint. • Do not overload dryer. • Use fabric softener in washer or dryer to reduce static electricity. • Remove items when they are slightly damp to avoid overdrying. • Check that lint filter is clean and in dryer after cycle...
... load size and rewash using liquid fabric softener in the final rinse. • Or, add a fabric softener sheet and tumble without heat. • Use lint brush or roller to remove lint. • Do not overload dryer. • Use fabric softener in washer or dryer to reduce static electricity. • Remove items when they are slightly damp to avoid overdrying. • Check that lint filter is clean and in dryer after cycle...
Use and Care Guide
Page 34
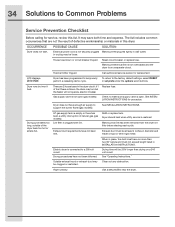
... drum may turn but won't heat. If 1 Replace fuse. Drying cycle takes too long, outside of natural gas (gas models). When in place, the duct must have enough air supply to the factory default settings, select RESET in INSTALLATION INSTRUCTIONS. Drying time will not operate. (electric models) Gas supply valve is on a 240 volt circuit. Outside exhaust hood or exhaust duct may save both time and expense. LCD displays DEMO MODE. LP gas supply tank is open (gas models). Exhaust duct must not exceed length listed in set prefs...
... drum may turn but won't heat. If 1 Replace fuse. Drying cycle takes too long, outside of natural gas (gas models). When in place, the duct must have enough air supply to the factory default settings, select RESET in INSTALLATION INSTRUCTIONS. Drying time will not operate. (electric models) Gas supply valve is on a 240 volt circuit. Outside exhaust hood or exhaust duct may save both time and expense. LCD displays DEMO MODE. LP gas supply tank is open (gas models). Exhaust duct must not exceed length listed in set prefs...
Use and Care Guide
Page 35
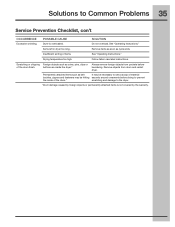
... dryer.* Always remove foreign objects from drum and restart dryer. Insufficient sorting of items. See "Operating Instructions." Drying temperature too high. Remove objects from pockets before drying to the dryer. *Drum damage caused by the warranty. Follow fabric care label instructions. Permanently attached items such as belt It may be necessary to Common Problems 35 Service Prevention Checklist, con't OCCURRENCE POSSIBLE CAUSE SOLUTION Excessive wrinkling. Do not overload. See "Operating Instructions...
... dryer.* Always remove foreign objects from drum and restart dryer. Insufficient sorting of items. See "Operating Instructions." Drying temperature too high. Remove objects from pockets before drying to the dryer. *Drum damage caused by the warranty. Follow fabric care label instructions. Permanently attached items such as belt It may be necessary to Common Problems 35 Service Prevention Checklist, con't OCCURRENCE POSSIBLE CAUSE SOLUTION Excessive wrinkling. Do not overload. See "Operating Instructions...
Use and Care Guide
Page 36
For one year from your original date of purchase, Electrolux will pay for parts needed for service calls to repair or replace appliance light bulbs, air filters, water filters, other consumables, or knobs, handles, or other than genuine Elec- In addition, your appliance is covered by an additional one year limited warranty. Products used , and maintained in a commercial setting. 6. Service calls to remote areas, including the state of...
For one year from your original date of purchase, Electrolux will pay for parts needed for service calls to repair or replace appliance light bulbs, air filters, water filters, other consumables, or knobs, handles, or other than genuine Elec- In addition, your appliance is covered by an additional one year limited warranty. Products used , and maintained in a commercial setting. 6. Service calls to remote areas, including the state of...


