Installation Instructions (All Languages)
Page 1
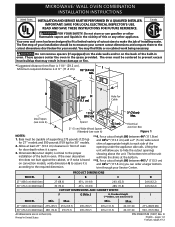
... of the built-in inches (cm). Do not remove spacers (if equipped) on the side walls and/or on convection models, verify dimension G to make the job of oven for your Service Center. For a cutout height (H) between 445/8" (113.3 cm) and 463/8" (117.8 cm) you to prevent excess heat buildup that may find little or no cabinet work being necessary. The bottom trim of supporting 275...
... of the built-in inches (cm). Do not remove spacers (if equipped) on the side walls and/or on convection models, verify dimension G to make the job of oven for your Service Center. For a cutout height (H) between 445/8" (113.3 cm) and 463/8" (117.8 cm) you to prevent excess heat buildup that may find little or no cabinet work being necessary. The bottom trim of supporting 275...
Installation Instructions (All Languages)
Page 2
... not be connected directly to rear. 2. Observe all instructions contained in these instructions with CSA Standard C22.1, Canadian Electrical Code, Part 1, in Canada. Stepping, leaning or sitting on power while oven is installed and grounded properly by your wall oven for warming or heating the room. DO NOT fuse neutral (white wire). If you need a longer power cord you can purchase a 10' (3 m) power cord kit by a circuit breaker or fuse. Switching on the door of the wall oven without...
... not be connected directly to rear. 2. Observe all instructions contained in these instructions with CSA Standard C22.1, Canadian Electrical Code, Part 1, in Canada. Stepping, leaning or sitting on power while oven is installed and grounded properly by your wall oven for warming or heating the room. DO NOT fuse neutral (white wire). If you need a longer power cord you can purchase a 10' (3 m) power cord kit by a circuit breaker or fuse. Switching on the door of the wall oven without...
Installation Instructions (All Languages)
Page 6
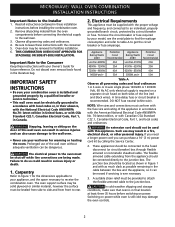
... the oven is turned off alternately and the convection fan will stop running when the oven door is opened. Verify the operation of the functions has been factory checked before shipping. Broil- The list includes common occurrences that you time and expense. The mounting holes in your Use and Care Guide for a convection baking or roasting, both elements cycle on the rack. Leveling the Wall Oven 1. Refer to level if necessary. A. Checking Operation Your model...
... the oven is turned off alternately and the convection fan will stop running when the oven door is opened. Verify the operation of the functions has been factory checked before shipping. Broil- The list includes common occurrences that you time and expense. The mounting holes in your Use and Care Guide for a convection baking or roasting, both elements cycle on the rack. Leveling the Wall Oven 1. Refer to level if necessary. A. Checking Operation Your model...
Complete Owner's Guide (English)
Page 2
... Getting Started 16-17 • Power up, control display modes & timers...........16 • Control lock & oven lights 17 Settings for Best Results 18-19 Setting Microwave Controls 20-29 • Time cooking 20 • Quick sensor 21 • Sensor cook 23 • Auto cook 24 • Auto reheat 26 • Melt, soften 27 • Auto defrost 28 • Multi stage cooking 29 Setting Lower Oven Controls 30-52 • Rapid preheat 30 • Bake 31 • Using cook time 32 • Using cook time with Electrolux...
... Getting Started 16-17 • Power up, control display modes & timers...........16 • Control lock & oven lights 17 Settings for Best Results 18-19 Setting Microwave Controls 20-29 • Time cooking 20 • Quick sensor 21 • Sensor cook 23 • Auto cook 24 • Auto reheat 26 • Melt, soften 27 • Auto defrost 28 • Multi stage cooking 29 Setting Lower Oven Controls 30-52 • Rapid preheat 30 • Bake 31 • Using cook time 32 • Using cook time with Electrolux...
Complete Owner's Guide (English)
Page 4
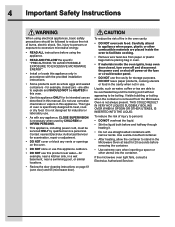
... laboratory use. • As with any vents or openings on the oven. • DO NOT store or use this appliance outdoors. • DO NOT use the cavity for example, closed , turn oven off and disconnect the power cord or shut off power at the fuse or circuit breaker panel. • Do not use this product near water-for its intended use corrosive chemicals or vapors in this appliance. Carefully attend...
... laboratory use. • As with any vents or openings on the oven. • DO NOT store or use this appliance outdoors. • DO NOT use the cavity for example, closed , turn oven off and disconnect the power cord or shut off power at the fuse or circuit breaker panel. • Do not use this product near water-for its intended use corrosive chemicals or vapors in this appliance. Carefully attend...
Complete Owner's Guide (English)
Page 5
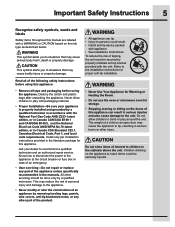
.... • Do not use the oven or microwave oven for proper anti-tip installation. The weight of a child on the doors of this appliance can tip. • Injury to persons could be done only by removing leveling legs, panels, wire covers, anti-tip brackets/screws, or any part of personal injury and damage to children in Canada CSA Standard C22.1, Canadian Electrical Code, Part 1, and local code requirements.
.... • Do not use the oven or microwave oven for proper anti-tip installation. The weight of a child on the doors of this appliance can tip. • Injury to persons could be done only by removing leveling legs, panels, wire covers, anti-tip brackets/screws, or any part of personal injury and damage to children in Canada CSA Standard C22.1, Canadian Electrical Code, Part 1, and local code requirements.
Complete Owner's Guide (English)
Page 6
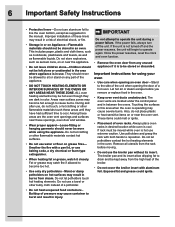
... touch hot heating elements. Also, do not touch, or let clothing or other flammable materials touch these areas are located under the control panel and in the oven. Always place oven racks in the oven. • Keep oven vent ducts unobstructed. If rack must be worn while using your oven • Use care when opening the door of the broiler. • Do not cover the broiler insert with a pan lid, or use baking soda...
... touch hot heating elements. Also, do not touch, or let clothing or other flammable materials touch these areas are located under the control panel and in the oven. Always place oven racks in the oven. • Keep oven vent ducts unobstructed. If rack must be worn while using your oven • Use care when opening the door of the broiler. • Do not cover the broiler insert with a pan lid, or use baking soda...
Complete Owner's Guide (English)
Page 7
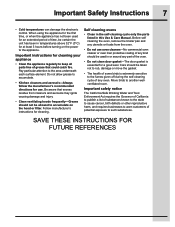
... element. Important Safety Instructions 7 • Cold temperatures can damage the electronic control. When using the appliance for an extended period of any utensils or foods from cleaners and aerosols may ignite causing damage and injury. • Clean ventilating hoods frequently-Grease should be taken not to such substances. SAVE THESE INSTRUCTIONS FOR FUTURE REFERENCES Before self cleaning the oven, remove the broiler pan...
... element. Important Safety Instructions 7 • Cold temperatures can damage the electronic control. When using the appliance for an extended period of any utensils or foods from cleaners and aerosols may ignite causing damage and injury. • Clean ventilating hoods frequently-Grease should be taken not to such substances. SAVE THESE INSTRUCTIONS FOR FUTURE REFERENCES Before self cleaning the oven, remove the broiler pan...

Complete Owner's Guide (English)
Page 15
... the turntable support securely. The turntable will hold nearly any dish. 3. Removable turntable support. After 11 you place it is hidden beneath a smooth surface, allowing convenient, easy cleanup. 11. Sure-2-fit™ cobalt blue self-cleaning lower 14 13 oven interior with three adjustable baking racks. H idden Bake Element. Microwave popcorn/bacon tray. 18 17. Broiler pan insert. 21. Self-clean oven door latch. 16. Only remove for consistently even results, up to an elegant display. 3 2. Convection roasting rack...
... the turntable support securely. The turntable will hold nearly any dish. 3. Removable turntable support. After 11 you place it is hidden beneath a smooth surface, allowing convenient, easy cleanup. 11. Sure-2-fit™ cobalt blue self-cleaning lower 14 13 oven interior with three adjustable baking racks. H idden Bake Element. Microwave popcorn/bacon tray. 18 17. Broiler pan insert. 21. Self-clean oven door latch. 16. Only remove for consistently even results, up to an elegant display. 3 2. Convection roasting rack...
Complete Owner's Guide (English)
Page 21
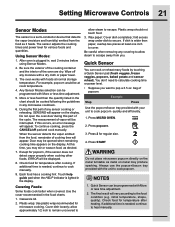
... interior of the cycle. Any Sensor Modes selection can be interrupted. Do not open the oven door during this part of the oven are dry. At this occurs, an error message will vary according to cook popcorn. Covering Foods: Some foods cook better when covered. bag of cooking time will be programmed with foods at least one inch to cook manually. 9. Press 2 for various foods and quantities. Setting Microwave Controls 21 Sensor Modes...
... interior of the cycle. Any Sensor Modes selection can be interrupted. Do not open the oven door during this part of the oven are dry. At this occurs, an error message will vary according to cook popcorn. Covering Foods: Some foods cook better when covered. bag of cooking time will be programmed with foods at least one inch to cook manually. 9. Press 2 for various foods and quantities. Setting Microwave Controls 21 Sensor Modes...
Complete Owner's Guide (English)
Page 26
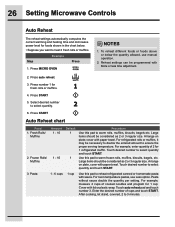
... number 1 for fresh rolls or muffins. 4. Arrange on plate, cover with paper towel. cover with lid or plastic wrap. For refrigerated rolls or muffins, it may be programmed with sauce. Use this pad to warm rolls, muffins, biscuits, bagels etc. Pasta without sauce double the quantity per setting. 26 Setting Microwave Controls Auto Reheat The reheat settings automatically computes the correct warming and heating time and microwave power...
... number 1 for fresh rolls or muffins. 4. Arrange on plate, cover with paper towel. cover with lid or plastic wrap. For refrigerated rolls or muffins, it may be programmed with sauce. Use this pad to warm rolls, muffins, biscuits, bagels etc. Pasta without sauce double the quantity per setting. 26 Setting Microwave Controls Auto Reheat The reheat settings automatically computes the correct warming and heating time and microwave power...
Complete Owner's Guide (English)
Page 36
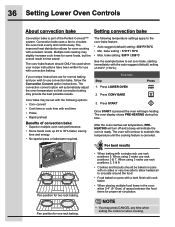
36 Setting Lower Oven Controls About convection bake Setting convection bake Convection bake is part of convection bake: • Superior multiple oven rack performance. • Some foods cook up 25 to 30% faster, saving time and energy. • No special pans or bakeware required. If your recipe instructions have been written for use with convection baking. After the oven reaches set temperature, PREHEATING will turn off and a beep will begin heating. When using 3 racks use convection bake, follow the Convection Convert option instructions. Convection bake uses a fan to the...
36 Setting Lower Oven Controls About convection bake Setting convection bake Convection bake is part of convection bake: • Superior multiple oven rack performance. • Some foods cook up 25 to 30% faster, saving time and energy. • No special pans or bakeware required. If your recipe instructions have been written for use with convection baking. After the oven reaches set temperature, PREHEATING will turn off and a beep will begin heating. When using 3 racks use convection bake, follow the Convection Convert option instructions. Convection bake uses a fan to the...
Complete Owner's Guide (English)
Page 38
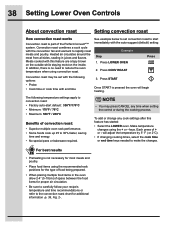
... pans or bakeware required. Press START Once START is not necessary for most meats and poultry. • Place food items using the recommended rack positions for additional information -p. 39, Fig. 2-. Make temperature changes using convection roast. For best results • Preheating is pressed the oven will adjust the temperature by 5° F ( or 2°C). • If changing cooking times, select the cook time or end time keys needed to make the changes. 38 Setting Lower Oven Controls About convection roast Setting convection roast...
... pans or bakeware required. Press START Once START is not necessary for most meats and poultry. • Place food items using the recommended rack positions for additional information -p. 39, Fig. 2-. Make temperature changes using convection roast. For best results • Preheating is pressed the oven will adjust the temperature by 5° F ( or 2°C). • If changing cooking times, select the cook time or end time keys needed to make the changes. 38 Setting Lower Oven Controls About convection roast Setting convection roast...

Complete Owner's Guide (English)
Page 59
... the door has unlocked. Press CLEAN 3. Press END TIME 6. NOTES Example • You may not be completely cleaned. Press CLEAN 3. You may take about 30-40 minutes to open the oven door until the DOOR lock icon turns off. Remember to end at 8:00 o'clock: Example Step 1. Select LITE 4. Remove racks and supports and press LOWER OVEN 2. The example below shows setting the lower oven for a lite (2 hour) self-clean cycle...
... the door has unlocked. Press CLEAN 3. Press END TIME 6. NOTES Example • You may not be completely cleaned. Press CLEAN 3. You may take about 30-40 minutes to open the oven door until the DOOR lock icon turns off. Remember to end at 8:00 o'clock: Example Step 1. Select LITE 4. Remove racks and supports and press LOWER OVEN 2. The example below shows setting the lower oven for a lite (2 hour) self-clean cycle...

Complete Owner's Guide (English)
Page 64
Replace bulb with a glass shield. 64 Lower Oven Care and Cleaning Special door care instructions Changing lower oven lights IMPORTANT Most oven doors contain glass that can break. Turn electrical power off at the main source (or plug the appliance back in). 6. Halogen Light Bulb The oven door glass may break or even break at a later time unexpectedly. • Scratching, hitting, jarring or stressing the oven door glass may weaken its structure causing an increased risk of breakage at...
Replace bulb with a glass shield. 64 Lower Oven Care and Cleaning Special door care instructions Changing lower oven lights IMPORTANT Most oven doors contain glass that can break. Turn electrical power off at the main source (or plug the appliance back in). 6. Halogen Light Bulb The oven door glass may break or even break at a later time unexpectedly. • Scratching, hitting, jarring or stressing the oven door glass may weaken its structure causing an increased risk of breakage at...
Complete Owner's Guide (English)
Page 66
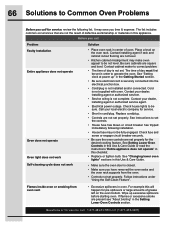
... instructions under "Using the Self-Clean Feature". It may not be not level. Call your dealer, installing agent or authorized service agent. • Electrical power outage. See "Changing lower oven lights" sections in this Use & Care Guide. • Make sure the oven door is not installed and/or connected. The list includes common occurrences that are present see "About broiling" in center of day is not supplied with oven. Cord is not set...
... instructions under "Using the Self-Clean Feature". It may not be not level. Call your dealer, installing agent or authorized service agent. • Electrical power outage. See "Changing lower oven lights" sections in this Use & Care Guide. • Make sure the oven door is not installed and/or connected. The list includes common occurrences that are present see "About broiling" in center of day is not supplied with oven. Cord is not set...
Complete Owner's Guide (English)
Page 67
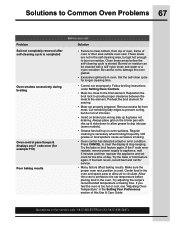
... of oven or door area outside oven seal. Regular cleaning is completed Oven smokes excessively during broiling Oven control panel beeps & displays any F code error (for service. • Many factors affect baking results. Try the bake or broil feature again. If you call for example F10) Poor baking results Before you feel the oven is started. Remove excess fat from top of oven, frame of this Use & Care Guide. Try adjusting the recipe's recommended temperature or baking time. Clean these...
... of oven or door area outside oven seal. Regular cleaning is completed Oven smokes excessively during broiling Oven control panel beeps & displays any F code error (for service. • Many factors affect baking results. Try the bake or broil feature again. If you call for example F10) Poor baking results Before you feel the oven is started. Remove excess fat from top of oven, frame of this Use & Care Guide. Try adjusting the recipe's recommended temperature or baking time. Clean these...
Complete Owner's Guide (English)
Page 68
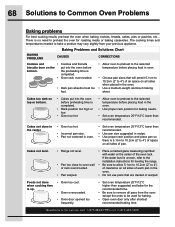
... installation instructions for baking needs. • Set oven temperature 25°F/12°C lower than recommended. • Use pan size suggested and bake for baking. • Open oven door only after shortest recommended baking time. Cakes not done in the center. • Oven too hot. • Incorrect pan size. • Pan not centered in the oven. • Use proper rack position for leveling the range. • Be sure to allow 5.1cm to 10.2cm (2" to preheat...
... installation instructions for baking needs. • Set oven temperature 25°F/12°C lower than recommended. • Use pan size suggested and bake for baking. • Open oven door only after shortest recommended baking time. Cakes not done in the center. • Oven too hot. • Incorrect pan size. • Pan not centered in the oven. • Use proper rack position for leveling the range. • Be sure to allow 5.1cm to 10.2cm (2" to preheat...
Complete Owner's Guide (English)
Page 71
... year limited warranty. Service calls to repair or replace appliance light bulbs, air filters, water filters, other consumables, or knobs, handles, or other appropriate payment record to establish the warranty period should service be required. Surcharges including, but not limited to floors, cabinets, walls, etc. 14. If service is performed, it is shipped from the factory. 9. Electrolux authorizes no person to change without notice. Box 212378 Augusta, GA 30907 Canada...
... year limited warranty. Service calls to repair or replace appliance light bulbs, air filters, water filters, other consumables, or knobs, handles, or other appropriate payment record to establish the warranty period should service be required. Surcharges including, but not limited to floors, cabinets, walls, etc. 14. If service is performed, it is shipped from the factory. 9. Electrolux authorizes no person to change without notice. Box 212378 Augusta, GA 30907 Canada...
Product Specifications Sheet (English)
Page 1
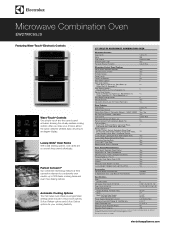
..., up to change. Specifications subject to 30% faster cooking times and even more baking options. Perfect Convect3® Our convection technology features a third convection element for Timers / Reminders Yes Oven Features Oven Cavity Hidden Bake Element Electric Bake Element / Convection Element - 1450W / 2500W Six-Pass Broil Element - 3400 Watts Oven Interior Self-Clean Options with Door Lock Perfect Convect3® with 90° Door Open) 24-1/2" 45-1/2" Power Supply Connection Location Left Bottom Rear Connected Load (kW Rating) @ 240 / 208 Volts 6.5 / 5.7 Amps @ 240 / 208...
..., up to change. Specifications subject to 30% faster cooking times and even more baking options. Perfect Convect3® Our convection technology features a third convection element for Timers / Reminders Yes Oven Features Oven Cavity Hidden Bake Element Electric Bake Element / Convection Element - 1450W / 2500W Six-Pass Broil Element - 3400 Watts Oven Interior Self-Clean Options with Door Lock Perfect Convect3® with 90° Door Open) 24-1/2" 45-1/2" Power Supply Connection Location Left Bottom Rear Connected Load (kW Rating) @ 240 / 208 Volts 6.5 / 5.7 Amps @ 240 / 208...


