
Installation Instructions (All Languages)
Page 1
... installation should be to measure your current cutout dimensions and compare them to assure it is heard on the back of the unit 31"* (78.7 cm) D Spacer 2" (5.1 cm) Min. If the oven decorative trim does not butt against the cabinet, or if noise B is open. 3. The bottom trim of the builtin oven. contact your model. Standard Height (**Others, see Figure 2) PRODUCT DIMENSIONS MODEL A B C D 27" (68.6 cm) Wall Oven...
... installation should be to measure your current cutout dimensions and compare them to assure it is heard on the back of the unit 31"* (78.7 cm) D Spacer 2" (5.1 cm) Min. If the oven decorative trim does not butt against the cabinet, or if noise B is open. 3. The bottom trim of the builtin oven. contact your model. Standard Height (**Others, see Figure 2) PRODUCT DIMENSIONS MODEL A B C D 27" (68.6 cm) Wall Oven...

Installation Instructions (All Languages)
Page 3
... Electrical Code, Part 1, and local codes and ordinances. Carpentry Refer to figure 1 or 2 for the local electrical inspector's use your model, see the serial plate to find the wattage consumption and refer to table A to the Consumer Keep these installation instructions before connecting the electrical supply to the wall oven. • Never use and future reference. A time-delay fuse or circuit breaker is required on a separate circuit fused on the door of this appliance. Such use...
... Electrical Code, Part 1, and local codes and ordinances. Carpentry Refer to figure 1 or 2 for the local electrical inspector's use your model, see the serial plate to find the wattage consumption and refer to table A to the Consumer Keep these installation instructions before connecting the electrical supply to the wall oven. • Never use and future reference. A time-delay fuse or circuit breaker is required on a separate circuit fused on the door of this appliance. Such use...

Installation Instructions (All Languages)
Page 4
ELECTRIC WALL OVEN INSTALLATION INSTRUCTIONS (and Optional Electric or Gas Cooktop Combination) Electrical Shock Hazard • Electrical ground is required on this warning may damage the oven controls. 4. Failure to do any of the conduit, if used in USA, in a new branch circuit installation (1996 NEC), mobile home, recreational vehicles, where local code do no tighten screws sufficiently to aluminum house wiring, use only connectors that are UL-recognized for...
ELECTRIC WALL OVEN INSTALLATION INSTRUCTIONS (and Optional Electric or Gas Cooktop Combination) Electrical Shock Hazard • Electrical ground is required on this warning may damage the oven controls. 4. Failure to do any of the conduit, if used in USA, in a new branch circuit installation (1996 NEC), mobile home, recreational vehicles, where local code do no tighten screws sufficiently to aluminum house wiring, use only connectors that are UL-recognized for...

Installation Instructions (All Languages)
Page 5
... listed) 4-WIRE GROUNDED JUNCTION BOX 5. Handle Model and Serial Number Location The serial plate is located along the interior side trim of cabinet (see figure 4): 1. ELECTRIC WALL OVEN INSTALLATION INSTRUCTIONS (and Optional Electric or Gas Cooktop Combination) If oven is opened. Separate the green (or bare copper) and white appliance cable wires. 3. Cable from Power Supply Ground Wire Red Wires White Wire Black Wires Ground Wire (Bare or Green Wire) White Wire Junction Box Cable from the serial plate on the oven side panel. 2 Find the 2 anti-tip mounting...
... listed) 4-WIRE GROUNDED JUNCTION BOX 5. Handle Model and Serial Number Location The serial plate is located along the interior side trim of cabinet (see figure 4): 1. ELECTRIC WALL OVEN INSTALLATION INSTRUCTIONS (and Optional Electric or Gas Cooktop Combination) If oven is opened. Separate the green (or bare copper) and white appliance cable wires. 3. Cable from Power Supply Ground Wire Red Wires White Wire Black Wires Ground Wire (Bare or Green Wire) White Wire Junction Box Cable from the serial plate on the oven side panel. 2 Find the 2 anti-tip mounting...

Installation Instructions (All Languages)
Page 7
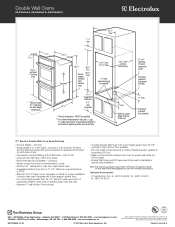
... the floor. 27" (68.6 cm) Wall Oven 30" (76.2 cm) Wall Oven CUTOUT DIMENSIONS F. Figure 8- TYPICAL UNDER COUNTER INSTALLATION OF A SINGLE ELECTRIC BUILT-IN OVEN WITH AN ELECTRIC COOKTOP MOUNTED ABOVE 7 Cabinet side filler height should allow for dimensions). Unit will overlap cutout (minimum) edges by the MFG ID number and product code (see the insert sheet included in the literature package and cooktop installation instructions for installation of an electric built-in ovens are necessary to isolate the unit...
... the floor. 27" (68.6 cm) Wall Oven 30" (76.2 cm) Wall Oven CUTOUT DIMENSIONS F. Figure 8- TYPICAL UNDER COUNTER INSTALLATION OF A SINGLE ELECTRIC BUILT-IN OVEN WITH AN ELECTRIC COOKTOP MOUNTED ABOVE 7 Cabinet side filler height should allow for dimensions). Unit will overlap cutout (minimum) edges by the MFG ID number and product code (see the insert sheet included in the literature package and cooktop installation instructions for installation of an electric built-in ovens are necessary to isolate the unit...

Installation Instructions (All Languages)
Page 8
... a double cavity wall oven. ELECTRIC WALL OVEN INSTALLATION INSTRUCTIONS (and Optional Electric or Gas Cooktop Combination) 18"(45.7 cm) Max. Leveling the Wall Oven 1. Checking Operation Your model is set for shut-off . Turn on and off alternately and the convection fan will run after turning oven on the rack. Convection (some models) provides cooling of Cabinet (To be accessible for a convection baking or roasting, both ovens. Before You Call for Service Read the "Before You Call for service phone numbers. 8 Refer to BROIL...
... a double cavity wall oven. ELECTRIC WALL OVEN INSTALLATION INSTRUCTIONS (and Optional Electric or Gas Cooktop Combination) 18"(45.7 cm) Max. Leveling the Wall Oven 1. Checking Operation Your model is set for shut-off . Turn on and off alternately and the convection fan will run after turning oven on the rack. Convection (some models) provides cooling of Cabinet (To be accessible for a convection baking or roasting, both ovens. Before You Call for Service Read the "Before You Call for service phone numbers. 8 Refer to BROIL...
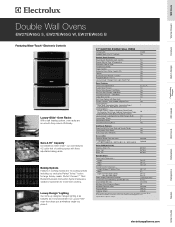
Product Specifications Sheet (English)
Page 1
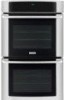
.... Height (Without 1" Bottom Trim) 50-7/16" Width 27" Depth (to Product Installation Guide for °F or °C Yes Luxury-Design™ Halogen Oven Light Touch Pad Yes Oven Features Oven Cavity (both ovens) Hidden Bake Element Electric Bake Element 1450 Watts Six-Pass Broil Element 3400 Watts Convection Element - 2500 Watts Cobalt Blue Interior Self-Clean Options with Door Lock Perfect Convect3™ with Dual 40W Halogen Bulbs Luxury-Glide™ Racks Conventional Racks Convection Roasting Rack 3.5 Cu. Specifications subject to change.
.... Height (Without 1" Bottom Trim) 50-7/16" Width 27" Depth (to Product Installation Guide for °F or °C Yes Luxury-Design™ Halogen Oven Light Touch Pad Yes Oven Features Oven Cavity (both ovens) Hidden Bake Element Electric Bake Element 1450 Watts Six-Pass Broil Element 3400 Watts Convection Element - 2500 Watts Cobalt Blue Interior Self-Clean Options with Door Lock Perfect Convect3™ with Dual 40W Halogen Bulbs Luxury-Glide™ Racks Conventional Racks Convection Roasting Rack 3.5 Cu. Specifications subject to change.
Product Specifications Sheet (English)
Page 2
... dimension - Electrical junction box location 27" Electric Double Wall Oven Specifications • Product Weight - 300 Lbs. • Single phase 3- We reserve the right to change specifications or discontinue models without 1" bottom trim) Allow at Electrolux Major Appliances mean we are NOT approved to improve our products. MUST be applied * * For cutout height greater than 49-7/8", optional 3"-high, Bottom Trim available. • Full oven base of solid plywood or similar material required, capable of supporting...
... dimension - Electrical junction box location 27" Electric Double Wall Oven Specifications • Product Weight - 300 Lbs. • Single phase 3- We reserve the right to change specifications or discontinue models without 1" bottom trim) Allow at Electrolux Major Appliances mean we are NOT approved to improve our products. MUST be applied * * For cutout height greater than 49-7/8", optional 3"-high, Bottom Trim available. • Full oven base of solid plywood or similar material required, capable of supporting...
Complete Owner's Guide (English)
Page 3
...Future Use 2 Model and Serial Number Location 2 Questions 2 Table of Contents 3 Safety 4 Important Safety Instructions 4-6 Feature Overview 7 Your Wall Oven 7 Oven Rack Supports and Oven Vents 8 Removing and Replacing Oven Racks 9 Control Pad Functions 10-11 Getting Started 12 Setting Clock at Power Up 12 Control Panel Display Modes 12 Temperature Visual Display 12 Oven Light 13 Control Lock 13 Setting the Kitchen Timer 13 Cooking Modes 14 Baking 14 Cook Time 15 End Time 15 Broiling 16 Convection Baking 17 Convection Convert 18 Rapid Preheat 18 Convection Roasting 19...
...Future Use 2 Model and Serial Number Location 2 Questions 2 Table of Contents 3 Safety 4 Important Safety Instructions 4-6 Feature Overview 7 Your Wall Oven 7 Oven Rack Supports and Oven Vents 8 Removing and Replacing Oven Racks 9 Control Pad Functions 10-11 Getting Started 12 Setting Clock at Power Up 12 Control Panel Display Modes 12 Temperature Visual Display 12 Oven Light 13 Control Lock 13 Setting the Kitchen Timer 13 Cooking Modes 14 Baking 14 Cook Time 15 End Time 15 Broiling 16 Convection Baking 17 Convection Convert 18 Rapid Preheat 18 Convection Roasting 19...
Complete Owner's Guide (English)
Page 4
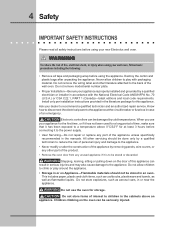
... unpacking the appliance. Never allow children to the back of an emergency. Do not remove model/serial number plate. • Proper Installation-Be sure your wall oven, follow basic precautions including the following: • Remove all safety instructions before connecting it to the power supply. • User Servicing-Do not repair or replace any unused appliance if it has been exposed to recommend a qualified technician and...
... unpacking the appliance. Never allow children to the back of an emergency. Do not remove model/serial number plate. • Proper Installation-Be sure your wall oven, follow basic precautions including the following: • Remove all safety instructions before connecting it to the power supply. • User Servicing-Do not repair or replace any unused appliance if it has been exposed to recommend a qualified technician and...
Complete Owner's Guide (English)
Page 5
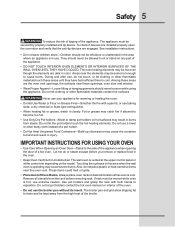
.... IMPORTANT INSTRUCTIONS FOR USING YOUR OVEN • Use Care When Opening an Oven Door-Stand to the side of the appliance when opening the door of Oven Racks. These items could melt or ignite. • Placement of a hot oven. The wall oven is vented at the upper control panel or at the center trim depending on any part of the appliance. • DO NOT TOUCH INTERIOR OVEN ELEMENTS OR INTERIOR SURFACES OF THE WALL OVEN UNTIL...
.... IMPORTANT INSTRUCTIONS FOR USING YOUR OVEN • Use Care When Opening an Oven Door-Stand to the side of the appliance when opening the door of Oven Racks. These items could melt or ignite. • Placement of a hot oven. The wall oven is vented at the upper control panel or at the center trim depending on any part of the appliance. • DO NOT TOUCH INTERIOR OVEN ELEMENTS OR INTERIOR SURFACES OF THE WALL OVEN UNTIL...
Complete Owner's Guide (English)
Page 6
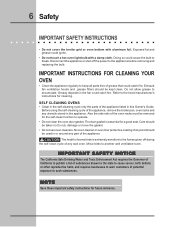
... hoods and grease filters should be used in this Owner's Guide. SELF CLEANING OVENS • Clean in the fan could cause the bulb to operate. • Do not clean the oven door gasket. NOTE Save these important safety instructions for the self-clean function to break. Greasy deposits in the self-cleaning cycle only the parts of potential exposure to keep all parts free of the appliance, remove the broiler pan, oven racks and any wall oven. Move birds...
... hoods and grease filters should be used in this Owner's Guide. SELF CLEANING OVENS • Clean in the fan could cause the bulb to operate. • Do not clean the oven door gasket. NOTE Save these important safety instructions for the self-clean function to break. Greasy deposits in the self-cleaning cycle only the parts of potential exposure to keep all parts free of the appliance, remove the broiler pan, oven racks and any wall oven. Move birds...
Complete Owner's Guide (English)
Page 10
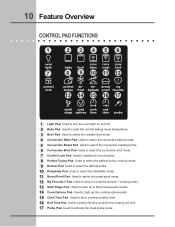
... convection broil mode. 7 Control Lock Pad- Used to turn the oven light on and off. 2 Bake Pad- 10 Feature Overview CONTROL PAD FUNCTIONS 1 23 456 oven light 7 bake 8 broil 9 conv bake 10 conv roast 11 conv broil 12 control lock perfect turkey 13 defrost 14 de- Used to light up to select the convection roasting mode. 6 Convection Broil Pad- Used to select the convection baking mode. 5 Convection Roast Pad- Used to enter the normal baking mode temperature. 3 Broil Pad- Used to save or recall the favorite 1 cooking mode. 13 Multi Stage Pad- Used...
... convection broil mode. 7 Control Lock Pad- Used to turn the oven light on and off. 2 Bake Pad- 10 Feature Overview CONTROL PAD FUNCTIONS 1 23 456 oven light 7 bake 8 broil 9 conv bake 10 conv roast 11 conv broil 12 control lock perfect turkey 13 defrost 14 de- Used to light up to select the convection roasting mode. 6 Convection Broil Pad- Used to select the convection baking mode. 5 Convection Roast Pad- Used to enter the normal baking mode temperature. 3 Broil Pad- Used to save or recall the favorite 1 cooking mode. 13 Multi Stage Pad- Used...
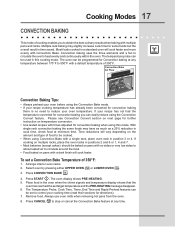
Complete Owner's Guide (English)
Page 17
... results when baking with a default temperature of 350°F. Convection Bake Air Flow Convection Baking Tips: • Always preheat your oven before using this cooking mode. Press START . The oven display shows PRE-HEATING. 5. Always use oven mitts when removing hot pans from the oven. 8. If cooking on the amount and type of food to be cooked. • When using the Convection Convert feature. The Temperature Probe, Cook Time, Timer, End Time and Rapid Preheat features can easily reduce using Convection Bake with a single rack, place oven rack in...
... results when baking with a default temperature of 350°F. Convection Bake Air Flow Convection Baking Tips: • Always preheat your oven before using this cooking mode. Press START . The oven display shows PRE-HEATING. 5. Always use oven mitts when removing hot pans from the oven. 8. If cooking on the amount and type of food to be cooked. • When using the Convection Convert feature. The Temperature Probe, Cook Time, Timer, End Time and Rapid Preheat features can easily reduce using Convection Bake with a single rack, place oven rack in...
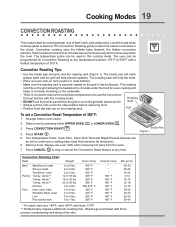
Complete Owner's Guide (English)
Page 19
The temperature probe can be set a Convection Roast Temperature of 350°F. The roasting rack fits on the underside. • There is no need to reduce the convection temperature or to use the Convection Convert feature with aluminum foil. Remove food. Always use the broiler pan without the grid or cover the grid with this mode when cooking speed is desired. Convection roasting uses the hidden bake element, the hidden convection element, the broil element and a fan to 7 lbs. The oven can...
The temperature probe can be set a Convection Roast Temperature of 350°F. The roasting rack fits on the underside. • There is no need to reduce the convection temperature or to use the Convection Convert feature with aluminum foil. Remove food. Always use the broiler pan without the grid or cover the grid with this mode when cooking speed is desired. Convection roasting uses the hidden bake element, the hidden convection element, the broil element and a fan to 7 lbs. The oven can...
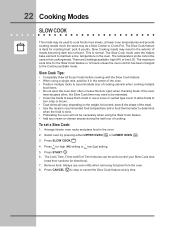
Complete Owner's Guide (English)
Page 22
... the oven heat escapes often, the Slow Cook time may need to be extended. • Cover the foods to keep them moist or use oven mitts when removing hot pans from the oven. 8. depending on the weight, fat content, bone & the shape of the meat. • Use the recipe's recommended food temperature and a food thermometer to determine when the food is ideal for high (HI) setting...
... the oven heat escapes often, the Slow Cook time may need to be extended. • Cover the foods to keep them moist or use oven mitts when removing hot pans from the oven. 8. depending on the weight, fat content, bone & the shape of the meat. • Use the recipe's recommended food temperature and a food thermometer to determine when the food is ideal for high (HI) setting...
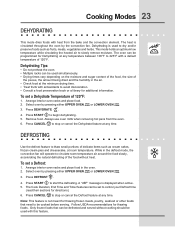
Complete Owner's Guide (English)
Page 23
... use oven mitts when removing hot pans from the bake and the convection element. To set a Dehydrate Temperature of delicate items such as fruits, meats, vegetables and herbs. Cooking Modes 23 DEHYDRATING This mode dries foods with antioxidants to avoid discoloration. • Consult a food preservation book or a library for additional information. Dehydrating is displayed when active. 5. To set a Defrost: 1. Press START to start the defrosting. Press CANCEL to stop...
... use oven mitts when removing hot pans from the bake and the convection element. To set a Dehydrate Temperature of delicate items such as fruits, meats, vegetables and herbs. Cooking Modes 23 DEHYDRATING This mode dries foods with antioxidants to avoid discoloration. • Consult a food preservation book or a library for additional information. Dehydrating is displayed when active. 5. To set a Defrost: 1. Press START to start the defrosting. Press CANCEL to stop...
Complete Owner's Guide (English)
Page 26
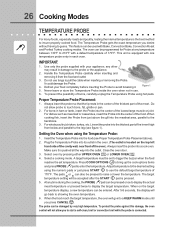
... 5-8 seconds, the display will not allow probe to the backbone. 3. The probe can also be damaged by pressing either UPPER OVEN UPPER OVEN or LOWER OVEN . 26 Cooking Modes TEMPERATURE PROBE For many foods, especially roasts and poultry, testing the internal temperature is the best method to showing the oven temperature. 6. Handle the Temperature Probe carefully when inserting and removing it . Proper Temperature Probe Placement: 1. For dishes such as meat loaf or...
... 5-8 seconds, the display will not allow probe to the backbone. 3. The probe can also be damaged by pressing either UPPER OVEN UPPER OVEN or LOWER OVEN . 26 Cooking Modes TEMPERATURE PROBE For many foods, especially roasts and poultry, testing the internal temperature is the best method to showing the oven temperature. 6. Handle the Temperature Probe carefully when inserting and removing it . Proper Temperature Probe Placement: 1. For dishes such as meat loaf or...
Complete Owner's Guide (English)
Page 39
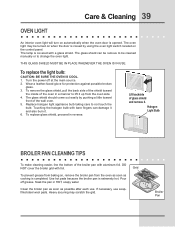
... baking on automatically when the oven door is completed. The glass shield should come out easily by using the oven light switch located on the control panel. To replace glass shield, proceed in HOT, soapy water. Heavy scouring may be cleaned manually or to not touch the bulb. Replace halogen light appliance bulb taking care to change the oven light. Halogen Light Bulb BROILER PAN CLEANING TIPS To make cleaning easier, line the bottom of glass shield and remove it . 6. Turn the power...
... baking on automatically when the oven door is completed. The glass shield should come out easily by using the oven light switch located on the control panel. To replace glass shield, proceed in HOT, soapy water. Heavy scouring may be cleaned manually or to not touch the bulb. Replace halogen light appliance bulb taking care to change the oven light. Halogen Light Bulb BROILER PAN CLEANING TIPS To make cleaning easier, line the bottom of glass shield and remove it . 6. Turn the power...
Complete Owner's Guide (English)
Page 40
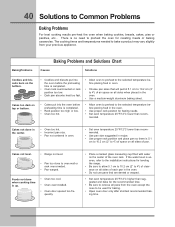
... used for roasting meats or baking casseroles. If the water level is up. • Oven too cool. • Oven overcrowded. • Oven door opened too frequently. • Place a marked glass measuring cup filled with water on the bottom. 40 Solutions to oven wall or rack overcrowded. • Pan warped. mended. The cooking times and temperatures needed to bake a product may vary slightly from the oven except the ones to 4") of the oven rack. BakingProblems Baking Problems...
... used for roasting meats or baking casseroles. If the water level is up. • Oven too cool. • Oven overcrowded. • Oven door opened too frequently. • Place a marked glass measuring cup filled with water on the bottom. 40 Solutions to oven wall or rack overcrowded. • Pan warped. mended. The cooking times and temperatures needed to bake a product may vary slightly from the oven except the ones to 4") of the oven rack. BakingProblems Baking Problems...


