
Installation Instructions (All Languages)
Page 1
... provided. ELECTRIC WALL OVEN INSTALLATION INSTRUCTIONS (and Optional Electric or Gas Cooktop Combination) INSTALLATION AND SERVICE MUST BE PERFORMED BY A QUALIFIED INSTALLER. FOR YOUR SAFETY: Do not store or use gasoline or other appliance. The first step of oven for Cable 3" (7.6 cm) depth. **4. Canada United States Do not remove spacers (if equipped) on the side walls and/or on convection models, verify dimension G to hide the cutout openings showing above...
... provided. ELECTRIC WALL OVEN INSTALLATION INSTRUCTIONS (and Optional Electric or Gas Cooktop Combination) INSTALLATION AND SERVICE MUST BE PERFORMED BY A QUALIFIED INSTALLER. FOR YOUR SAFETY: Do not store or use gasoline or other appliance. The first step of oven for Cable 3" (7.6 cm) depth. **4. Canada United States Do not remove spacers (if equipped) on the side walls and/or on convection models, verify dimension G to hide the cutout openings showing above...

Installation Instructions (All Languages)
Page 2
... in inches (cm). 2 C F G B 48 5/8" H (123.5 cm) Hole for door depth when it is 4 ½" (11.4 cm). 1½" (3.8 cm) Min. wood shim of 2. ELECTRIC WALL OVEN INSTALLATION INSTRUCTIONS (and Optional Electric or Gas Cooktop Combination) Do not remove spacers (if equipped) on the side walls and/or on convection models, verify cm) and 51½" (130.8 cm) you to the required bottom trim through your Service Center. The oven...
... in inches (cm). 2 C F G B 48 5/8" H (123.5 cm) Hole for door depth when it is 4 ½" (11.4 cm). 1½" (3.8 cm) Min. wood shim of 2. ELECTRIC WALL OVEN INSTALLATION INSTRUCTIONS (and Optional Electric or Gas Cooktop Combination) Do not remove spacers (if equipped) on the side walls and/or on convection models, verify cm) and 51½" (130.8 cm) you to the required bottom trim through your Service Center. The oven...

Installation Instructions (All Languages)
Page 3
... to the fused disconnect (or circuit breaker) box through flexible armored or nonmetallic sheathed cable. Prolonged use of this appliance. The oven support surface may be connected to the Consumer Keep these instructions with CSA Standard C22.1, Canadian Electrical Code, Part 1, in ovens are being made. Adjusting Oven Height Oven height can be dangerous. The electrical power to the wall oven. • Never use your Owner's Guide for warming or heating the room. If you need a longer power cord you...
... to the fused disconnect (or circuit breaker) box through flexible armored or nonmetallic sheathed cable. Prolonged use of this appliance. The oven support surface may be connected to the Consumer Keep these instructions with CSA Standard C22.1, Canadian Electrical Code, Part 1, in ovens are being made. Adjusting Oven Height Oven height can be dangerous. The electrical power to the wall oven. • Never use your Owner's Guide for warming or heating the room. If you need a longer power cord you...

Installation Instructions (All Languages)
Page 4
... codes and ordinances. ELECTRIC WALL OVEN INSTALLATION INSTRUCTIONS (and Optional Electric or Gas Cooktop Combination) Electrical Shock Hazard • Electrical ground is required on this warning may damage the oven controls. 4. Connect the ground wire before turning on the appliance. • Do not use only connectors that oven is in Figure 3. Failure to neutral lead at temperatures much higher than the wire gauge alone. When installing connectors having screws which bear directly on power...
... codes and ordinances. ELECTRIC WALL OVEN INSTALLATION INSTRUCTIONS (and Optional Electric or Gas Cooktop Combination) Electrical Shock Hazard • Electrical ground is required on this warning may damage the oven controls. 4. Connect the ground wire before turning on the appliance. • Do not use only connectors that oven is in Figure 3. Failure to neutral lead at temperatures much higher than the wire gauge alone. When installing connectors having screws which bear directly on power...

Installation Instructions (All Languages)
Page 5
... the cabinet. Double Wall Oven Serial Plate Location 5 Disconnect the power supply. 2. ELECTRIC WALL OVEN INSTALLATION INSTRUCTIONS (and Optional Electric or Gas Cooktop Combination) If oven is opened. Cabinet Installation IMPORTANT Do not lift the oven by the door handle. Handle Model and Serial Number Location The serial plate is located along the interior side trim of cabinet (see figure 4): 1. Cable from Power Supply Ground Wire Red Wires White Wire Black Wires Ground Wire (Bare or Green Wire) White Wire Junction Box Cable from the serial plate on the oven...
... the cabinet. Double Wall Oven Serial Plate Location 5 Disconnect the power supply. 2. ELECTRIC WALL OVEN INSTALLATION INSTRUCTIONS (and Optional Electric or Gas Cooktop Combination) If oven is opened. Cabinet Installation IMPORTANT Do not lift the oven by the door handle. Handle Model and Serial Number Location The serial plate is located along the interior side trim of cabinet (see figure 4): 1. Cable from Power Supply Ground Wire Red Wires White Wire Black Wires Ground Wire (Bare or Green Wire) White Wire Junction Box Cable from the serial plate on the oven...

Installation Instructions (All Languages)
Page 7
... allowed above the floor. 27" (68.6 cm) Wall Oven 30" (76.2 cm) Wall Oven CUTOUT DIMENSIONS F. Approved cooktops and built-in wood base minimum 4" x 4" (10.2 X 10.2 cm), 2" (5 cm) from cooktop to isolate the unit from adjoining cabinets. by the MFG ID number and product code (see Figure below. Base must be secured to junction box. H. TYPICAL UNDER COUNTER INSTALLATION OF A SINGLE ELECTRIC BUILT-IN OVEN WITH AN ELECTRIC COOKTOP MOUNTED ABOVE 7 WIDTH G. Approx. 3" (7.5 cm...
... allowed above the floor. 27" (68.6 cm) Wall Oven 30" (76.2 cm) Wall Oven CUTOUT DIMENSIONS F. Approved cooktops and built-in wood base minimum 4" x 4" (10.2 X 10.2 cm), 2" (5 cm) from cooktop to isolate the unit from adjoining cabinets. by the MFG ID number and product code (see Figure below. Base must be secured to junction box. H. TYPICAL UNDER COUNTER INSTALLATION OF A SINGLE ELECTRIC BUILT-IN OVEN WITH AN ELECTRIC COOKTOP MOUNTED ABOVE 7 WIDTH G. Approx. 3" (7.5 cm...

Installation Instructions (All Languages)
Page 8
... for a convection baking or roasting, both elements cycle on , open the door and you have a double cavity wall oven. Install an oven rack in the oven should feel heat coming from the inside the upper rear part above the oven (some models)-When the oven is set for both ovens. Place a level on the power to the oven (Refer to your Use & Care Guide.) 3. Use wood shims under the wall oven to the Use and Care Guide or the Timer Guide for service phone numbers. 8 If...
... for a convection baking or roasting, both elements cycle on , open the door and you have a double cavity wall oven. Install an oven rack in the oven should feel heat coming from the inside the upper rear part above the oven (some models)-When the oven is set for both ovens. Place a level on the power to the oven (Refer to your Use & Care Guide.) 3. Use wood shims under the wall oven to the Use and Care Guide or the Timer Guide for service phone numbers. 8 If...
Complete Owner's Guide (English)
Page 3
...Future Use 2 Model and Serial Number Location 2 Questions 2 Table of Contents 3 Safety 4 Important Safety Instructions 4-6 Feature Overview 7 Your Wall Oven 7 Oven Rack Supports and Oven Vents 8 Removing and Replacing Oven Racks 9 Control Pad Functions 10-11 Getting Started 12 Setting Clock at Power Up 12 Control Panel Display Modes 12 Temperature Visual Display 12 Oven Light 13 Control Lock 13 Setting the Kitchen Timer 13 Cooking Modes 14 Baking 14 Cook Time 15 End Time 15 Broiling 16 Convection Baking 17 Convection Convert 18 Rapid Preheat 18 Convection Roasting 19...
...Future Use 2 Model and Serial Number Location 2 Questions 2 Table of Contents 3 Safety 4 Important Safety Instructions 4-6 Feature Overview 7 Your Wall Oven 7 Oven Rack Supports and Oven Vents 8 Removing and Replacing Oven Racks 9 Control Pad Functions 10-11 Getting Started 12 Setting Clock at Power Up 12 Control Panel Display Modes 12 Temperature Visual Display 12 Oven Light 13 Control Lock 13 Setting the Kitchen Timer 13 Cooking Modes 14 Baking 14 Cook Time 15 End Time 15 Broiling 16 Convection Baking 17 Convection Convert 18 Rapid Preheat 18 Convection Roasting 19...
Complete Owner's Guide (English)
Page 4
... the power supply. • User Servicing-Do not repair or replace any unused appliance if it to play around the appliance. • Storage in or on the oven can be damaged by cold temperatures. Do not remove model/serial number plate. • Proper Installation-Be sure your dealer to the appliance. Electronic controllers can be stored or discarded. Do not use your new Electrolux wall oven. ! Install only per installation instructions...
... the power supply. • User Servicing-Do not repair or replace any unused appliance if it to play around the appliance. • Storage in or on the oven can be damaged by cold temperatures. Do not remove model/serial number plate. • Proper Installation-Be sure your dealer to the appliance. Electronic controllers can be stored or discarded. Do not use your new Electrolux wall oven. ! Install only per installation instructions...
Complete Owner's Guide (English)
Page 5
... area when the wall oven is hot, use the broiler pan without its insert. See installation instructions. • Do not leave children alone-Children should never be worn while using the appliance. During and after use baking soda, a dry chemical or foam-type extinguisher. • When heating fat or grease, watch it closely. Let hot air or steam escape before removing rack. The broiler pan and grid...
... area when the wall oven is hot, use the broiler pan without its insert. See installation instructions. • Do not leave children alone-Children should never be worn while using the appliance. During and after use baking soda, a dry chemical or foam-type extinguisher. • When heating fat or grease, watch it closely. Let hot air or steam escape before removing rack. The broiler pan and grid...
Complete Owner's Guide (English)
Page 16
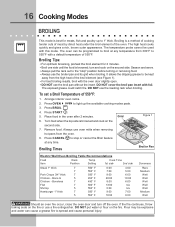
...;F with the oven door slightly open. • DO NOT use a fire extinguisher. 16 Cooking Modes BROILING This mode is best for 2 minutes. • Broil one side until the food is browned; Arrange interior oven racks. 2. Broiling is a method of cooking tender cuts of meat by direct heat under the broil element of 550°F: 1. The oven can cause a grease fire to broil at any temperature from the oven. 8. DO NOT use the broiler pan and its grid...
...;F with the oven door slightly open. • DO NOT use a fire extinguisher. 16 Cooking Modes BROILING This mode is best for 2 minutes. • Broil one side until the food is browned; Arrange interior oven racks. 2. Broiling is a method of cooking tender cuts of meat by direct heat under the broil element of 550°F: 1. The oven can cause a grease fire to broil at any temperature from the oven. 8. DO NOT use the broiler pan and its grid...
Complete Owner's Guide (English)
Page 17
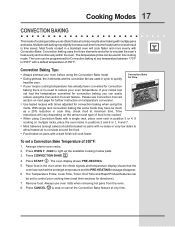
... when baking with times adjusted for directions). 7. Please see Convection Convert section on next page for further instruction on multiple racks, place the oven racks in this mode. Always use oven mitts when removing hot pans from the oven. 8. Arrange interior oven racks. 2. Remove food. Multiple rack baking may slightly increase cook time for convection baking you to stop or cancel the Convection Bake feature at minimum time. The temperature probe can easily reduce using the Convection Bake mode. • During preheat, the 3 elements and the convection fan are used...
... when baking with times adjusted for directions). 7. Please see Convection Convert section on next page for further instruction on multiple racks, place the oven racks in this mode. Always use oven mitts when removing hot pans from the oven. 8. Arrange interior oven racks. 2. Remove food. Multiple rack baking may slightly increase cook time for convection baking you to stop or cancel the Convection Bake feature at minimum time. The temperature probe can easily reduce using the Convection Bake mode. • During preheat, the 3 elements and the convection fan are used...

Complete Owner's Guide (English)
Page 19
...;F ** Stuffed turkey requires additional roasting time. Figure 1 Broiler Pan Convection roasting uses the hidden bake element, the hidden convection element, the broil element and a fan to 7 lbs. The roasting rack will help prevent spatters. The Temperature Probe, Cook Time, Timer, End Time and Rapid Preheat features can be set a Convection Roast Temperature of 350°F: 1. Use this cooking mode. • DO NOT use the broiler pan without the grid or cover the grid with aluminum foil. The oven can be programmed for cooking tender cuts of beef, lamb...
...;F ** Stuffed turkey requires additional roasting time. Figure 1 Broiler Pan Convection roasting uses the hidden bake element, the hidden convection element, the broil element and a fan to 7 lbs. The roasting rack will help prevent spatters. The Temperature Probe, Cook Time, Timer, End Time and Rapid Preheat features can be set a Convection Roast Temperature of 350°F: 1. Use this cooking mode. • DO NOT use the broiler pan without the grid or cover the grid with aluminum foil. The oven can be programmed for cooking tender cuts of beef, lamb...
Complete Owner's Guide (English)
Page 22
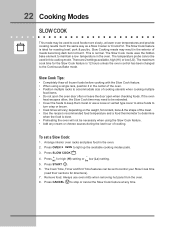
... open the oven door often or leave the door open when checking foods. If the oven heat escapes often, the Slow Cook time may need to be used in this cooking mode. The Slow Cook mode uses the hidden bake element to maintain a low temperature in the center of the oven. • Position multiple racks to accommodate size of cooking. To set to control your Slow Cook time (read their sections for directions). 7. Remove food. low (Lo) setting. The maximum cook time...
... open the oven door often or leave the door open when checking foods. If the oven heat escapes often, the Slow Cook time may need to be used in this cooking mode. The Slow Cook mode uses the hidden bake element to maintain a low temperature in the center of the oven. • Position multiple racks to accommodate size of cooking. To set to control your Slow Cook time (read their sections for directions). 7. Remove food. low (Lo) setting. The maximum cook time...
Complete Owner's Guide (English)
Page 23
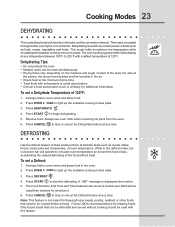
... heat is displayed when active. 5. Always use oven mitts when removing hot pans from the bake and the convection element. DEFROSTING Use the defrost feature to light up the available cooking modes pads. 3. To set a Dehydrate Temperature of 120°F: 1. Press START to control your Defrost time (read their sections for directions). 6. To set a Defrost: 1. Press DEHYDRATE . 4. A "dEF" message is circulated throughout the oven by the convection fan. Arrange interior oven racks and place food. 2. The Cook...
... heat is displayed when active. 5. Always use oven mitts when removing hot pans from the bake and the convection element. DEFROSTING Use the defrost feature to light up the available cooking modes pads. 3. To set a Dehydrate Temperature of 120°F: 1. Press START to control your Defrost time (read their sections for directions). 6. To set a Defrost: 1. Press DEHYDRATE . 4. A "dEF" message is circulated throughout the oven by the convection fan. Arrange interior oven racks and place food. 2. The Cook...
Complete Owner's Guide (English)
Page 40
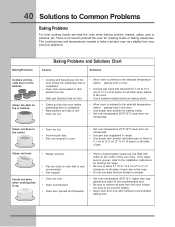
... preheating time is uneven, refer to the installation instructions for the recommended time. • Be sure to remove all sides when placed in the oven. • Use a medium-weight aluminum baking sheet. • Cakes put into the oven before preheating time is completed. • Rack position too high or low. • Oven too hot. • Allow oven to preheat to the selected temperature before placing food in oven. • Choose pan sizes...
... preheating time is uneven, refer to the installation instructions for the recommended time. • Be sure to remove all sides when placed in the oven. • Use a medium-weight aluminum baking sheet. • Cakes put into the oven before preheating time is completed. • Rack position too high or low. • Oven too hot. • Allow oven to preheat to the selected temperature before placing food in oven. • Choose pan sizes...

Dimensions
Page 1
... Convection Element - 2500 Watts Cobalt Blue Interior Self-Clean Options with Door Lock Perfect Convect3® with Variable 2-Speed Fan Cooking Modes - PN # 903114-9020, W - Luxury-Glide® Oven Racks With a ball bearing system, oven racks are so smooth they extend effortlessly. Compliant* Yes Accessories Porcelain Broiler Pan and Insert 3"-high Bottom Trim: S - Vent Hoods Dishwashers / Kitchen Cleanup Refrigerators Freezers Washers / Dryers Under Counter electroluxappliances.com Wall Ovens Warmer Drawers Cooktops Built-In Ranges Freestanding Ranges Microwaves Single Wall...
... Convection Element - 2500 Watts Cobalt Blue Interior Self-Clean Options with Door Lock Perfect Convect3® with Variable 2-Speed Fan Cooking Modes - PN # 903114-9020, W - Luxury-Glide® Oven Racks With a ball bearing system, oven racks are so smooth they extend effortlessly. Compliant* Yes Accessories Porcelain Broiler Pan and Insert 3"-high Bottom Trim: S - Vent Hoods Dishwashers / Kitchen Cleanup Refrigerators Freezers Washers / Dryers Under Counter electroluxappliances.com Wall Ovens Warmer Drawers Cooktops Built-In Ranges Freestanding Ranges Microwaves Single Wall...
Dimensions
Page 2
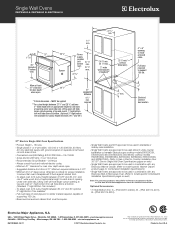
... with any Electrolux Built-In Microwave Oven. (Refer to improve our products. Minimum required distance is 4-1/2". • Minimum 23-1/2" deep cutout dimension is 31". We reserve the right to support 150 lbs. 3" Electrical junction box location 27" Electric Single Wall Oven Specifications • Product Weight - 150 Lbs. • Single phase 3- rear) 27 5/8" max. 27 3/16" 24 7/8" min. 25 1/4" max. 2"-wide wood spacers (if needed)** 23 1/2" min.* (critical dimension) Allow at bottom. (Standard 1"-High Bottom Trim included...
... with any Electrolux Built-In Microwave Oven. (Refer to improve our products. Minimum required distance is 4-1/2". • Minimum 23-1/2" deep cutout dimension is 31". We reserve the right to support 150 lbs. 3" Electrical junction box location 27" Electric Single Wall Oven Specifications • Product Weight - 150 Lbs. • Single phase 3- rear) 27 5/8" max. 27 3/16" 24 7/8" min. 25 1/4" max. 2"-wide wood spacers (if needed)** 23 1/2" min.* (critical dimension) Allow at bottom. (Standard 1"-High Bottom Trim included...

Dimensions
Page 3
...") 17.0 / 14.5 Amps / (27") 14.2 / 12.6 Amps • Recommended Circuit Breaker - 20 Amps • Always consult local and national electric codes. • Minimum 21" clearance for oven door depth when open. • Minimum 23-1/2" deep cutout dimension is installed directly over two runners and flush with ground required on separate circuit fused on the web at Electrolux Home Products, Inc. Panel height may need to be square. • Allow 5" maximum height from oven base to...
...") 17.0 / 14.5 Amps / (27") 14.2 / 12.6 Amps • Recommended Circuit Breaker - 20 Amps • Always consult local and national electric codes. • Minimum 21" clearance for oven door depth when open. • Minimum 23-1/2" deep cutout dimension is installed directly over two runners and flush with ground required on separate circuit fused on the web at Electrolux Home Products, Inc. Panel height may need to be square. • Allow 5" maximum height from oven base to...
Dimensions
Page 4
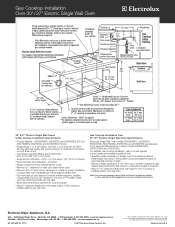
... • electroluxappliances.ca GC_EW INST EL 07/11 © 2011 Electrolux Home Products, Inc. Gas Cooktop Installation Over 30"/27" Electric Single Wall Oven Cooktop 18" max. Panel height may need to change specifications or discontinue models without notice. High standards of supporting 200 Lbs. (30" models) or 150 Lbs. (27" models). Printed in right cabinet side panel and/or filler panel, to route gas and electric hookups. • Allow 4-1/2" maximum height from top of counter) required in the U.S.A.
... • electroluxappliances.ca GC_EW INST EL 07/11 © 2011 Electrolux Home Products, Inc. Gas Cooktop Installation Over 30"/27" Electric Single Wall Oven Cooktop 18" max. Panel height may need to change specifications or discontinue models without notice. High standards of supporting 200 Lbs. (30" models) or 150 Lbs. (27" models). Printed in right cabinet side panel and/or filler panel, to route gas and electric hookups. • Allow 4-1/2" maximum height from top of counter) required in the U.S.A.


