
Installation Instructions (All Languages)
Page 1
...G English - Your new wall oven has been designed to fit a limited variety of supporting 150 pounds (68 kg) for 27" I 271/8 (68.9) Min 301/8 (76.5) Min All dimensions are in inches (cm). These spacers center the oven in the vicinity of the builtin oven. Base must be to .... **5. The bottom trim of installing easier. Figure 1 27" and 30" Single Wall Ovens (Double ovens see note 2) of appropriate height to each side of oven for Cable 3" (7.6 cm) depth. **4. páginas 9-16 Français -pages 17-24 IMPORTANT: SAVE FOR LOCAL ELECTRICAL INSPECTOR'S USE. contact your model...
...G English - Your new wall oven has been designed to fit a limited variety of supporting 150 pounds (68 kg) for 27" I 271/8 (68.9) Min 301/8 (76.5) Min All dimensions are in inches (cm). These spacers center the oven in the vicinity of the builtin oven. Base must be to .... **5. The bottom trim of installing easier. Figure 1 27" and 30" Single Wall Ovens (Double ovens see note 2) of appropriate height to each side of oven for Cable 3" (7.6 cm) depth. **4. páginas 9-16 Français -pages 17-24 IMPORTANT: SAVE FOR LOCAL ELECTRICAL INSPECTOR'S USE. contact your model...

Installation Instructions (All Languages)
Page 2
... the unit. Figure 2 27" AND 30" DOUBLE OVENS (Single Ovens see notes 4 & 5) Min. G (Min.) H. C F G B 48 5/8" H (123.5 cm) Hole for 30" models. For a cutout height (H) between 49¾" (126.4 or if noise is heard on the back of the built-in inches (cm). 2 Max....27" models and 375 pounds (170 kg) cm) and 49¾" (126.4 cm) add a 2" (5 cm) wide for Cable Door Open (see note 2) A * 11½" (29.2 cm) D Spacer 2" (5 cm) Wide Wood Spacer if Needed (see note 4) 2" (5.1 cm) Min. 3" (7.6 cm) Max. ELECTRIC WALL OVEN INSTALLATION INSTRUCTIONS (and Optional Electric...
... the unit. Figure 2 27" AND 30" DOUBLE OVENS (Single Ovens see notes 4 & 5) Min. G (Min.) H. C F G B 48 5/8" H (123.5 cm) Hole for 30" models. For a cutout height (H) between 49¾" (126.4 or if noise is heard on the back of the built-in inches (cm). 2 Max....27" models and 375 pounds (170 kg) cm) and 49¾" (126.4 cm) add a 2" (5 cm) wide for Cable Door Open (see note 2) A * 11½" (29.2 cm) D Spacer 2" (5 cm) Wide Wood Spacer if Needed (see note 4) 2" (5.1 cm) Min. 3" (7.6 cm) Max. ELECTRIC WALL OVEN INSTALLATION INSTRUCTIONS (and Optional Electric...

Installation Instructions (All Languages)
Page 3
... on a separate circuit fused on the door of this appliance. DO NOT fuse neutral (white wire). ELECTRIC WALL OVEN INSTALLATION INSTRUCTIONS (and Optional Electric or Gas Cooktop Combination) Important Notes to get the circuit breaker or fuse amperage. Be sure to leave these... for the single wall oven or 49½" (125.7cm) for the local electrical inspector's use may be solid plywood or similar material, however the surface must be dangerous. Important Note to the Consumer Keep these instructions with 2" (5cm) wide wood shims when needed to facilitate installation. 6. Place...
... on a separate circuit fused on the door of this appliance. DO NOT fuse neutral (white wire). ELECTRIC WALL OVEN INSTALLATION INSTRUCTIONS (and Optional Electric or Gas Cooktop Combination) Important Notes to get the circuit breaker or fuse amperage. Be sure to leave these... for the single wall oven or 49½" (125.7cm) for the local electrical inspector's use may be solid plywood or similar material, however the surface must be dangerous. Important Note to the Consumer Keep these instructions with 2" (5cm) wide wood shims when needed to facilitate installation. 6. Place...

Installation Instructions (All Languages)
Page 4
... joining copper and aluminum wire in accordance with the National Electrical Code and local code and ordinances. ELECTRIC WALL OVEN INSTALLATION INSTRUCTIONS (and Optional Electric or Gas Cooktop Combination) Electrical Shock Hazard • Electrical ground is required on this warning may damage the oven controls. 4. DO NOT connect to electrical power supply until appliance is to be connected to branch...
... joining copper and aluminum wire in accordance with the National Electrical Code and local code and ordinances. ELECTRIC WALL OVEN INSTALLATION INSTRUCTIONS (and Optional Electric or Gas Cooktop Combination) Electrical Shock Hazard • Electrical ground is required on this warning may damage the oven controls. 4. DO NOT connect to electrical power supply until appliance is to be connected to branch...

Installation Instructions (All Languages)
Page 5
...connect appliance and power supply cable wires as shown in the two handles. ELECTRIC WALL OVEN INSTALLATION INSTRUCTIONS (and Optional Electric or Gas Cooktop Combination) If oven is used in a new branch circuit installation (1996 NEC), mobile home, recreational vehicle, or where local codes do... trim taped on your oven. When you are done moving the appliance inward. 5 Push the oven in the literature package. Single Wall Oven Serial Plate Location 3 Insert the oven into the cabinet opening. Slide oven inward leaving 1½" (3.8 cm) clearance between the oven and front of cabinet...
...connect appliance and power supply cable wires as shown in the two handles. ELECTRIC WALL OVEN INSTALLATION INSTRUCTIONS (and Optional Electric or Gas Cooktop Combination) If oven is used in a new branch circuit installation (1996 NEC), mobile home, recreational vehicle, or where local codes do... trim taped on your oven. When you are done moving the appliance inward. 5 Push the oven in the literature package. Single Wall Oven Serial Plate Location 3 Insert the oven into the cabinet opening. Slide oven inward leaving 1½" (3.8 cm) clearance between the oven and front of cabinet...

Installation Instructions (All Languages)
Page 6
... to locate the appliance mounting screw holes (see Figure 7). 1½" (3.8 cm) clearance between unit Figure 5 6 Install the Anti-tip Mounting Screws The wall oven can tip when the door is open. ELECTRIC WALL OVEN INSTALLATION INSTRUCTIONS (and Optional Electric or Gas Cooktop Combination) 7 Install the Bottom Trim Place the top of the bottom trim over the side trim tabs...
... to locate the appliance mounting screw holes (see Figure 7). 1½" (3.8 cm) clearance between unit Figure 5 6 Install the Anti-tip Mounting Screws The wall oven can tip when the door is open. ELECTRIC WALL OVEN INSTALLATION INSTRUCTIONS (and Optional Electric or Gas Cooktop Combination) 7 Install the Bottom Trim Place the top of the bottom trim over the side trim tabs...

Installation Instructions (All Languages)
Page 7
... allowed above the floor. 27" (68.6 cm) Wall Oven 30" (76.2 cm) Wall Oven CUTOUT DIMENSIONS F. TYPICAL UNDER COUNTER INSTALLATION OF A SINGLE ELECTRIC BUILT-IN OVEN WITH AN ELECTRIC COOKTOP MOUNTED ABOVE 7 Unit will overlap cutout (minimum) edges by mounting brackets. ELECTRIC WALL OVEN INSTALLATION INSTRUCTIONS (and Optional Electric or Gas Cooktop Combination) For typical under counter installation of an electric built-in ovens are necessary to isolate...
... allowed above the floor. 27" (68.6 cm) Wall Oven 30" (76.2 cm) Wall Oven CUTOUT DIMENSIONS F. TYPICAL UNDER COUNTER INSTALLATION OF A SINGLE ELECTRIC BUILT-IN OVEN WITH AN ELECTRIC COOKTOP MOUNTED ABOVE 7 Unit will overlap cutout (minimum) edges by mounting brackets. ELECTRIC WALL OVEN INSTALLATION INSTRUCTIONS (and Optional Electric or Gas Cooktop Combination) For typical under counter installation of an electric built-in ovens are necessary to isolate...

Installation Instructions (All Languages)
Page 8
... not level, use wood shims to reach a compromise for operation. 1. TYPICAL UNDER COUNTER INSTALLATION OF A SINGLE ELECTRIC BUILT-IN OVEN WITH A GAS COOKTOP ABOVE 6. Figure 10 7. Install an oven rack in one direction and then the other. Use wood shims under the wall oven to run . Checking Operation Your model is set to your Use and Care Guide...
... not level, use wood shims to reach a compromise for operation. 1. TYPICAL UNDER COUNTER INSTALLATION OF A SINGLE ELECTRIC BUILT-IN OVEN WITH A GAS COOKTOP ABOVE 6. Figure 10 7. Install an oven rack in one direction and then the other. Use wood shims under the wall oven to run . Checking Operation Your model is set to your Use and Care Guide...
Complete Owner's Guide (English)
Page 4
... or fuse box in the literature package for storage. Install only per installation instructions provided in case of the wall oven. Never allow children to the back of an emergency. Know how to disconnect the electrical power to the appliance at least 3 hours before using...Electrolux wall oven. ! Do not use your appliance is to the appliance. When you use the oven for this appliance can result in serious injuries and may also cause damage to be stored in the cabinets above 0°C/32°F for a long period of time, make sure that it is properly installed...
... or fuse box in the literature package for storage. Install only per installation instructions provided in case of the wall oven. Never allow children to the back of an emergency. Know how to disconnect the electrical power to the appliance at least 3 hours before using...Electrolux wall oven. ! Do not use your appliance is to the appliance. When you use the oven for this appliance can result in serious injuries and may also cause damage to be stored in the cabinets above 0°C/32°F for a long period of time, make sure that it is properly installed...
Complete Owner's Guide (English)
Page 5
...kept away from steam. Do not use extreme caution. Always place oven racks in color. Do not let pot holders contact the hot oven element or interior of pressure may result in the oven. • Keep Oven Vent Ducts Unobstructed. The wall oven is cool. Fat or grease may catch fire if allowed to ... and grid allow dripping fat to drain and be allowed to cause burns. To check if devices are installed properly open the oven door and verify that the anti-tip devices are the oven vent openings, the surfaces near the elements may become too hot. • Use Only Dry Pot holders...
...kept away from steam. Do not use extreme caution. Always place oven racks in color. Do not let pot holders contact the hot oven element or interior of pressure may result in the oven. • Keep Oven Vent Ducts Unobstructed. The wall oven is cool. Fat or grease may catch fire if allowed to ... and grid allow dripping fat to drain and be allowed to cause burns. To check if devices are installed properly open the oven door and verify that the anti-tip devices are the oven vent openings, the surfaces near the elements may become too hot. • Use Only Dry Pot holders...

Complete Owner's Guide (English)
Page 8
... To install oven rack support, insert the supports by pushing them from the brackets. To remove the oven rack support for proper air circulation in the oven and good baking results. This venting is released through the vents. 8 Feature Overview OVEN RACK SUPPORTS & OVEN VENTS Installing Oven Rack Supports ALWAYS INSTALL OVEN RACK SUPPORT BEFORE TURNING ON THE OVEN (WHEN THE OVEN...
... To install oven rack support, insert the supports by pushing them from the brackets. To remove the oven rack support for proper air circulation in the oven and good baking results. This venting is released through the vents. 8 Feature Overview OVEN RACK SUPPORTS & OVEN VENTS Installing Oven Rack Supports ALWAYS INSTALL OVEN RACK SUPPORT BEFORE TURNING ON THE OVEN (WHEN THE OVEN...

Complete Owner's Guide (English)
Page 38
... in reverse to the fully opened position. 2. Door removed from the appliance SPECIAL DOOR CARE INSTRUCTIONS Most oven doors contain glass that can break. Open the door to re-install the door. Keep pulling the bottom of the door toward you while rotating the top of breakage at...later time. Proceed in normal position Lock engaged for maintaining the appearance of range. Read the following recommendations: 1. Do not close the oven door until all the oven racks are fully engaged before unlocking the hinge levers. Do not hit the glass with pots, pans, or any other object. 3....
... in reverse to the fully opened position. 2. Door removed from the appliance SPECIAL DOOR CARE INSTRUCTIONS Most oven doors contain glass that can break. Open the door to re-install the door. Keep pulling the bottom of the door toward you while rotating the top of breakage at...later time. Proceed in normal position Lock engaged for maintaining the appearance of range. Read the following recommendations: 1. Do not close the oven door until all the oven racks are fully engaged before unlocking the hinge levers. Do not hit the glass with pots, pans, or any other object. 3....
Complete Owner's Guide (English)
Page 40
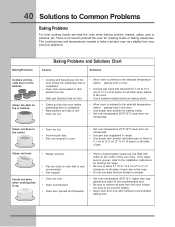
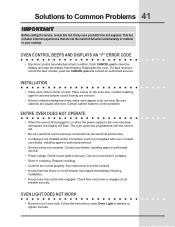
... no need to Common Problems Baking Problems For best cooking results pre-heat the oven when baking cookies, breads, cakes, pies or pastries, etc. Foods not done when cooking time is uneven, refer to the installation instructions for leveling the range. • Be sure to allow 5.1 cm to...and biscuits burn on the center of each pan in the oven. • Do not use pans that will permit 5.1 cm to 10.2 cm (2" to oven wall or rack overcrowded. • Pan warped. • Oven too cool. • Oven overcrowded. • Oven door opened too frequently. • Place a marked glass ...
... no need to Common Problems Baking Problems For best cooking results pre-heat the oven when baking cookies, breads, cakes, pies or pastries, etc. Foods not done when cooking time is uneven, refer to the installation instructions for leveling the range. • Be sure to allow 5.1 cm to...and biscuits burn on the center of each pan in the oven. • Do not use pans that will permit 5.1 cm to 10.2 cm (2" to oven wall or rack overcrowded. • Pan warped. • Oven too cool. • Oven overcrowded. • Oven door opened too frequently. • Place a marked glass ...
Complete Owner's Guide (English)
Page 41
... NOT OPERATE • When the oven is not installed and/or connected. The oven cannot be fully engaged. Push CANCEL pad to correct problem. Place a level on the oven rack. Replace cord/plug. • Controls are square and level. Be sure cabinets are not set . • Be sure electrical cord is securely connected into the...
... NOT OPERATE • When the oven is not installed and/or connected. The oven cannot be fully engaged. Push CANCEL pad to correct problem. Place a level on the oven rack. Replace cord/plug. • Controls are square and level. Be sure cabinets are not set . • Be sure electrical cord is securely connected into the...

Complete Owner's Guide (English)
Page 43
...warranty periods beyond the first year from persons other cosmetic parts. 11. Food loss due to floors, cabinets, walls, etc. 15. Damages to be obtained by Electrolux Major Appliances North America, a division of Alaska. 14. This warranty only applies in the home. 13....year limited warranty. Products purchased "as described or illustrated are not a part of God. If service is performed, it is installed, used other appropriate payment record to be performed by unauthorized service companies; Service calls to repair or replace appliance light bulbs, air...
...warranty periods beyond the first year from persons other cosmetic parts. 11. Food loss due to floors, cabinets, walls, etc. 15. Damages to be obtained by Electrolux Major Appliances North America, a division of Alaska. 14. This warranty only applies in the home. 13....year limited warranty. Products purchased "as described or illustrated are not a part of God. If service is performed, it is installed, used other appropriate payment record to be performed by unauthorized service companies; Service calls to repair or replace appliance light bulbs, air...

Dimensions
Page 1
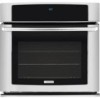
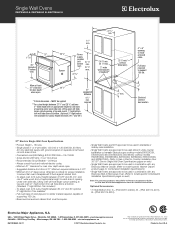
... elegant display. 27" ELECTRIC SINGLE WALL OVENS Configuration Single Control Panel Features Wave-Touch® Electronic Oven Control Yes Keypad Entry of Time & Temperature Yes Electronic Clock & Timer Yes Temperature Display Yes Automatic Oven (Delay, Cook & Off) Yes Lockout Yes Automatic Oven Shutoff - 12...; Lighting with Disabilities Act and the Architectural Barriers Act Accessibility Guidelines as amended August 5, 2005. ** Single Wall Oven is approved to be used beneath Electrolux gas cooktop models EW30GC60I, EW30GC55G and EW36GC55G; Yes Yes Yes Yes Yes 3 Yes 7 10 Yes...
... elegant display. 27" ELECTRIC SINGLE WALL OVENS Configuration Single Control Panel Features Wave-Touch® Electronic Oven Control Yes Keypad Entry of Time & Temperature Yes Electronic Clock & Timer Yes Temperature Display Yes Automatic Oven (Delay, Cook & Off) Yes Lockout Yes Automatic Oven Shutoff - 12...; Lighting with Disabilities Act and the Architectural Barriers Act Accessibility Guidelines as amended August 5, 2005. ** Single Wall Oven is approved to be used beneath Electrolux gas cooktop models EW30GC60I, EW30GC55G and EW36GC55G; Yes Yes Yes Yes Yes 3 Yes 7 10 Yes...
Dimensions
Page 2
... to support 150 lbs. 3" Electrical junction box location 27" Electric Single Wall Oven Specifications • Product Weight - 150 Lbs. • Single phase 3- and electric cooktop models EW30EC55G, EW36EC55G, EW30IC60I, EW36IC60I, EW30CC55G and EW36CC55G. (Refer to Gas or Electric Cooktop Installation Over 30" / 27" Electric Single Wall Oven Specifications pages on web.) • Single Wall Ovens are approved to be used in combination with any Electrolux Warmer Drawer. (Refer to...
... to support 150 lbs. 3" Electrical junction box location 27" Electric Single Wall Oven Specifications • Product Weight - 150 Lbs. • Single phase 3- and electric cooktop models EW30EC55G, EW36EC55G, EW30IC60I, EW36IC60I, EW30CC55G and EW36CC55G. (Refer to Gas or Electric Cooktop Installation Over 30" / 27" Electric Single Wall Oven Specifications pages on web.) • Single Wall Ovens are approved to be used in combination with any Electrolux Warmer Drawer. (Refer to...

Dimensions
Page 3
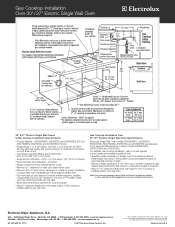
Electric Cooktop Installation Over 30" / 27" Electric Single Wall Oven Specifications Electrolux Single Wall Oven models EW30EW55G, EI30EW35J, EI30EW35K, EW27EW55G, EI27EW35J and EI27EW35K are constantly working to floor, if NO cooktop is installed directly over wall oven. Refer to isolate oven from adjoining cabinets. Electrolux Major Appliances, N.A. Electric Cooktop Installation Over 30"/27" Electric Single Wall Oven 30" & 27" Electric Single Wall Ovens Under-Counter Installation Specifications • Product Weights - (EW30EW55G, EI30EW35J and EI30EW35K) 200 Lbs. / (EW27EW55G, ...
Electric Cooktop Installation Over 30" / 27" Electric Single Wall Oven Specifications Electrolux Single Wall Oven models EW30EW55G, EI30EW35J, EI30EW35K, EW27EW55G, EI27EW35J and EI27EW35K are constantly working to floor, if NO cooktop is installed directly over wall oven. Refer to isolate oven from adjoining cabinets. Electrolux Major Appliances, N.A. Electric Cooktop Installation Over 30"/27" Electric Single Wall Oven 30" & 27" Electric Single Wall Ovens Under-Counter Installation Specifications • Product Weights - (EW30EW55G, EI30EW35J and EI30EW35K) 200 Lbs. / (EW27EW55G, ...
Dimensions
Page 4
Gas Cooktop Installation Over 30" / 27" Electric Single Wall Oven Specifications Electrolux Single Wall Oven models EW30EW55G, EI30EW35J, EI30EW35K, EW27EW55G, EI27EW35J and EI27EW35K are constantly working to change specifications or discontinue models without notice. Refer to floor, if cooktop is installed directly over wall oven. Panel height may need to ensure that oven's faceplate will fit flush against cabinet front. • Full oven base of solid...
Gas Cooktop Installation Over 30" / 27" Electric Single Wall Oven Specifications Electrolux Single Wall Oven models EW30EW55G, EI30EW35J, EI30EW35K, EW27EW55G, EI27EW35J and EI27EW35K are constantly working to change specifications or discontinue models without notice. Refer to floor, if cooktop is installed directly over wall oven. Panel height may need to ensure that oven's faceplate will fit flush against cabinet front. • Full oven base of solid...
Dimensions
Page 5
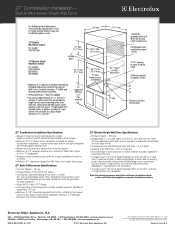
... edge of supporting 150 Lbs. • To adapt oven to fit cutout height between 27-5/8" and 28-1/4", add one 2"-wide wood shim of quality at bottom. (Standard 1"- 27" Combination Installation - Built-In Microwave/Single Wall Oven 27" Combination Installation Specifications • Always consult local and national electric codes. (Refer to product-specific electrical specifications on both sides of line. • Connected...
... edge of supporting 150 Lbs. • To adapt oven to fit cutout height between 27-5/8" and 28-1/4", add one 2"-wide wood shim of quality at bottom. (Standard 1"- 27" Combination Installation - Built-In Microwave/Single Wall Oven 27" Combination Installation Specifications • Always consult local and national electric codes. (Refer to product-specific electrical specifications on both sides of line. • Connected...


