Complete Owner's Guide (English)
Page 3
... the Use and Care Guide, Installation Instructions and on the risk type as described below: This symbol alerts you to light any appliance. • Do not touch any appliance. Power cord with unit except those manufactured for future reference. 240 v Electric Dryer 120 v Gas Dryer 10-30R 3-wire (fused 30 amp) 14-30R 4-wire (fused 30 amp) UL-approved service cord must be installed on electric dryers (not provided with 3-prong grounded plug Avoid...
... the Use and Care Guide, Installation Instructions and on the risk type as described below: This symbol alerts you to light any appliance. • Do not touch any appliance. Power cord with unit except those manufactured for future reference. 240 v Electric Dryer 120 v Gas Dryer 10-30R 3-wire (fused 30 amp) 14-30R 4-wire (fused 30 amp) UL-approved service cord must be installed on electric dryers (not provided with 3-prong grounded plug Avoid...
Complete Owner's Guide (English)
Page 5
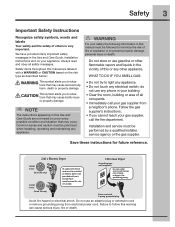
... type spray cleanser when cleaning dryer interior. Do not use of this Use & Care Guide. A service technician must replace the thermal limiter switch after correcting the fault. • Failure to the weather. • A thermal limiter switch automatically turns off the motor in accordance with local codes. Failure to warn customer of which may be removed. Included in the dryer for detailed grounding procedures. CAUTION The California Safe Drinking Water...
... type spray cleanser when cleaning dryer interior. Do not use of this Use & Care Guide. A service technician must replace the thermal limiter switch after correcting the fault. • Failure to the weather. • A thermal limiter switch automatically turns off the motor in accordance with local codes. Failure to warn customer of which may be removed. Included in the dryer for detailed grounding procedures. CAUTION The California Safe Drinking Water...
Complete Owner's Guide (English)
Page 7
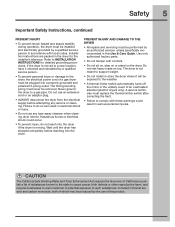
... The dryer drum is controlled by electric solenoids. C. GAS VALVE (Gas models only.) The flow of gas is supported by electric solenoids. During operation there may be a clicking sound as the valve opens and closes to control the water flow. Dryer heat may permanently set of the Use and Care Guide before operating your dryer. This is ignited in the combustion tube. Repeat stain removal process and wash again before operating your new dryer: A. Operating Instructions 7 Normal Operating...
... The dryer drum is controlled by electric solenoids. C. GAS VALVE (Gas models only.) The flow of gas is supported by electric solenoids. During operation there may be a clicking sound as the valve opens and closes to control the water flow. Dryer heat may permanently set of the Use and Care Guide before operating your dryer. This is ignited in the combustion tube. Repeat stain removal process and wash again before operating your new dryer: A. Operating Instructions 7 Normal Operating...

Complete Owner's Guide (English)
Page 8
... buttons at the end of the cycle. • To save energy and time and avoid uneven drying and wrinkling, do not overload the dryer. • When drying large items, dry only two or three items at a time. When the cycle ends, remove the items promptly and hang or fold. IMPORTANT Clean the lint filter after the cycle starts, the lights will blink and a signal will beep. • To change...
... buttons at the end of the cycle. • To save energy and time and avoid uneven drying and wrinkling, do not overload the dryer. • When drying large items, dry only two or three items at a time. When the cycle ends, remove the items promptly and hang or fold. IMPORTANT Clean the lint filter after the cycle starts, the lights will blink and a signal will beep. • To change...
Complete Owner's Guide (English)
Page 9
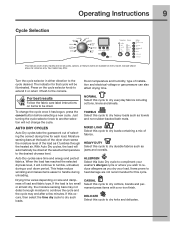
... finish. With Auto Dry cycles, the load will automatically be dried. Auto Dry cycles save time and energy and protect fabrics. ALLERGEN Select this cycle. To change the cycle. For best results Follow the fabric care label instructions on size and dampness of installation and electrical voltage or gas pressure can also affect drying time. If this cycle to the desired dryness level. Just turning the cycle selector knob to another...
... finish. With Auto Dry cycles, the load will automatically be dried. Auto Dry cycles save time and energy and protect fabrics. ALLERGEN Select this cycle. To change the cycle. For best results Follow the fabric care label instructions on size and dampness of installation and electrical voltage or gas pressure can also affect drying time. If this cycle to the desired dryness level. Just turning the cycle selector knob to another...
Complete Owner's Guide (English)
Page 10
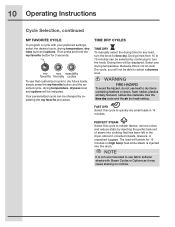
... selected by repeating the my favorite procedure. Use the time dry cycle and the air (no heat) setting. Select any load, turn the knob. Your personalized cycle can be changed by continuing to dry items containing feathers or down, foam rubber, plastics similarly textured, rubber-like materials. 10 Operating Instructions Cycle Selection, continued MY FAVORITE CYCLE To program a cycle with Steam Cycles or Options as it may cause staining...
... selected by repeating the my favorite procedure. Use the time dry cycle and the air (no heat) setting. Select any load, turn the knob. Your personalized cycle can be changed by continuing to dry items containing feathers or down, foam rubber, plastics similarly textured, rubber-like materials. 10 Operating Instructions Cycle Selection, continued MY FAVORITE CYCLE To program a cycle with Steam Cycles or Options as it may cause staining...
Complete Owner's Guide (English)
Page 14
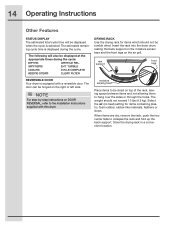
... the appropriate times during the cycle. SANITIZING EXT. The estimated remaining cycle time is displayed during the cycle: DRYING WRINKLE REL. Insert the rack into the dryer drum, resting the back support on the moisture sensor bars and the front legs on top of the rack, leaving space between items and not allowing them to the Installation Instructions supplied with a reversible door. TUMBLE COOLING CYCLE COMPLETE ADDING STEAM CLEAN FILTER DRYING RACK Use the drying rack for...
... the appropriate times during the cycle. SANITIZING EXT. The estimated remaining cycle time is displayed during the cycle: DRYING WRINKLE REL. Insert the rack into the dryer drum, resting the back support on the moisture sensor bars and the front legs on top of the rack, leaving space between items and not allowing them to the Installation Instructions supplied with a reversible door. TUMBLE COOLING CYCLE COMPLETE ADDING STEAM CLEAN FILTER DRYING RACK Use the drying rack for...

Complete Owner's Guide (English)
Page 16
.... Remove cleanser residue before drying the next load. • Every 18 months an authorized servicer should clean the dryer cabinet interior and exhaust duct. The dryer must be connected to avoid electrical shock hazards. • Do not use any type spray cleanser when cleaning the dryer interior. Regularly inspect the outdoor exhaust opening and remove any time. Do not operate the dryer without the lint filter in place. • If the dryer drum...
.... Remove cleanser residue before drying the next load. • Every 18 months an authorized servicer should clean the dryer cabinet interior and exhaust duct. The dryer must be connected to avoid electrical shock hazards. • Do not use any type spray cleanser when cleaning the dryer interior. Regularly inspect the outdoor exhaust opening and remove any time. Do not operate the dryer without the lint filter in place. • If the dryer drum...
Complete Owner's Guide (English)
Page 17
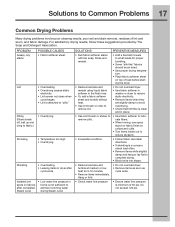
... to complete drying. • Block knits into shape. • Reduce load size and tumble at medium or low heat for proper tumbling. • Some "silk-like" fabrics should be air dried. • Use proper drying temperature. • Place fabric softener sheet on collars and cuffs. • Turn items inside out to reduce abrasion. • Irreversible condition. • Follow fabric care label directions. • If...
... to complete drying. • Block knits into shape. • Reduce load size and tumble at medium or low heat for proper tumbling. • Some "silk-like" fabrics should be air dried. • Use proper drying temperature. • Place fabric softener sheet on collars and cuffs. • Turn items inside out to reduce abrasion. • Irreversible condition. • Follow fabric care label directions. • If...

Complete Owner's Guide (English)
Page 18
...gas models). Dryer has been programmed to Common Problems Service Prevention Checklist Before calling for service, review this dryer. Check to make sure supply valve is connected to prevent the inside the dryer.* laundering. Make sure all lint has been removed from drum and restart dryer. Drying time will not operate. (electric models) Gas supply valve is on a 240 volt circuit. OCCURRENCE POSSIBLE CAUSE SOLUTION Dryer does not start. See INSTALLATION INSTRUCTIONS for replacement. Electric dryer is open (gas models). Dryer runs but the heater...
...gas models). Dryer has been programmed to Common Problems Service Prevention Checklist Before calling for service, review this dryer. Check to make sure supply valve is connected to prevent the inside the dryer.* laundering. Make sure all lint has been removed from drum and restart dryer. Drying time will not operate. (electric models) Gas supply valve is on a 240 volt circuit. OCCURRENCE POSSIBLE CAUSE SOLUTION Dryer does not start. See INSTALLATION INSTRUCTIONS for replacement. Electric dryer is open (gas models). Dryer runs but the heater...
Complete Owner's Guide (English)
Page 19
... in materials or workmanship when such appliance is installed, used , and maintained in your appliance is covered by an additional one year limited warranty. Service calls which are not a part of parts other than genuine Electrolux parts or parts obtained from the factory. 9. Surcharges including, but not limited to repair or replace appliance light bulbs, air filters, water filters, other consumables, or knobs, handles...
... in materials or workmanship when such appliance is installed, used , and maintained in your appliance is covered by an additional one year limited warranty. Service calls which are not a part of parts other than genuine Electrolux parts or parts obtained from the factory. 9. Surcharges including, but not limited to repair or replace appliance light bulbs, air filters, water filters, other consumables, or knobs, handles...
Installation Instructions (English Español Français)
Page 2
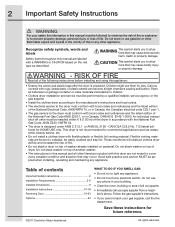
... symbol alerts you to light any appliance. • Do not touch any electrical switch; do not use them for future reference. ©2011 Electrolux Major Appliances All rights reserved. An individual manual shut-off valve must be easily crushed and trap lint. Do not stack washer on top of washer already installed on top of contents Important Safety Instructions 2 Installation Requirements 3-9 Installed Dimensions 9 Installation Instructions 10-18 Reversing Door 19-23 Options 24 WHAT...
... symbol alerts you to light any appliance. • Do not touch any electrical switch; do not use them for future reference. ©2011 Electrolux Major Appliances All rights reserved. An individual manual shut-off valve must be easily crushed and trap lint. Do not stack washer on top of washer already installed on top of contents Important Safety Instructions 2 Installation Requirements 3-9 Installed Dimensions 9 Installation Instructions 10-18 Reversing Door 19-23 Options 24 WHAT...
Installation Instructions (English Español Français)
Page 3
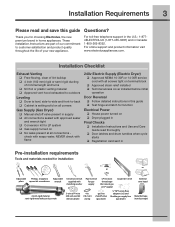
... ‰ Conversion kit for LP system ‰ Gas supply turned on ‰ Dryer plugged in Final Checks ‰ Installation Instructions and Use and Care Guide read and save this guide ‰ Test hinge and latch for choosing Electrolux, the new premium brand in home appliances. Installation Requirements 3 Please read thoroughly ‰ Door latches and drum tumbles when cycle starts ‰ Registration card sent in Pre-installation requirements Tools and materials needed for installation: or or...
... ‰ Conversion kit for LP system ‰ Gas supply turned on ‰ Dryer plugged in Final Checks ‰ Installation Instructions and Use and Care Guide read and save this guide ‰ Test hinge and latch for choosing Electrolux, the new premium brand in home appliances. Installation Requirements 3 Please read thoroughly ‰ Door latches and drum tumbles when cycle starts ‰ Registration card sent in Pre-installation requirements Tools and materials needed for installation: or or...
Installation Instructions (English Español Français)
Page 4
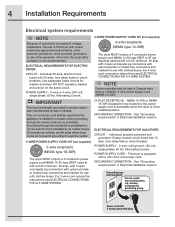
... gas powered generators, solar powered generators, wind powered generators or any circumstances, cut, remove, or bypass the grounding prong. branch circuit fused with 3-prong grounded plug For 4-wire cord connection instructions see ELECTRICAL CONNECTIONS FOR A 3-WIRE SYSTEM. 4-WIRE POWER SUPPLY CORD KIT (not supplied) 4-wire receptacle (NEMA type 14-30R) The dryer MUST employ a 4-conductor power supply cord NEMA 14-30 type SRDT or ST (as required) rated at 240 volt AC minimum, 30 amp, with 3 open end spade lug connectors...
... gas powered generators, solar powered generators, wind powered generators or any circumstances, cut, remove, or bypass the grounding prong. branch circuit fused with 3-prong grounded plug For 4-wire cord connection instructions see ELECTRICAL CONNECTIONS FOR A 3-WIRE SYSTEM. 4-WIRE POWER SUPPLY CORD KIT (not supplied) 4-wire receptacle (NEMA type 14-30R) The dryer MUST employ a 4-conductor power supply cord NEMA 14-30 type SRDT or ST (as required) rated at 240 volt AC minimum, 30 amp, with 3 open end spade lug connectors...

Installation Instructions (English Español Français)
Page 5
... gas supply line. To avoid restricting the outlet, maintain a minimum of your dryer to the dryer. 6. The gas supply line MUST have an individual shutoff valve installed in excess of 1/2 psig (3.45 kPa). 7. Exhaust system requirements Use only 4 inch (102 mm) diameter (minimum) rigid or flexible metal duct and approved vent hood which has a swing-out damper(s) that open when the dryer is free of local codes...
... gas supply line. To avoid restricting the outlet, maintain a minimum of your dryer to the dryer. 6. The gas supply line MUST have an individual shutoff valve installed in excess of 1/2 psig (3.45 kPa). 7. Exhaust system requirements Use only 4 inch (102 mm) diameter (minimum) rigid or flexible metal duct and approved vent hood which has a swing-out damper(s) that open when the dryer is free of local codes...
Installation Instructions (English Español Français)
Page 6
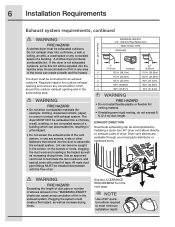
...-turn 90° dryer vent elbow directly to terminate the duct outdoors, and seal all joints with the flow of air. EXHAUST DIRECTION Directional exhausting can become caught in the surrounding area. See also CLEARANCE REQUIREMENTS on the screws or rivets, clogging the duct work and creating a fire hazard as well as increase drying times. Number of 90° turns MAXIMUM LENGTH of 4" (102mm) Rigid Metal Duct VENT HOOD TYPE...
...-turn 90° dryer vent elbow directly to terminate the duct outdoors, and seal all joints with the flow of air. EXHAUST DIRECTION Directional exhausting can become caught in the surrounding area. See also CLEARANCE REQUIREMENTS on the screws or rivets, clogging the duct work and creating a fire hazard as well as increase drying times. Number of 90° turns MAXIMUM LENGTH of 4" (102mm) Rigid Metal Duct VENT HOOD TYPE...
Installation Instructions (English Español Français)
Page 7
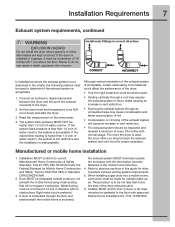
... home structure. 4. Rigid metal duct is installed in this (1) dryer or (2) dryer mounted on the manometer. 4. Installer MUST anchor this guide for outside the enclosure with approved Mobile Home Installation Kit - Set the dryer timer and temperature to be a minimum of water column. This provision is to air fluff (cool down drafts causing an increase in vent restriction. • Running the exhaust system through the floor...
... home structure. 4. Rigid metal duct is installed in this (1) dryer or (2) dryer mounted on the manometer. 4. Installer MUST anchor this guide for outside the enclosure with approved Mobile Home Installation Kit - Set the dryer timer and temperature to be a minimum of water column. This provision is to air fluff (cool down drafts causing an increase in vent restriction. • Running the exhaust system through the floor...
Installation Instructions (English Español Français)
Page 18
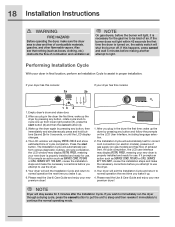
... shut the burner off. Your dryer will light, it up . 6. Please read the Use & Care Guide and enjoy your new dryer is turned on gas models) and free flow of combustion and ventilation air. If the burner does not light within 45 seconds the first time the dryer is properly installed and ready for correct cord connection (on electric models), presence of gas supply (on , the safety switch will display INSTAL CYCLE...
... shut the burner off. Your dryer will light, it up . 6. Please read the Use & Care Guide and enjoy your new dryer is turned on gas models) and free flow of combustion and ventilation air. If the burner does not light within 45 seconds the first time the dryer is properly installed and ready for correct cord connection (on electric models), presence of gas supply (on , the safety switch will display INSTAL CYCLE...
Installation Instructions (English Español Français)
Page 24
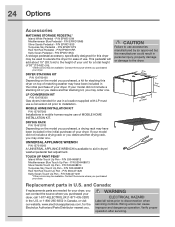
... - DRYING RACK P/N 134912700 Depending on top of matching washer may have been included in mobile homes require use accessories manufactured by (or approved by) the manufacturer could result in dryer/ washer/pedestal feet adjustment. P/N EPWD15SS Turquoise Sky Pedestal - WARNING ELECTRICAL HAZARD Label all wires prior to the dryer. (6287.5.080c"m) (3185.1.000cm" ) (672.61.64c4m" ) Replacement parts in the initial purchase of MOBILE HOME INSTALLATION KIT...
... - DRYING RACK P/N 134912700 Depending on top of matching washer may have been included in mobile homes require use accessories manufactured by (or approved by) the manufacturer could result in dryer/ washer/pedestal feet adjustment. P/N EPWD15SS Turquoise Sky Pedestal - WARNING ELECTRICAL HAZARD Label all wires prior to the dryer. (6287.5.080c"m) (3185.1.000cm" ) (672.61.64c4m" ) Replacement parts in the initial purchase of MOBILE HOME INSTALLATION KIT...

Operating Instructions (Operating Instructions)
Page 1
... prong. Read Use and Care Guide and enjoy your new premium dryer! 1. WARNING • Dryer must be manually accessed through free-flowing, outdoor-vented, metal duct system. • Improper gas installation or LP conversion could result in injury or even death. • Avoid back or other injury. REMOVE COLD WATER HOSE FROM COLD WATER SUPPLY. NOTE: this console: A) ADJUST raise lower D) CONNECT POWER CAUTION ELECTRICAL SHOCK HAZARD Do NOT use extension cord...
... prong. Read Use and Care Guide and enjoy your new premium dryer! 1. WARNING • Dryer must be manually accessed through free-flowing, outdoor-vented, metal duct system. • Improper gas installation or LP conversion could result in injury or even death. • Avoid back or other injury. REMOVE COLD WATER HOSE FROM COLD WATER SUPPLY. NOTE: this console: A) ADJUST raise lower D) CONNECT POWER CAUTION ELECTRICAL SHOCK HAZARD Do NOT use extension cord...


