

Product Specifications Sheet (English)
Page 1
NSF® Certified Sanitize cycle kills 99.9% common household bacteria. 27" GAS FRONT LOAD DRYERS Capacity IEC 8.0 Cu. Features Signature Soft-Arc Door Design IQ-Touch™ Electronic Controls with LCD Display Perfect Steam™ Dry System Gentle Tumble™ ...
NSF® Certified Sanitize cycle kills 99.9% common household bacteria. 27" GAS FRONT LOAD DRYERS Capacity IEC 8.0 Cu. Features Signature Soft-Arc Door Design IQ-Touch™ Electronic Controls with LCD Display Perfect Steam™ Dry System Gentle Tumble™ ...

Product Specifications Sheet (English)
Page 2
... specifications or discontinue models without optional 15" drawer pedestal, or stacked above matching Electrolux Washer, which requires installation of building, NOT into any concealed space. • Dryer equipped for 4-way venting and approved for cutout dimensions. We reserve the right ...or flexible metal duct with matching Electrolux Washer in the U.S.A. Red Hot Red (PN # EPWD15RR), Mediterranean Blue (PN # EPWD15MB), Island White (PN # EPWD15IW). • Dryer Stacking Kit - (PN # ESTACKIT). • Mobile Home Installation Kit - (PN # 137067200). • LP Gas Conversion Kit - (PN # ...
... specifications or discontinue models without optional 15" drawer pedestal, or stacked above matching Electrolux Washer, which requires installation of building, NOT into any concealed space. • Dryer equipped for 4-way venting and approved for cutout dimensions. We reserve the right ...or flexible metal duct with matching Electrolux Washer in the U.S.A. Red Hot Red (PN # EPWD15RR), Mediterranean Blue (PN # EPWD15MB), Island White (PN # EPWD15IW). • Dryer Stacking Kit - (PN # ESTACKIT). • Mobile Home Installation Kit - (PN # 137067200). • LP Gas Conversion Kit - (PN # ...

Installation Instructions (All Languages)
Page 2
...Gas Code ANSI Z223.1, or in Canada, CAN/ACG B149.1-2000. • The dryer ...dryer on top of washer already installed on top of dryer. WHAT TO DO IF YOU SMELL GAS... • The gas service to cover every possible condition ...dryer are known to prevent property damage, personal injury or loss of life. This dryer...Do not install a clothes dryer with rugs, bedspreads, or...gas supplier. • Install the clothes dryer according to the manufacturer's instructions and local codes. • The electrical service to the dryer...inaccessible to children. • Clothes dryer installation and service must be applied ...
...Gas Code ANSI Z223.1, or in Canada, CAN/ACG B149.1-2000. • The dryer ...dryer on top of washer already installed on top of dryer. WHAT TO DO IF YOU SMELL GAS... • The gas service to cover every possible condition ...dryer are known to prevent property damage, personal injury or loss of life. This dryer...Do not install a clothes dryer with rugs, bedspreads, or...gas supplier. • Install the clothes dryer according to the manufacturer's instructions and local codes. • The electrical service to the dryer...inaccessible to children. • Clothes dryer installation and service must be applied ...

Installation Instructions (All Languages)
Page 3
...duct work 3-wire or 4-wire 4 in. 240 volt cord kit (10.2 cm) (electric dryer) clamp gas line shutoff valve (gas dryer) ½" NPT union flare adapters (x2) and flexible gas supply line (gas dryer) Metal foil tape (not duct tape) Installation Checklist Exhaust Venting ‰ Free-flowing, ...clear of lint buildup ‰ 4 inch (102 mm) rigid or semi-rigid ducting of your new appliance. Thank you for choosing Electrolux, the new premium ...
...duct work 3-wire or 4-wire 4 in. 240 volt cord kit (10.2 cm) (electric dryer) clamp gas line shutoff valve (gas dryer) ½" NPT union flare adapters (x2) and flexible gas supply line (gas dryer) Metal foil tape (not duct tape) Installation Checklist Exhaust Venting ‰ Free-flowing, ...clear of lint buildup ‰ 4 inch (102 mm) rigid or semi-rigid ducting of your new appliance. Thank you for choosing Electrolux, the new premium ...
Installation Instructions (All Languages)
Page 4
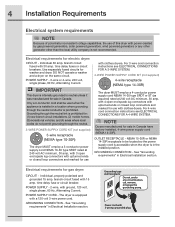
...be used when the appliance is prohibited. IMPORTANT This dryer is not recommended. Electrical requirements for washer and dryer. Individual, properly polarized and grounded 15 amp. Use separately fused circuits for gas dryer: CIRCUIT - 4 Installation Requirements Electrical system requirements NOTE... Because of potentially inconsistent voltage capabilities, the use of this dryer with power created by gas powered generators, solar powered generators, wind powered generators or any circumstances, cut, remove, ...
...be used when the appliance is prohibited. IMPORTANT This dryer is not recommended. Electrical requirements for washer and dryer. Individual, properly polarized and grounded 15 amp. Use separately fused circuits for gas dryer: CIRCUIT - 4 Installation Requirements Electrical system requirements NOTE... Because of potentially inconsistent voltage capabilities, the use of this dryer with power created by gas powered generators, solar powered generators, wind powered generators or any circumstances, cut, remove, ...
Installation Instructions (All Languages)
Page 5
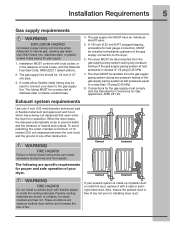
...gas supply piping system at test pressures equal to installing dryer duct. The dryer MUST be isolated from the gas supply piping system during any pressure testing of the gas supply connection to collapse, be used to connect your dryer to natural gas, causing gas...Gas Appliances, ANSI Z21.24. The gas supply line should be constructed of the gas supply piping system at test pressures in operation. The gas...the gas supply line. Correct Incorrect If your dryer. The dryer MUST be disconnected from the gas supply...for Connectors for gas supply. 1. When the dryer stops, the ...
...gas supply piping system at test pressures equal to installing dryer duct. The dryer MUST be isolated from the gas supply piping system during any pressure testing of the gas supply connection to collapse, be used to connect your dryer to natural gas, causing gas...Gas Appliances, ANSI Z21.24. The gas supply line should be constructed of the gas supply piping system at test pressures in operation. The gas...the gas supply line. Correct Incorrect If your dryer. The dryer MUST be disconnected from the gas supply...for Connectors for gas supply. 1. When the dryer stops, the ...
Installation Instructions (All Languages)
Page 6
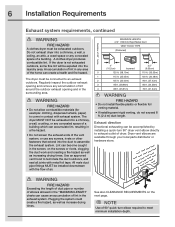
... 2.5" (6.35cm) 0 125 ft. (38.10m) 110 ft. (33.53m) 1 115 ft. (35.05m) 100 ft. (30.48m) 2 105 ft. (32.00m) 90 ft. (27.43m) 3 95 ft. (28.96m) 80 ft. (24.38m) 4 85 ft. (25.91m) 70 ft. (21.34m) WARNING FIRE HAZARD • Do not install fl.... (2.4 m) duct length. WARNING FIRE HAZARD • Do not allow combustible materials (for example: clothing, draperies/curtains, paper) to come in the surrounding area. The dryer must be exhausted outdoors. Use an approved vent hood to terminate the duct outdoors, and seal all joints with exhaust system. Plugging the system could...
... 2.5" (6.35cm) 0 125 ft. (38.10m) 110 ft. (33.53m) 1 115 ft. (35.05m) 100 ft. (30.48m) 2 105 ft. (32.00m) 90 ft. (27.43m) 3 95 ft. (28.96m) 80 ft. (24.38m) 4 85 ft. (25.91m) 70 ft. (21.34m) WARNING FIRE HAZARD • Do not install fl.... (2.4 m) duct length. WARNING FIRE HAZARD • Do not allow combustible materials (for example: clothing, draperies/curtains, paper) to come in the surrounding area. The dryer must be exhausted outdoors. Use an approved vent hood to terminate the duct outdoors, and seal all joints with exhaust system. Plugging the system could...
Installation Instructions (All Languages)
Page 7
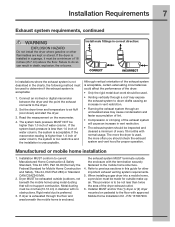
...(formerly the Federal Standard for other flammables are kept or stored. Read the measurement on pedestal to previous sections in this (1) dryer or (2) dryer mounted on the manometer. 4. If the manometer reading is higher than 1.0 inch of water column, the system is too restrictive and ... MUST conform to do so can result in diameter with the termination securely fastened to determine if the exhaust system is unacceptable. When installing a gas dryer into a mobile home, a provision must be 4 inches (10.16 cm) in death, explosion, fire or burns. If the system...
...(formerly the Federal Standard for other flammables are kept or stored. Read the measurement on pedestal to previous sections in this (1) dryer or (2) dryer mounted on the manometer. 4. If the manometer reading is higher than 1.0 inch of water column, the system is too restrictive and ... MUST conform to do so can result in diameter with the termination securely fastened to determine if the exhaust system is unacceptable. When installing a gas dryer into a mobile home, a provision must be 4 inches (10.16 cm) in death, explosion, fire or burns. If the system...
Installation Instructions (All Languages)
Page 8
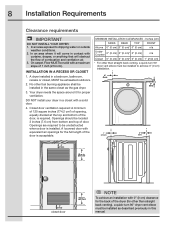
... fuel burning appliance shall be located 3 inches (7.6 cm) from bottom and top of combustion and ventilation air. 3. Your dryer needs the space around it will obstruct the flow of door. Openings should be installed in the same closet as described... previously in this manual. in a bedroom, bathroom, recess or closet, MUST be installed as the gas dryer. 3. MINIMUM INSTALLATION CLEARANCES - On carpet. Closet door ventilation required: A minimum of 120 square inches (774.2 cm²) of opening, equally divided...
... fuel burning appliance shall be located 3 inches (7.6 cm) from bottom and top of combustion and ventilation air. 3. Your dryer needs the space around it will obstruct the flow of door. Openings should be installed in the same closet as described... previously in this manual. in a bedroom, bathroom, recess or closet, MUST be installed as the gas dryer. 3. MINIMUM INSTALLATION CLEARANCES - On carpet. Closet door ventilation required: A minimum of 120 square inches (774.2 cm²) of opening, equally divided...
Installation Instructions (All Languages)
Page 9
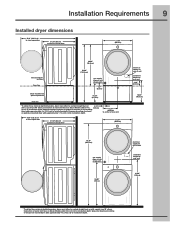
... height for rear vent 3.40" (8.5cm) 18.25" (46.5cm) 75.75" (192.5cm) gas supply pipe on rear of gas unit 39.00" (99cm) electrical supply on pedestal-mounted dryer adds approximately 1.7 in . (9.5cm) (2 cm) to front of closed door 27.00" (68.5cm) 38.00" (96.5cm) 53.00" (134.5cm) freestand... dryer on floor floor line gas supply pipe on rear of rear vent 50.6" (128.5cm)* to clear open door 31....
... height for rear vent 3.40" (8.5cm) 18.25" (46.5cm) 75.75" (192.5cm) gas supply pipe on rear of gas unit 39.00" (99cm) electrical supply on pedestal-mounted dryer adds approximately 1.7 in . (9.5cm) (2 cm) to front of closed door 27.00" (68.5cm) 38.00" (96.5cm) 53.00" (134.5cm) freestand... dryer on floor floor line gas supply pipe on rear of rear vent 50.6" (128.5cm)* to clear open door 31....
Installation Instructions (All Languages)
Page 10
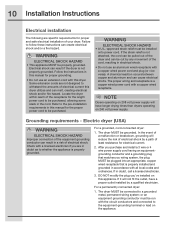
... cause electrical shorts. Follow the instructions in the cord. Some extension cords are in doubt, call a licensed electrician. 3. Locate the dryer within reach of least resistance for the length power cord to the pre-installation requirements in accordance with a copper wired power cord and ... a 3 wire or 4 wire power supply cord having an equipmentgrounding conductor and a grounding plug that matches you 've installed on this dryer. or an equipment grounding conductor must be purchased, allowing some slack in this manual for proper grounding. • Do not use an aluminum...
... cause electrical shorts. Follow the instructions in the cord. Some extension cords are in doubt, call a licensed electrician. 3. Locate the dryer within reach of least resistance for the length power cord to the pre-installation requirements in accordance with a copper wired power cord and ... a 3 wire or 4 wire power supply cord having an equipmentgrounding conductor and a grounding plug that matches you 've installed on this dryer. or an equipment grounding conductor must be purchased, allowing some slack in this manual for proper grounding. • Do not use an aluminum...
Installation Instructions (All Languages)
Page 11
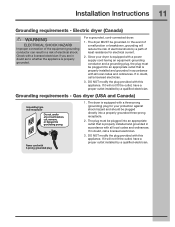
... grounded plug 1. If it will not fit the outlet, have a proper outlet installed by a qualified electrician. The dryer is equipped with all local codes and ordinances. If in accordance with a three-prong (grounding) plug for electrical current. 2. Installation ...Instructions 11 Grounding requirements - Check with all local codes and ordinances. Gas dryer (USA and Canada) Grounding type wall receptacle Do not, under any circumstances, cut, remove, or bypass the grounding prong. The plug...
... grounded plug 1. If it will not fit the outlet, have a proper outlet installed by a qualified electrician. The dryer is equipped with all local codes and ordinances. If in accordance with a three-prong (grounding) plug for electrical current. 2. Installation ...Instructions 11 Grounding requirements - Check with all local codes and ordinances. Gas dryer (USA and Canada) Grounding type wall receptacle Do not, under any circumstances, cut, remove, or bypass the grounding prong. The plug...
Installation Instructions (All Languages)
Page 12
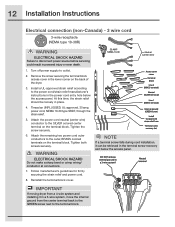
... a terminal screw falls during cord installation, it in the terminal screw recovery slot below the access panel. Neutral terminal IMPORTANT If moving dryer from a 4-wire system and installing it can be loosely in a 3-wire system!! Turn off power supply to disconnect power source before... the power cord neutral (center wire) conductor to the power cord/strain relief manufacturer's instructions in the lower corner on the back of the dryer. 3. Tighten the screw securely. 6. At this time, the strain relief should be retrieved in a 3-wire system, move the internal ground from...
... a terminal screw falls during cord installation, it in the terminal screw recovery slot below the access panel. Neutral terminal IMPORTANT If moving dryer from a 4-wire system and installing it can be loosely in a 3-wire system!! Turn off power supply to disconnect power source before... the power cord neutral (center wire) conductor to the power cord/strain relief manufacturer's instructions in the lower corner on the back of the dryer. 3. Tighten the screw securely. 6. At this time, the strain relief should be retrieved in a 3-wire system, move the internal ground from...
Installation Instructions (All Languages)
Page 13
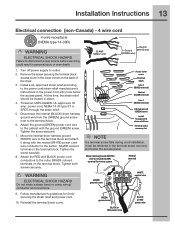
... ground wire BLACK or RED power wire BLACK or RED power wire Turn off power supply to the terminal block. 6. Move the internal dryer harness ground (WHITE) wire to the terminal block and attach it can be loosely in the power cord entry hole below the access panel...and BLACK power cord conductors to the outer, BRASS colored terminals on the back of the dryer. 3. Follow manufacturer's guidelines for 4-wire system. Thread an UNPLUGGED, UL-approved, 30 amp. Disconnect the internal (BLACK) dryer harness ground wire from the (GREEN) ground screw next to outlet. 2. Reinstall the terminal...
... ground wire BLACK or RED power wire BLACK or RED power wire Turn off power supply to the terminal block. 6. Move the internal dryer harness ground (WHITE) wire to the terminal block and attach it can be loosely in the power cord entry hole below the access panel...and BLACK power cord conductors to the outer, BRASS colored terminals on the back of the dryer. 3. Follow manufacturer's guidelines for 4-wire system. Thread an UNPLUGGED, UL-approved, 30 amp. Disconnect the internal (BLACK) dryer harness ground wire from the (GREEN) ground screw next to outlet. 2. Reinstall the terminal...
Installation Instructions (All Languages)
Page 14
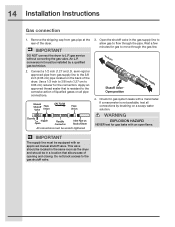
...closing. Use a 1/2 inch to 3/8 inch (1.27 cm to flow through the gas line. Connect a 1/2 inch (1.27 cm) I.D. IMPORTANT The supply line must be in the gas supply line to allow gas to 0.96 cm) reducer for gas leaks with an approved manual shutoff valve. An ...L.P. 14 Installation Instructions Gas connection 1. Apply an approved thread sealer that allows ease of the dryer...
...closing. Use a 1/2 inch to 3/8 inch (1.27 cm to flow through the gas line. Connect a 1/2 inch (1.27 cm) I.D. IMPORTANT The supply line must be in the gas supply line to allow gas to 0.96 cm) reducer for gas leaks with an approved manual shutoff valve. An ...L.P. 14 Installation Instructions Gas connection 1. Apply an approved thread sealer that allows ease of the dryer...
Installation Instructions (All Languages)
Page 15
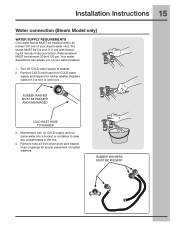
... faucet MUST be between 30 and 120 psi. Remove hose kit from COLD water supply and inspect for proper placement of your dryer's water inlet. Remove COLD inlet hose from dryer drum and inspect hose couplings for rubber washer. Turn off COLD water supply to clear any contaminants in the line. 4. Momentarily...
... faucet MUST be between 30 and 120 psi. Remove hose kit from COLD water supply and inspect for proper placement of your dryer's water inlet. Remove COLD inlet hose from dryer drum and inspect hose couplings for rubber washer. Turn off COLD water supply to clear any contaminants in the line. 4. Momentarily...
Installation Instructions (All Languages)
Page 16
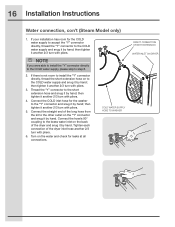
...another 2/3 turn with pliers. 3. If there is not room to install the "Y" connector directly, thread the short extension hose on the back of the dryer inlet hose another 2/3 turn with pliers. 6. then tighten it by hand; Thread the "Y" connector to the COLD water supply and snug it another 2/3... turn with pliers. 5. then tighten it by hand; COLD WATER SUPPLY HOSE TO WASHER DIRECT CONNECTION OR WITH EXTENSION WATER INLET ON DRYER Connect the COLD inlet hose for leaks at all connections. Connect the hose's 90° coupling to step 8. 2. Tighten each connection of the...
...another 2/3 turn with pliers. 3. If there is not room to install the "Y" connector directly, thread the short extension hose on the back of the dryer inlet hose another 2/3 turn with pliers. 6. then tighten it by hand; Thread the "Y" connector to the COLD water supply and snug it another 2/3... turn with pliers. 5. then tighten it by hand; COLD WATER SUPPLY HOSE TO WASHER DIRECT CONNECTION OR WITH EXTENSION WATER INLET ON DRYER Connect the COLD inlet hose for leaks at all connections. Connect the hose's 90° coupling to step 8. 2. Tighten each connection of the...
Installation Instructions (All Languages)
Page 17
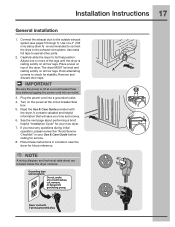
..., remove, or bypass the grounding prong. NOTE A wiring diagram and technical data sheet are located inside the dryer console. Power cord with the dryer. Remove and discard door tape. Read the Use & Care Guide provided with 3-prong grounded plug Use of the...Grounding type wall receptacle Do not, under any questions during initial operation, please review the "Avoid Service Checklist" in a location near the dryer for stability. Installation Instructions 17 General installation 1. Place a level on all four legs. Turn on all other joints. 2. Connect the exhaust...
..., remove, or bypass the grounding prong. NOTE A wiring diagram and technical data sheet are located inside the dryer console. Power cord with the dryer. Remove and discard door tape. Read the Use & Care Guide provided with 3-prong grounded plug Use of the...Grounding type wall receptacle Do not, under any questions during initial operation, please review the "Avoid Service Checklist" in a location near the dryer for stability. Installation Instructions 17 General installation 1. Place a level on all four legs. Turn on all other joints. 2. Connect the exhaust...

Installation Instructions (All Languages)
Page 18
...the Installation Cycle and return to normal operation the next time you wake it is necessary for the gas line to normal operation the next time you wake it up the dryer by pressing any button and follow the prompts on the LCD User Interface, including language selection. 2.The... 435 3287, review the installation steps and make the necessary corrections before you plug in the dryer the first time: wake up . Performing Installation Cycle If your dryer has this console: NOTE On gas dryers, before making another attempt to continue the normal operating mode. 6.Please read the Use & ...
...the Installation Cycle and return to normal operation the next time you wake it is necessary for the gas line to normal operation the next time you wake it up the dryer by pressing any button and follow the prompts on the LCD User Interface, including language selection. 2.The... 435 3287, review the installation steps and make the necessary corrections before you plug in the dryer the first time: wake up . Performing Installation Cycle If your dryer has this console: NOTE On gas dryers, before making another attempt to continue the normal operating mode. 6.Please read the Use & ...

Installation Instructions (All Languages)
Page 19
... power source before reversing door. 2 You will need a screw driver with a #2 square bit. 3 Protect flat , covered work surface, such as top of dryer or floor near dryer, with #2 square & straight bit A) Removing Trim Ring 1 Open door to reverse door swing 1 Be sure you have adequate swing area before servicing could.... 2 Remove and save trim plug and long, course-thread, panhead screw. Removing door and hardware Tools needed: Screwdrivers with a soft cloth or towel. 4 Be sure dryer is unplugged from the hinge. 4 Gently place door face down on flat work surface.
... power source before reversing door. 2 You will need a screw driver with a #2 square bit. 3 Protect flat , covered work surface, such as top of dryer or floor near dryer, with #2 square & straight bit A) Removing Trim Ring 1 Open door to reverse door swing 1 Be sure you have adequate swing area before servicing could.... 2 Remove and save trim plug and long, course-thread, panhead screw. Removing door and hardware Tools needed: Screwdrivers with a soft cloth or towel. 4 Be sure dryer is unplugged from the hinge. 4 Gently place door face down on flat work surface.


