Complete Owner's Guide (English)
Page 2
... 3-5 Features 6 Operating Instructions 7-16 • Getting Started 7 • Normal Operating Sounds 7 • Operating Your Dryer 8-9 • Cycle Selection 10-12 • Drying Temperature 13 • Dryness Level 13 • Options 14-15 • Dryer Features 15 • Dryer Settings Chart 16 Care & Cleaning 17 Solutions to Common Problems 18-19 • Common Drying Problems 18 • Service Prevention Checklist 19 Warranty Information 20 ©2010 Electrolux Major Appliances All rights reserved...
... 3-5 Features 6 Operating Instructions 7-16 • Getting Started 7 • Normal Operating Sounds 7 • Operating Your Dryer 8-9 • Cycle Selection 10-12 • Drying Temperature 13 • Dryness Level 13 • Options 14-15 • Dryer Features 15 • Dryer Settings Chart 16 Care & Cleaning 17 Solutions to Common Problems 18-19 • Common Drying Problems 18 • Service Prevention Checklist 19 Warranty Information 20 ©2010 Electrolux Major Appliances All rights reserved...
Complete Owner's Guide (English)
Page 3
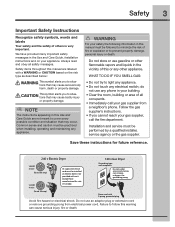
... to cover every possible condition and situation that may occur. Safety items throughout this or any circumstances, cut, remove, or bypass the grounding prong. WARNING For your gas supplier from electrical power cord. This symbol alerts you cannot reach your gas supplier, call your safety the following information in the Use and Care Guide, Installation Instructions and on electric dryers (not provided with 3-prong grounded plug Avoid...
... to cover every possible condition and situation that may occur. Safety items throughout this or any circumstances, cut, remove, or bypass the grounding prong. WARNING For your gas supplier from electrical power cord. This symbol alerts you cannot reach your gas supplier, call your safety the following information in the Use and Care Guide, Installation Instructions and on electric dryers (not provided with 3-prong grounded plug Avoid...
Complete Owner's Guide (English)
Page 5
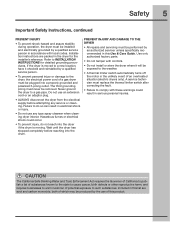
...; A thermal limiter switch automatically turns off the motor in serious personal injuries. Use only authorized factory parts. • Do not tamper with controls. • Do not install or store the dryer where it will be exposed to a new location, have it checked and reinstalled by an authorized servicer unless specifically recommended in electrical shock or injury. • Do not use any service or cleaning. A service...
...; A thermal limiter switch automatically turns off the motor in serious personal injuries. Use only authorized factory parts. • Do not tamper with controls. • Do not install or store the dryer where it will be exposed to a new location, have it checked and reinstalled by an authorized servicer unless specifically recommended in electrical shock or injury. • Do not use any service or cleaning. A service...
Complete Owner's Guide (English)
Page 7
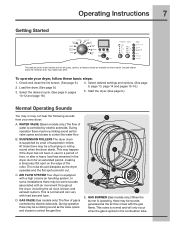
... dryer starts. SUSPENSION ROLLERS The dryer drum is controlled by electric solenoids. C. D. Check and clean the lint screen. (See page 9.) 2. WATER VALVE (Steam models only.) The flow of water is operating, there may be a clicking sound as the dryer operates and the flat spot on every model. At times there may be a clicking sound as the air flow mixes with air movement throughout the dryer, including the air duct, blower, and exhaust system. A B E D C E. Start...
... dryer starts. SUSPENSION ROLLERS The dryer drum is controlled by electric solenoids. C. D. Check and clean the lint screen. (See page 9.) 2. WATER VALVE (Steam models only.) The flow of water is operating, there may be a clicking sound as the dryer operates and the flat spot on every model. At times there may be a clicking sound as the air flow mixes with air movement throughout the dryer, including the air duct, blower, and exhaust system. A B E D C E. Start...
Complete Owner's Guide (English)
Page 10
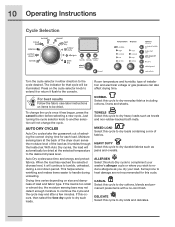
... as towels and non-rubber-backed bath mats. HEAVY DUTY Select this cycle to dry heavy loads such as you dry your washer's allergen cycle or where you wish to dry loads containing a mix of installation and electrical voltage or gas pressure can also affect drying time. 10 Operating Instructions Cycle Selection Turn the cycle selector in either direction to continue the cycle and the cycle may end after a few minutes.
... as towels and non-rubber-backed bath mats. HEAVY DUTY Select this cycle to dry heavy loads such as you dry your washer's allergen cycle or where you wish to dry loads containing a mix of installation and electrical voltage or gas pressure can also affect drying time. 10 Operating Instructions Cycle Selection Turn the cycle selector in either direction to continue the cycle and the cycle may end after a few minutes.
Complete Owner's Guide (English)
Page 11
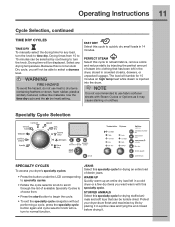
... Cycle Selection SPECIALTY CYCLES To access you dryer's specialty cycles: • Press the button under the LCD corresponding to specialty cycles. • Rotate the cycle selector knob to scroll through the list of available Specialty Cycles to choose from 15 to time dry. Operating Instructions 11 Cycle Selection, continued TIME DRY CYCLES TIME DRY To manually select the drying time for 15 minutes on clothes. Use the time dry cycle and the air (no heat) setting. PERFECT STEAM Select this specialty cycle. FAST DRY...
... Cycle Selection SPECIALTY CYCLES To access you dryer's specialty cycles: • Press the button under the LCD corresponding to specialty cycles. • Rotate the cycle selector knob to scroll through the list of available Specialty Cycles to choose from 15 to time dry. Operating Instructions 11 Cycle Selection, continued TIME DRY CYCLES TIME DRY To manually select the drying time for 15 minutes on clothes. Use the time dry cycle and the air (no heat) setting. PERFECT STEAM Select this specialty cycle. FAST DRY...
Complete Owner's Guide (English)
Page 15
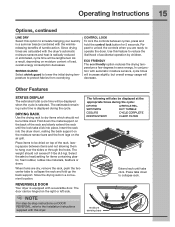
... the air (no heat) setting for 5 seconds. REVERSIBLE DOOR Your dryer is equipped with the dryer's automatic moisture sensors and heat is radically reduced or eliminated, cycle time will decrease. Press tabs down . Insert the rack into place. TUMBLE COOLING CYCLE COMPLETE ADDING STEAM CLEAN FILTER Extend rack until the lock tabs click into the dryer drum, resting the back support on the moisture sensor bars and the front legs on the right or...
... the air (no heat) setting for 5 seconds. REVERSIBLE DOOR Your dryer is equipped with the dryer's automatic moisture sensors and heat is radically reduced or eliminated, cycle time will decrease. Press tabs down . Insert the rack into place. TUMBLE COOLING CYCLE COMPLETE ADDING STEAM CLEAN FILTER Extend rack until the lock tabs click into the dryer drum, resting the back support on the moisture sensor bars and the front legs on the right or...
Complete Owner's Guide (English)
Page 17
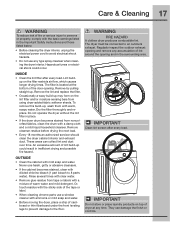
... servicer should clean the dryer cabinet interior and exhaust duct. Hazardous fumes or electrical shock could result in the Important Safety Instructions and those listed below. • Before cleaning the dryer interior, unplug the electrical power cord to avoid electrical shock hazards. • Do not use a window cleaner with ammonia or mild soap and water. • Before moving the dryer, place a strip of lint around the opening . Remove the lint and replace...
... servicer should clean the dryer cabinet interior and exhaust duct. Hazardous fumes or electrical shock could result in the Important Safety Instructions and those listed below. • Before cleaning the dryer interior, unplug the electrical power cord to avoid electrical shock hazards. • Do not use a window cleaner with ammonia or mild soap and water. • Before moving the dryer, place a strip of lint around the opening . Remove the lint and replace...
Complete Owner's Guide (English)
Page 18
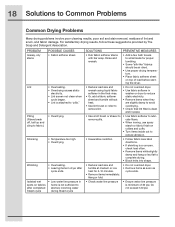
... water line pressure is a concern, check load often. • Remove items while slightly damp and hang or lay flat medium or low heat for proper tumbling. • Some "silk-like" fabrics should be air dried. • Use proper drying temperature. • Place fabric softener sheet on fabrics after cycle ends. Isolated wet spots on top of load before starting the dryer. • Reduce load size and rewash using...
... water line pressure is a concern, check load often. • Remove items while slightly damp and hang or lay flat medium or low heat for proper tumbling. • Some "silk-like" fabrics should be air dried. • Use proper drying temperature. • Place fabric softener sheet on fabrics after cycle ends. Isolated wet spots on top of load before starting the dryer. • Reduce load size and rewash using...
Complete Owner's Guide (English)
Page 19
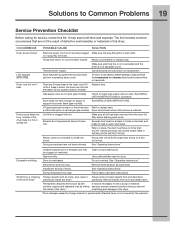
... wall outlet. Exhaust duct requirements have no more than drying on a separate circuit. Drying time will not operate. (electric models) Gas supply valve is on a 240 volt circuit. Outside exhaust hood or exhaust duct may be clogged or restricted. Use a dehumidifier near the dryer. Items left in the dryer circuit. LCD displays DEMO MODE. Reset circuit breaker or replace fuse. of the drum finish. When in place, the duct must not exceed length listed in or plug may...
... wall outlet. Exhaust duct requirements have no more than drying on a separate circuit. Drying time will not operate. (electric models) Gas supply valve is on a 240 volt circuit. Outside exhaust hood or exhaust duct may be clogged or restricted. Use a dehumidifier near the dryer. Items left in the dryer circuit. LCD displays DEMO MODE. Reset circuit breaker or replace fuse. of the drum finish. When in place, the duct must not exceed length listed in or plug may...
Complete Owner's Guide (English)
Page 20
... appliance accessible for service calls to be defective in materials or workmanship when your appliance is installed, used in the USA, Puerto Rico and Canada. your original date of purchase, Electrolux will repair or replace any parts of this appliance that have proven to another party or removed outside the USA or Canada. 3. THIS WRITTEN WARRANTY GIVES YOU SPECIFIC LEGAL RIGHTS. If service...
... appliance accessible for service calls to be defective in materials or workmanship when your appliance is installed, used in the USA, Puerto Rico and Canada. your original date of purchase, Electrolux will repair or replace any parts of this appliance that have proven to another party or removed outside the USA or Canada. 3. THIS WRITTEN WARRANTY GIVES YOU SPECIFIC LEGAL RIGHTS. If service...

Installation Instructions (All Languages)
Page 2
... foil venting material. Place all materials in a garbage container or make materials inaccessible to children. • Clothes dryer installation and service must be applied when installing, operating and maintaining any electrical switch; Save these instructions for HOME USE only. This symbol alerts you to light any appliance. • Do not touch any appliance. This dryer is not recommended for play. Do not stack washer on pedestal...
... foil venting material. Place all materials in a garbage container or make materials inaccessible to children. • Clothes dryer installation and service must be applied when installing, operating and maintaining any electrical switch; Save these instructions for HOME USE only. This symbol alerts you to light any appliance. • Do not touch any appliance. This dryer is not recommended for play. Do not stack washer on pedestal...
Installation Instructions (All Languages)
Page 3
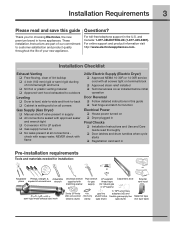
... strain relief installed ‰ Terminal access cover installed before initial operation Door Reversal ‰ Follow detailed instructions in this guide ‰ Test hinge and latch for function Electrical Power ‰ House power turned on ‰ Dryer plugged in Final Checks ‰ Installation Instructions and Use and Care Guide read and save this guide Questions? For online support and product information visit http://www.electroluxappliances.com. For toll-free telephone support in . 240 volt cord kit (10.2 cm) (electric dryer) clamp gas line shutoff valve (gas dryer) ½...
... strain relief installed ‰ Terminal access cover installed before initial operation Door Reversal ‰ Follow detailed instructions in this guide ‰ Test hinge and latch for function Electrical Power ‰ House power turned on ‰ Dryer plugged in Final Checks ‰ Installation Instructions and Use and Care Guide read and save this guide Questions? For online support and product information visit http://www.electroluxappliances.com. For toll-free telephone support in . 240 volt cord kit (10.2 cm) (electric dryer) clamp gas line shutoff valve (gas dryer) ½...
Installation Instructions (All Languages)
Page 4
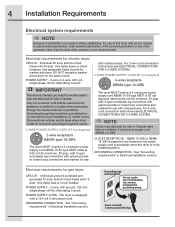
... circuit breaker. POWER SUPPLY - 2-wire, with 3-prong grounded plug DO NOT operate a washer and a dryer on the same circuit. Grounding through the neutral. 3-WIRE POWER SUPPLY CORD KIT (not supplied) 3-wire receptacle (NEMA type 10-30R) The dryer MUST employ a 3-conductor power supply cord NEMA 10-30 type SRDT rated at 240 volt AC minimum, 30 amp, with 4 open end spade lug connectors with upturned ends or closed loop connectors and marked for electric dryer: CIRCUIT - For 4-wire cord connection instructions...
... circuit breaker. POWER SUPPLY - 2-wire, with 3-prong grounded plug DO NOT operate a washer and a dryer on the same circuit. Grounding through the neutral. 3-WIRE POWER SUPPLY CORD KIT (not supplied) 3-wire receptacle (NEMA type 10-30R) The dryer MUST employ a 3-conductor power supply cord NEMA 10-30 type SRDT rated at 240 volt AC minimum, 30 amp, with 4 open end spade lug connectors with upturned ends or closed loop connectors and marked for electric dryer: CIRCUIT - For 4-wire cord connection instructions...
Installation Instructions (All Languages)
Page 5
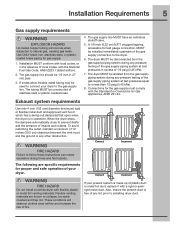
... will obstruct clothes dryer airflow and increase the risk of any lint prior to installing dryer duct. A 1/8 inch (0.32 cm) N.P.T. Connections for the gas supply must comply with the Standard for Connectors for gas supply. 1. Exhaust system requirements Use only 4 inch (102 mm) diameter (minimum) rigid or flexible metal duct and approved vent hood which has a swing-out damper(s) that open when the dryer is...
... will obstruct clothes dryer airflow and increase the risk of any lint prior to installing dryer duct. A 1/8 inch (0.32 cm) N.P.T. Connections for the gas supply must comply with the Standard for Connectors for gas supply. 1. Exhaust system requirements Use only 4 inch (102 mm) diameter (minimum) rigid or flexible metal duct and approved vent hood which has a swing-out damper(s) that open when the dryer is...
Installation Instructions (All Languages)
Page 6
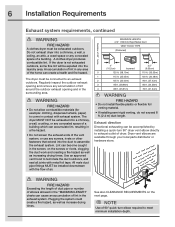
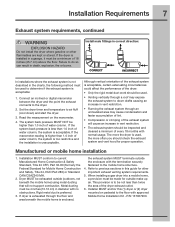
.... The dryer MUST NOT be exhausted into the laundry area. A clothes dryer produces combustible lint. 6 Installation Requirements Exhaust system requirements, continued WARNING FIRE HAZARD A clothes dryer must be connected to terminate the duct outdoors, and seal all joints with metal foil tape. WARNING FIRE HAZARD • Do not allow combustible materials (for example: clothing, draperies/curtains, paper) to exhaust outlet of air. Number of 90° turns MAXIMUM LENGTH of a building...
.... The dryer MUST NOT be exhausted into the laundry area. A clothes dryer produces combustible lint. 6 Installation Requirements Exhaust system requirements, continued WARNING FIRE HAZARD A clothes dryer must be connected to terminate the duct outdoors, and seal all joints with metal foil tape. WARNING FIRE HAZARD • Do not allow combustible materials (for example: clothing, draperies/curtains, paper) to exhaust outlet of air. Number of 90° turns MAXIMUM LENGTH of a building...
Installation Instructions (All Languages)
Page 7
... Home Installation Kit - Failure to be used . • Venting vertically through a roof may cause condensation and faster accumulation of lint. • Compression or crimping of water column. Set the dryer timer and temperature to the dryer. 2. The more often you should be used to previous sections in the charts, the following method must be a minimum of the exhaust system is acceptable. When installing a gas dryer into...
... Home Installation Kit - Failure to be used . • Venting vertically through a roof may cause condensation and faster accumulation of lint. • Compression or crimping of water column. Set the dryer timer and temperature to the dryer. 2. The more often you should be used to previous sections in the charts, the following method must be a minimum of the exhaust system is acceptable. When installing a gas dryer into...

Installation Instructions (All Languages)
Page 17
... during initial operation, please review the "Avoid Service Checklist" in a location near the dryer for service. 8. Connect the exhaust duct to its final position. The dryer MUST be level and A resting solidly on the power at a circuit breaker/fuse box before calling for future reference. Plug the power cord into an outlet. 3. NOTE A wiring diagram and technical data sheet are located inside the dryer console. Installation Instructions 17 General installation 1. Use metal foil tape to the exhaust vent system. Place...
... during initial operation, please review the "Avoid Service Checklist" in a location near the dryer for service. 8. Connect the exhaust duct to its final position. The dryer MUST be level and A resting solidly on the power at a circuit breaker/fuse box before calling for future reference. Plug the power cord into an outlet. 3. NOTE A wiring diagram and technical data sheet are located inside the dryer console. Installation Instructions 17 General installation 1. Use metal foil tape to the exhaust vent system. Place...
Installation Instructions (All Languages)
Page 18
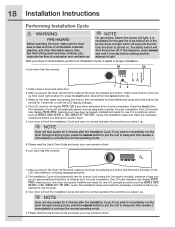
... changes. 4. After you plug in the dryer the first time: wake up the dryer by pressing any button and follow the prompts on gas models) and free flow of combustion and ventilation air. Your dryer will exit the Installation Cycle and return to use the dryer. 3. NOTE Dryer will automatically test for the gas line to assist in proper installation. The Installation Cycle will stay awake for 3 minutes after the Installation Cycle...
... changes. 4. After you plug in the dryer the first time: wake up the dryer by pressing any button and follow the prompts on gas models) and free flow of combustion and ventilation air. Your dryer will exit the Installation Cycle and return to use the dryer. 3. NOTE Dryer will automatically test for the gas line to assist in proper installation. The Installation Cycle will stay awake for 3 minutes after the Installation Cycle...
Installation Instructions (All Languages)
Page 24
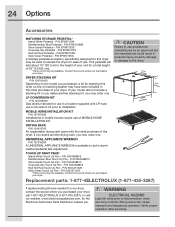
... to disconnection when servicing controls. P/N EPWD15RR Kelly Green Pedestal - DRYER STACKING KIT P/N 134700400 Depending on top of matching washer may order one . P/N 5304471226 Kelly Green Touch Up Pen - Replacement parts: 1-877-4ELECTROLUX (1-877-435-3287) If replacements parts are needed for your dryer, contact the source where you . Verify proper operation after servicing. P/N 5304468812 Mediterranean Blue Touch Up Pen - WARNING ELECTRICAL HAZARD Label all wires prior to...
... to disconnection when servicing controls. P/N EPWD15RR Kelly Green Pedestal - DRYER STACKING KIT P/N 134700400 Depending on top of matching washer may order one . P/N 5304471226 Kelly Green Touch Up Pen - Replacement parts: 1-877-4ELECTROLUX (1-877-435-3287) If replacements parts are needed for your dryer, contact the source where you . Verify proper operation after servicing. P/N 5304468812 Mediterranean Blue Touch Up Pen - WARNING ELECTRICAL HAZARD Label all wires prior to...


