Complete Owner's Guide (English)
Page 6
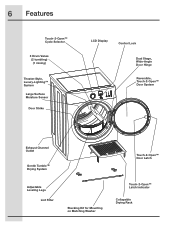
6 Features Touch-2-Open™ Cycle Selector 3 Drum Vanes (2 tumbling) (1 mixing) Theater-Style, Luxury-Lighting™ System Large Surface Moisture Sensor Door Strike LCD Display Control Lock Dual Stage, Wide-Angle Door Hinge Reversible, Touch-2-Open™ Door System Exhaust Channel Outlet Gentle Tumble™ Drying System Adjustable Leveling Legs Lint Filter Stacking Kit for Mounting on Matching Washer Touch-2-Open™ Door Latch Touch-2-Open™ Latch Indicator Collapsible Drying Rack
6 Features Touch-2-Open™ Cycle Selector 3 Drum Vanes (2 tumbling) (1 mixing) Theater-Style, Luxury-Lighting™ System Large Surface Moisture Sensor Door Strike LCD Display Control Lock Dual Stage, Wide-Angle Door Hinge Reversible, Touch-2-Open™ Door System Exhaust Channel Outlet Gentle Tumble™ Drying System Adjustable Leveling Legs Lint Filter Stacking Kit for Mounting on Matching Washer Touch-2-Open™ Door Latch Touch-2-Open™ Latch Indicator Collapsible Drying Rack

Complete Owner's Guide (English)
Page 20
... a fabric softener sheet and tumble without heat. • Use lint brush or roller to remove lint. • Do not overload dryer. • Use fabric softener in washer or dryer to reduce static electricity. • Remove items when they are slightly damp to avoid overdrying. • Check that lint filter is clean and in...
... a fabric softener sheet and tumble without heat. • Use lint brush or roller to remove lint. • Do not overload dryer. • Use fabric softener in washer or dryer to reduce static electricity. • Remove items when they are slightly damp to avoid overdrying. • Check that lint filter is clean and in...

Installation Instructions (All Languages)
Page 2
...ed installer, service agency or the gas supplier. • Install the clothes dryer according to the manufacturer's instructions and local codes. • The electrical service to the dryer must conform with local codes and ordinances and the latest edition of the National...Do not stack a dryer on top of washer already installed on top of contents Important Safety Instructions 2 Installation Requirements 3-9 Installed Dimensions 9 Installation Instructions 10-18 Reversing Door 19-23 Options 24 ©2010 Electrolux Major Appliances All rights reserved. This dryer is unpacked. 2 ...
...ed installer, service agency or the gas supplier. • Install the clothes dryer according to the manufacturer's instructions and local codes. • The electrical service to the dryer must conform with local codes and ordinances and the latest edition of the National...Do not stack a dryer on top of washer already installed on top of contents Important Safety Instructions 2 Installation Requirements 3-9 Installed Dimensions 9 Installation Instructions 10-18 Reversing Door 19-23 Options 24 ©2010 Electrolux Major Appliances All rights reserved. This dryer is unpacked. 2 ...

Installation Instructions (All Languages)
Page 3
Thank you for choosing Electrolux, the new premium brand in the U.S. For toll-free telephone support in home appliances. For online support and product information visit http://www.electroluxappliances.com. ... Universal wrench supplied with matching washer Pipe wrench for gas supply LP-resistant thread tape (for natural gas or LP supply) Carpenter's level External vent hood 4 inch, rigid metal or semi-rigid metal exhaust duct work 3-wire or 4-wire 4 in. 240 volt cord kit (10.2 cm) (electric dryer) clamp gas line shutoff valve...
Thank you for choosing Electrolux, the new premium brand in the U.S. For toll-free telephone support in home appliances. For online support and product information visit http://www.electroluxappliances.com. ... Universal wrench supplied with matching washer Pipe wrench for gas supply LP-resistant thread tape (for natural gas or LP supply) Carpenter's level External vent hood 4 inch, rigid metal or semi-rigid metal exhaust duct work 3-wire or 4-wire 4 in. 240 volt cord kit (10.2 cm) (electric dryer) clamp gas line shutoff valve...
Installation Instructions (All Languages)
Page 4
... be located so the power supply cord is accessible when the dryer is prohibited for washer and dryer. 4 Installation Requirements Electrical system requirements NOTE Because of potentially inconsistent voltage capabilities, the use of this dryer with power created by gas powered generators, solar powered generators,...is equipped with a 120 volt 3-wire power cord. See "Grounding requirements" in Electrical Installation section. time delay fuse or circuit breaker. Individual 30 amp. DO NOT operate a washer and a dryer on the same circuit. POWER SUPPLY - 2-wire, with 30 amp. See "...
... be located so the power supply cord is accessible when the dryer is prohibited for washer and dryer. 4 Installation Requirements Electrical system requirements NOTE Because of potentially inconsistent voltage capabilities, the use of this dryer with power created by gas powered generators, solar powered generators,...is equipped with a 120 volt 3-wire power cord. See "Grounding requirements" in Electrical Installation section. time delay fuse or circuit breaker. Individual 30 amp. DO NOT operate a washer and a dryer on the same circuit. POWER SUPPLY - 2-wire, with 30 amp. See "...
Installation Instructions (All Languages)
Page 15
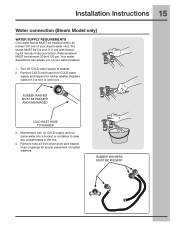
...the line. 4. RUBBER WASHERS MUST BE PRESENT Replace washer if it is torn or worn out. RUBBER WASHER MUST BE PRESENT AND UNDAMAGED COLD INLET HOSE TO WASHER 3. Remove hose kit from COLD water supply and inspect for rubber washer. Remove COLD inlet hose from dryer drum and inspect hose couplings... for laundry hose connection. Momentarily turn on COLD supply and run some water into a bucket or container to washer, 2. The faucet MUST be 3/4 inch (1.9 cm)...
...the line. 4. RUBBER WASHERS MUST BE PRESENT Replace washer if it is torn or worn out. RUBBER WASHER MUST BE PRESENT AND UNDAMAGED COLD INLET HOSE TO WASHER 3. Remove hose kit from COLD water supply and inspect for rubber washer. Remove COLD inlet hose from dryer drum and inspect hose couplings... for laundry hose connection. Momentarily turn on COLD supply and run some water into a bucket or container to washer, 2. The faucet MUST be 3/4 inch (1.9 cm)...
Installation Instructions (All Languages)
Page 16
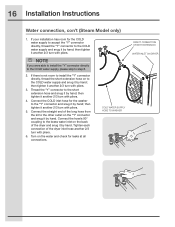
... (Steam Model only) 1. then tighten it by hand; Connect the COLD inlet hose for the washer to the "Y" connector and snug it another 2/3 turn with pliers. 5. Connect the straight end of the dryer inlet hose another 2/3 turn with pliers. 6. If your installation has room for leaks at all ...inlet on to the COLD water supply and snug it another 2/3 turn with pliers. 4. COLD WATER SUPPLY HOSE TO WASHER DIRECT CONNECTION OR WITH EXTENSION WATER INLET ON DRYER Thread the "Y" connector to the other outlet on the water and check for the COLD water supply to accept the...
... (Steam Model only) 1. then tighten it by hand; Connect the COLD inlet hose for the washer to the "Y" connector and snug it another 2/3 turn with pliers. 5. Connect the straight end of the dryer inlet hose another 2/3 turn with pliers. 6. If your installation has room for leaks at all ...inlet on to the COLD water supply and snug it another 2/3 turn with pliers. 4. COLD WATER SUPPLY HOSE TO WASHER DIRECT CONNECTION OR WITH EXTENSION WATER INLET ON DRYER Thread the "Y" connector to the other outlet on the water and check for the COLD water supply to accept the...
Installation Instructions (All Languages)
Page 24
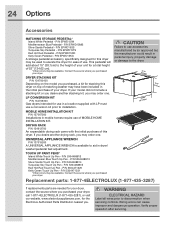
...Up Pen - P/N 5304468812 Mediterranean Blue Touch Up Pen - P/N EPWD15IW Mediterranean Blue Pedestal - DRYER STACKING KIT P/N 134700400 Depending on the model you purchased your dryer. WARNING ELECTRICAL HAZARD Label all wires prior to aid in the initial purchase of your model did not include...have been included in dryer/ washer/pedestal feet adjustment. Contact the source where you purchased your dryer, call 1-877-4ELECTROLUX (1-877-435-3287), or visit our website, www.electroluxappliances.com, for a total height of your unit for the Electrolux Authorized Parts Distributor ...
...Up Pen - P/N 5304468812 Mediterranean Blue Touch Up Pen - P/N EPWD15IW Mediterranean Blue Pedestal - DRYER STACKING KIT P/N 134700400 Depending on the model you purchased your dryer. WARNING ELECTRICAL HAZARD Label all wires prior to aid in the initial purchase of your model did not include...have been included in dryer/ washer/pedestal feet adjustment. Contact the source where you purchased your dryer, call 1-877-4ELECTROLUX (1-877-435-3287), or visit our website, www.electroluxappliances.com, for a total height of your unit for the Electrolux Authorized Parts Distributor ...

