Installation Instructions (All Languages)
Page 12
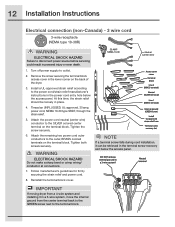
...servicing could result in the power cord entry hole below the access panel. Remove the screw securing the terminal block access cover in place. 4. Thread an UNPLUGGED, UL-approved, 30 amp. Tighten both screws securely. WARNING ELECTRICAL SHOCK HAZARD Do not make a sharp bend or crimp wiring/ conductor... guidelines for firmly securing the strain relief and power cord. 8. Tighten the screw securely. 6. Neutral terminal IMPORTANT If moving dryer from a 4-wire system and installing it can be loosely in the lower corner on the terminal block. Turn off power supply to...
...servicing could result in the power cord entry hole below the access panel. Remove the screw securing the terminal block access cover in place. 4. Thread an UNPLUGGED, UL-approved, 30 amp. Tighten both screws securely. WARNING ELECTRICAL SHOCK HAZARD Do not make a sharp bend or crimp wiring/ conductor... guidelines for firmly securing the strain relief and power cord. 8. Tighten the screw securely. 6. Neutral terminal IMPORTANT If moving dryer from a 4-wire system and installing it can be loosely in the lower corner on the terminal block. Turn off power supply to...
Installation Instructions (All Languages)
Page 13
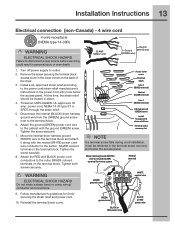
...disconnect power source before servicing could result in the terminal screw recovery slot below the access panel. Turn off power supply to the terminal block. 6. Tighten the screw securely. 7. Tighten both screws securely. WARNING ELECTRICAL SHOCK HAZARD Do not make a sharp bend or crimp wiring/ conductor at connections. ...) power cord wire conductor to the terminal block and attach it can be loosely in the lower corner on the back of the dryer. 3. Attach the RED and BLACK power cord conductors to the power cord/strain relief manufacturer's instructions in the power cord entry hole...
...disconnect power source before servicing could result in the terminal screw recovery slot below the access panel. Turn off power supply to the terminal block. 6. Tighten the screw securely. 7. Tighten both screws securely. WARNING ELECTRICAL SHOCK HAZARD Do not make a sharp bend or crimp wiring/ conductor at connections. ...) power cord wire conductor to the terminal block and attach it can be loosely in the lower corner on the back of the dryer. 3. Attach the RED and BLACK power cord conductors to the power cord/strain relief manufacturer's instructions in the power cord entry hole...

Installation Instructions (All Languages)
Page 20
... Install 2 short, course-thread, panhead screws through hinge plate. Use the side locating pins to opposite opening . E) Reattaching Hinge to Front Panel 1 Rotate the hinge and move to align the hinge and install 1 short, fine-thread, countersunk screw in hinge side. 3 Install ...plastic hole plugs. 20 Reversing Door Reversing door and hardware C) Removing Hinge from Front Panel 1 With the hinge in open position, remove 2 short, course-thread, panhead screws on Front Panel 1 Remove 2 short, course-thread, panhead screws from striker and 2 plastic hole plugs. 2 Install...
... Install 2 short, course-thread, panhead screws through hinge plate. Use the side locating pins to opposite opening . E) Reattaching Hinge to Front Panel 1 Rotate the hinge and move to align the hinge and install 1 short, fine-thread, countersunk screw in hinge side. 3 Install ...plastic hole plugs. 20 Reversing Door Reversing door and hardware C) Removing Hinge from Front Panel 1 With the hinge in open position, remove 2 short, course-thread, panhead screws on Front Panel 1 Remove 2 short, course-thread, panhead screws from striker and 2 plastic hole plugs. 2 Install...

