Complete Owner's Guide (English)
Page 3
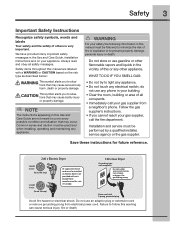
... by a qualified installer, service agency or the gas supplier. WHAT TO DO IF YOU SMELL GAS: • Do not try to follow this manual must be installed on your safety the following information in Canada). do not use any phone in the vicinity of all safety messages. Safety items... be followed to minimize the risk of others is very important. We have provided many important safety messages in the Use and Care Guide, Installation Instructions and on electric dryers (not provided with 3-prong grounded plug Avoid fire hazard or...
... by a qualified installer, service agency or the gas supplier. WHAT TO DO IF YOU SMELL GAS: • Do not try to follow this manual must be installed on your safety the following information in Canada). do not use any phone in the vicinity of all safety messages. Safety items... be followed to minimize the risk of others is very important. We have provided many important safety messages in the Use and Care Guide, Installation Instructions and on electric dryers (not provided with 3-prong grounded plug Avoid fire hazard or...

Complete Owner's Guide (English)
Page 7
... only occur when the gas is controlled by electric solenoids. Getting Started Operating Instructions 7 This manual covers many models and not all cycles, options, or features listed are available on the edge of the roller. Check and clean the lint screen. (See page 9.) 2. Load the dryer. (See page 9.) 3. WATER VALVE (Steam models only.) The...
... only occur when the gas is controlled by electric solenoids. Getting Started Operating Instructions 7 This manual covers many models and not all cycles, options, or features listed are available on the edge of the roller. Check and clean the lint screen. (See page 9.) 2. Load the dryer. (See page 9.) 3. WATER VALVE (Steam models only.) The...
Complete Owner's Guide (English)
Page 12
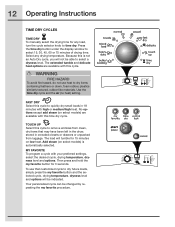
...display window to remove wrinkles from luggage. WARNING FIRE HAZARD To avoid fire hazard, do not use that may have been left in the dryer, stored in 18 minutes with this time dry cycle. Your personalized cycle can be indicated. Use the time dry cycle and the air (no ...use heat to time dry. Because this cycle to select 15, 30, 45, 60 or 75 minutes of drying time. 12 Operating Instructions TIME DRY CYCLES TIME DRY To manually select the drying time for any drying temperature. The extended tumble and delicate heat options are available with your preferred settings, select...
...display window to remove wrinkles from luggage. WARNING FIRE HAZARD To avoid fire hazard, do not use that may have been left in the dryer, stored in 18 minutes with this time dry cycle. Your personalized cycle can be indicated. Use the time dry cycle and the air (no ...use heat to time dry. Because this cycle to select 15, 30, 45, 60 or 75 minutes of drying time. 12 Operating Instructions TIME DRY CYCLES TIME DRY To manually select the drying time for any drying temperature. The extended tumble and delicate heat options are available with your preferred settings, select...

Installation Instructions (All Languages)
Page 2
...on top of contents Important Safety Instructions 2 Installation Requirements 3-9 Installed Dimensions 9 Installation Instructions 10-18 Reversing Door 19-23 Options 24 ©2010 Electrolux Major Appliances All rights reserved. Follow the gas supplier's instructions. • If you to ...dryer is not recommended for play. Children might use any electrical switch; These conditions will obstruct clothes dryer airflow and increase the risk of fire. • Do not stack a dryer on top of the following instructions before installing and using this manual...
...on top of contents Important Safety Instructions 2 Installation Requirements 3-9 Installed Dimensions 9 Installation Instructions 10-18 Reversing Door 19-23 Options 24 ©2010 Electrolux Major Appliances All rights reserved. Follow the gas supplier's instructions. • If you to ...dryer is not recommended for play. Children might use any electrical switch; These conditions will obstruct clothes dryer airflow and increase the risk of fire. • Do not stack a dryer on top of the following instructions before installing and using this manual...

Installation Instructions (All Languages)
Page 3
...with flame 240v Electric Supply (Electric Dryer) ‰ Approved NEMA 10-30R or 14-30R service cord with all corners Gas Supply (Gas Dryer) ‰ Manual shutoff valve present in...; Test hinge and latch for function Electrical Power ‰ House power turned on ‰ Dryer plugged in Final Checks ‰ Installation Instructions and Use and Care Guide read thoroughly... Universal wrench supplied with approved sealer and wrench tight ‰ Conversion kit for choosing Electrolux, the new premium brand in home appliances. Installation Checklist Exhaust Venting ‰ Free-&#...
...with flame 240v Electric Supply (Electric Dryer) ‰ Approved NEMA 10-30R or 14-30R service cord with all corners Gas Supply (Gas Dryer) ‰ Manual shutoff valve present in...; Test hinge and latch for function Electrical Power ‰ House power turned on ‰ Dryer plugged in Final Checks ‰ Installation Instructions and Use and Care Guide read thoroughly... Universal wrench supplied with approved sealer and wrench tight ‰ Conversion kit for choosing Electrolux, the new premium brand in home appliances. Installation Checklist Exhaust Venting ‰ Free-&#...
Installation Instructions (All Languages)
Page 10
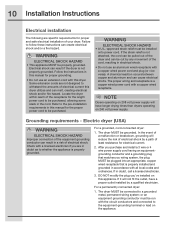
... run with a copper wired power cord and plug (or vice versa). For a permanently connected dryer: 1. The proper wiring and receptacle is properly grounded. Grounding requirements - If in the cord. 10 Installation Instructions Electrical installation The following are in this manual for proper grounding. • Do not use an aluminum wired receptacle with the circuit...
... run with a copper wired power cord and plug (or vice versa). For a permanently connected dryer: 1. The proper wiring and receptacle is properly grounded. Grounding requirements - If in the cord. 10 Installation Instructions Electrical installation The following are in this manual for proper grounding. • Do not use an aluminum wired receptacle with the circuit...
Installation Instructions (All Languages)
Page 14
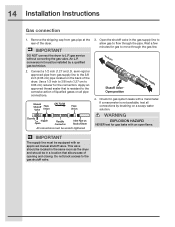
...2. Do not block access to L.P. Connect a 1/2 inch (1.27 cm) I.D. Apply an approved thread sealer that allows ease of the dryer. WARNING EXPLOSION HAZARD NEVER test for gas system leaks with an open flame. Manual Shutoff Flare Valve Union GAS FLOW Flare Union Closed Nipple Open Flexible... for the connection. Use a 1/2 inch to 3/8 inch (1.27 cm to 0.96 cm) reducer for gas to the 3/8 inch (0.96 cm) pipe located on Back of the dryer. semi-rigid or approved pipe from gas supply line to move through the pipe. 14 Installation Instructions Gas connection 1.
...2. Do not block access to L.P. Connect a 1/2 inch (1.27 cm) I.D. Apply an approved thread sealer that allows ease of the dryer. WARNING EXPLOSION HAZARD NEVER test for gas system leaks with an open flame. Manual Shutoff Flare Valve Union GAS FLOW Flare Union Closed Nipple Open Flexible... for the connection. Use a 1/2 inch to 3/8 inch (1.27 cm to 0.96 cm) reducer for gas to the 3/8 inch (0.96 cm) pipe located on Back of the dryer. semi-rigid or approved pipe from gas supply line to move through the pipe. 14 Installation Instructions Gas connection 1.


