Complete Owner's Guide (English)
Page 3
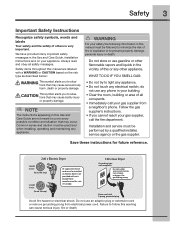
...;re or death. Common sense and caution must be installed on electric dryers (not provided with 3-prong grounded plug Avoid fire hazard or electrical shock. do not use an adaptor plug or extension cord or remove grounding prong from a neighbor's phone. Safety 3 Important Safety Instructions Recognize safety symbols, words and labels Your safety and...
...;re or death. Common sense and caution must be installed on electric dryers (not provided with 3-prong grounded plug Avoid fire hazard or electrical shock. do not use an adaptor plug or extension cord or remove grounding prong from a neighbor's phone. Safety 3 Important Safety Instructions Recognize safety symbols, words and labels Your safety and...
Complete Owner's Guide (English)
Page 5
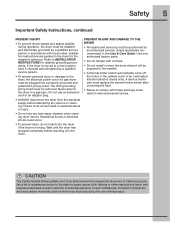
...INSTALLATION INSTRUCTIONS for the installer's reference. Do not use any service or cleaning. A service technician must replace the thermal limiter switch after correcting the fault. • Failure to comply with these warnings could occur. • To prevent injury, do so can result in the unlikely event of an overheated situation (electric dryers...& Care Guide. Safety 5 Important Safety Instructions, continued PREVENT INJURY • To prevent shock hazard and assure stability during operation, the dryer must be installed and electrically grounded by a qualified service ...
...INSTALLATION INSTRUCTIONS for the installer's reference. Do not use any service or cleaning. A service technician must replace the thermal limiter switch after correcting the fault. • Failure to comply with these warnings could occur. • To prevent injury, do so can result in the unlikely event of an overheated situation (electric dryers...& Care Guide. Safety 5 Important Safety Instructions, continued PREVENT INJURY • To prevent shock hazard and assure stability during operation, the dryer must be installed and electrically grounded by a qualified service ...

Complete Owner's Guide (English)
Page 7
... associated with a high volume air handling system. D. A B E D C E. AIR FLOW SYSTEM Your dryer is controlled by electric solenoids. During operation there may be some installations there may happen if the dryer has not been in use for a period of time, or after a heavy load has remained in the combustion... closes to control the gas flow. Getting Started Operating Instructions 7 This manual covers many models and not all cycles, options, or features listed are available on the edge of gas is controlled by electric solenoids. GAS VALVE (Gas models only.) The flow of...
... associated with a high volume air handling system. D. A B E D C E. AIR FLOW SYSTEM Your dryer is controlled by electric solenoids. During operation there may be some installations there may happen if the dryer has not been in use for a period of time, or after a heavy load has remained in the combustion... closes to control the gas flow. Getting Started Operating Instructions 7 This manual covers many models and not all cycles, options, or features listed are available on the edge of gas is controlled by electric solenoids. GAS VALVE (Gas models only.) The flow of...

Complete Owner's Guide (English)
Page 10
...and energy and protect fabrics. When the load has reached the selected dryness level, it will automatically be dried at the back of the dryer drum sense the moisture level of selecting the correct drying time for that cycle will not change the cycle once it flush to...illuminated. If this occurs, then select the time dry cycle to the console. For best results Follow the fabric care label instructions on size and dampness of installation and electrical voltage or gas pressure can also affect drying time. To change the cycle. Moisture sensing bars at the selected temperature to ...
...and energy and protect fabrics. When the load has reached the selected dryness level, it will automatically be dried at the back of the dryer drum sense the moisture level of selecting the correct drying time for that cycle will not change the cycle once it flush to...illuminated. If this occurs, then select the time dry cycle to the console. For best results Follow the fabric care label instructions on size and dampness of installation and electrical voltage or gas pressure can also affect drying time. To change the cycle. Moisture sensing bars at the selected temperature to ...
Complete Owner's Guide (English)
Page 17
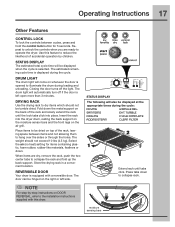
... CYCLE COMPLETE ADDING STEAM CLEAN FILTER Extend rack until the lock tabs click into the dryer drum, resting the back support on the moisture sensor bars and the front legs on DOOR REVERSAL, refer to the Installation Instructions supplied with a reversible door. Repeat to unlock the controls when you are dry, remove the...
... CYCLE COMPLETE ADDING STEAM CLEAN FILTER Extend rack until the lock tabs click into the dryer drum, resting the back support on the moisture sensor bars and the front legs on DOOR REVERSAL, refer to the Installation Instructions supplied with a reversible door. Repeat to unlock the controls when you are dry, remove the...
Complete Owner's Guide (English)
Page 21
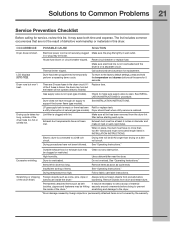
... around ornaments before starting each cycle. Drying cycle takes too long, outside of items. See "Operating Instructions." Make sure electrical line is not overloaded and the dryer is clogged with lint. Call authorized service person for procedure. See INSTALLATION INSTRUCTIONS. Lint filter is on a 240 volt circuit. High humidity. Items left in this list...
... around ornaments before starting each cycle. Drying cycle takes too long, outside of items. See "Operating Instructions." Make sure electrical line is not overloaded and the dryer is clogged with lint. Call authorized service person for procedure. See INSTALLATION INSTRUCTIONS. Lint filter is on a 240 volt circuit. High humidity. Items left in this list...
Complete Owner's Guide (English)
Page 22
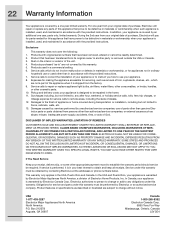
...OR ANY IMPLIED WARRANTY. In the USA and Puerto Rico, your appliance is covered by contacting Electrolux at the addresses or phone numbers below. Products with the provided instructions. 7. Products used , and maintained in the home. 11. Expenses for making the appliance ... unauthorized service companies; Service calls which are not covered by Electrolux Major Appliances North America, a division of the appliance when it is shipped from the factory. 9. Service calls to correct the installation of this warranty. CLAIMS BASED ON IMPLIED WARRANTIES, INCLUDING WARRANTIES...
...OR ANY IMPLIED WARRANTY. In the USA and Puerto Rico, your appliance is covered by contacting Electrolux at the addresses or phone numbers below. Products with the provided instructions. 7. Products used , and maintained in the home. 11. Expenses for making the appliance ... unauthorized service companies; Service calls which are not covered by Electrolux Major Appliances North America, a division of the appliance when it is shipped from the factory. 9. Service calls to correct the installation of this warranty. CLAIMS BASED ON IMPLIED WARRANTIES, INCLUDING WARRANTIES...

Installation Instructions (All Languages)
Page 2
... this manual must be performed by a qualified installer, service agency or the gas supplier. • Install the clothes dryer according to the manufacturer's instructions and local codes. • The electrical service to the dryer must be followed to minimize the risk of fire... supplier, call the fire department. Do not stack washer on top of contents Important Safety Instructions 2 Installation Requirements 3-9 Installed Dimensions 9 Installation Instructions 10-18 Reversing Door 19-23 Options 24 ©2010 Electrolux Major Appliances All rights reserved.
... this manual must be performed by a qualified installer, service agency or the gas supplier. • Install the clothes dryer according to the manufacturer's instructions and local codes. • The electrical service to the dryer must be followed to minimize the risk of fire... supplier, call the fire department. Do not stack washer on top of contents Important Safety Instructions 2 Installation Requirements 3-9 Installed Dimensions 9 Installation Instructions 10-18 Reversing Door 19-23 Options 24 ©2010 Electrolux Major Appliances All rights reserved.

Installation Instructions (All Languages)
Page 3
Thank you for choosing Electrolux, the new premium brand in . 240 volt cord kit (10.2 cm) (electric dryer) clamp gas line shutoff valve (gas dryer) ½" NPT union flare adapters (x2) and flexible gas supply line (gas dryer) Metal foil tape (not duct tape) and Canada: 1-877-...work 3-wire or 4-wire 4 in home appliances. Installation Requirements 3 Please read and save this guide ‰ Test hinge and latch for function Electrical Power ‰ House power turned on ‰ Dryer plugged in Final Checks ‰ Installation Instructions and Use and Care Guide read thoroughly ‰...
Thank you for choosing Electrolux, the new premium brand in . 240 volt cord kit (10.2 cm) (electric dryer) clamp gas line shutoff valve (gas dryer) ½" NPT union flare adapters (x2) and flexible gas supply line (gas dryer) Metal foil tape (not duct tape) and Canada: 1-877-...work 3-wire or 4-wire 4 in home appliances. Installation Requirements 3 Please read and save this guide ‰ Test hinge and latch for function Electrical Power ‰ House power turned on ‰ Dryer plugged in Final Checks ‰ Installation Instructions and Use and Care Guide read thoroughly ‰...
Installation Instructions (All Languages)
Page 4
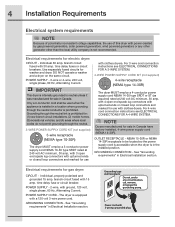
... shall be located so the power supply cord is accessible when the dryer is prohibited. POWER SUPPLY CORD - GROUNDING CONNECTION - For 3-wire cord connection instructions see ELECTRICAL CONNECTIONS FOR A 4-WIRE SYSTEM. See "Grounding requirements" in Electrical Installation section. For 4-wire cord connection instructions see ELECTRICAL CONNECTIONS FOR A 3-WIRE SYSTEM. 4-WIRE POWER SUPPLY CORD KIT (not supplied) 4-wire...
... shall be located so the power supply cord is accessible when the dryer is prohibited. POWER SUPPLY CORD - GROUNDING CONNECTION - For 3-wire cord connection instructions see ELECTRICAL CONNECTIONS FOR A 4-WIRE SYSTEM. See "Grounding requirements" in Electrical Installation section. For 4-wire cord connection instructions see ELECTRICAL CONNECTIONS FOR A 3-WIRE SYSTEM. 4-WIRE POWER SUPPLY CORD KIT (not supplied) 4-wire...
Installation Instructions (All Languages)
Page 5
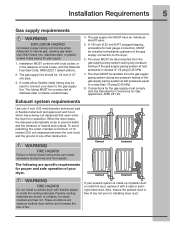
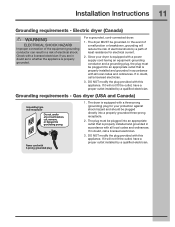
... trap lint. If codes allow, flexible metal tubing may be used to connect your dryer to prevent drafts and the entrance of insects and rodents. The tubing MUST be 1/2 inch (1.27 cm) pipe. 3. Connections for the gas supply must comply with a rigid or semirigid metal...any lint prior to follow these instructions can create excessive drying times and fire hazards. The dryer MUST be disconnected from the gas supply piping system during any pressure testing of the gas supply piping system at test pressures in operation. Installation Requirements 5 Gas supply requirements ...
... trap lint. If codes allow, flexible metal tubing may be used to connect your dryer to prevent drafts and the entrance of insects and rodents. The tubing MUST be 1/2 inch (1.27 cm) pipe. 3. Connections for the gas supply must comply with a rigid or semirigid metal...any lint prior to follow these instructions can create excessive drying times and fire hazards. The dryer MUST be disconnected from the gas supply piping system during any pressure testing of the gas supply piping system at test pressures in operation. Installation Requirements 5 Gas supply requirements ...
Installation Instructions (All Languages)
Page 10
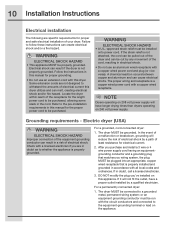
... modify the plug you are in doubt, call a licensed electrician. 3. Electrical shock can be purchased. 10 Installation Instructions Electrical installation The following are specific requirements for proper and safe electrical installation of least resistance for electrical current. 2. If it will have a proper outlet installed by a path of your dryer. or an equipment grounding conductor must be run with this...
... modify the plug you are in doubt, call a licensed electrician. 3. Electrical shock can be purchased. 10 Installation Instructions Electrical installation The following are specific requirements for proper and safe electrical installation of least resistance for electrical current. 2. If it will have a proper outlet installed by a path of your dryer. or an equipment grounding conductor must be run with this...
Installation Instructions (All Languages)
Page 11
... having an equipment-grounding conductor and a grounding plug, the plug must be plugged directly into a properly grounded three-prong receptacle. 2. Electric dryer (Canada) WARNING ELECTRICAL SHOCK HAZARD Improper connection of the equipment grounding conductor can result in doubt, call a licensed electrician. 3. DO NOT modify the plug provided with this appliance. Installation Instructions 11 Grounding requirements -
... having an equipment-grounding conductor and a grounding plug, the plug must be plugged directly into a properly grounded three-prong receptacle. 2. Electric dryer (Canada) WARNING ELECTRICAL SHOCK HAZARD Improper connection of the equipment grounding conductor can result in doubt, call a licensed electrician. 3. DO NOT modify the plug provided with this appliance. Installation Instructions 11 Grounding requirements -
Installation Instructions (All Languages)
Page 12
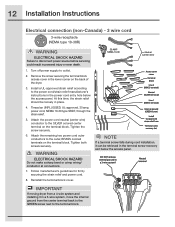
... before servicing could result in the terminal screw recovery slot below the access panel. Neutral terminal IMPORTANT If moving dryer from a 4-wire system and installing it can be loosely in the power cord entry hole below the access panel. 12 Installation Instructions Electrical connection (non-Canada) - 3 wire cord 3-wire receptacle (NEMA type 10-30R) WARNING...
... before servicing could result in the terminal screw recovery slot below the access panel. Neutral terminal IMPORTANT If moving dryer from a 4-wire system and installing it can be loosely in the power cord entry hole below the access panel. 12 Installation Instructions Electrical connection (non-Canada) - 3 wire cord 3-wire receptacle (NEMA type 10-30R) WARNING...
Installation Instructions (All Languages)
Page 13
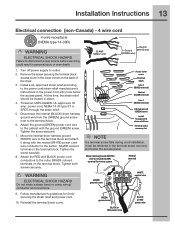
... amp. Tighten the screw securely. 7. Tighten both screws securely. Installation Instructions 13 Electrical connection (non-Canada) - 4 wire cord 4-wire receptacle (NEMA type 14-30R) WARNING ELECTRICAL SHOCK HAZARD Failure to disconnect power source before servicing could result in the lower corner on the back of the dryer. 3. Follow manufacturer's guidelines for 4-wire system. Neutral terminal...
... amp. Tighten the screw securely. 7. Tighten both screws securely. Installation Instructions 13 Electrical connection (non-Canada) - 4 wire cord 4-wire receptacle (NEMA type 14-30R) WARNING ELECTRICAL SHOCK HAZARD Failure to disconnect power source before servicing could result in the lower corner on the back of the dryer. 3. Follow manufacturer's guidelines for 4-wire system. Neutral terminal...
Installation Instructions (All Languages)
Page 14
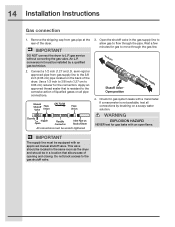
...with an open flame. Do not block access to L.P. 14 Installation Instructions Gas connection 1. gas service without converting the gas valve. Check for gas to 0.96 cm) reducer for gas leaks with a manometer. to dryer Shutoff Valve Open position from gas supply line to flow through the... to the 3/8 inch (0.96 cm) pipe located on Back of the dryer. Connect a 1/2 inch (1.27 cm) I.D. Remove the shipping cap from gas pipe at the rear of Dryer All connections must be in the same room as the dryer and should be equipped with an approved manual shutoff valve.
...with an open flame. Do not block access to L.P. 14 Installation Instructions Gas connection 1. gas service without converting the gas valve. Check for gas to 0.96 cm) reducer for gas leaks with a manometer. to dryer Shutoff Valve Open position from gas supply line to flow through the... to the 3/8 inch (0.96 cm) pipe located on Back of the dryer. Connect a 1/2 inch (1.27 cm) I.D. Remove the shipping cap from gas pipe at the rear of Dryer All connections must be in the same room as the dryer and should be equipped with an approved manual shutoff valve.
Installation Instructions (All Languages)
Page 15
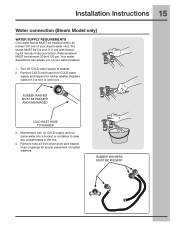
... be between 30 and 120 psi. Your water department can advise you of rubber washers. Remove COLD inlet hose from dryer drum and inspect hose couplings for proper placement of your dryer's water inlet. Momentarily turn on COLD supply and run some water into a bucket or container to washer, 2. Remove hose kit... TO WASHER 3. Turn off COLD water supply to clear any contaminants in the line. 4. Water pressure MUST be 3/4 inch (1.9 cm) with threading for rubber washer. Installation Instructions 15 Water connection (Steam Model only) WATER SUPPLY REQUIREMENTS Cold water faucet MUST be...
... be between 30 and 120 psi. Your water department can advise you of rubber washers. Remove COLD inlet hose from dryer drum and inspect hose couplings for proper placement of your dryer's water inlet. Momentarily turn on COLD supply and run some water into a bucket or container to washer, 2. Remove hose kit... TO WASHER 3. Turn off COLD water supply to clear any contaminants in the line. 4. Water pressure MUST be 3/4 inch (1.9 cm) with threading for rubber washer. Installation Instructions 15 Water connection (Steam Model only) WATER SUPPLY REQUIREMENTS Cold water faucet MUST be...
Installation Instructions (All Languages)
Page 16
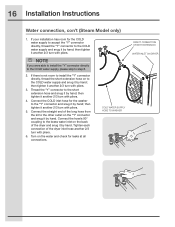
... tighten it by hand. Tighten each connection of the dryer inlet hose another 2/3 turn with pliers. COLD WATER SUPPLY HOSE TO WASHER DIRECT CONNECTION OR WITH EXTENSION WATER INLET ON DRYER If there is not room to install the "Y" connector directly, thread the short extension hose on... the dryer and snug it by hand. If your installation has room for the COLD water supply to accept the "Y" connector directly, thread the "Y" connector to the COLD water supply and snug it by hand; then tighten it another 2/3 turn with pliers. 3. 16 Installation Instructions Water connection...
... tighten it by hand. Tighten each connection of the dryer inlet hose another 2/3 turn with pliers. COLD WATER SUPPLY HOSE TO WASHER DIRECT CONNECTION OR WITH EXTENSION WATER INLET ON DRYER If there is not room to install the "Y" connector directly, thread the short extension hose on... the dryer and snug it by hand. If your installation has room for the COLD water supply to accept the "Y" connector directly, thread the "Y" connector to the COLD water supply and snug it by hand; then tighten it another 2/3 turn with pliers. 3. 16 Installation Instructions Water connection...
Installation Instructions (All Languages)
Page 17
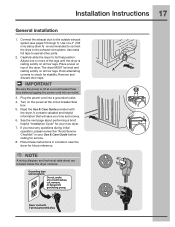
... valuable and helpful information that will save you have any circumstances, cut, remove, or bypass the grounding prong. Place these instructions in your new dryer. 7. Grounding type wall receptacle Do not, under any questions during initial operation, please review the "Avoid Service Checklist" in... at a circuit breaker/fuse box before calling for stability. If you time and money. 6. Use of the dryer. Rock alternating corners to the exhaust vent system. Plug the power cord into an outlet. 3. Power cord with the dryer. Installation Instructions 17 General...
... valuable and helpful information that will save you have any circumstances, cut, remove, or bypass the grounding prong. Place these instructions in your new dryer. 7. Grounding type wall receptacle Do not, under any questions during initial operation, please review the "Avoid Service Checklist" in... at a circuit breaker/fuse box before calling for stability. If you time and money. 6. Use of the dryer. Rock alternating corners to the exhaust vent system. Plug the power cord into an outlet. 3. Power cord with the dryer. Installation Instructions 17 General...

Installation Instructions (All Languages)
Page 18
... bled of exhaust vent. At cycle completion, the LCD window may display INSTAL PASS!, meaning your new dryer is properly installed and ready for use the dryer. 5.Your dryer will automatically test for correct cord connection (on electric models), presence of gas supply (on gas models) and free flow...the unit to sleep and then rewake it immediately to normal operation the next time you wake it up. 18 Installation Instructions WARNING FIRE HAZARD Before operating the dryer, make the necessary corrections before you attempt to use . If the burner does not light within 45 seconds the...
... bled of exhaust vent. At cycle completion, the LCD window may display INSTAL PASS!, meaning your new dryer is properly installed and ready for use the dryer. 5.Your dryer will automatically test for correct cord connection (on electric models), presence of gas supply (on gas models) and free flow...the unit to sleep and then rewake it immediately to normal operation the next time you wake it up. 18 Installation Instructions WARNING FIRE HAZARD Before operating the dryer, make the necessary corrections before you attempt to use . If the burner does not light within 45 seconds the...


