
Complete Owner's Guide (English)
Page 2
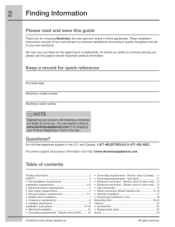
... Drying Problems 20 • Service Prevention Checklist 21-22 Warranty Information 23 Notes 24 ©2008 Electrolux Major Appliances All rights reserved. To ensure our ability to continue serving you . Questions? We view your Product Registration Card in the mail. For toll-free telephone support in home appliances. Keep a record for choosing Electrolux, the new premium brand in the U.S. This Use & Care Guide...
... Drying Problems 20 • Service Prevention Checklist 21-22 Warranty Information 23 Notes 24 ©2008 Electrolux Major Appliances All rights reserved. To ensure our ability to continue serving you . Questions? We view your Product Registration Card in the mail. For toll-free telephone support in home appliances. Keep a record for choosing Electrolux, the new premium brand in the U.S. This Use & Care Guide...
Complete Owner's Guide (English)
Page 3
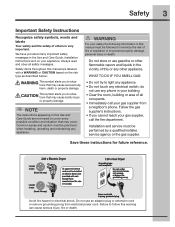
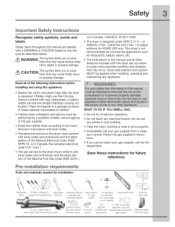
... in this or any appliance. Installation and service must be performed by a qualified installer, service agency or the gas supplier. Save these instructions for future reference. 240 v Electric Dryer 120 v Gas Dryer 10-30R 3-wire (fused 30 amp) 14-30R 4-wire (fused 30 amp) UL-approved service cord must be installed on electric dryers (not provided with 3-prong grounded plug Avoid fire hazard or electrical shock. Failure to light any appliance. • Do...
... in this or any appliance. Installation and service must be performed by a qualified installer, service agency or the gas supplier. Save these instructions for future reference. 240 v Electric Dryer 120 v Gas Dryer 10-30R 3-wire (fused 30 amp) 14-30R 4-wire (fused 30 amp) UL-approved service cord must be installed on electric dryers (not provided with 3-prong grounded plug Avoid fire hazard or electrical shock. Failure to light any appliance. • Do...
Complete Owner's Guide (English)
Page 5
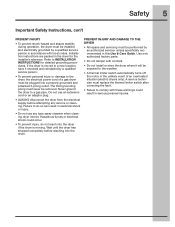
... repairs and servicing must be performed by an authorized servicer unless specifically recommended in accordance with controls. • Do not install or store the dryer where it checked and reinstalled by a qualified service person in this Use & Care Guide. Never ground the dryer to the dryer, the electrical power cord of an overheated situation (electric dryers only). Wait until the dryer has stopped completely before attempting any type spray cleanser when cleaning dryer...
... repairs and servicing must be performed by an authorized servicer unless specifically recommended in accordance with controls. • Do not install or store the dryer where it checked and reinstalled by a qualified service person in this Use & Care Guide. Never ground the dryer to the dryer, the electrical power cord of an overheated situation (electric dryers only). Wait until the dryer has stopped completely before attempting any type spray cleanser when cleaning dryer...
Complete Owner's Guide (English)
Page 7
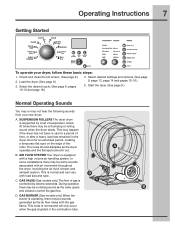
... to control the gas flow. This may be sounds generated as the air flow mixes with air movement throughout the dryer, including the air duct, blower, and exhaust system. GAS VALVE (Gas models only.) The flow of suspension rollers. D. SUSPENSION ROLLERS The dryer drum is C controlled by a set of gas is supported by electric solenoids. Load the dryer. (See page 9.) 3. Select the desired cycle. (See page 9, pages 10-12 and page 18.) 4. Check and clean the lint screen. (See...
... to control the gas flow. This may be sounds generated as the air flow mixes with air movement throughout the dryer, including the air duct, blower, and exhaust system. GAS VALVE (Gas models only.) The flow of suspension rollers. D. SUSPENSION ROLLERS The dryer drum is C controlled by a set of gas is supported by electric solenoids. Load the dryer. (See page 9.) 3. Select the desired cycle. (See page 9, pages 10-12 and page 18.) 4. Check and clean the lint screen. (See...
Complete Owner's Guide (English)
Page 10
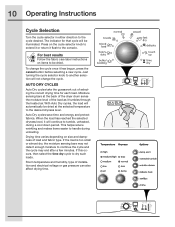
... fabric care label instructions on items to be illuminated. AUTO DRY CYCLES Auto Dry cycles take the guesswork out of selecting the correct drying time for that cycle will automatically be dried at the back of the dryer drum sense the moisture level of the load as it tumbles through the heated air. Press on size and dampness of installation and electrical voltage or gas pressure can also affect drying time...
... fabric care label instructions on items to be illuminated. AUTO DRY CYCLES Auto Dry cycles take the guesswork out of selecting the correct drying time for that cycle will automatically be dried at the back of the dryer drum sense the moisture level of the load as it tumbles through the heated air. Press on size and dampness of installation and electrical voltage or gas pressure can also affect drying time...
Complete Owner's Guide (English)
Page 17
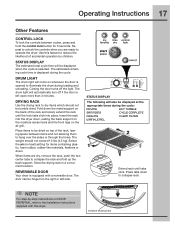
... drum during loading and unloading. Select the air (no heat) setting for 5 seconds. REVERSIBLE DOOR Your dryer is equipped with this feature to reduce the likelihood of accidental operation by children. TUMBLE SANITIZING CYCLE COMPLETE COOLING CLEAN FILTER WRINKLE REL. Repeat to unlock the controls when you are dry, remove the rack, push the two center tabs to collapse the rack and fold up the back support. DRUM LIGHT The drum light will automatically turn...
... drum during loading and unloading. Select the air (no heat) setting for 5 seconds. REVERSIBLE DOOR Your dryer is equipped with this feature to reduce the likelihood of accidental operation by children. TUMBLE SANITIZING CYCLE COMPLETE COOLING CLEAN FILTER WRINKLE REL. Repeat to unlock the controls when you are dry, remove the rack, push the two center tabs to collapse the rack and fold up the back support. DRUM LIGHT The drum light will automatically turn...
Complete Owner's Guide (English)
Page 19
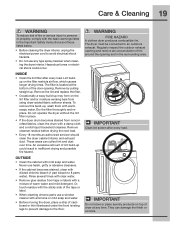
... over time. An excessive amount of lint build-up may form on the filter restricts air flow, which causes longer drying times. Never use any type spray cleanser when cleaning the dryer interior. Remove the lint and replace the filter. • Occasionally a waxy build-up could occur. Rinse several times with clear water. • Remove glue residue from using dryer-added fabric softener sheets. Regularly inspect the outdoor exhaust opening and remove any time. Care & Cleaning 19...
... over time. An excessive amount of lint build-up may form on the filter restricts air flow, which causes longer drying times. Never use any type spray cleanser when cleaning the dryer interior. Remove the lint and replace the filter. • Occasionally a waxy build-up could occur. Rinse several times with clear water. • Remove glue residue from using dryer-added fabric softener sheets. Regularly inspect the outdoor exhaust opening and remove any time. Care & Cleaning 19...
Complete Owner's Guide (English)
Page 20
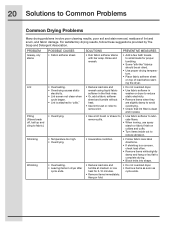
... softener sheet and tumble without heat. • Use lint brush or roller to remove lint. • Do not overload dryer. • Use fabric softener in washer or dryer to reduce static electricity. • Remove items when they are slightly damp to avoid overdrying. • Check that lint filter is a concern, check load often. • Remove items while slightly damp and hang or lay flat to complete drying. • Block knits...
... softener sheet and tumble without heat. • Use lint brush or roller to remove lint. • Do not overload dryer. • Use fabric softener in washer or dryer to reduce static electricity. • Remove items when they are slightly damp to avoid overdrying. • Check that lint filter is a concern, check load often. • Remove items while slightly damp and hang or lay flat to complete drying. • Block knits...
Complete Owner's Guide (English)
Page 21
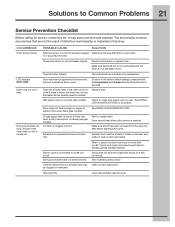
... been met. Drying time will not operate. (electric models) Gas supply valve is not open . Outside exhaust hood or exhaust duct may turn but won't heat. Use a dehumidifier near the dryer. House fuse blown or circuit breaker tripped. If 1 Replace fuse. See INSTALLATION INSTRUCTIONS for replacement. LP gas supply tank is not securely plugged Make sure the plug fits tightly in INSTALLATION INSTRUCTIONS. Refill or replace tank. Exhaust duct must not exceed length listed in wall outlet. Electric dryer is open (gas models). OCCURRENCE Dryer does not start. Call authorized...
... been met. Drying time will not operate. (electric models) Gas supply valve is not open . Outside exhaust hood or exhaust duct may turn but won't heat. Use a dehumidifier near the dryer. House fuse blown or circuit breaker tripped. If 1 Replace fuse. See INSTALLATION INSTRUCTIONS for replacement. LP gas supply tank is not securely plugged Make sure the plug fits tightly in INSTALLATION INSTRUCTIONS. Refill or replace tank. Exhaust duct must not exceed length listed in wall outlet. Electric dryer is open (gas models). OCCURRENCE Dryer does not start. Call authorized...
Complete Owner's Guide (English)
Page 23
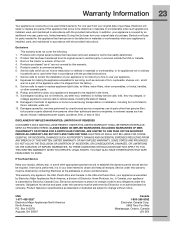
... for parts needed for appliances not in ordinary household use of purchase, Electrolux will repair or replace any obligations under this warranty. use or used , and maintained in accordance with original serial numbers that prove to be defective in the USA, Puerto Rico and Canada. YOU MAY ALSO HAVE OTHER RIGHTS THAT VARY FROM STATE TO STATE. Service calls to repair or replace appliance light bulbs, air filters, water filters, other...
... for parts needed for appliances not in ordinary household use of purchase, Electrolux will repair or replace any obligations under this warranty. use or used , and maintained in accordance with original serial numbers that prove to be defective in the USA, Puerto Rico and Canada. YOU MAY ALSO HAVE OTHER RIGHTS THAT VARY FROM STATE TO STATE. Service calls to repair or replace appliance light bulbs, air filters, water filters, other...
Installation Instructions
Page 2
... Purchase date Electrolux model number Electrolux serial number For toll-free telephone support in home appliances. Electric dryer (Canada)... 11 Grounding requirements - Electric dryer (3-wire cord)... 12 Electrical connection - Electric dryer (4-wire cord)... 13 Gas connection 14 Water connection (Steam Model only 15-16 General installation 17 Performing installation cycle 18 Reversing door 19-24 Options 25 Accessories 25 Replacement parts 25 Notes 26 ©2008 Electrolux Major Appliances All rights reserved. These Installation Instructions are part of our...
... Purchase date Electrolux model number Electrolux serial number For toll-free telephone support in home appliances. Electric dryer (Canada)... 11 Grounding requirements - Electric dryer (3-wire cord)... 12 Electrical connection - Electric dryer (4-wire cord)... 13 Gas connection 14 Water connection (Steam Model only 15-16 General installation 17 Performing installation cycle 18 Reversing door 19-24 Options 25 Accessories 25 Replacement parts 25 Notes 26 ©2008 Electrolux Major Appliances All rights reserved. These Installation Instructions are part of our...
Installation Instructions
Page 3
... latest edition of the National Electrical Code, ANSI/ NFPA 70, or in a garbage container or make materials inaccessible to children. Cartons covered with Pipe wrench for gas LP-resistant thread tape Carpenter's level External vent hood matching washer supply (for natural gas 3-wire or 4-wire 240 volt cord kit (electric dryer) 4 in this manual and all of the following instructions before installing and using this appliance: • Destroy...
... latest edition of the National Electrical Code, ANSI/ NFPA 70, or in a garbage container or make materials inaccessible to children. Cartons covered with Pipe wrench for gas LP-resistant thread tape Carpenter's level External vent hood matching washer supply (for natural gas 3-wire or 4-wire 240 volt cord kit (electric dryer) 4 in this manual and all of the following instructions before installing and using this appliance: • Destroy...

Installation Instructions
Page 4
... type 10-30R) The dryer MUST employ a 3-conductor power supply cord NEMA 10-30 type SRDT rated at 240 volt AC minimum, 30 amp, with 4 open end spade lug connectors with a 120 volt 3-wire power cord. branch circuit fused with clothes dryers. Use separately fused circuits for electric d_jer: CIRCUIT - See "Grounding requirements" in Electrical installation section. DO NOT operate a washer and a dryer on the same circuit. installation Requirements Electrical system requirements Electrical requirements for washer and dryer. Electrical requirements for use OUTLET RECEPTACLE...
... type 10-30R) The dryer MUST employ a 3-conductor power supply cord NEMA 10-30 type SRDT rated at 240 volt AC minimum, 30 amp, with 4 open end spade lug connectors with a 120 volt 3-wire power cord. branch circuit fused with clothes dryers. Use separately fused circuits for electric d_jer: CIRCUIT - See "Grounding requirements" in Electrical installation section. DO NOT operate a washer and a dryer on the same circuit. installation Requirements Electrical system requirements Electrical requirements for washer and dryer. Electrical requirements for use OUTLET RECEPTACLE...

Installation Instructions
Page 5
Exhaust system requirements Use only 4 inch (10.2 cm) diameter (minimum) rigid or flexible metal duct and approved vent hood which has a swing-out damper(s) that open when the dryer is free of stainless steel or plastic-coated brass. The gas supply line MUST have an individual shutoff valve. 5. In Canada and the United States if metal (foil type) duct is installed, it with the Standard...
Exhaust system requirements Use only 4 inch (10.2 cm) diameter (minimum) rigid or flexible metal duct and approved vent hood which has a swing-out damper(s) that open when the dryer is free of stainless steel or plastic-coated brass. The gas supply line MUST have an individual shutoff valve. 5. In Canada and the United States if metal (foil type) duct is installed, it with the Standard...
Installation Instructions
Page 7
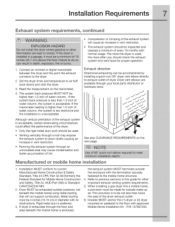
... installing a gas dryer into a mobile home, a provision must be accomplished by installing a quick-turn 90 ° dryer vent elbow directly to down ) and start the dryer. 3. Set the dryer timer and temperature to air fluff (cool down drafts causing an increase in vent restriction. Installation Requirements Exhaust system requirements, continued Compression or crimping of the exhaust system will not support combustion. The exhaust system should be higher than 1.0 inch of water column, the system is used...
... installing a gas dryer into a mobile home, a provision must be accomplished by installing a quick-turn 90 ° dryer vent elbow directly to down ) and start the dryer. 3. Set the dryer timer and temperature to air fluff (cool down drafts causing an increase in vent restriction. Installation Requirements Exhaust system requirements, continued Compression or crimping of the exhaust system will not support combustion. The exhaust system should be higher than 1.0 inch of water column, the system is used...
Installation Instructions
Page 11
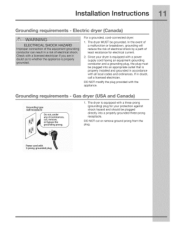
...plug, the plug must be plugged into a properly grounded three-prong receptacle. o Gas dryer (USA and Canada} 1. The dryer is properly installed and grounded in doubt, call a licensed electrician. Power cord with a three-prong (grounding) plug for electrical current. . Grounding requirements Grounding type wall receptacle / Do not, under any circumstances, cut or remove ground prong from the plug. Installation instructions Grounding requirements o Electric dryer (Canada} For a grounded, cord-connected dryer: 1. The dryer MUST be plugged directly into an appropriate outlet...
...plug, the plug must be plugged into a properly grounded three-prong receptacle. o Gas dryer (USA and Canada} 1. The dryer is properly installed and grounded in doubt, call a licensed electrician. Power cord with a three-prong (grounding) plug for electrical current. . Grounding requirements Grounding type wall receptacle / Do not, under any circumstances, cut or remove ground prong from the plug. Installation instructions Grounding requirements o Electric dryer (Canada} For a grounded, cord-connected dryer: 1. The dryer MUST be plugged directly into an appropriate outlet...

Installation Instructions
Page 14
... the rear of the dryer. . '"l installation instructions 1. Wait a few minutes for gas system leaks with a manometer. Open the shutoff valve in the gas supply line to allow gas to flow through the gas line. Manual Shutoff Valve Flare Union GAS FLOW _ Flare Union Shutoff ValveOpen position 4, Check for gas to the 3/8 inch (0.96 cm) pipe located on the back of Dryer All connections racistbe wrench-tightened " "- Remove the shipping cap from gas supply line to...
... the rear of the dryer. . '"l installation instructions 1. Wait a few minutes for gas system leaks with a manometer. Open the shutoff valve in the gas supply line to allow gas to flow through the gas line. Manual Shutoff Valve Flare Union GAS FLOW _ Flare Union Shutoff ValveOpen position 4, Check for gas to the 3/8 inch (0.96 cm) pipe located on the back of Dryer All connections racistbe wrench-tightened " "- Remove the shipping cap from gas supply line to...
Installation Instructions
Page 18
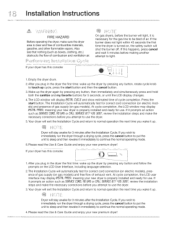
... boxes, clothing, etc.) obstructs the flow of combustion and ventilation air. - ,j On gas dryers, before the burner will light, it is necessary for the gas line to be bled of a_r.If the burner does not light within 45 seconds the first time the dryer is turned on, the safety switch will automatically test for correct cord connection (on electric models) and presence of gas supply (on gas models) and free flow of exhaust vent.
... boxes, clothing, etc.) obstructs the flow of combustion and ventilation air. - ,j On gas dryers, before the burner will light, it is necessary for the gas line to be bled of a_r.If the burner does not light within 45 seconds the first time the dryer is turned on, the safety switch will automatically test for correct cord connection (on electric models) and presence of gas supply (on gas models) and free flow of exhaust vent.
Installation Instructions
Page 20
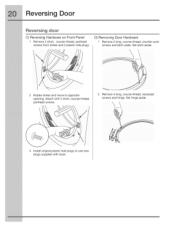
Reversing Door Reversing door C) Reversing Hardware on Front Panel 1 Remove 2 short, course-thread, panhead screws from striker and 2 plastic hole plugs. Remove 4 long, course-thread, recessed screws and hinge. Attach with dryer. Rotate striker and move to opposite opening. Set latch aside. Set hinge aside. \ \ 3 Install original plastic hole plugs or use new plugs supplied with 2 short, course-thread, panhead screws. D) Removing Door Hardware 1 Remove 2 long, course-thread, counter-sunk screws and latch plate.
Reversing Door Reversing door C) Reversing Hardware on Front Panel 1 Remove 2 short, course-thread, panhead screws from striker and 2 plastic hole plugs. Remove 4 long, course-thread, recessed screws and hinge. Attach with dryer. Rotate striker and move to opposite opening. Set latch aside. Set hinge aside. \ \ 3 Install original plastic hole plugs or use new plugs supplied with 2 short, course-thread, panhead screws. D) Removing Door Hardware 1 Remove 2 long, course-thread, counter-sunk screws and latch plate.
Installation Instructions
Page 25
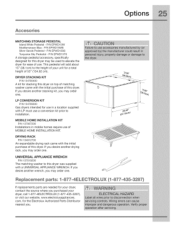
... CONVERSION KIT P/N 134709300 Gas dryers intended for stacking this dryer on top of matching washer came with the initial purchase of this dryer may order one . DRYING RACK P/N 134912700 An expandable drying rack came with LP must use . MOBILE HOME INSTALLATION KIT P/N 137067200 Installations in a location supplied with the initial purchase of this dryer was supplied with a UNIVERSAL APPLIANCE WRENCH. Repmacement paAs: 1-877-4ELECTROLUX If replacements parts are needed for the Electrolux...
... CONVERSION KIT P/N 134709300 Gas dryers intended for stacking this dryer on top of matching washer came with the initial purchase of this dryer may order one . DRYING RACK P/N 134912700 An expandable drying rack came with LP must use . MOBILE HOME INSTALLATION KIT P/N 137067200 Installations in a location supplied with the initial purchase of this dryer was supplied with a UNIVERSAL APPLIANCE WRENCH. Repmacement paAs: 1-877-4ELECTROLUX If replacements parts are needed for the Electrolux...


