
Complete Owner's Guide (English)
Page 5
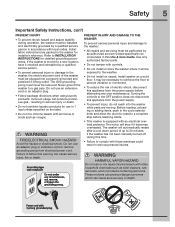
...will stop before attempting any circumstances, cut, remove, or bypass the grounding prong. WARNING HARMFUL VAPOR HAZARD Do not use in 1 load unless specified on the label. • Do not mix chlorine bleach with ammonia or acids such as toilet cleaners, rust removers,... usage can cause serious injury or death. WARNING FIRE/ELECTRICAL SHOCK HAZARD Avoid fire hazard or electrical shock. Installation instructions are moving. If the washer is equipped with other household chemicals such as vinegar. Refer to a gas pipe. Safety 5 Important Safety Instructions, con't PREVENT...
...will stop before attempting any circumstances, cut, remove, or bypass the grounding prong. WARNING HARMFUL VAPOR HAZARD Do not use in 1 load unless specified on the label. • Do not mix chlorine bleach with ammonia or acids such as toilet cleaners, rust removers,... usage can cause serious injury or death. WARNING FIRE/ELECTRICAL SHOCK HAZARD Avoid fire hazard or electrical shock. Installation instructions are moving. If the washer is equipped with other household chemicals such as vinegar. Refer to a gas pipe. Safety 5 Important Safety Instructions, con't PREVENT...
Complete Owner's Guide (English)
Page 26
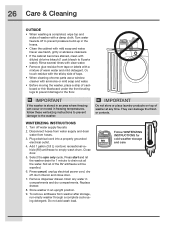
...water in the hoses. • Clean the cabinet with ammonia or mild soap and water. • Before moving the washer, place a strip of cardboard or thin fiberboard under the front leveling legs to prevent damage to the floor. Plug electrical cord into a properly grounded electrical outlet. 4. ... the finish or controls. Close door. 5. Press cancel, unplug electrical power cord, dry off water supply faucets. 2. Do not add wash load. Turn off drum interior and close door. 7. Turn water faucets off to empty wash drum. Never use a window cleaner with mild soap ...
...water in the hoses. • Clean the cabinet with ammonia or mild soap and water. • Before moving the washer, place a strip of cardboard or thin fiberboard under the front leveling legs to prevent damage to the floor. Plug electrical cord into a properly grounded electrical outlet. 4. ... the finish or controls. Close door. 5. Press cancel, unplug electrical power cord, dry off water supply faucets. 2. Do not add wash load. Turn off drum interior and close door. 7. Turn water faucets off to empty wash drum. Never use a window cleaner with mild soap ...
Complete Owner's Guide (English)
Page 29
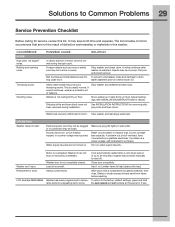
... inside out. Vibrating noise. Call your authorized servicer. Move washer so it becomes overheated. been removed during the spin cycle. Water supply faucets are hitting wash drum. Washer motor will automatically restart after washer is a circuit overload, have not See INSTALLATION INSTRUCTIONS for service, review this washer. Load is probably out of defective workmanship or materials...
... inside out. Vibrating noise. Call your authorized servicer. Move washer so it becomes overheated. been removed during the spin cycle. Water supply faucets are hitting wash drum. Washer motor will automatically restart after washer is a circuit overload, have not See INSTALLATION INSTRUCTIONS for service, review this washer. Load is probably out of defective workmanship or materials...
Installation Instructions (All Languages)
Page 2
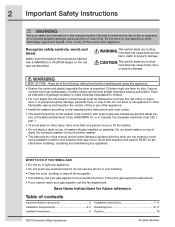
...top of contents Important Safety Instructions 2 Installation Requirements 3-5 Installed Dimensions 6 Installation Instructions 7-11 Reversing Door 12-17 Options 18 ©2010 Electrolux Major Appliances All rights reserved. This symbol alerts you to light any appliance. • Do not touch any other flammable vapors... and liquids in this or any other injury, have more than one person move or lift the washer. • Do not stack a dryer on pedestal. Place all other flammable vapors and liquids in this dryer are ...
...top of contents Important Safety Instructions 2 Installation Requirements 3-5 Installed Dimensions 6 Installation Instructions 7-11 Reversing Door 12-17 Options 18 ©2010 Electrolux Major Appliances All rights reserved. This symbol alerts you to light any appliance. • Do not touch any other flammable vapors... and liquids in this or any other injury, have more than one person move or lift the washer. • Do not stack a dryer on pedestal. Place all other flammable vapors and liquids in this dryer are ...
Installation Instructions (All Languages)
Page 7
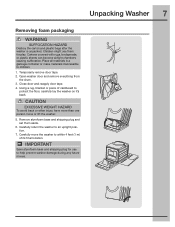
...back or other injury, have more than one person move the washer to protect the floor, carefully lay the washer on it's back. Children might use to children. 1. Close door and reapply door tape. 4. Carefully move or lift the washer. 5. Using a rug, blanket or piece of cardboard...and shipping plug for play. Place all materials in a garbage container or make materials inaccessible to help prevent washer damage during any future moves. Carefully return the washer to an upright position. 7. Temporarily remove door tape. 2. Remove styrofoam base and shipping plug and set...
...back or other injury, have more than one person move the washer to protect the floor, carefully lay the washer on it's back. Children might use to children. 1. Close door and reapply door tape. 4. Carefully move or lift the washer. 5. Using a rug, blanket or piece of cardboard...and shipping plug for play. Place all materials in a garbage container or make materials inaccessible to help prevent washer damage during any future moves. Carefully return the washer to an upright position. 7. Temporarily remove door tape. 2. Remove styrofoam base and shipping plug and set...

Installation Instructions (All Languages)
Page 14
...holes of hinge side. 6 Install 2 short, course-thread, panhead screws through the front panel first, and then pivot the lock until it in place. F) Reattaching Hinge to Front Panel 1 Rotate the hinge and move it to the opposite opening . 2 Connect the harness to the hinge retainer by ... secure. 3 Insert the harness connection through hinge plate. 14 Reversing Door Reversing door and hardware E) Reattaching Door Lock to Front Panel 1 Rotate the door lock and move it to the opposite opening . 2 Connect the harness to the door lock by inserting it in the retention terminal and ...
...holes of hinge side. 6 Install 2 short, course-thread, panhead screws through the front panel first, and then pivot the lock until it in place. F) Reattaching Hinge to Front Panel 1 Rotate the hinge and move it to the opposite opening . 2 Connect the harness to the hinge retainer by ... secure. 3 Insert the harness connection through hinge plate. 14 Reversing Door Reversing door and hardware E) Reattaching Door Lock to Front Panel 1 Rotate the door lock and move it to the opposite opening . 2 Connect the harness to the door lock by inserting it in the retention terminal and ...

Installation Instructions (All Languages)
Page 16
...until the tab snaps in place. 16 Reversing Door J) Reinserting Latch Indicator 1 Rotate the latch indicator and move it to the opposite hole in the door. 2 Firmly insert the two small tabs on either side ... place. insert tab L) Reinserting Hole Plug 1 Rotate the hole plug and move it to the opposite hole in the door. insert indicator through slot K) Reattaching Striker Plate 1 Rotate the ...striker plate and move it to the opposite side of door above the indicator. 2 Reattach with 2 long, course-...
...until the tab snaps in place. 16 Reversing Door J) Reinserting Latch Indicator 1 Rotate the latch indicator and move it to the opposite hole in the door. 2 Firmly insert the two small tabs on either side ... place. insert tab L) Reinserting Hole Plug 1 Rotate the hole plug and move it to the opposite hole in the door. insert indicator through slot K) Reattaching Striker Plate 1 Rotate the ...striker plate and move it to the opposite side of door above the indicator. 2 Reattach with 2 long, course-...
Installation Instructions (All Languages)
Page 17
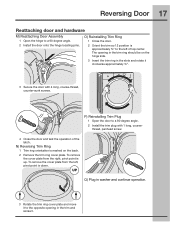
... the right, pivot point is approximately ¾" to a 90 degree angle. 2 Install the trim plug with 4 long, course-thread, counter-sunk screws. UP Q) Plug in washer and continue operation. 3 Rotate the trim ring cover plate and move it clockwise approximately ¾". 3 Secure the door with 1 long, course-
... the right, pivot point is approximately ¾" to a 90 degree angle. 2 Install the trim plug with 4 long, course-thread, counter-sunk screws. UP Q) Plug in washer and continue operation. 3 Rotate the trim ring cover plate and move it clockwise approximately ¾". 3 Secure the door with 1 long, course-

