
Complete Owner's Guide (English)
Page 2
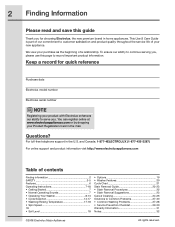
... 14-17 • Washing/Rinsing Temperature 17-18 • Spin Speed 18 • Soil Level 18 • Options 19 • Washer Features 20 Cycle Chart 21 Stain Removal Guide 22-23 • Stain Removal Procedures 22 • Stain Removal Suggestions 23 Care & Cleaning 24... of a relationship. For toll-free telephone support in the mail. This Use & Care Guide is part of your product with Electrolux enhances our ability to Common Problems 27-30 • Common Washing Problems 27-28 • Service Prevention Checklist 29-30 Warranty Information 31 Notes 32 ©2008...
... 14-17 • Washing/Rinsing Temperature 17-18 • Spin Speed 18 • Soil Level 18 • Options 19 • Washer Features 20 Cycle Chart 21 Stain Removal Guide 22-23 • Stain Removal Procedures 22 • Stain Removal Suggestions 23 Care & Cleaning 24... of a relationship. For toll-free telephone support in the mail. This Use & Care Guide is part of your product with Electrolux enhances our ability to Common Problems 27-30 • Common Washing Problems 27-28 • Service Prevention Checklist 29-30 Warranty Information 31 Notes 32 ©2008...
Complete Owner's Guide (English)
Page 4
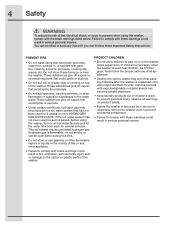
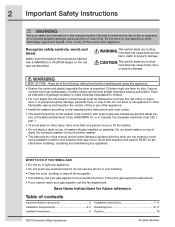
...using this or any accumulated hydrogen gas. PROTECT CHILDREN • Do not allow children to play . Close supervision of children is necessary when the washer is removed from each for 2 weeks or more. To prevent personal injury, observe all appliances. • Destroy the carton, plastic bag and other... this time. • Do not store or use of the washer. These substances give off vapors or chemical reactions that could result in fire, explosion, serious bodily injury and/ or damage to the rubber or plastic parts of all warnings on or near children. As children grow, teach...
...using this or any accumulated hydrogen gas. PROTECT CHILDREN • Do not allow children to play . Close supervision of children is necessary when the washer is removed from each for 2 weeks or more. To prevent personal injury, observe all appliances. • Destroy the carton, plastic bag and other... this time. • Do not store or use of the washer. These substances give off vapors or chemical reactions that could result in fire, explosion, serious bodily injury and/ or damage to the rubber or plastic parts of all warnings on or near children. As children grow, teach...
Complete Owner's Guide (English)
Page 5
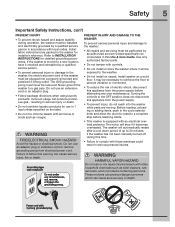
... to INSTALLATION INSTRUCTIONS for installer's reference. Use only authorized factory parts. • Do not tamper with controls. • Do not install or store the washer where it will be plugged into the washer while parts are packed in serious injury or death. • Do not... combine laundry products for use an adaptor plug or extension cord or remove grounding prong from the power supply before reaching inside. • This washer is moved to a new location, have it becomes overheated. Before loading...
... to INSTALLATION INSTRUCTIONS for installer's reference. Use only authorized factory parts. • Do not tamper with controls. • Do not install or store the washer where it will be plugged into the washer while parts are packed in serious injury or death. • Do not... combine laundry products for use an adaptor plug or extension cord or remove grounding prong from the power supply before reaching inside. • This washer is moved to a new location, have it becomes overheated. Before loading...
Complete Owner's Guide (English)
Page 7
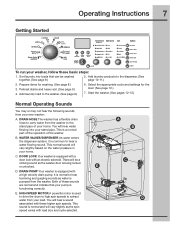
... (See page 9.) 4. This is equipped with a door lock with these higher spin speeds. DOOR LOCK Your washer is a normal part of the operation of your home. Getting Started Operating Instructions 7 To run your home. B. WATER VALVES/DISPENSER ...As water enters the dispenser system, it is functioning correctly. E D. Add laundry load to the dispenser. (See page 10-11.) 2. E. HIGH SPEED MOTOR A powerful motor is pumped from your new washer...
... (See page 9.) 4. This is equipped with a door lock with these higher spin speeds. DOOR LOCK Your washer is a normal part of the operation of your home. Getting Started Operating Instructions 7 To run your home. B. WATER VALVES/DISPENSER ...As water enters the dispenser system, it is functioning correctly. E D. Add laundry load to the dispenser. (See page 10-11.) 2. E. HIGH SPEED MOTOR A powerful motor is pumped from your new washer...
Complete Owner's Guide (English)
Page 10
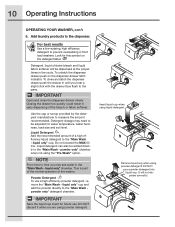
...To close the dispenser drawer slowly. Powder Detergent To use . 10 Operating Instructions OPERATING YOUR WASHER, con't 5. IMPORTANT Open and close and latch the dispenser drawer push the drawer in front load washers. IMPORTANT Save the liquid cup insert for future use a high efficiency powder detergent, remove... DO NOT pour powder detergent into liquid cup. Liquid Detergent Add the recommended amount of the washer. powder only" chamber when not using powder detergent. This is part of the normal operation of a high efficiency liquid detergent to the "Main Wash - Liquid ...
...To close the dispenser drawer slowly. Powder Detergent To use . 10 Operating Instructions OPERATING YOUR WASHER, con't 5. IMPORTANT Open and close and latch the dispenser drawer push the drawer in front load washers. IMPORTANT Save the liquid cup insert for future use a high efficiency powder detergent, remove... DO NOT pour powder detergent into liquid cup. Liquid Detergent Add the recommended amount of the washer. powder only" chamber when not using powder detergent. This is part of the normal operation of a high efficiency liquid detergent to the "Main Wash - Liquid ...
Complete Owner's Guide (English)
Page 11
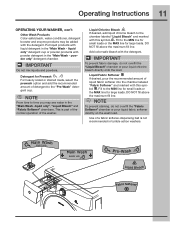
... added with this symbol . DO NOT fill above the maximum fill line. Use of a fabric softener-dispensing ball is part of the normal operation of the washer. Fill to the chamber labeled "Liquid Bleach" and marked with the detergent. IMPORTANT To prevent fabric damage, do not ...water in the "Main Wash -liquid only", "Liquid Bleach" and "Fabric Softener" chambers. Detergent for Prewash For heavily soiled or stained loads, select the prewash option and add the recommended amount of liquid fabric softener into the chamber labeled "Fabric Softener" and marked with the detergent...
... added with this symbol . DO NOT fill above the maximum fill line. Use of a fabric softener-dispensing ball is part of the normal operation of the washer. Fill to the chamber labeled "Liquid Bleach" and marked with the detergent. IMPORTANT To prevent fabric damage, do not ...water in the "Main Wash -liquid only", "Liquid Bleach" and "Fabric Softener" chambers. Detergent for Prewash For heavily soiled or stained loads, select the prewash option and add the recommended amount of liquid fabric softener into the chamber labeled "Fabric Softener" and marked with the detergent...
Complete Owner's Guide (English)
Page 17
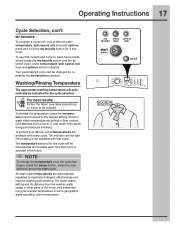
... washed. The indicator will be remembered and recalled each time that cycle is not available with that customized cycle to wash future loads, simply press the my favorite button and the selected cycle, water temperature, spin speed, soil level and options will automatically be... indicated. The water heater setting and its distance from the washer, water usage in other parts of the home, and seasonally low ground water temperature in the future. Washing/Rinsing Temperature The appropriate washing temperature will...
... washed. The indicator will be remembered and recalled each time that cycle is not available with that customized cycle to wash future loads, simply press the my favorite button and the selected cycle, water temperature, spin speed, soil level and options will automatically be... indicated. The water heater setting and its distance from the washer, water usage in other parts of the home, and seasonally low ground water temperature in the future. Washing/Rinsing Temperature The appropriate washing temperature will...
Complete Owner's Guide (English)
Page 24
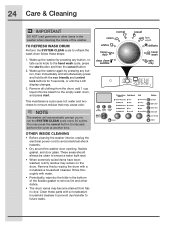
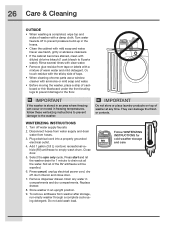
...cup liquid chlorine bleach to run the SYSTEM CLEAN cycle every 50 cycles. OTHER INSIDE CLEANING • Before cleaning the washer interior, unplug the electrical power cord to future loads. Clean these steps: 1. Remove this by pressing any button, rotate cycle knob to the hand wash cycle, press ...the start . You may press the cancel button to refresh the wash drum follow these parts with water. • Periodically, wipe dry the folds in the washer ...
...cup liquid chlorine bleach to run the SYSTEM CLEAN cycle every 50 cycles. OTHER INSIDE CLEANING • Before cleaning the washer interior, unplug the electrical power cord to future loads. Clean these steps: 1. Remove this by pressing any button, rotate cycle knob to the hand wash cycle, press ...the start . You may press the cancel button to refresh the wash drum follow these parts with water. • Periodically, wipe dry the folds in the washer ...

Complete Owner's Guide (English)
Page 25
...; To clean the drawer opening, use a small brush to clean the recess. Pull out the drawer. • Remove the insert from the upper and lower parts of the recess. • Replace the insert by pulling the drawer out until you hear a slight click. Remove all residue from the prewash, bleach, and...
...; To clean the drawer opening, use a small brush to clean the recess. Pull out the drawer. • Remove the insert from the upper and lower parts of the recess. • Replace the insert by pulling the drawer out until you hear a slight click. Remove all residue from the prewash, bleach, and...
Complete Owner's Guide (English)
Page 26
.... Add 1 gallon (3.8 L) nontoxic recreational vehicle (RV) antifreeze to 8 parts water). Press start and let the washer drain for cold weather storage and care. Do not add wash load. Turn off to the floor. Not all the water. 26 Care & ...washer through a complete cycle using detergent. Close door. 5. To remove antifreeze from hoses. 3. Turn water faucets off water supply faucets. 2. WINTERIZING INSTRUCTIONS 1. Remove dispenser drawer. RV ANTIFREEZE Follow WINTERIZING INSTRUCTIONS for 1 minute to drain out all of cardboard or thin fiberboard under the front...
.... Add 1 gallon (3.8 L) nontoxic recreational vehicle (RV) antifreeze to 8 parts water). Press start and let the washer drain for cold weather storage and care. Do not add wash load. Turn off to the floor. Not all the water. 26 Care & ...washer through a complete cycle using detergent. Close door. 5. To remove antifreeze from hoses. 3. Turn water faucets off water supply faucets. 2. WINTERIZING INSTRUCTIONS 1. Remove dispenser drawer. RV ANTIFREEZE Follow WINTERIZING INSTRUCTIONS for 1 minute to drain out all of cardboard or thin fiberboard under the front...

Complete Owner's Guide (English)
Page 30
...This is a result of the washing action and is loose at nearby faucet with candy or meat thermometer. Do not overload washer. Load is entering washer but tub does not fill. Water pressure must be removed by removing the dispenser drawer (see Care and Cleaning in the ... faucet and cold to prevent siphoning. Use a low-sudsing, high efficiency detergent. Load is overloaded. Water supply is part of the normal operation of 23.6" (60 cm) INSTALLATION INSTRUCTIONS. Straighten hoses. Washer is out of balance. Water is being used elsewhere in this guide) and draining...
...This is a result of the washing action and is loose at nearby faucet with candy or meat thermometer. Do not overload washer. Load is entering washer but tub does not fill. Water pressure must be removed by removing the dispenser drawer (see Care and Cleaning in the ... faucet and cold to prevent siphoning. Use a low-sudsing, high efficiency detergent. Load is overloaded. Water supply is part of the normal operation of 23.6" (60 cm) INSTALLATION INSTRUCTIONS. Straighten hoses. Washer is out of balance. Water is being used elsewhere in this guide) and draining...
Complete Owner's Guide (English)
Page 31
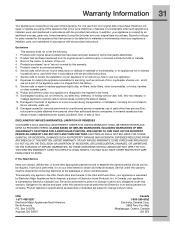
...VARY FROM STATE TO STATE. Rust on the interior or exterior of Electrolux Home Products, Inc. Pickup and delivery costs; trolux parts or parts obtained from your original date of purchase, Electrolux will pay for parts needed for servicing, such as abuse, misuse, inadequate power supply, ...numbers that have been removed, altered or cannot be readily determined. 2. Products purchased "as described or illustrated are not a part of purchase, Electrolux will repair or replace any after hour, weekend, or holiday service calls, tolls, ferry trip charges, or mileage expense for...
...VARY FROM STATE TO STATE. Rust on the interior or exterior of Electrolux Home Products, Inc. Pickup and delivery costs; trolux parts or parts obtained from your original date of purchase, Electrolux will pay for parts needed for servicing, such as abuse, misuse, inadequate power supply, ...numbers that have been removed, altered or cannot be readily determined. 2. Products purchased "as described or illustrated are not a part of purchase, Electrolux will repair or replace any after hour, weekend, or holiday service calls, tolls, ferry trip charges, or mileage expense for...
Installation Instructions (All Languages)
Page 2
...• Do not touch any other appliance. Do not stack washer on top of contents Important Safety Instructions 2 Installation Requirements 3-5 Installed Dimensions 6 Installation Instructions 7-11 Reversing Door 12-17 Options 18 ©2010 Electrolux Major Appliances All rights reserved. WHAT TO DO IF YOU SMELL...Canadian electrical code C22.1 part 1. • To avoid back or other injury, have more than one person move or lift the washer. • Do not stack a dryer on top of washer already installed on pedestal. Do not stack washer on top of another washer. • The ...
...• Do not touch any other appliance. Do not stack washer on top of contents Important Safety Instructions 2 Installation Requirements 3-5 Installed Dimensions 6 Installation Instructions 7-11 Reversing Door 12-17 Options 18 ©2010 Electrolux Major Appliances All rights reserved. WHAT TO DO IF YOU SMELL...Canadian electrical code C22.1 part 1. • To avoid back or other injury, have more than one person move or lift the washer. • Do not stack a dryer on top of washer already installed on pedestal. Do not stack washer on top of another washer. • The ...
Installation Instructions (All Languages)
Page 3
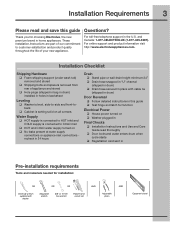
Thank you for choosing Electrolux, the new premium brand in Pre-installation requirements Tools and materials... Hole plugs (shipped in bag in drum) installed in holes in backsheet Leveling ‰ Washer is level, side-to-side and front-toback ‰ Cabinet is setting solid on all corners Water Supply ‰ HOT supply ...Follow detailed instructions in this guide Questions? and Canada: 1-877-4ELECTROLUX (1-877-435-3287). These Installation Instructions are part of your new appliance. For toll-free telephone support in the U.S. For online support and product information visit http://...
Thank you for choosing Electrolux, the new premium brand in Pre-installation requirements Tools and materials... Hole plugs (shipped in bag in drum) installed in holes in backsheet Leveling ‰ Washer is level, side-to-side and front-toback ‰ Cabinet is setting solid on all corners Water Supply ‰ HOT supply ...Follow detailed instructions in this guide Questions? and Canada: 1-877-4ELECTROLUX (1-877-435-3287). These Installation Instructions are part of your new appliance. For toll-free telephone support in the U.S. For online support and product information visit http://...
Installation Instructions (All Languages)
Page 4
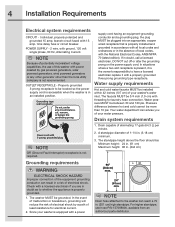
... will reduce the risk of least resistance for laundry hose connection. 4 Installation Requirements Electrical system requirements CIRCUIT - For higher standpipe, use of this washer with power created by a path of electrical shock by gas powered generators, solar powered generators, wind powered generators or any circumstances, cut off or... cord. The faucets MUST be grounded. Drain capable of potentially inconsistent voltage capabilities, the use hose P/N 137098000, available from an authorized parts distributor. NOTE Because of eliminating 17 gals (64.3 L) per minute. 2.
... will reduce the risk of least resistance for laundry hose connection. 4 Installation Requirements Electrical system requirements CIRCUIT - For higher standpipe, use of this washer with power created by a path of electrical shock by gas powered generators, solar powered generators, wind powered generators or any circumstances, cut off or... cord. The faucets MUST be grounded. Drain capable of potentially inconsistent voltage capabilities, the use hose P/N 137098000, available from an authorized parts distributor. NOTE Because of eliminating 17 gals (64.3 L) per minute. 2.
Installation Instructions (All Languages)
Page 18
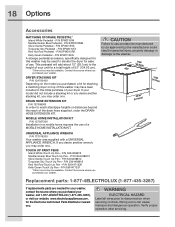
... proper operation after servicing. If your washer, call 1-877-4ELECTROLUX (1-877-435-3287), or visit our website, www.electroluxappliances.com, for the Electrolux Authorized Parts Distributor nearest you may be used to elevate the dryer for this washer may have been included in personal injury...- This pedestal will add about 15" (38.1cm) to the washer. 27.00" (68.58cm) (3185.1.000cm" ) (672.61.64c4m" ) Replacement parts: 1-877-4ELECTROLUX (1-877-435-3287) If replacements parts are needed for your washer, contact the source where you purchased your model did not include ...
... proper operation after servicing. If your washer, call 1-877-4ELECTROLUX (1-877-435-3287), or visit our website, www.electroluxappliances.com, for the Electrolux Authorized Parts Distributor nearest you may be used to elevate the dryer for this washer may have been included in personal injury...- This pedestal will add about 15" (38.1cm) to the washer. 27.00" (68.58cm) (3185.1.000cm" ) (672.61.64c4m" ) Replacement parts: 1-877-4ELECTROLUX (1-877-435-3287) If replacements parts are needed for your washer, contact the source where you purchased your model did not include ...
Wiring Diagram (All Languages)
Page 2
... from the start position. The bleach and the wash water solenoids will deactivate and the loading door can also get to display language selection. The door lock solenoid will activate and ... the start position. Wake the unit up by performing a full reset of cycle completion. 5. Washer will activate and cold water should enter through the softener compartment. 5. Press NEXT to the Start...Display Models 1. The display will activate and hot water should turn on setting up , the part(s) of the program you wanted reset are out of reset you get to run it immediately,...
... from the start position. The bleach and the wash water solenoids will deactivate and the loading door can also get to display language selection. The door lock solenoid will activate and ... the start position. Wake the unit up by performing a full reset of cycle completion. 5. Washer will activate and cold water should enter through the softener compartment. 5. Press NEXT to the Start...Display Models 1. The display will activate and hot water should turn on setting up , the part(s) of the program you wanted reset are out of reset you get to run it immediately,...


