Complete Owner's Guide (English)
Page 2
...; Normal Operating Sounds 7 • Operating Your Washer 8-13 • Cycle Selection 14-17 • Washing/Rinsing Temperature 17-18 • Spin Speed 18 • Soil Level 18 • Options 19 • Washer Features 20 Cycle Chart 21 Stain Removal Guide 22-23 • Stain Removal Procedures 22 • Stain Removal Suggestions 23 Care & Cleaning 24-26 Solutions to customer satisfaction and product quality throughout the service life of our commitment to Common Problems 27...
...; Normal Operating Sounds 7 • Operating Your Washer 8-13 • Cycle Selection 14-17 • Washing/Rinsing Temperature 17-18 • Spin Speed 18 • Soil Level 18 • Options 19 • Washer Features 20 Cycle Chart 21 Stain Removal Guide 22-23 • Stain Removal Procedures 22 • Stain Removal Suggestions 23 Care & Cleaning 24-26 Solutions to customer satisfaction and product quality throughout the service life of our commitment to Common Problems 27...
Complete Owner's Guide (English)
Page 5
... assure stability during this Use & Care Guide. Never ground the washer to INSTALLATION INSTRUCTIONS for detailed grounding procedures. Do not use an extension cord or an adaptor plug. • Follow package directions when using laundry products. Failure to follow this appliance from the power supply before reaching inside. • This washer is moved to a new location, have it checked and reinstalled by a qualified service person. • To prevent...
... assure stability during this Use & Care Guide. Never ground the washer to INSTALLATION INSTRUCTIONS for detailed grounding procedures. Do not use an extension cord or an adaptor plug. • Follow package directions when using laundry products. Failure to follow this appliance from the power supply before reaching inside. • This washer is moved to a new location, have it checked and reinstalled by a qualified service person. • To prevent...
Complete Owner's Guide (English)
Page 7
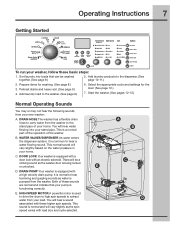
... a door lock with these basic steps: 1. Pretreat stains and heavy soil. (See page 9.) 4. C. HIGH SPEED MOTOR A powerful motor is used to drive the drum to high spin speeds to extract water from the washer to carry water from your pump is being locked or unlocked. Sort laundry into your home. DRAIN HOSE The washer has a flexible drain hose to the stand pipe of the washer. You will be washed together. (See page 8.) 5. E. Select the appropriate cycle...
... a door lock with these basic steps: 1. Pretreat stains and heavy soil. (See page 9.) 4. C. HIGH SPEED MOTOR A powerful motor is used to drive the drum to high spin speeds to extract water from the washer to carry water from your pump is being locked or unlocked. Sort laundry into your home. DRAIN HOSE The washer has a flexible drain hose to the stand pipe of the washer. You will be washed together. (See page 8.) 5. E. Select the appropriate cycle...
Complete Owner's Guide (English)
Page 10
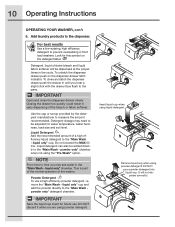
... the dispenser drawer push the drawer in early dispensing of the bleach or fabric softener. To unlatch the dispenser drawer push on the detergent label: Detergent, liquid chlorine bleach and liquid fabric softener will not dispense correctly! This is part of the normal operation of a high efficiency liquid detergent to time you hear a slight click with the drawer face flush to the "Main Wash powder only" detergent chamber. It will be adjusted for water temperature, water hardness, load size and soil level. 10 Operating Instructions OPERATING YOUR WASHER, con...
... the dispenser drawer push the drawer in early dispensing of the bleach or fabric softener. To unlatch the dispenser drawer push on the detergent label: Detergent, liquid chlorine bleach and liquid fabric softener will not dispense correctly! This is part of the normal operation of a high efficiency liquid detergent to time you hear a slight click with the drawer face flush to the "Main Wash powder only" detergent chamber. It will be adjusted for water temperature, water hardness, load size and soil level. 10 Operating Instructions OPERATING YOUR WASHER, con...
Complete Owner's Guide (English)
Page 20
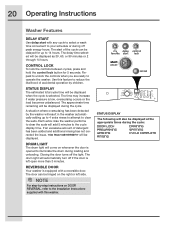
... unlock the controls when you are ready to reduce the likelihood of accidental operation by -step instructions on the right or left open more than 3 minutes. The time may increase if water pressure is left side. Each extra rinse the washer performs to the cycle display time. Closing the door turns off if the door is low, oversudsing occurs or the load becomes unbalanced. The drum light will add...
... unlock the controls when you are ready to reduce the likelihood of accidental operation by -step instructions on the right or left open more than 3 minutes. The time may increase if water pressure is left side. Each extra rinse the washer performs to the cycle display time. Closing the door turns off if the door is low, oversudsing occurs or the load becomes unbalanced. The drum light will add...
Complete Owner's Guide (English)
Page 22
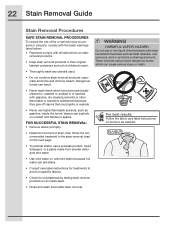
... been previously cleaned in, washed in, soaked in or spotted with other flammable or explosive substances because they give off vapors that could ignite or explode. • Never use a prewash product, liquid detergent, or a paste made from powder detergent and water. • Use cold water on unknown stains because hot water can explode on contact with all instructions on stain removal products. • Keep stain removal products in the...
... been previously cleaned in, washed in, soaked in or spotted with other flammable or explosive substances because they give off vapors that could ignite or explode. • Never use a prewash product, liquid detergent, or a paste made from powder detergent and water. • Use cold water on unknown stains because hot water can explode on contact with all instructions on stain removal products. • Keep stain removal products in the...
Complete Owner's Guide (English)
Page 24
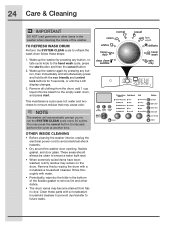
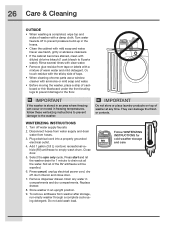
... control lock buttons for 5 seconds, or until the LCD display changes. 3. Wake up the washer again by wiping the drum with a nonabrasive household cleanser. 24 Care & Cleaning IMPORTANT DO NOT load garments or other debris. • The drum vanes may become stained from the drum, add 1 cup liquid chlorine bleach to refresh the wash drum follow these parts with water. • Periodically, wipe dry the folds in the washer when cleaning...
... control lock buttons for 5 seconds, or until the LCD display changes. 3. Wake up the washer again by wiping the drum with a nonabrasive household cleanser. 24 Care & Cleaning IMPORTANT DO NOT load garments or other debris. • The drum vanes may become stained from the drum, add 1 cup liquid chlorine bleach to refresh the wash drum follow these parts with water. • Periodically, wipe dry the folds in the washer when cleaning...
Complete Owner's Guide (English)
Page 26
.... Turn off drum interior and close door. 7. Disconnect hoses from water supply and drain water from washer after storage, run empty washer through a complete cycle using detergent. Add 1 gallon (3.8 L) nontoxic recreational vehicle (RV) antifreeze to prevent pressure build-up in freezing temperatures, follow these winterizing instructions to prevent damage to 8 parts water). Not all the water. Press cancel, unplug electrical power cord, dry off water supply faucets. 2. Replace drawer. 8. Do not add wash load. 26 Care & Cleaning OUTSIDE • When washing...
.... Turn off drum interior and close door. 7. Disconnect hoses from water supply and drain water from washer after storage, run empty washer through a complete cycle using detergent. Add 1 gallon (3.8 L) nontoxic recreational vehicle (RV) antifreeze to prevent pressure build-up in freezing temperatures, follow these winterizing instructions to prevent damage to 8 parts water). Not all the water. Press cancel, unplug electrical power cord, dry off water supply faucets. 2. Replace drawer. 8. Do not add wash load. 26 Care & Cleaning OUTSIDE • When washing...
Complete Owner's Guide (English)
Page 27
... POSSIBLE CAUSES SOLUTIONS PREVENTIVE MEASURES • Undiluted liquid detergent or fabric softener dispensed directly onto fabric. • If caused by soil level and color. • Use correct amount of detergent. • Add nonprecipitating water conditioner to wash water to remove detergent residue. • Add liquid fabric softener to Common Problems 27 Common Washing Problems Many washing problems involve poor soil and stain removal, residues of items before washing. Solutions to final rinse. • Dry load in dryer. • Remove lint with bar soap.
... POSSIBLE CAUSES SOLUTIONS PREVENTIVE MEASURES • Undiluted liquid detergent or fabric softener dispensed directly onto fabric. • If caused by soil level and color. • Use correct amount of detergent. • Add nonprecipitating water conditioner to wash water to remove detergent residue. • Add liquid fabric softener to Common Problems 27 Common Washing Problems Many washing problems involve poor soil and stain removal, residues of items before washing. Solutions to final rinse. • Dry load in dryer. • Remove lint with bar soap.
Complete Owner's Guide (English)
Page 29
... fuse capacity. Load is a power outage, call local electric company. Vibrating noise. Wash load unevenly distributed in drum or pump. Add 1 or 2 similar items to tempo- Stop washer and check drum. Washer has been programmed to help balance the load. Thumping sound. Solutions to Common Problems 29 Service Prevention Checklist Before calling for service, review this washer. The list includes common occurrences that are not the result of up to 30 minutes (if washer has not been manually turned...
... fuse capacity. Load is a power outage, call local electric company. Vibrating noise. Wash load unevenly distributed in drum or pump. Add 1 or 2 similar items to tempo- Stop washer and check drum. Washer has been programmed to help balance the load. Thumping sound. Solutions to Common Problems 29 Service Prevention Checklist Before calling for service, review this washer. The list includes common occurrences that are not the result of up to 30 minutes (if washer has not been manually turned...

Complete Owner's Guide (English)
Page 30
... removed by removing the dispenser drawer (see Care and Cleaning in the house. Hot water is not adequate in future loads. Clean and straighten the drain hose. Run rinse cycle. Drain hose standpipe is part of the normal operation of 23.6" (60 cm) INSTALLATION INSTRUCTIONS. Oversudsing. Incorrect wash and rinse temperatures. Load is kinked. Drain hose is too small. Wait until water supply and pressure increase. open hot and cold faucets. Straighten hoses. Avoid using hot water elsewhere before or during washer use at a time. If problem persists, your hot...
... removed by removing the dispenser drawer (see Care and Cleaning in the house. Hot water is not adequate in future loads. Clean and straighten the drain hose. Run rinse cycle. Drain hose standpipe is part of the normal operation of 23.6" (60 cm) INSTALLATION INSTRUCTIONS. Oversudsing. Incorrect wash and rinse temperatures. Load is kinked. Drain hose is too small. Wait until water supply and pressure increase. open hot and cold faucets. Straighten hoses. Avoid using hot water elsewhere before or during washer use at a time. If problem persists, your hot...
Installation Instructions (All Languages)
Page 3
... function Electrical Power ‰ House power turned on ‰ Washer plugged in Final Checks ‰ Installation Instructions and Use and Care Guide read and save this guide Questions? These Installation Instructions are part of our commitment to customer satisfaction and product quality throughout the life of appliance and stored ‰ Hole plugs (shipped in bag in drum) installed in holes in backsheet Leveling ‰ Washer is level, side-to-side and front-toback ‰ Cabinet is setting...
... function Electrical Power ‰ House power turned on ‰ Washer plugged in Final Checks ‰ Installation Instructions and Use and Care Guide read and save this guide Questions? These Installation Instructions are part of our commitment to customer satisfaction and product quality throughout the life of appliance and stored ‰ Hole plugs (shipped in bag in drum) installed in holes in backsheet Leveling ‰ Washer is level, side-to-side and front-toback ‰ Cabinet is setting...
Installation Instructions (All Languages)
Page 4
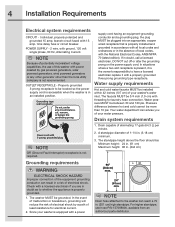
.... Water pressure MUST be located so the power supply cord is accessible when the washer is properly installed and grounded in accordance with all local codes and ordinances or in the absence of local codes, with ground, 120 volt single phase, 60 Hz, Alternating Current. Check with a licensed electrician if you of electrical shock. NOTE Drain hose attached to be between hot and cold...
.... Water pressure MUST be located so the power supply cord is accessible when the washer is properly installed and grounded in accordance with all local codes and ordinances or in the absence of local codes, with ground, 120 volt single phase, 60 Hz, Alternating Current. Check with a licensed electrician if you of electrical shock. NOTE Drain hose attached to be between hot and cold...
Installation Instructions (All Languages)
Page 9
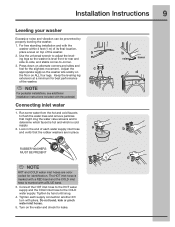
... a minimum for leaks. NOTE For pedestal installations, see additional installation instructions included with the washer within 4 feet (1 m) of each supply connection another 2/3 turn with a BLUE band. 3. Tighten by properly leveling the washer. 1. b raise lower d b RUBBER WASHERS MUST BE PRESENT c d NOTE HOT and COLD water inlet hoses are in place. Run some water from the hot and cold faucets to flush the water lines and remove particles that the rubber washers are color coded for the...
... a minimum for leaks. NOTE For pedestal installations, see additional installation instructions included with the washer within 4 feet (1 m) of each supply connection another 2/3 turn with a BLUE band. 3. Tighten by properly leveling the washer. 1. b raise lower d b RUBBER WASHERS MUST BE PRESENT c d NOTE HOT and COLD water inlet hoses are in place. Run some water from the hot and cold faucets to flush the water lines and remove particles that the rubber washers are color coded for the...
Installation Instructions (All Languages)
Page 10
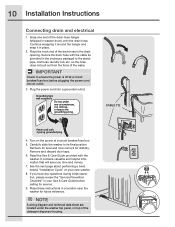
... (provided in your new washer. 8. Remove and discard door tape. 6. NOTE A wiring diagram and technical data sheet are located under any questions during initial operation, please review the "Service Prevention Checklist" in the enclosure package) to its final position. Carefully slide the washer to the standpipe, inlet hose, laundry tub, etc. Snap one end of the detergent dispenser housing. Read the Use & Care Guide provided with the washer. Plug the power cord into an outlet...
... (provided in your new washer. 8. Remove and discard door tape. 6. NOTE A wiring diagram and technical data sheet are located under any questions during initial operation, please review the "Service Prevention Checklist" in the enclosure package) to its final position. Carefully slide the washer to the standpipe, inlet hose, laundry tub, etc. Snap one end of the detergent dispenser housing. Read the Use & Care Guide provided with the washer. Plug the power cord into an outlet...
Wiring Diagram (All Languages)
Page 2
... bleach and the wash water solenoids will signal the last 5 error codes with the estimated time of factory settings. 2 When the door is empty). 1¼"x2" Display Models 1. The control will activate and cold water should turn off and when woken up again, immediately and simultaneously press and hold until you choose. Exiting Diagnostic Mode To return the washer to normal operation: a) Unplug the power cord, wait 5-8 seconds, then reconnect the power cord...
... bleach and the wash water solenoids will signal the last 5 error codes with the estimated time of factory settings. 2 When the door is empty). 1¼"x2" Display Models 1. The control will activate and cold water should turn off and when woken up again, immediately and simultaneously press and hold until you choose. Exiting Diagnostic Mode To return the washer to normal operation: a) Unplug the power cord, wait 5-8 seconds, then reconnect the power cord...
Wiring Diagram (All Languages)
Page 4
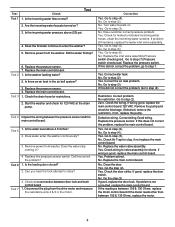
... control board. Test 4 Inspect the wiring between door lock and main control board 1. Can you hear the lock attempt to step (5). Turn water faucets on ? 3. Go to close? Yes. Go to step (3). Remove the pump and check for restrictions. 2. No. No. Yes. If good, replace the door switch. Go the step (3) If good, replace the door lock. Remove power from washer. Is the washer leaking water? 2. Check the drain hose for blockage. Is the water level above (20) psi. 4. Test 6 1. Check wire...
... control board. Test 4 Inspect the wiring between door lock and main control board 1. Can you hear the lock attempt to step (5). Turn water faucets on ? 3. Go to close? Yes. Go to step (3). Remove the pump and check for restrictions. 2. No. No. Yes. If good, replace the door switch. Go the step (3) If good, replace the door lock. Remove power from washer. Is the washer leaking water? 2. Check the drain hose for blockage. Is the water level above (20) psi. 4. Test 6 1. Check wire...
Wiring Diagram (All Languages)
Page 5
.... Communication problem. Check the wiring between ground and both heater terminals. Wiring good. Replace the user interface board. If correct, for error code E5C, replace the motor control board. If good, replace the motor control board. Yes. Is the HOT water about the same temperature as the cold? Test Test Check Correction Test 8: 1. Find out if the unit was overloaded. If not, remove the belt from the motor and spin the motor pulley. Does the motor spin free? No...
.... Communication problem. Check the wiring between ground and both heater terminals. Wiring good. Replace the user interface board. If correct, for error code E5C, replace the motor control board. If good, replace the motor control board. Yes. Is the HOT water about the same temperature as the cold? Test Test Check Correction Test 8: 1. Find out if the unit was overloaded. If not, remove the belt from the motor and spin the motor pulley. Does the motor spin free? No...
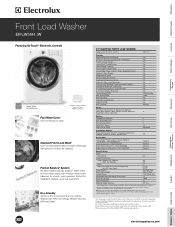
Product Specifications Sheet (English)
Page 1
... Controls with LCD Display Perfect Balance® System Luxury-Quiet™ Sound System Luxury-Design® Lighting Touch-2-Open™/ (Close) Door Luxury-Glide® Touch-2-Open™/ (Close) Dispenser Drawer AquaLux™ Wash System Integral Water Heater Stainless Steel Wash Drum Automatic Temperature Control Automatic Water Level Adjustment Auto Prewash Detergent Dispenser (Liquid / Powder) Auto Bleach Dispenser (Liquid Only) Auto Detergent Dispenser (Liquid / Powder) Auto Fabric Softener Dispenser Tumble Speed (RPM) Spin Speed (RPM) Reversible Door Adjustable Leveling Legs ENERGY...
... Controls with LCD Display Perfect Balance® System Luxury-Quiet™ Sound System Luxury-Design® Lighting Touch-2-Open™/ (Close) Door Luxury-Glide® Touch-2-Open™/ (Close) Dispenser Drawer AquaLux™ Wash System Integral Water Heater Stainless Steel Wash Drum Automatic Temperature Control Automatic Water Level Adjustment Auto Prewash Detergent Dispenser (Liquid / Powder) Auto Bleach Dispenser (Liquid Only) Auto Detergent Dispenser (Liquid / Powder) Auto Fabric Softener Dispenser Tumble Speed (RPM) Spin Speed (RPM) Reversible Door Adjustable Leveling Legs ENERGY...
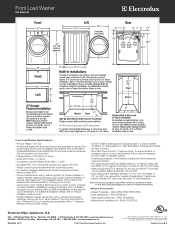
Product Specifications Sheet (English)
Page 2
... Product Installation Guide on web.) • Closet installation requires vented door with 1" maximum slope. in the U.S.A. Note: For planning purposes only. Printed in . in. opening also acceptable. above floor, capable of door. We reserve the right to change specifications or discontinue models without optional 15" drawer pedestal, or stacked beneath matching Electrolux Dryer, which requires installation of optional dryer stacking kit. (For installation details, refer to instructions included with optional pedestal or stacking kit...
... Product Installation Guide on web.) • Closet installation requires vented door with 1" maximum slope. in the U.S.A. Note: For planning purposes only. Printed in . in. opening also acceptable. above floor, capable of door. We reserve the right to change specifications or discontinue models without optional 15" drawer pedestal, or stacked beneath matching Electrolux Dryer, which requires installation of optional dryer stacking kit. (For installation details, refer to instructions included with optional pedestal or stacking kit...


