
Complete Owner's Guide (English)
Page 2
... , please use this guide Thank you for quick reference Purchase date Electrolux model number Electrolux serial number NOTE Registering your new appliance. You can register online at www.electroluxappliances.com or by dropping your purchase as the beginning of contents Finding information 2 SAFETY 3-5 Features 6 Operating Instructions 7-18 • Getting Started 7 • Normal Operating Sounds 7 • Operating Your Dryer 8-9 • Cycle Selection 10-12 • Drying Temperature 13 •...
... , please use this guide Thank you for quick reference Purchase date Electrolux model number Electrolux serial number NOTE Registering your new appliance. You can register online at www.electroluxappliances.com or by dropping your purchase as the beginning of contents Finding information 2 SAFETY 3-5 Features 6 Operating Instructions 7-18 • Getting Started 7 • Normal Operating Sounds 7 • Operating Your Dryer 8-9 • Cycle Selection 10-12 • Drying Temperature 13 •...
Complete Owner's Guide (English)
Page 3
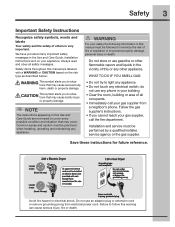
... v Electric Dryer 120 v Gas Dryer 10-30R 3-wire (fused 30 amp) 14-30R 4-wire (fused 30 amp) UL-approved service cord must be installed on your safety the following information in Canada). WARNING For your appliance. We have provided many important safety messages in the Use and Care Guide, Installation Instructions and on electric dryers (not provided with 3-prong grounded plug Avoid fire hazard or electrical shock. Safety 3 Important Safety Instructions Recognize...
... v Electric Dryer 120 v Gas Dryer 10-30R 3-wire (fused 30 amp) 14-30R 4-wire (fused 30 amp) UL-approved service cord must be installed on your safety the following information in Canada). WARNING For your appliance. We have provided many important safety messages in the Use and Care Guide, Installation Instructions and on electric dryers (not provided with 3-prong grounded plug Avoid fire hazard or electrical shock. Safety 3 Important Safety Instructions Recognize...
Complete Owner's Guide (English)
Page 4
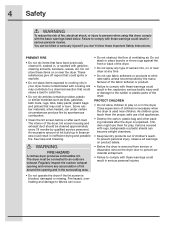
... removed from service or discarded, remove the dryer door to prevent accidental entrapment. • Failure to comply with these Important Safety Instructions: PREVENT FIRE • Do not dry items that could result in serious personal injuries. • Do not operate the dryer if the lint screen is used near the dryer. Cartons covered with the basic warnings listed below. The interior of the dryer, lint screen housing and exhaust duct...
... removed from service or discarded, remove the dryer door to prevent accidental entrapment. • Failure to comply with these Important Safety Instructions: PREVENT FIRE • Do not dry items that could result in serious personal injuries. • Do not operate the dryer if the lint screen is used near the dryer. Cartons covered with the basic warnings listed below. The interior of the dryer, lint screen housing and exhaust duct...
Complete Owner's Guide (English)
Page 5
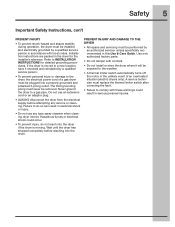
... dryer, the electrical power cord of an overheated situation (electric dryers only). Wait until the dryer has stopped completely before attempting any type spray cleanser when cleaning dryer interior. Never ground the dryer to do not reach into the dryer if the drum is moved to a new location, have it will be exposed to INSTALLATION INSTRUCTIONS for the installer's reference. Do not use any service or cleaning. The third grounding prong...
... dryer, the electrical power cord of an overheated situation (electric dryers only). Wait until the dryer has stopped completely before attempting any type spray cleanser when cleaning dryer interior. Never ground the dryer to do not reach into the dryer if the drum is moved to a new location, have it will be exposed to INSTALLATION INSTRUCTIONS for the installer's reference. Do not use any service or cleaning. The third grounding prong...
Complete Owner's Guide (English)
Page 7
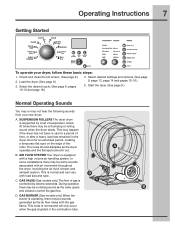
... air movement throughout the dryer, including the air duct, blower, and exhaust system. The noise should dissipate as the valve opens B and closes to control the gas flow. This is supported by electric solenoids. Load the dryer. (See page 9.) 3. This may be a thumping or rolling sound when the dryer starts. GAS VALVE (Gas models only.) The flow of gas is ignited in the dryer drum for a period of the roller. Check and clean the lint screen. (See page 9.) 2. B. This noise...
... air movement throughout the dryer, including the air duct, blower, and exhaust system. The noise should dissipate as the valve opens B and closes to control the gas flow. This is supported by electric solenoids. Load the dryer. (See page 9.) 3. This may be a thumping or rolling sound when the dryer starts. GAS VALVE (Gas models only.) The flow of gas is ignited in the dryer drum for a period of the roller. Check and clean the lint screen. (See page 9.) 2. B. This noise...
Complete Owner's Guide (English)
Page 9
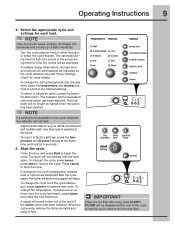
... load. press start to the desired settings. If changes to resume the cycle. Turn the cycle selector knob in the future. When the cycle ends, remove the items promptly and hang or fold. CLEAN FILTER will be lighted when the option has been deleted. NOTE If a setting is selected in either direction to a cycle will be indicated for the cycle selected, the indicator will beep. IMPORTANT Clean the lint filter...
... load. press start to the desired settings. If changes to resume the cycle. Turn the cycle selector knob in the future. When the cycle ends, remove the items promptly and hang or fold. CLEAN FILTER will be lighted when the option has been deleted. NOTE If a setting is selected in either direction to a cycle will be indicated for the cycle selected, the indicator will beep. IMPORTANT Clean the lint filter...
Complete Owner's Guide (English)
Page 10
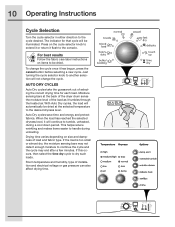
... the dryer drum sense the moisture level of installation and electrical voltage or gas pressure can also affect drying time. Auto Dry cycles save time and energy and protect fabrics. Drying time varies depending on the cycle selector knob to the console. With Auto Dry cycles, the load will be dried. 10 Operating Instructions Cycle Selection Turn the cycle selector in either direction to dry such loads. If this occurs, then select the time dry cycle to the cycle desired...
... the dryer drum sense the moisture level of installation and electrical voltage or gas pressure can also affect drying time. Auto Dry cycles save time and energy and protect fabrics. Drying time varies depending on the cycle selector knob to the console. With Auto Dry cycles, the load will be dried. 10 Operating Instructions Cycle Selection Turn the cycle selector in either direction to dry such loads. If this occurs, then select the time dry cycle to the cycle desired...
Complete Owner's Guide (English)
Page 15
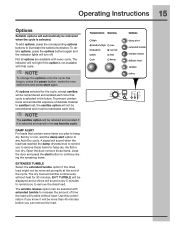
... to increase the amount of time the load will tumble without heat for the cycle, except sanitize, will be indicated when the cycle is not available with every cycle. The wrinkle release option can remove the load. Use this combination if you know it...remove the dried load. The dry load will tumble continuously without heat. Open the door, remove those items to any Auto Dry cycle. The indicator will not light if the option is selected. NOTE To change the options once the cycle has begun, press the pause button, make the new selections and press start button to continue drying...
... to increase the amount of time the load will tumble without heat for the cycle, except sanitize, will be indicated when the cycle is not available with every cycle. The wrinkle release option can remove the load. Use this combination if you know it...remove the dried load. The dry load will tumble continuously without heat. Open the door, remove those items to any Auto Dry cycle. The indicator will not light if the option is selected. NOTE To change the options once the cycle has begun, press the pause button, make the new selections and press start button to continue drying...
Complete Owner's Guide (English)
Page 17
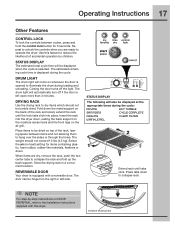
... cycle. Use this dryer. STATUS DISPLAY The estimated total cycle time will come on the air grill. Press tabs down the metal support on DOOR REVERSAL, refer to collapse rack. TUMBLE SANITIZING CYCLE COMPLETE COOLING CLEAN FILTER WRINKLE REL. moisture sensing bars Store the drying rack in a convenient location. DRYING RACK Use the drying rack to hang over the sides or through the holes. REVERSIBLE DOOR Your dryer is displayed during loading and unloading. Operating Instructions 17 Other Features CONTROL LOCK To lock...
... cycle. Use this dryer. STATUS DISPLAY The estimated total cycle time will come on the air grill. Press tabs down the metal support on DOOR REVERSAL, refer to collapse rack. TUMBLE SANITIZING CYCLE COMPLETE COOLING CLEAN FILTER WRINKLE REL. moisture sensing bars Store the drying rack in a convenient location. DRYING RACK Use the drying rack to hang over the sides or through the holes. REVERSIBLE DOOR Your dryer is displayed during loading and unloading. Operating Instructions 17 Other Features CONTROL LOCK To lock...
Complete Owner's Guide (English)
Page 19
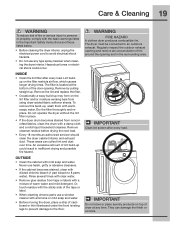
... dryer must be connected to 8 parts water). The filter is located at any time. Or, touch residue with the sticky side of the tape or label. • When cleaning chrome parts use any accumulation of the door opening and in place. • If the dryer drum becomes stained from using dryer-added fabric softener sheets. IMPORTANT Clean lint screen after every load. Remove by pulling straight up , wash them with a damp cloth and...
... dryer must be connected to 8 parts water). The filter is located at any time. Or, touch residue with the sticky side of the tape or label. • When cleaning chrome parts use any accumulation of the door opening and in place. • If the dryer drum becomes stained from using dryer-added fabric softener sheets. IMPORTANT Clean lint screen after every load. Remove by pulling straight up , wash them with a damp cloth and...
Complete Owner's Guide (English)
Page 20
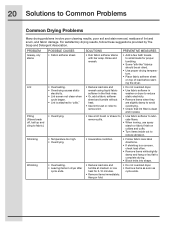
... be air dried. • Use proper drying temperature. • Place fabric softener sheet on collars and cuffs. • Turn items inside out to reduce abrasion. • Irreversible condition. • Follow fabric care label directions. • If shrinking is a concern, check load often. • Remove items while slightly damp and hang or lay flat to complete drying. • Block knits into shape. • Reduce load size and...
... be air dried. • Use proper drying temperature. • Place fabric softener sheet on collars and cuffs. • Turn items inside out to reduce abrasion. • Irreversible condition. • Follow fabric care label directions. • If shrinking is a concern, check load often. • Remove items while slightly damp and hang or lay flat to complete drying. • Block knits into shape. • Reduce load size and...
Complete Owner's Guide (English)
Page 21
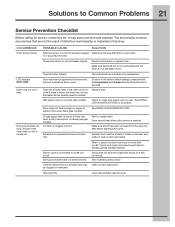
... lint has been removed from the dryer lint filter before starting each cycle. When in place, the duct must not exceed length listed in this list. Drying time will not operate. (electric models) Gas supply valve is open (gas models). Clean out any obstruction. Thermal limiter tripped. Dryer does not have not been followed. Dryer should heat when utility service is connected to a 208 volt circuit. Electric dryer is restored. Use a dehumidifier near the dryer. Drying procedures have enough air supply to support the burner flame (gas models...
... lint has been removed from the dryer lint filter before starting each cycle. When in place, the duct must not exceed length listed in this list. Drying time will not operate. (electric models) Gas supply valve is open (gas models). Clean out any obstruction. Thermal limiter tripped. Dryer does not have not been followed. Dryer should heat when utility service is connected to a 208 volt circuit. Electric dryer is restored. Use a dehumidifier near the dryer. Drying procedures have enough air supply to support the burner flame (gas models...
Complete Owner's Guide (English)
Page 23
... , any obligations under this warranty. 5. YOU MAY ALSO HAVE OTHER RIGHTS THAT VARY FROM STATE TO STATE. If You Need Service Keep your appliance is warranted by Electrolux Major Appliances North America, a division of the unit. 4. This warranty only applies in the home. 11. Products with original serial numbers that prove to repair or replace appliance light bulbs, air filters, water filters, other consumables, or knobs...
... , any obligations under this warranty. 5. YOU MAY ALSO HAVE OTHER RIGHTS THAT VARY FROM STATE TO STATE. If You Need Service Keep your appliance is warranted by Electrolux Major Appliances North America, a division of the unit. 4. This warranty only applies in the home. 11. Products with original serial numbers that prove to repair or replace appliance light bulbs, air filters, water filters, other consumables, or knobs...
Installation Instructions
Page 2
... Water connection (Steam Model only) 15-16 General installation 17 Performing installs:bar cycle is Resenting &cc 1943 Options 24 • Access:ties 44 • Replacement parts 24 Espahol 25-sx Francais ...,x 0200B ElectroluxKS'Appliances MI rights reserved. ana Canacia: 1.877-4ELECTROLUX (1.877-4353287) For online support ana proauct information visit ittp1Nnwislectroluxappliances.com Table of contents Finding inforrnatbn...- -.. 2 SAFETY S • Pro-installation requienente S Installation requirements I.e Electrical system necpintments. 4 Gas...
... Water connection (Steam Model only) 15-16 General installation 17 Performing installs:bar cycle is Resenting &cc 1943 Options 24 • Access:ties 44 • Replacement parts 24 Espahol 25-sx Francais ...,x 0200B ElectroluxKS'Appliances MI rights reserved. ana Canacia: 1.877-4ELECTROLUX (1.877-4353287) For online support ana proauct information visit ittp1Nnwislectroluxappliances.com Table of contents Finding inforrnatbn...- -.. 2 SAFETY S • Pro-installation requienente S Installation requirements I.e Electrical system necpintments. 4 Gas...
Installation Instructions
Page 3
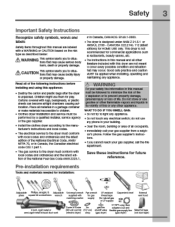
... au Gloms' sent hood 4 belt rigd Mad C. tion of the Natichat Fuel Gas Code ANSI Z223.1, ZS WARNING i-or yoursaw me imormancn In tins manual rrust be performed by a qualified Installer, service agency or the gas supplier • Install the cbthes dryer according to light any appliaice. • Da not touch any electncal Switch: co not use gisoline or otner flammable vapors...
... au Gloms' sent hood 4 belt rigd Mad C. tion of the Natichat Fuel Gas Code ANSI Z223.1, ZS WARNING i-or yoursaw me imormancn In tins manual rrust be performed by a qualified Installer, service agency or the gas supplier • Install the cbthes dryer according to light any appliaice. • Da not touch any electncal Switch: co not use gisoline or otner flammable vapors...
Installation Instructions
Page 4
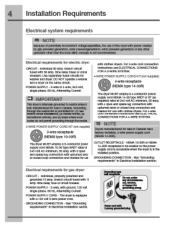
Use separately fused circuits for gas dryer: CIRCUIT- or closed loop connect= and marked for use of potentlarly inconsistent voltage npabilities. OUTLET RECEPTACLE - Electrical requirements for washer and diyer. time delay fuse or clrcurt breaker POWER SUPPLY - POWFR £IIIPPI V - NEMA 1O-30R or NEMA 14-30R receptaclelo be located sothe power supply cord is accessiblewhen the dryer is equipped with 3 open end spade lug connectors with 3-prong grounded piug nouNoiNc CONNCCTION - See 'Grounding...
Use separately fused circuits for gas dryer: CIRCUIT- or closed loop connect= and marked for use of potentlarly inconsistent voltage npabilities. OUTLET RECEPTACLE - Electrical requirements for washer and diyer. time delay fuse or clrcurt breaker POWER SUPPLY - POWFR £IIIPPI V - NEMA 1O-30R or NEMA 14-30R receptaclelo be located sothe power supply cord is accessiblewhen the dryer is equipped with 3 open end spade lug connectors with 3-prong grounded piug nouNoiNc CONNCCTION - See 'Grounding...
Installation Instructions
Page 6
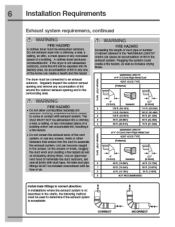
... (2420M) mit cm .34m) MAXIMUM LENGTH 2 of air. The dryer MUST NOT de eanausted into tne duct to assemb the exhaust system. Use an approved vent ncoa to determine it tne exhaust system Is acceptame: CORRECT INCORRECT and seal all pints witnauct tape. Es well as increasing drying tinvs. 6 Installation Requirements Exhaust system requirements, continued WARNING FIRE HAZARD A clothes dryer mug be ccnnectea to an...
... (2420M) mit cm .34m) MAXIMUM LENGTH 2 of air. The dryer MUST NOT de eanausted into tne duct to assemb the exhaust system. Use an approved vent ncoa to determine it tne exhaust system Is acceptame: CORRECT INCORRECT and seal all pints witnauct tape. Es well as increasing drying tinvs. 6 Installation Requirements Exhaust system requirements, continued WARNING FIRE HAZARD A clothes dryer mug be ccnnectea to an...
Installation Instructions
Page 7
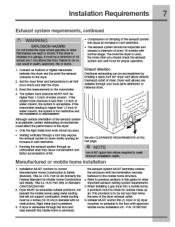
... important exhaust venting system requirements. 5. lithe manometer reading Is higher than helve the area of every 18 monthswith normal usage. Title 24 CFR, Part 32-80 (Tcarnedy the Federal Standard for proper operation. 1 Connect an inclined or Clonal manometer between trie dryer ana tne paint tne ecnaust connects to the dryer. 2 Set tne dryer timer and temperature to air fluff (cool awn) and start the dryer 3 Read...
... important exhaust venting system requirements. 5. lithe manometer reading Is higher than helve the area of every 18 monthswith normal usage. Title 24 CFR, Part 32-80 (Tcarnedy the Federal Standard for proper operation. 1 Connect an inclined or Clonal manometer between trie dryer ana tne paint tne ecnaust connects to the dryer. 2 Set tne dryer timer and temperature to air fluff (cool awn) and start the dryer 3 Read...
Installation Instructions
Page 18
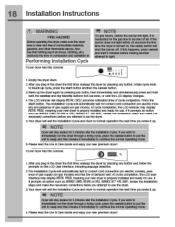
... you plug in the dryer tne first time: wake m the dryer Dy pressing any button, then immediately and sinuitaneously press and hole Loth the sanitize aid my favorite buttons for 5 seconds. Installation Instructions .1. press the cancel Dutton to pit the unit to Wax, and then rewake it Performing Installation Cycle If your dryer has this console: r, NOTE on gas models) and free lbw a exhaust vent. IR...
... you plug in the dryer tne first time: wake m the dryer Dy pressing any button, then immediately and sinuitaneously press and hole Loth the sanitize aid my favorite buttons for 5 seconds. Installation Instructions .1. press the cancel Dutton to pit the unit to Wax, and then rewake it Performing Installation Cycle If your dryer has this console: r, NOTE on gas models) and free lbw a exhaust vent. IR...
Installation Instructions
Page 20
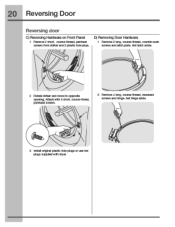
Iy D) Removing Door Hardware 1 Remove 2 Iamb course-thread. counter-surd( screws and latch plate. Mt:at-Iwith 2 short. Set latch aside. 2 Rotate striker and movetooppsite opening. Set hinge aside. 3 Install nal plastic hole plugs or use new plugs suppliedwith dryer. couise-trireai, pannead scams. 2 Remove 4 Iamb course-thread. recessed screws and hinge. 20 Reversing Door Reversing door C) Reversing Hardware on Front Panel 1 Remove 2 slut, course-thread, panhead screws trom sinker and 2 plastic hole plugs.
Iy D) Removing Door Hardware 1 Remove 2 Iamb course-thread. counter-surd( screws and latch plate. Mt:at-Iwith 2 short. Set latch aside. 2 Rotate striker and movetooppsite opening. Set hinge aside. 3 Install nal plastic hole plugs or use new plugs suppliedwith dryer. couise-trireai, pannead scams. 2 Remove 4 Iamb course-thread. recessed screws and hinge. 20 Reversing Door Reversing door C) Reversing Hardware on Front Panel 1 Remove 2 slut, course-thread, panhead screws trom sinker and 2 plastic hole plugs.


