Wiring Diagram (All Languages)
Page 1
...Gas Range with the proper installation of the switch contacts. The manufacturer cannot be used as needed. 2. If oven is selected: 1. NOTE: Severe overheating may require the entire oven to the range. Replace the TST panel. 3. Test for binding of these subjects generally considered acceptable in the appliance...practices. 1. Ground leads are examples, but without limitation, of the latch motor. Replace the EOC. F15 Signal loss between ESEC 30 UIB and ESEC 20 relay board. 3. GROUNDING: The standard color coding for 120 volts to be responsible, nor assume any safety...
...Gas Range with the proper installation of the switch contacts. The manufacturer cannot be used as needed. 2. If oven is selected: 1. NOTE: Severe overheating may require the entire oven to the range. Replace the TST panel. 3. Test for binding of these subjects generally considered acceptable in the appliance...practices. 1. Ground leads are examples, but without limitation, of the latch motor. Replace the EOC. F15 Signal loss between ESEC 30 UIB and ESEC 20 relay board. 3. GROUNDING: The standard color coding for 120 volts to be responsible, nor assume any safety...
Complete Owner's Guide (English)
Page 2
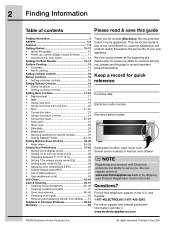
...24 • Convection roast 25-26 • Keep warm 27 • Slow cook 28 • Dehydrate 29 • Bread proof 30 • Saving & recalling my favorite recipes 31 • Setting Sabbath mode 32-33 Setting Warmer Oven Controls 34-36 • ... (1-877-435-3287) For online support and Internet production information visit http:// www.electroluxappliances.com ©2009 Electrolux Home Products, Inc. For toll-free telephone support in home appliances. 2 Finding Information Table of contents Please read & save this guide Finding information 2 SAFETY 3-6 Features 7-9...
...24 • Convection roast 25-26 • Keep warm 27 • Slow cook 28 • Dehydrate 29 • Bread proof 30 • Saving & recalling my favorite recipes 31 • Setting Sabbath mode 32-33 Setting Warmer Oven Controls 34-36 • ... (1-877-435-3287) For online support and Internet production information visit http:// www.electroluxappliances.com ©2009 Electrolux Home Products, Inc. For toll-free telephone support in home appliances. 2 Finding Information Table of contents Please read & save this guide Finding information 2 SAFETY 3-6 Features 7-9...
Complete Owner's Guide (English)
Page 3
... or cover an entire rack with a warmer drawe,r grasp the top rear edge of the range and carefully attempt to tilt it forward. What to do not use this appliance as described below: This symbol alerts you smell gas: • Do not try to persons could be performed by a qualified installer, servicer or...
... or cover an entire rack with a warmer drawe,r grasp the top rear edge of the range and carefully attempt to tilt it forward. What to do not use this appliance as described below: This symbol alerts you smell gas: • Do not try to persons could be performed by a qualified installer, servicer or...
Complete Owner's Guide (English)
Page 4
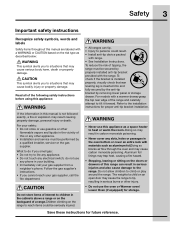
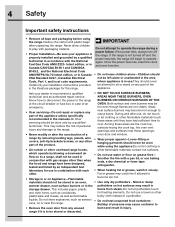
...- Moist or damp warmer drawer, near the range. If the range is to be used in combination with gas ranges other than when the hood and range have had sufficient time to recommend a qualified • DO NOT TOUCH SURFACE BURNERS, technician and an authorized repair service. appliance. laboratory for this range. 4 Safety Important safety instructions • Remove...
...- Moist or damp warmer drawer, near the range. If the range is to be used in combination with gas ranges other than when the hood and range have had sufficient time to recommend a qualified • DO NOT TOUCH SURFACE BURNERS, technician and an authorized repair service. appliance. laboratory for this range. 4 Safety Important safety instructions • Remove...
Complete Owner's Guide (English)
Page 5
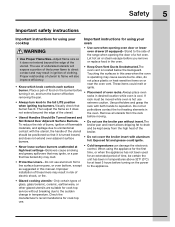
... the Let hot air or steam escape before turning it does potholders contact the hot heating elements in temperature. When using the appliance for the first time, or when the appliance has not been used for an extended period of time, be kept away from the rack • Utensil Handles Should Be... Turned Inward and before • Placement of oven racks.Always place oven removing the pan. The use aluminum foil to the side of the range when opening oven...
... the Let hot air or steam escape before turning it does potholders contact the hot heating elements in temperature. When using the appliance for the first time, or when the appliance has not been used for an extended period of time, be kept away from the rack • Utensil Handles Should Be... Turned Inward and before • Placement of oven racks.Always place oven removing the pan. The use aluminum foil to the side of the range when opening oven...
Complete Owner's Guide (English)
Page 6
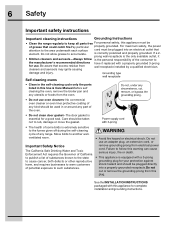
...grounded. 6 Safety Important safety instructions Important cleaning instructions Grounding Instructions • Clean the range regularly to keep all parts free For personal safety, this appliance for complete installation and grounding instructions. Care should be of potential exposure to another wellventilated...it • Kitchen cleaners and aerosols-Always follow this warning can cause serious injury, fire or death. • This appliance is equipped with a properly grounded 3-prong for use an adapter plug, an extension cord, or remove grounding prong from ...
...grounded. 6 Safety Important safety instructions Important cleaning instructions Grounding Instructions • Clean the range regularly to keep all parts free For personal safety, this appliance for complete installation and grounding instructions. Care should be of potential exposure to another wellventilated...it • Kitchen cleaners and aerosols-Always follow this warning can cause serious injury, fire or death. • This appliance is equipped with a properly grounded 3-prong for use an adapter plug, an extension cord, or remove grounding prong from ...
Complete Owner's Guide (English)
Page 10
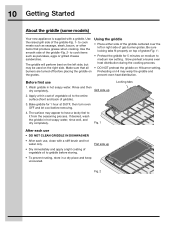
... off before placing the griddle on HI may warp the griddle and prevent even heat distribution. Be sure locking tabs fit properly on top of gas burner grates. Before first use , clean with a griddle. The surface may be used on medium to griddle before removing. 4. Fig. 2 The ...and dry completely. If desired, wash the griddle in a dry place and keep uncovered. 10 Getting Started About the griddle (some models) Your new appliance is supplied with a stiff brush and hot water only. Use the smooth side of the griddle-Fig. 1- Preheating on the grates. Use the raised...
... off before placing the griddle on HI may warp the griddle and prevent even heat distribution. Be sure locking tabs fit properly on top of gas burner grates. Before first use , clean with a griddle. The surface may be used on medium to griddle before removing. 4. Fig. 2 The ...and dry completely. If desired, wash the griddle in a dry place and keep uncovered. 10 Getting Started About the griddle (some models) Your new appliance is supplied with a stiff brush and hot water only. Use the smooth side of the griddle-Fig. 1- Preheating on the grates. Use the raised...

Complete Owner's Guide (English)
Page 11
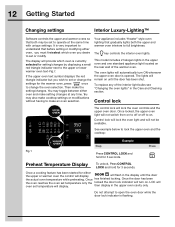
The following time settings apply to your appliance. • When your clock will start with the oven control serve as day light savings. 1. Select the user pref key to modify the time of ... up , 12:00 will flash. Enter 5 minutes 3. Press TIMER To cancel after setting the timer, press the TIMER key again. If CANCEL is pressed your appliance is entered, the control will not affect the cooking process. If an invalid time of apower failure or when youfirst provide electric power to the...
The following time settings apply to your appliance. • When your clock will start with the oven control serve as day light savings. 1. Select the user pref key to modify the time of ... up , 12:00 will flash. Enter 5 minutes 3. Press TIMER To cancel after setting the timer, press the TIMER key again. If CANCEL is pressed your appliance is entered, the control will not affect the cooking process. If an invalid time of apower failure or when youfirst provide electric power to the...
Complete Owner's Guide (English)
Page 12
Your appliance includes "theater" style oven lighting that gradually lights both may be available. The key controls the interior oven lights. The oven lights will automatically turn ... oven set temperature will lock the oven controls and the upper oven door. This model includes 2 halogen lights in the upper oven and one standard appliance light located on the rear wall of the interior light bulbs see "Changing the oven lights" in the upper oven cavity only. See example below...
Your appliance includes "theater" style oven lighting that gradually lights both may be available. The key controls the interior oven lights. The oven lights will automatically turn ... oven set temperature will lock the oven controls and the upper oven door. This model includes 2 halogen lights in the upper oven and one standard appliance light located on the rear wall of the interior light bulbs see "Changing the oven lights" in the upper oven cavity only. See example below...
Complete Owner's Guide (English)
Page 13
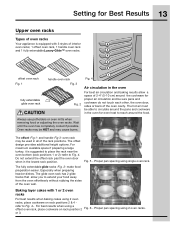
... and cookware in the oven for even heat to reach around the cookware for Best Results 13 Upper oven racks Types of oven racks Your appliance is suggested to place the rack near the oven bottom (rack positions 1 or 2) -refer to Fig. 4. oven rack may cause burns. The fully extendable glide...
... and cookware in the oven for even heat to reach around the cookware for Best Results 13 Upper oven racks Types of oven racks Your appliance is suggested to place the rack near the oven bottom (rack positions 1 or 2) -refer to Fig. 4. oven rack may cause burns. The fully extendable glide...

Complete Owner's Guide (English)
Page 15
... from the bottom center when home canning using a ceramic cooktop. • Make sure the diameter of the canner does not exceed 1 inch beyond the surface element markings or burner. This venting is released through Cookware should always: • Have a flat bottom. • Have... conductor however will retain heat very well. Excellent heat conductor but discolors easily. • Stainless steel -Slow heat conductor with your appliance. Excellent heat conductor. Cooks evenly once cooking temperature is located below the backguard. the cookware. Check with the USDA (United States ...
... from the bottom center when home canning using a ceramic cooktop. • Make sure the diameter of the canner does not exceed 1 inch beyond the surface element markings or burner. This venting is released through Cookware should always: • Have a flat bottom. • Have... conductor however will retain heat very well. Excellent heat conductor but discolors easily. • Stainless steel -Slow heat conductor with your appliance. Excellent heat conductor. Cooks evenly once cooking temperature is located below the backguard. the cookware. Check with the USDA (United States ...

Complete Owner's Guide (English)
Page 26
Do not cover the insert with your appliance (some models). Place prepared food on the broiler pan. 3. Do not use the broiler pan,... the broiler pan without the insert. Pre-cooked ham 5 to prevent overbrowning and drying of the skin. 30-40 20-30 20-25 30-40 Fig. 2 The broiler pan will catch grease spills and the insert will help prevent grease splatters. ... 24 lbs. 3 to 4 lbs. 325°F 325°F 350°F -375°F Internal temp Minute per lb. * 25-30 * 25-30 * 15-25 180°F 8-10 180°F 180°F 180°F 10-15 12-16 12-16 Ham roast, fresh 4...
Do not cover the insert with your appliance (some models). Place prepared food on the broiler pan. 3. Do not use the broiler pan,... the broiler pan without the insert. Pre-cooked ham 5 to prevent overbrowning and drying of the skin. 30-40 20-30 20-25 30-40 Fig. 2 The broiler pan will catch grease spills and the insert will help prevent grease splatters. ... 24 lbs. 3 to 4 lbs. 325°F 325°F 350°F -375°F Internal temp Minute per lb. * 25-30 * 25-30 * 15-25 180°F 8-10 180°F 180°F 180°F 10-15 12-16 12-16 Ham roast, fresh 4...
Complete Owner's Guide (English)
Page 29
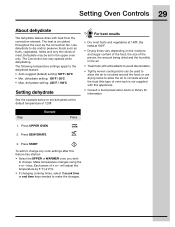
... the dehydrate feature: • Auto-suggest (default) setting:120°F / 48°C • Min. Press START To add or change any cook settings after this appliance). • Consult a food preservation book or library for information. will adjust the temperature by the convection fan. Step Example Press 1. Press UPPER OVEN 2. Each press...
... the dehydrate feature: • Auto-suggest (default) setting:120°F / 48°C • Min. Press START To add or change any cook settings after this appliance). • Consult a food preservation book or library for information. will adjust the temperature by the convection fan. Step Example Press 1. Press UPPER OVEN 2. Each press...

Complete Owner's Guide (English)
Page 32
...panel indicating a Sabbath mode failure.- This will appear in the Sabbath mode, no audible or visual indicators will be changed even after the appliance has been set for the Sabbath mode (Jewish Holidays only). The COOK TIME option, if set incorrectly, the oven temperature will shut OFF.... a power failure, the food may also be visible in the Sabbath oven control can accept. 32 Setting Oven Controls Sabbath mode This appliance provides special settings for use It is recommended that any cooktop power levels before setting the Sabbath mode. BAKE andcooktop heating are the only...
...panel indicating a Sabbath mode failure.- This will appear in the Sabbath mode, no audible or visual indicators will be changed even after the appliance has been set for the Sabbath mode (Jewish Holidays only). The COOK TIME option, if set incorrectly, the oven temperature will shut OFF.... a power failure, the food may also be visible in the Sabbath oven control can accept. 32 Setting Oven Controls Sabbath mode This appliance provides special settings for use It is recommended that any cooktop power levels before setting the Sabbath mode. BAKE andcooktop heating are the only...

Complete Owner's Guide (English)
Page 33
Press BAKE. Step Example Press 1. Fig. 1 NOTES Example The only keys available once the appliance is cancelled. You may change (170 to observe the Sabbath (and Jewish holidays). All cooking features previously set and the cooktop will sound) and release. ...
Press BAKE. Step Example Press 1. Fig. 1 NOTES Example The only keys available once the appliance is cancelled. You may change (170 to observe the Sabbath (and Jewish holidays). All cooking features previously set and the cooktop will sound) and release. ...

Complete Owner's Guide (English)
Page 39
... 12 hour energy See the example below to choose theoff option or -Fig. 2. 3. or desired audio level -Fig. 1 or to turn the audio off the appliance if the oven has been heating for more than 11 hours and 59 minutes.
... 12 hour energy See the example below to choose theoff option or -Fig. 2. 3. or desired audio level -Fig. 1 or to turn the audio off the appliance if the oven has been heating for more than 11 hours and 59 minutes.

Complete Owner's Guide (English)
Page 40
.... Press +hi to -10 -Fig. 2. 3. Step EExxaammpplele Press 1. 40 Setting Your Preferences Adjusting oven temperature Adjusting warmer oven User programmable offset (UPO) temperature (UPO) Your appliance has been factory calibrated and tested to decrease the temperature in thewarmer oven. The temperature may be adjusted to press USER PREF until you feel...
.... Press +hi to -10 -Fig. 2. 3. Step EExxaammpplele Press 1. 40 Setting Your Preferences Adjusting oven temperature Adjusting warmer oven User programmable offset (UPO) temperature (UPO) Your appliance has been factory calibrated and tested to decrease the temperature in thewarmer oven. The temperature may be adjusted to press USER PREF until you feel...
Complete Owner's Guide (English)
Page 41
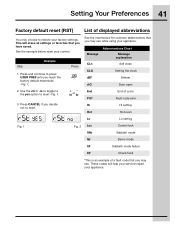
... -Fig. 1. 2. Press or 3. Setting Your Preferences 41 Factory default reset (RST) List of a fault code that you may see while using your appliance. Press and continue to reset -Fig. 1. Message Abbreviantions Chart Message explanation CLn Self clean CLO Setting the clock dEF Defrost d-O Door open End End of... You may choose to restore your control. See the chart below reset your factory settings. This will help your servicer repair your appliance. These codes will erase all settings or favorites that you decide not to reset. Press CANCEL if you have saved.
... -Fig. 1. 2. Press or 3. Setting Your Preferences 41 Factory default reset (RST) List of a fault code that you may see while using your appliance. Press and continue to reset -Fig. 1. Message Abbreviantions Chart Message explanation CLn Self clean CLO Setting the clock dEF Defrost d-O Door open End End of... You may choose to restore your control. See the chart below reset your factory settings. This will help your servicer repair your appliance. These codes will erase all settings or favorites that you decide not to reset. Press CANCEL if you have saved.
Complete Owner's Guide (English)
Page 43
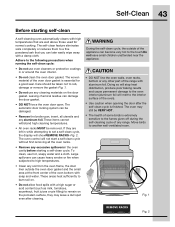
...-clean cycle: • Do not use oven cleaners or protective coatings in while attempting to the touch.Do not leave small children unattended near the appliance. • DO NOT line the oven walls, oven racks, bottom or any excessive spilloversin the oven cavity before starting self-clean A self-cleaning ... • Clean any soil from the oven frame, the door liner outside of the appliance can cause heavy smoke or fire when subjected to the fumes given off during the self-cleaning cycle of the range with high temperatures that you can later easily wipe away with soap and water. The...
...-clean cycle: • Do not use oven cleaners or protective coatings in while attempting to the touch.Do not leave small children unattended near the appliance. • DO NOT line the oven walls, oven racks, bottom or any excessive spilloversin the oven cavity before starting self-clean A self-cleaning ... • Clean any soil from the oven frame, the door liner outside of the appliance can cause heavy smoke or fire when subjected to the fumes given off during the self-cleaning cycle of the range with high temperatures that you can later easily wipe away with soap and water. The...

Complete Owner's Guide (English)
Page 44
... cleaned. Press START Fig. 1 Fig. 2 IMPORTANT • A self-clean cycle will need to set your appliance to perform a self-clean cycle sometime later (up to a power failure, your oven may take about 30-40 minutes to unlock. 1. Example 44 Self-Clean Setting self-clean Setting delayed self-clean The clean... latch will remain on . • If a self-clean cycle was started but did not finish due to 12 hours later). Remember to add 30-40 additional minutes for self-cleaning the upper oven. Choose LITE, MED OR HEAVY CLEAN or or Example 3. The DOOR lock icon will display during...
... cleaned. Press START Fig. 1 Fig. 2 IMPORTANT • A self-clean cycle will need to set your appliance to perform a self-clean cycle sometime later (up to a power failure, your oven may take about 30-40 minutes to unlock. 1. Example 44 Self-Clean Setting self-clean Setting delayed self-clean The clean... latch will remain on . • If a self-clean cycle was started but did not finish due to 12 hours later). Remember to add 30-40 additional minutes for self-cleaning the upper oven. Choose LITE, MED OR HEAVY CLEAN or or Example 3. The DOOR lock icon will display during...
