Complete Owner's Guide (English)
Page 2
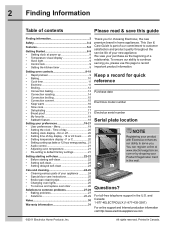
... Started 8-9 • Setting clock at www.electroluxappliances. We view your preferences 19-21 • User preferences - To ensure our ability to continue serving you . Time of a relationship. Questions? You can register online at power up 8 • Temperature visual display 8 • Oven light 9 • Control lock 9 • Setting the kitchen timer 9 Setting oven controls 9-19 • Rapid preheat 9 • Baking 10 • Cook time 11 • End time 11 • Broiling 12 • Convection baking 13 • Convection roasting...
... Started 8-9 • Setting clock at www.electroluxappliances. We view your preferences 19-21 • User preferences - To ensure our ability to continue serving you . Time of a relationship. Questions? You can register online at power up 8 • Temperature visual display 8 • Oven light 9 • Control lock 9 • Setting the kitchen timer 9 Setting oven controls 9-19 • Rapid preheat 9 • Baking 10 • Cook time 11 • End time 11 • Broiling 12 • Convection baking 13 • Convection roasting...
Complete Owner's Guide (English)
Page 3
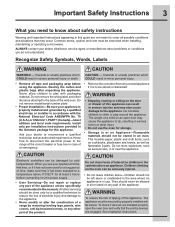
...range by cold temperatures. Ask your dealer to children in the cabinets above 0°C/32°F for at the circuit breaker or fuse box in case of an emergency. All other part of the product. Do not remove the wiring label and other injury. • Do not use the oven... be stored in this guide are not meant to cover all tape and packaging wrap before connecting it to the power supply. • User Servicing-Do not repair or replace any part of the appliance. See installation instructions. Install only per installation instructions provided in the literature package...
...range by cold temperatures. Ask your dealer to children in the cabinets above 0°C/32°F for at the circuit breaker or fuse box in case of an emergency. All other part of the product. Do not remove the wiring label and other injury. • Do not use the oven... be stored in this guide are not meant to cover all tape and packaging wrap before connecting it to the power supply. • User Servicing-Do not repair or replace any part of the appliance. See installation instructions. Install only per installation instructions provided in the literature package...
Complete Owner's Guide (English)
Page 4
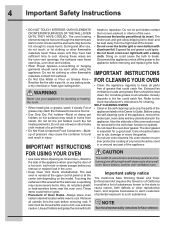
... parts free of Oven Racks. Greasy deposits in this area when the wall oven is cool. SELF CLEANING OVENS • Clean in the self-cleaning cycle only the parts of any wall oven. No oven cleaner or oven liner protective coating of the appliance listed in the fan could ignite. • Do not touch a hot oven light bulb with a pan lid, or use your appliance for future reference. 4 Important Safety Instructions • DO NOT TOUCH INTERIOR OVEN ELEMENTS...
... parts free of Oven Racks. Greasy deposits in this area when the wall oven is cool. SELF CLEANING OVENS • Clean in the self-cleaning cycle only the parts of any wall oven. No oven cleaner or oven liner protective coating of the appliance listed in the fan could ignite. • Do not touch a hot oven light bulb with a pan lid, or use your appliance for future reference. 4 Important Safety Instructions • DO NOT TOUCH INTERIOR OVEN ELEMENTS...
Complete Owner's Guide (English)
Page 5
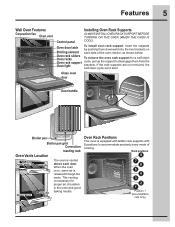
Glass oven door Door handle Broiler pan Broiler pan grid Convection roasting rack Oven Vents Location Oven Vent Oven Vent Warm Air Warm Air The oven is vented above each side of cooking. Oven Rack Positions This oven is equipped with ladder rack supports with 8 positions to disengage them downward into the two brackets on Broiling element each door. Oven door latch To install oven rack support, insert the supports by pushing them from the brackets. When the oven is on the oven (when the oven is Control panel cool). Rack positions Position 1 (Non-SLIDING rack only) Oven...
Glass oven door Door handle Broiler pan Broiler pan grid Convection roasting rack Oven Vents Location Oven Vent Oven Vent Warm Air Warm Air The oven is vented above each side of cooking. Oven Rack Positions This oven is equipped with ladder rack supports with 8 positions to disengage them downward into the two brackets on Broiling element each door. Oven door latch To install oven rack support, insert the supports by pushing them from the brackets. When the oven is on the oven (when the oven is Control panel cool). Rack positions Position 1 (Non-SLIDING rack only) Oven...
Complete Owner's Guide (English)
Page 9
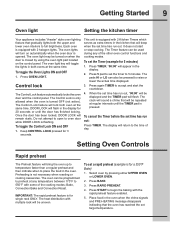
... OVEN. 2. Press BAKE. 3. Control lock The Control Lock feature automatically locks the oven door and the control panel. The oven light may be used during any temperature between 170°F to the time of the cooking modes; DOOR LOCK will flash. The oven can be displayed and the TIMER pad will flash in both the upper and lower oven interiors to preheat at any of the other oven control functions and cooking modes. Getting Started 9 Oven light Setting the kitchen timer Your appliance includes "theater" style oven lighting...
... OVEN. 2. Press BAKE. 3. Control lock The Control Lock feature automatically locks the oven door and the control panel. The oven light may be used during any temperature between 170°F to the time of the cooking modes; DOOR LOCK will flash. The oven can be displayed and the TIMER pad will flash in both the upper and lower oven interiors to preheat at any of the other oven control functions and cooking modes. Getting Started 9 Oven light Setting the kitchen timer Your appliance includes "theater" style oven lighting...
Complete Owner's Guide (English)
Page 10
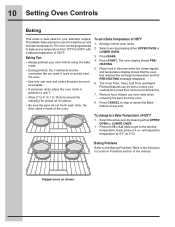
... temperature from the oven. 8. The oven display shows PREHEATING. 5. Select the active oven by pressing either UPPER OVEN or LOWER OVEN. 1. The Cook Time, Timer, End Time and Rapid Preheat features can be set to 10,2cm) around the utensil(s) for directions). 7. 10 Setting Oven Controls Baking This mode is used to stop or cancel the Bake feature at any time. Press START. Baking Tips • Always preheat your oven before using the bake mode. • During preheat, the 3 elements and the convection fan are used...
... temperature from the oven. 8. The oven display shows PREHEATING. 5. Select the active oven by pressing either UPPER OVEN or LOWER OVEN. 1. The Cook Time, Timer, End Time and Rapid Preheat features can be set to 10,2cm) around the utensil(s) for directions). 7. 10 Setting Oven Controls Baking This mode is used to stop or cancel the Bake feature at any time. Press START. Baking Tips • Always preheat your oven before using the bake mode. • During preheat, the 3 elements and the convection fan are used...

Complete Owner's Guide (English)
Page 13
... to be baked on pans with no need to reduce your oven temperature. Press CONVECTION BAKE. 4. If your cooking time (read their sections for convection baking there is time saved. If cooking on pans with a single rack, place oven rack in position 3 or 4. Arrange interior oven racks. 2. Press CANCEL to stop or cancel the Convection Bake feature at minimum time. Convection baking uses the three elements and a fan to circulate the oven's heat evenly and continuously within the oven. Remove food. With single rack convection baking the some...
... to be baked on pans with no need to reduce your oven temperature. Press CONVECTION BAKE. 4. If your cooking time (read their sections for convection baking there is time saved. If cooking on pans with a single rack, place oven rack in position 3 or 4. Arrange interior oven racks. 2. Press CANCEL to stop or cancel the Convection Bake feature at minimum time. Convection baking uses the three elements and a fan to circulate the oven's heat evenly and continuously within the oven. Remove food. With single rack convection baking the some...

Complete Owner's Guide (English)
Page 14
... mode when cooking speed is best for even cooking and helps to increase browning on the underside. • There is securely seated on the roasting rack. Arrange interior oven racks. 2. Remove food. Always use the broiler pan without the grid or cover the grid with a default temperature of beef, lamb, park and poultry. Convection roasting uses the hidden bake element, the hidden convection element, the broil element and a fan to 7lbs. Convection Roasting Tips • Use the broiler pan...
... mode when cooking speed is best for even cooking and helps to increase browning on the underside. • There is securely seated on the roasting rack. Arrange interior oven racks. 2. Remove food. Always use the broiler pan without the grid or cover the grid with a default temperature of beef, lamb, park and poultry. Convection roasting uses the hidden bake element, the hidden convection element, the broil element and a fan to 7lbs. Convection Roasting Tips • Use the broiler pan...

Complete Owner's Guide (English)
Page 15
... LOWER OVEN. 2. DO NOT use the broiler pan and its grid when broiling. DO NOT cover the broil pan insert with the COOK TIME option, the COOK TIME pad must be pressed before turning or removing food. • Always use the roasting rack when broiling. • Convection broiling is used with the oven door closed and turn on. Place food in the juices. When set a Convection Broil Temperature of the broil element (see Figure 1). • DO NOT use this time the oven control will beep...
... LOWER OVEN. 2. DO NOT use the broiler pan and its grid when broiling. DO NOT cover the broil pan insert with the COOK TIME option, the COOK TIME pad must be pressed before turning or removing food. • Always use the roasting rack when broiling. • Convection broiling is used with the oven door closed and turn on. Place food in the juices. When set a Convection Broil Temperature of the broil element (see Figure 1). • DO NOT use this time the oven control will beep...
Complete Owner's Guide (English)
Page 16
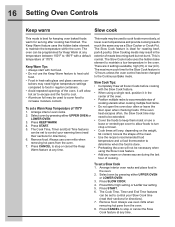
... foil may result in the oven. Arrange interior oven racks. 2. Press CANCEL to the Continuous Bake mode. This is done. • Preheating the oven will vary; The maximum cook time for directions). 7. Press SLOW COOK. 4. tainers may be set a Warm Keep Temperature of meats becoming dark but not burnt. Press KEEP WARM. 4. The Cook Time, Timer and End Time features can be used to cover food to control your Slow Cook time (read their sections for...
... foil may result in the oven. Arrange interior oven racks. 2. Press CANCEL to the Continuous Bake mode. This is done. • Preheating the oven will vary; The maximum cook time for directions). 7. Press SLOW COOK. 4. tainers may be set a Warm Keep Temperature of meats becoming dark but not burnt. Press KEEP WARM. 4. The Cook Time, Timer and End Time features can be used to cover food to control your Slow Cook time (read their sections for...
Complete Owner's Guide (English)
Page 17
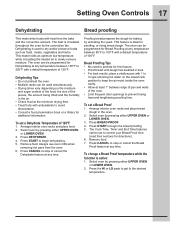
... the convection fan. Press DEHYDRATE. 4. Arrange interior oven racks and place bread dough in the oven. 2. The oven can be programmed for Bread Proofing at any time. Remove food. Press CANCEL to stop or cancel the Bread Proof feature at any temperature between 100°F to 225°F with antioxidants to 100°F with heat from the oven. 6. Setting Oven Controls 17 Dehydrating Bread proofing This mode...
... the convection fan. Press DEHYDRATE. 4. Arrange interior oven racks and place bread dough in the oven. 2. The oven can be programmed for Bread Proofing at any time. Remove food. Press CANCEL to stop or cancel the Bread Proof feature at any temperature between 100°F to 225°F with antioxidants to 100°F with heat from the oven. 6. Setting Oven Controls 17 Dehydrating Bread proofing This mode...
Complete Owner's Guide (English)
Page 19
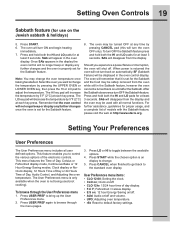
... or interruption, the oven will be turned back on display to control the various options of models with all user defined options. To browse through the menu pages. 3. Press START while the chosen option is properly set for the Sabbath and the food may be used (not cooking). Setting Oven Controls 19 Sabbath feature (for use on ; When power is set for at least 3 seconds. Clock on /off . Remember...
... or interruption, the oven will be turned back on display to control the various options of models with all user defined options. To browse through the menu pages. 3. Press START while the chosen option is properly set for the Sabbath and the food may be used (not cooking). Setting Oven Controls 19 Sabbath feature (for use on ; When power is set for at least 3 seconds. Clock on /off . Remember...
Complete Owner's Guide (English)
Page 25
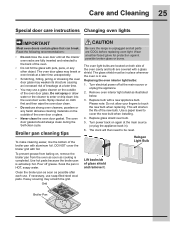
... glass with pots, pans, or any harsh abrasive cleaning materials on the outside of the oven door glass. Remove oven interior light shield as cooking is unplugged and all the interior oven racks are covered with foil. Replace glass shield over bulb. 5. Broiler Pan To prevent grease from the oven as soon as illustrated below. 3. Use hot pads because the broiler pan is in place whenever the oven is extremely hot. The glass shield must be reset. Turn electrical power...
... glass with pots, pans, or any harsh abrasive cleaning materials on the outside of the oven door glass. Remove oven interior light shield as cooking is unplugged and all the interior oven racks are covered with foil. Replace glass shield over bulb. 5. Broiler Pan To prevent grease from the oven as soon as illustrated below. 3. Use hot pads because the broiler pan is in place whenever the oven is extremely hot. The glass shield must be reset. Turn electrical power...
Complete Owner's Guide (English)
Page 27
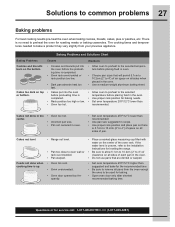
.... • Set oven temperature 25°F/12°C higher than recommended. • Use pan size suggested and bake for the recommended time. • Be sure to remove all sides of air space on top • Cakes put into the oven • Allow oven to preheat to the selected or bottom. There is completed. • Oven rack overcrowded or rack position too low. • Dark pan absorbs heat too...
.... • Set oven temperature 25°F/12°C higher than recommended. • Use pan size suggested and bake for the recommended time. • Be sure to remove all sides of air space on top • Cakes put into the oven • Allow oven to preheat to the selected or bottom. There is completed. • Oven rack overcrowded or rack position too low. • Dark pan absorbs heat too...

Complete Owner's Guide (English)
Page 28
... removed the oven racks and the oven rack supports from the oven. • Controls not set . • Be sure electrical cord is securely connected into the electrical junction box. • Cord/plug is not installed and/or connected. Wipe up excessive spillovers from beeping. Be sure cabinets are not the result of defective workmanship or materials in cord/plug. Follow the instructions under "Using the Self-Clean Feature". Before you call for service, review the following installation. • House fuse...
... removed the oven racks and the oven rack supports from the oven. • Controls not set . • Be sure electrical cord is securely connected into the electrical junction box. • Cord/plug is not installed and/or connected. Wipe up excessive spillovers from beeping. Be sure cabinets are not the result of defective workmanship or materials in cord/plug. Follow the instructions under "Using the Self-Clean Feature". Before you call for service, review the following installation. • House fuse...
Installation Instructions (English, Spanish, French)
Page 1
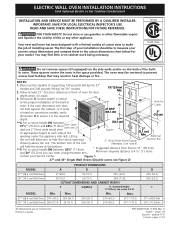
... SAVE THESE INSTRUCTIONS FOR FUTURE REFERENCE. Canada United States Do not remove spacers (if equipped) on the side walls and/or on convection models, verify dimension G to make the job of the builtin oven. If the oven decorative trim does not butt against the cabinet, or if noise B is heard on the back of installing easier. A English - NOTES: 1. The bottom trim of cutout sizes to...
... SAVE THESE INSTRUCTIONS FOR FUTURE REFERENCE. Canada United States Do not remove spacers (if equipped) on the side walls and/or on convection models, verify dimension G to make the job of the builtin oven. If the oven decorative trim does not butt against the cabinet, or if noise B is heard on the back of installing easier. A English - NOTES: 1. The bottom trim of cutout sizes to...
Installation Instructions (English, Spanish, French)
Page 3
... Owner's Guide for warming or heating the room. The electrical power to leave these instructions with the proper voltage and frequency, and connected to the junction box. 3 NOTE: Wire sizes and connections must be removed to get the circuit breaker or fuse amperage. An extension cord should be supplied with the consumer. 5. If you need a longer power cord you can purchase a 10' (3 m) power cord kit #903056-9010 by a qualified installer or service technician. • This wall oven...
... Owner's Guide for warming or heating the room. The electrical power to leave these instructions with the proper voltage and frequency, and connected to the junction box. 3 NOTE: Wire sizes and connections must be removed to get the circuit breaker or fuse amperage. An extension cord should be supplied with the consumer. 5. If you need a longer power cord you can purchase a 10' (3 m) power cord kit #903056-9010 by a qualified installer or service technician. • This wall oven...
Installation Instructions (English, Spanish, French)
Page 7
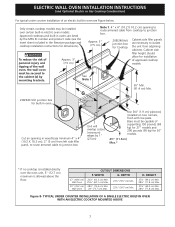
Unit will overlap cutout (minimum) edges by the MFG ID number and product code (see Figure below. Base must be secured to isolate the unit from adjoining cabinets. TYPICAL UNDER COUNTER INSTALLATION OF A SINGLE ELECTRIC BUILT-IN OVEN WITH AN ELECTRIC COOKTOP MOUNTED ABOVE 7 by 1" (2.5cm) Use 3/4" (1.9 cm) plywood, installed on two runners, flush with toe plate. H. Figure 8- Only certain cooktop models may be capable of supporting 150 pounds (68 kg...
Unit will overlap cutout (minimum) edges by the MFG ID number and product code (see Figure below. Base must be secured to isolate the unit from adjoining cabinets. TYPICAL UNDER COUNTER INSTALLATION OF A SINGLE ELECTRIC BUILT-IN OVEN WITH AN ELECTRIC COOKTOP MOUNTED ABOVE 7 by 1" (2.5cm) Use 3/4" (1.9 cm) plywood, installed on two runners, flush with toe plate. H. Figure 8- Only certain cooktop models may be capable of supporting 150 pounds (68 kg...
Installation Instructions (English, Spanish, French)
Page 8
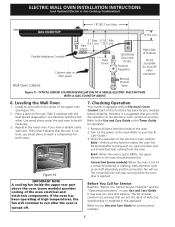
... for service phone numbers. 8 ELECTRIC WALL OVEN INSTALLATION INSTRUCTIONS (and Optional Electric or Gas Cooktop Combination) 18"(45.7 cm) Max. Place a level on the power to the oven (Refer to reach a compromise for shut-off . 7. Checking Operation Your model is set to run . If the oven has been operating at high temperatures, the fan will continue to BROIL, the upper element in the lower oven if you time and expense. Each of the oven electrical and...
... for service phone numbers. 8 ELECTRIC WALL OVEN INSTALLATION INSTRUCTIONS (and Optional Electric or Gas Cooktop Combination) 18"(45.7 cm) Max. Place a level on the power to the oven (Refer to reach a compromise for shut-off . 7. Checking Operation Your model is set to run . If the oven has been operating at high temperatures, the fan will continue to BROIL, the upper element in the lower oven if you time and expense. Each of the oven electrical and...
Product Specifications Sheet (English)
Page 1
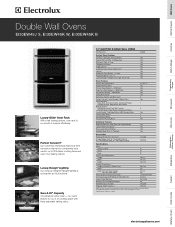
... Watts Convection Element - 2500 Watts Cobalt Blue Interior Self-Clean Options with Door Lock Perfect Convect3® with three adjustable baking racks. 30" ELECTRIC DOUBLE WALL OVENS Configuration Double Control Panel Features IQ-Touch™ Electronic Oven Controls Yes Keypad Entry of cooking space with Variable 2-Speed Fans Cooking Modes - Ft. PN # 903114-9110, W - Height 16-1/2" Width 24-1/8" Depth 18-1/32" Product Dimensions - our ovens feature 4.2 cu. Dehydrate, Bread Proof, My Favorite, Rapid Preheat, Delay Bake, Convection Convert Luxury-Design® Lighting...
... Watts Convection Element - 2500 Watts Cobalt Blue Interior Self-Clean Options with Door Lock Perfect Convect3® with three adjustable baking racks. 30" ELECTRIC DOUBLE WALL OVENS Configuration Double Control Panel Features IQ-Touch™ Electronic Oven Controls Yes Keypad Entry of cooking space with Variable 2-Speed Fans Cooking Modes - Ft. PN # 903114-9110, W - Height 16-1/2" Width 24-1/8" Depth 18-1/32" Product Dimensions - our ovens feature 4.2 cu. Dehydrate, Bread Proof, My Favorite, Rapid Preheat, Delay Bake, Convection Convert Luxury-Design® Lighting...


