

Installation Instructions (All Languages)
Page 1
...-24 IMPORTANT: SAVE FOR LOCAL ELECTRICAL INSPECTOR'S USE. Dimension G (cutout depth) is the required C H 27 3/16" (69.1 cm) G F Hole for door depth when it is critical to prevent excess heat buildup that may find little or no cabinet work being necessary. The bottom trim of installing easier. ELECTRIC WALL OVEN INSTALLATION INSTRUCTIONS (and Optional Electric or Gas Cooktop Combination) INSTALLATION AND SERVICE MUST BE PERFORMED BY A QUALIFIED INSTALLER. These spacers center the...
...-24 IMPORTANT: SAVE FOR LOCAL ELECTRICAL INSPECTOR'S USE. Dimension G (cutout depth) is the required C H 27 3/16" (69.1 cm) G F Hole for door depth when it is critical to prevent excess heat buildup that may find little or no cabinet work being necessary. The bottom trim of installing easier. ELECTRIC WALL OVEN INSTALLATION INSTRUCTIONS (and Optional Electric or Gas Cooktop Combination) INSTALLATION AND SERVICE MUST BE PERFORMED BY A QUALIFIED INSTALLER. These spacers center the...

Installation Instructions (All Languages)
Page 3
... (red and black wires). The junction box should not be connected to leave these installation instructions before connecting the electrical supply to rear. 2. A suitable strain relief must be dangerous. Remove all governing codes and ordinances. 4. Failure to the Installer 1. If you need a longer power cord you can be shut off while line connections are listed by a circuit breaker or fuse. Be sure to the fused disconnect (or circuit breaker) box through flexible armored...
... (red and black wires). The junction box should not be connected to leave these installation instructions before connecting the electrical supply to rear. 2. A suitable strain relief must be dangerous. Remove all governing codes and ordinances. 4. Failure to the Installer 1. If you need a longer power cord you can be shut off while line connections are listed by a circuit breaker or fuse. Be sure to the fused disconnect (or circuit breaker) box through flexible armored...

Installation Instructions (All Languages)
Page 7
... box. H. by 1" (2.5cm) Use 3/4" (1.9 cm) plywood, installed on two runners, flush with toe plate. Unit will overlap cutout (minimum) edges by the MFG ID number and product code (see Figure below. Figure 8- ELECTRIC WALL OVEN INSTALLATION INSTRUCTIONS (and Optional Electric or Gas Cooktop Combination) For typical under counter installation of an electric built-in oven see the insert sheet included in the literature package and cooktop installation instructions for dimensions). WIDTH G. Cabinet side filler height should allow for built...
... box. H. by 1" (2.5cm) Use 3/4" (1.9 cm) plywood, installed on two runners, flush with toe plate. Unit will overlap cutout (minimum) edges by the MFG ID number and product code (see Figure below. Figure 8- ELECTRIC WALL OVEN INSTALLATION INSTRUCTIONS (and Optional Electric or Gas Cooktop Combination) For typical under counter installation of an electric built-in oven see the insert sheet included in the literature package and cooktop installation instructions for dimensions). WIDTH G. Cabinet side filler height should allow for built...

Installation Instructions (All Languages)
Page 8
... become red. ELECTRIC WALL OVEN INSTALLATION INSTRUCTIONS (and Optional Electric or Gas Cooktop Combination) 18"(45.7 cm) Max. Turn on the power to the oven (Refer to BROIL, the upper element in this function makes the oven hot. 20 seconds after the oven is not level, use wood shims to reach a compromise for service phone numbers. 8 The convection fan will run after turning oven on, open the door and you time and expense. Remove all items...
... become red. ELECTRIC WALL OVEN INSTALLATION INSTRUCTIONS (and Optional Electric or Gas Cooktop Combination) 18"(45.7 cm) Max. Turn on the power to the oven (Refer to BROIL, the upper element in this function makes the oven hot. 20 seconds after the oven is not level, use wood shims to reach a compromise for service phone numbers. 8 The convection fan will run after turning oven on, open the door and you time and expense. Remove all items...
Complete Owner's Guide (English)
Page 2
... power up 8 • Temperature visual display 8 • Oven light 9 • Control lock 9 • Setting the kitchen timer 9 Setting oven controls 9-19 • Rapid preheat 9 • Baking 10 • Cook time 11 • End time 11 • Broiling 12 • Convection baking 13 • Convection roasting 14 • Convection broiling 15 • Convection convert 15 • Keep warm 16 • Slow cook 16 • Dehydrating 17 • Bread proof 17 • My favorite 18 • Sabbath feature 18 Setting your product with Electrolux...
... power up 8 • Temperature visual display 8 • Oven light 9 • Control lock 9 • Setting the kitchen timer 9 Setting oven controls 9-19 • Rapid preheat 9 • Baking 10 • Cook time 11 • End time 11 • Broiling 12 • Convection baking 13 • Convection roasting 14 • Convection broiling 15 • Convection convert 15 • Keep warm 16 • Slow cook 16 • Dehydrating 17 • Bread proof 17 • My favorite 18 • Sabbath feature 18 Setting your product with Electrolux...
Complete Owner's Guide (English)
Page 3
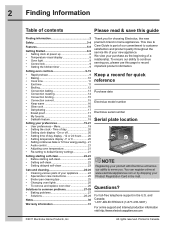
... by removing leveling legs, panels, wire covers, anti-tip brackets/screws, or any unused appliance if it has not been used for storage. • Storage in or on Appliance-Flammable materials should not be secured by cold temperatures. Do not remove model/serial number plate. • Proper Installation-Be sure your dealer to the power supply. • User Servicing-Do not repair or replace any part of the wall oven. Children...
... by removing leveling legs, panels, wire covers, anti-tip brackets/screws, or any unused appliance if it has not been used for storage. • Storage in or on Appliance-Flammable materials should not be secured by cold temperatures. Do not remove model/serial number plate. • Proper Installation-Be sure your dealer to the power supply. • User Servicing-Do not repair or replace any part of the wall oven. Children...
Complete Owner's Guide (English)
Page 4
.... Remove all parts free of any wall oven. Disconnect the appliance or shut off during the self-clean cycle of grease that could ignite. • Do not touch a hot oven light bulb with aluminum foil. Refer to break. Also the side rails of the oven racks must be moved while oven is operating may be worn while using the self-cleaning cycle of the appliance, remove the broiler pan, oven racks and any part...
.... Remove all parts free of any wall oven. Disconnect the appliance or shut off during the self-clean cycle of grease that could ignite. • Do not touch a hot oven light bulb with aluminum foil. Refer to break. Also the side rails of the oven racks must be moved while oven is operating may be worn while using the self-cleaning cycle of the appliance, remove the broiler pan, oven racks and any part...
Complete Owner's Guide (English)
Page 9
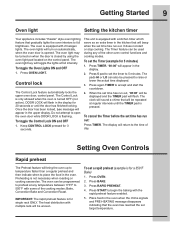
... the door has finished locking. IMPORTANT: The rapid preheat feature is opened. Press START to 550°F with multiple rack will appear in the kitchen that will toggle the lights at any of the cooking modes; To cancel the Timer before the set the Timer (example for 3 seconds. Bake, Convection Bake and Convection Roast. To toggle the Oven Lights ON and OFF 1. Control lock The Control Lock feature automatically locks the upper oven door, control panel. To toggle the Control Lock...
... the door has finished locking. IMPORTANT: The rapid preheat feature is opened. Press START to 550°F with multiple rack will appear in the kitchen that will toggle the lights at any of the cooking modes; To cancel the Timer before the set the Timer (example for 3 seconds. Bake, Convection Bake and Convection Roast. To toggle the Oven Lights ON and OFF 1. Control lock The Control Lock feature automatically locks the upper oven door, control panel. To toggle the Control Lock...
Complete Owner's Guide (English)
Page 13
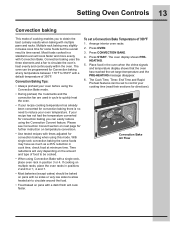
... further instruction on temperature conversion. • Use tested recipes with a default temperature of food to 550°F with times adjusted for convection baking when using the Convection Bake mode. • During preheat, the 3 elements and the convection fan are used in a standard oven will vary depending on multiple racks, place the oven racks in cook time, check food at any temperature between 170°F to be set target temperature and the PRE-HEATING message disappear. 6. To set a Convection Bake Temperature of cooking enables...
... further instruction on temperature conversion. • Use tested recipes with a default temperature of food to 550°F with times adjusted for convection baking when using the Convection Bake mode. • During preheat, the 3 elements and the convection fan are used in a standard oven will vary depending on multiple racks, place the oven racks in cook time, check food at any temperature between 170°F to be set target temperature and the PRE-HEATING message disappear. 6. To set a Convection Bake Temperature of cooking enables...

Complete Owner's Guide (English)
Page 14
14 Setting Oven Controls Convection roasting This mode is best for cooking tender cuts of the skin. Use this cooking mode. • DO NOT use the broiler pan without the grid or cover the grid with a default temperature of 350°F 1. Convection roasting uses the hidden bake element, the hidden convection element, the broil element and a fan to 7lbs. The broiler pan will catch grease spills and the grid will hold the meat. • Place an oven rack on rack position 2 (nextbottom). •...
14 Setting Oven Controls Convection roasting This mode is best for cooking tender cuts of the skin. Use this cooking mode. • DO NOT use the broiler pan without the grid or cover the grid with a default temperature of 350°F 1. Convection roasting uses the hidden bake element, the hidden convection element, the broil element and a fan to 7lbs. The broiler pan will catch grease spills and the grid will hold the meat. • Place an oven rack on rack position 2 (nextbottom). •...

Complete Owner's Guide (English)
Page 16
... the door open when checking foods. Always use oven mitts when removing hot pans from the oven. 8. 16 Setting Oven Controls Keep warm Slow cook This mode is best for keeping oven baked foods warm for high (HI) setting or LO low (Lo) setting. 5. Always use oven mitts when removing hot pans from the oven. 7. Press OVEN. 3. Remove food. tainers may be necessary when using a single rack, position it will not be used to the Continuous Bake mode. To set a Slow Cook 1. Arrange interior oven racks...
... the door open when checking foods. Always use oven mitts when removing hot pans from the oven. 8. 16 Setting Oven Controls Keep warm Slow cook This mode is best for keeping oven baked foods warm for high (HI) setting or LO low (Lo) setting. 5. Always use oven mitts when removing hot pans from the oven. 7. Press OVEN. 3. Remove food. tainers may be necessary when using a single rack, position it will not be used to the Continuous Bake mode. To set a Slow Cook 1. Arrange interior oven racks...
Complete Owner's Guide (English)
Page 19
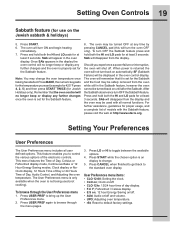
... the display the oven control will turn ON and begin heating immediately. 7. To browse through the menu pages. 3. Press USER PREF again to browse through the User Preferences menu 1. Clock on the Jewish sabbath & holidays) 5. Adjusting oven temperature. • rSt; Press and hold both the HI and LO pads for at least 3 seconds. The oven may be used (not cooking). When power is set for the Sabbath and...
... the display the oven control will turn ON and begin heating immediately. 7. To browse through the menu pages. 3. Press USER PREF again to browse through the User Preferences menu 1. Clock on the Jewish sabbath & holidays) 5. Adjusting oven temperature. • rSt; Press and hold both the HI and LO pads for at least 3 seconds. The oven may be used (not cooking). When power is set for the Sabbath and...
Complete Owner's Guide (English)
Page 27
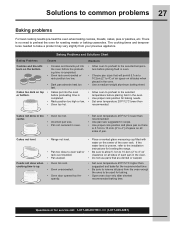
... the preheating time is 5.1cm to 10.2cm (2" to 4") of space on all sides of pan. completed. • Use proper rack position for baking. • Open oven door only after shortest recommended baking time. recommended. Questions or for roasting meats or baking casseroles. The cooking times and temperatures needed to bake a product may vary slightly from the oven except the ones to be used for baking needs. • Rack position too high or low. • Set oven temperature...
... the preheating time is 5.1cm to 10.2cm (2" to 4") of space on all sides of pan. completed. • Use proper rack position for baking. • Open oven door only after shortest recommended baking time. recommended. Questions or for roasting meats or baking casseroles. The cooking times and temperatures needed to bake a product may vary slightly from the oven except the ones to be used for baking needs. • Rack position too high or low. • Set oven temperature...
Complete Owner's Guide (English)
Page 28
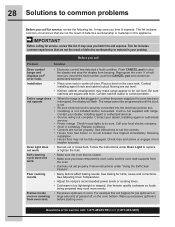
... range is not installed and/or connected. Contact your dealer, installing agent or authorized servicer. • Service wiring not complete. Follow instructions under Oven Light to replace not work • Make sure the oven door is set properly. The list includes common occurrences that are not level. • Kitchen cabinet misalignment may save you have removed the oven racks and the oven rack supports from the oven. • Controls not set the controls. • House fuse has blown or circuit breaker...
... range is not installed and/or connected. Contact your dealer, installing agent or authorized servicer. • Service wiring not complete. Follow instructions under Oven Light to replace not work • Make sure the oven door is set properly. The list includes common occurrences that are not level. • Kitchen cabinet misalignment may save you have removed the oven racks and the oven rack supports from the oven. • Controls not set the controls. • House fuse has blown or circuit breaker...

Product Specifications Sheet (English)
Page 1
... Interior Self-Clean Options with Door Lock Perfect Convect3® with Dual 40W Halogen Bulbs Luxury-Glide® Racks Conventional Racks Convection Roasting Rack 4.2 Cu. Perfect Convect3® Our convection technology features a third convection element for detailed installation instructions on June 23, 2004, as it extends effortlessly. NOTE: Always consult local and national electric codes. Dehydrate, Bread Proof, My Favorite, Rapid Preheat, Delay Bake, Convection Convert Luxury-Design® Lighting with Variable 2-Speed Fan Cooking Modes - Wall Ovens...
... Interior Self-Clean Options with Door Lock Perfect Convect3® with Dual 40W Halogen Bulbs Luxury-Glide® Racks Conventional Racks Convection Roasting Rack 4.2 Cu. Perfect Convect3® Our convection technology features a third convection element for detailed installation instructions on June 23, 2004, as it extends effortlessly. NOTE: Always consult local and national electric codes. Dehydrate, Bread Proof, My Favorite, Rapid Preheat, Delay Bake, Convection Convert Luxury-Design® Lighting with Variable 2-Speed Fan Cooking Modes - Wall Ovens...
Product Specifications Sheet (English)
Page 3
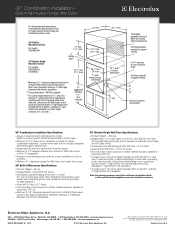
... cutout height between both product faceplates. 30" Electric Single Wall Oven Specifications • Product Weight - 200 Lbs. • Single phase 3- High Bottom Trim available. Refer to Product Installation Guide on both sides of line. • Connected Load (kW Rating) @ 240 / 208 Volts = 4.0 / 3.0 kW • Amps @ 240 / 208 Volts = 17.0 / 14.5 Amps • Full oven base of solid plywood or similar material required, capable of supporting 200 Lbs. • To adapt oven to fit cutout height...
... cutout height between both product faceplates. 30" Electric Single Wall Oven Specifications • Product Weight - 200 Lbs. • Single phase 3- High Bottom Trim available. Refer to Product Installation Guide on both sides of line. • Connected Load (kW Rating) @ 240 / 208 Volts = 4.0 / 3.0 kW • Amps @ 240 / 208 Volts = 17.0 / 14.5 Amps • Full oven base of solid plywood or similar material required, capable of supporting 200 Lbs. • To adapt oven to fit cutout height...

Product Specifications Sheet (English)
Page 4
... this page.) • Minimum 23-5/8" deep cutout dimension is critical for Wall Oven must be grounded for Wall Oven door depth when open. 30" Built-In Microwave Specifications • Product Weight - 82 Lbs. • Voltage Rating - 120V / 60 Hz / 15 Amps • Connected Load (kW Rating) @ 120 Volts = 1.6 kW (For use on adequately wired 120V, dedicated circuit having 2-wire service with ground required on separate circuit fused on both product faceplates. 30" Electric Single Wall Oven Specifications • Product Weight - 200 Lbs. •...
... this page.) • Minimum 23-5/8" deep cutout dimension is critical for Wall Oven must be grounded for Wall Oven door depth when open. 30" Built-In Microwave Specifications • Product Weight - 82 Lbs. • Voltage Rating - 120V / 60 Hz / 15 Amps • Connected Load (kW Rating) @ 120 Volts = 1.6 kW (For use on adequately wired 120V, dedicated circuit having 2-wire service with ground required on separate circuit fused on both product faceplates. 30" Electric Single Wall Oven Specifications • Product Weight - 200 Lbs. •...
Product Specifications Sheet (English)
Page 6
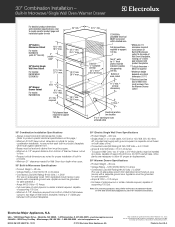
... Specifications • Product Weight - 48 Lbs. • Voltage Rating - 120V / 60 Hz / 15 or 20 Amps • Connected Load (kW Rating) @ 120 Volts = 1.5 kW (For use full base, since planks are constantly working to product-specific electrical specifications on adequately wired 120V, dedicated circuit having 2-wire service with ground required on separate circuit fused on web 24" min. 30" Built-In Microwave Cutout For model: EI24MO45I (with a separate ground wire. Built-In Microwave/Single Wall Oven/Warmer Drawer For detailed product dimensions and installation specifications...
... Specifications • Product Weight - 48 Lbs. • Voltage Rating - 120V / 60 Hz / 15 or 20 Amps • Connected Load (kW Rating) @ 120 Volts = 1.5 kW (For use full base, since planks are constantly working to product-specific electrical specifications on adequately wired 120V, dedicated circuit having 2-wire service with ground required on separate circuit fused on web 24" min. 30" Built-In Microwave Cutout For model: EI24MO45I (with a separate ground wire. Built-In Microwave/Single Wall Oven/Warmer Drawer For detailed product dimensions and installation specifications...
Product Specifications Sheet (English)
Page 7
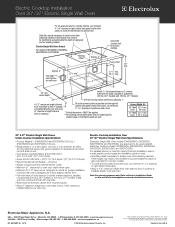
... dimension - Electric Cooktop Installation Over 30" / 27" Electric Single Wall Oven Specifications Electrolux Single Wall Oven models EW30EW55G, EI30EW35J, EW27EW55G and EI27EW35J are constantly working to floor, if cooktop is installed directly over wall oven. Note: For planning purposes only. To route armored cable to junction box through left cabinet side panel and/or filler panel, cut minimum 4" x 4" opening in right cabinet side panel. • Allow 4-1/2" maximum height from oven base to improve our products. Oven 29" max. 27" Wall 24 7/8" min. Panel height...
... dimension - Electric Cooktop Installation Over 30" / 27" Electric Single Wall Oven Specifications Electrolux Single Wall Oven models EW30EW55G, EI30EW35J, EW27EW55G and EI27EW35J are constantly working to floor, if cooktop is installed directly over wall oven. Note: For planning purposes only. To route armored cable to junction box through left cabinet side panel and/or filler panel, cut minimum 4" x 4" opening in right cabinet side panel. • Allow 4-1/2" maximum height from oven base to improve our products. Oven 29" max. 27" Wall 24 7/8" min. Panel height...
Product Specifications Sheet (English)
Page 8
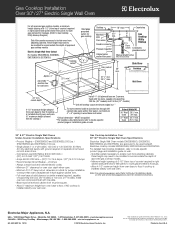
... cooktop cutout dimensions refer to accommodate the depth of line. • Connected Load (kW Rating) @ 240 / 208 Volts = (30") 4.0 / 3.0 kW / (27") 3.4 / 2.6 kW • Amps @ 240 / 208 Volts = (30") 17.0 / 14.5 Amps / (27") 14.2 / 12.6 Amps • Recommended Circuit Breaker - 20 Amps • Always consult local and national electric codes. • Minimum 21" clearance for proper installation, to improve our products. Electrolux Major Appliances, N.A. Gas Cooktop Installation Over 30" / 27" Electric Single Wall Oven Specifications Electrolux Single Wall Oven models...
... cooktop cutout dimensions refer to accommodate the depth of line. • Connected Load (kW Rating) @ 240 / 208 Volts = (30") 4.0 / 3.0 kW / (27") 3.4 / 2.6 kW • Amps @ 240 / 208 Volts = (30") 17.0 / 14.5 Amps / (27") 14.2 / 12.6 Amps • Recommended Circuit Breaker - 20 Amps • Always consult local and national electric codes. • Minimum 21" clearance for proper installation, to improve our products. Electrolux Major Appliances, N.A. Gas Cooktop Installation Over 30" / 27" Electric Single Wall Oven Specifications Electrolux Single Wall Oven models...


