Complete Owner's Guide (English)
Page 2
... Use & Care Guide is part of our commitment to customer satisfaction and product quality throughout the service life of a relationship. Questions? Time of day display - 12 or 24 hours.........20 • Setting temperature display - You can register online at power up 8 • Temperature visual display 8 • Oven light 9 • Control lock 9 • Setting the kitchen timer 9 Setting oven controls 9-19 • Rapid preheat 9 • Baking 10 • Cook time 11 • End time 11 • Broiling 12 • Convection baking 13 • Convection roasting...
... Use & Care Guide is part of our commitment to customer satisfaction and product quality throughout the service life of a relationship. Questions? Time of day display - 12 or 24 hours.........20 • Setting temperature display - You can register online at power up 8 • Temperature visual display 8 • Oven light 9 • Control lock 9 • Setting the kitchen timer 9 Setting oven controls 9-19 • Rapid preheat 9 • Baking 10 • Cook time 11 • End time 11 • Broiling 12 • Convection baking 13 • Convection roasting...
Complete Owner's Guide (English)
Page 3
... the circuit breaker or fuse box in minor personal injury. • Remove the oven door from any part of this appliance. Hazards or unsafe practices which COULD result in an oven. When you do not understand. Do not store items of an emergency. See installation instructions. Do not remove model/serial number plate. • Proper Installation-Be sure your dealer, distributor, service agent or manufacturer about safety instructions Warning...
... the circuit breaker or fuse box in minor personal injury. • Remove the oven door from any part of this appliance. Hazards or unsafe practices which COULD result in an oven. When you do not understand. Do not store items of an emergency. See installation instructions. Do not remove model/serial number plate. • Proper Installation-Be sure your dealer, distributor, service agent or manufacturer about safety instructions Warning...
Complete Owner's Guide (English)
Page 4
... Enforcement Act requires the Governor of California to accumulate. Never use the broiler pan without its insert. Do not let the pot holders touch the hot heating elements. Disconnect the appliance or shut off during the self-clean cycle of some birds is cool. The door gasket is vented at the upper control panel or at the center trim depending on the model. Care should be...
... Enforcement Act requires the Governor of California to accumulate. Never use the broiler pan without its insert. Do not let the pot holders touch the hot heating elements. Disconnect the appliance or shut off during the self-clean cycle of some birds is cool. The door gasket is vented at the upper control panel or at the center trim depending on the model. Care should be...
Complete Owner's Guide (English)
Page 5
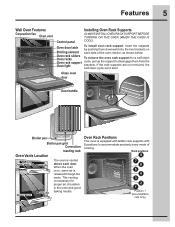
... the brackets. This venting is on Broiling element each door. Rack positions Position 1 (Non-SLIDING rack only) Glass oven door Door handle Broiler pan Broiler pan grid Convection roasting rack Oven Vents Location Oven Vent Oven Vent Warm Air Warm Air The oven is Control panel cool). When the oven is necessary for a self-clean cycle, pull up the support to accommodate precisely every mode of the oven interior, as shown below. Features 5 Wall Oven Features Convection fan Oven vent Installing Oven Rack Supports Always install oven rack support before turning on...
... the brackets. This venting is on Broiling element each door. Rack positions Position 1 (Non-SLIDING rack only) Glass oven door Door handle Broiler pan Broiler pan grid Convection roasting rack Oven Vents Location Oven Vent Oven Vent Warm Air Warm Air The oven is Control panel cool). When the oven is necessary for a self-clean cycle, pull up the support to accommodate precisely every mode of the oven interior, as shown below. Features 5 Wall Oven Features Convection fan Oven vent Installing Oven Rack Supports Always install oven rack support before turning on...
Complete Owner's Guide (English)
Page 9
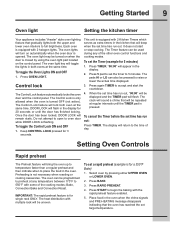
... BAKE. 3. Getting Started 9 Oven light Setting the kitchen timer Your appliance includes "theater" style oven lighting feature that will beep when the set time has run out. Control lock The Control Lock feature automatically locks the oven door and the control panel. Press again TIMER to place the food in the kitchen that gradually lights both the upper and lower oven interiors to oven door while DOOR LOCK is turned OFF (not active). Select oven by using the oven light pad located on automatically when the oven door...
... BAKE. 3. Getting Started 9 Oven light Setting the kitchen timer Your appliance includes "theater" style oven lighting feature that will beep when the set time has run out. Control lock The Control Lock feature automatically locks the oven door and the control panel. Press again TIMER to place the food in the kitchen that gradually lights both the upper and lower oven interiors to oven door while DOOR LOCK is turned OFF (not active). Select oven by using the oven light pad located on automatically when the oven door...
Complete Owner's Guide (English)
Page 10
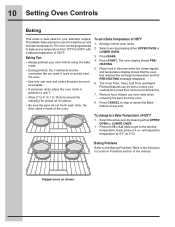
... directions). 7. Always use oven mitts when removing hot pans from 170°F to 550°F with a default temperature of + or - will adjust the temperature by pressing either UPPER OVEN or LOWER OVEN. 3. Press CANCEL to stop or cancel the Bake feature at any time. The Cook Time, Timer, End Time and Rapid Preheat features can be set a Bake Temperature of 425°F 1. 10 Setting Oven Controls Baking This mode is used to heat the air and maintain temperature. Press BAKE. 4. To set...
... directions). 7. Always use oven mitts when removing hot pans from 170°F to 550°F with a default temperature of + or - will adjust the temperature by pressing either UPPER OVEN or LOWER OVEN. 3. Press CANCEL to stop or cancel the Bake feature at any time. The Cook Time, Timer, End Time and Rapid Preheat features can be set a Bake Temperature of 425°F 1. 10 Setting Oven Controls Baking This mode is used to heat the air and maintain temperature. Press BAKE. 4. To set...

Complete Owner's Guide (English)
Page 13
... cooking time (read their sections for directions). 7. Please see Convection Convert section on next page for further instruction on pans with a dark finish will vary depending on pans with no need to be baked on temperature conversion. • Use tested recipes with multiple pans and racks. Setting Oven Controls 13 Convection baking This mode of cooking enables you can be set to 550°F with a default temperature of 350°F. Arrange interior oven racks. 2. Press START. Multiple rack baking...
... cooking time (read their sections for directions). 7. Please see Convection Convert section on next page for further instruction on pans with a dark finish will vary depending on pans with no need to be baked on temperature conversion. • Use tested recipes with multiple pans and racks. Setting Oven Controls 13 Convection baking This mode of cooking enables you can be set to 550°F with a default temperature of 350°F. Arrange interior oven racks. 2. Press START. Multiple rack baking...

Complete Owner's Guide (English)
Page 14
... interior oven racks. 2. 14 Setting Oven Controls Convection roasting This mode is best for Convection Roasting at any temperature between 170°F to use oven mitts when removing hot pans from the oven. 7. Use this cooking mode. • DO NOT use the broiler pan without the grid or cover the grid with foil to circulate under the food for directions). 6. The roasting rack will help prevent spatters. The roasting rack fits on the roasting rack. Press START. 5. The Cook Time, Timer, End Time and Rapid Preheat features...
... interior oven racks. 2. 14 Setting Oven Controls Convection roasting This mode is best for Convection Roasting at any temperature between 170°F to use oven mitts when removing hot pans from the oven. 7. Use this cooking mode. • DO NOT use the broiler pan without the grid or cover the grid with foil to circulate under the food for directions). 6. The roasting rack will help prevent spatters. The roasting rack fits on the roasting rack. Press START. 5. The Cook Time, Timer, End Time and Rapid Preheat features...

Complete Owner's Guide (English)
Page 15
... the oven's heat evenly and continuously within the oven. Press CONVECTION CONVERT. Convection broiling uses the broil element and a fan to a convection bake temperature 1. Season and serve. • Always pull the rack out to display the actual converted (reduced) temperature in the display. When set a Convection Broil Temperature of the bake time complete. Press CONVECTION BAKE. 3. Press START to spread and cause personal injury. Should an oven fire occur, leave the oven door closed or the fan will sound 3 long beeps...
... the oven's heat evenly and continuously within the oven. Press CONVECTION CONVERT. Convection broiling uses the broil element and a fan to a convection bake temperature 1. Season and serve. • Always pull the rack out to display the actual converted (reduced) temperature in the display. When set a Convection Broil Temperature of the bake time complete. Press CONVECTION BAKE. 3. Press START to spread and cause personal injury. Should an oven fire occur, leave the oven door closed or the fan will sound 3 long beeps...
Complete Owner's Guide (English)
Page 16
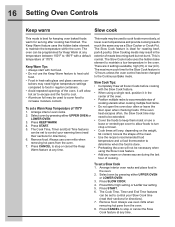
... openings of the oven, it in heat-safe glass and glass ceramic con- Press CANCEL to increase moisture content. The oven can be programmed for directions). 6. The Cook Time, Timer and End Time features can be set to control your Slow Cook time (read their sections for directions). 7. Arrange interior oven racks. 2. Select oven by pressing either UPPER OVEN or LOWER OVEN. 3. The Keep Warm feature uses the hidden bake element to maintain a low temperature in the oven...
... openings of the oven, it in heat-safe glass and glass ceramic con- Press CANCEL to increase moisture content. The oven can be programmed for directions). 6. The Cook Time, Timer and End Time features can be set to control your Slow Cook time (read their sections for directions). 7. Arrange interior oven racks. 2. Select oven by pressing either UPPER OVEN or LOWER OVEN. 3. The Keep Warm feature uses the hidden bake element to maintain a low temperature in the oven...
Complete Owner's Guide (English)
Page 17
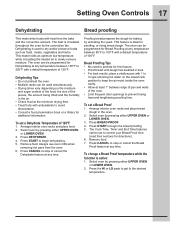
... UPPER OVEN or LOWER OVEN. 3. Remove food. Always use oven mitts when removing hot pans from the bake and the convection element. Bread Proofing Tips • No need to preheat for additional information. Press START to dry and/or preserve foods such as fruits, meats, vegetables and herbs. Dehydrating Tips • Do not preheat the oven. • Multiple racks can be set to 225°F with a default temperature of...
... UPPER OVEN or LOWER OVEN. 3. Remove food. Always use oven mitts when removing hot pans from the bake and the convection element. Bread Proofing Tips • No need to preheat for additional information. Press START to dry and/or preserve foods such as fruits, meats, vegetables and herbs. Dehydrating Tips • Do not preheat the oven. • Multiple racks can be set to 225°F with a default temperature of...
Complete Owner's Guide (English)
Page 19
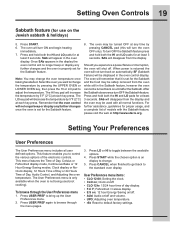
... longer beep or display any further changes once the oven is not being used with the Sabbath feature, please visit the web at least 3 seconds. For further assistance, guidelines for the Sabbath feature. 8. Press CANCEL when finished to get back to default factory settings. Setting the clock. • CLO on /off . • CLO 12hr; 12/24 hour time of the electronic controls. Adjusting oven temperature...
... longer beep or display any further changes once the oven is not being used with the Sabbath feature, please visit the web at least 3 seconds. For further assistance, guidelines for the Sabbath feature. 8. Press CANCEL when finished to get back to default factory settings. Setting the clock. • CLO on /off . • CLO 12hr; 12/24 hour time of the electronic controls. Adjusting oven temperature...
Complete Owner's Guide (English)
Page 25
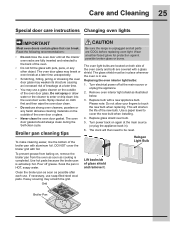
... Light Bulb Lift backside of the oven cavity and both are fully inserted and retracted to enter or drip down into the oven door vents. Care and Cleaning 25 Special door care instructions Changing oven lights IMPORTANT Most oven doors contain glass that can break. Spray cleaner on again at a later time. • You may scratch the grid. Use hot pads because the broiler pan is unplugged and all the interior oven racks are covered...
... Light Bulb Lift backside of the oven cavity and both are fully inserted and retracted to enter or drip down into the oven door vents. Care and Cleaning 25 Special door care instructions Changing oven lights IMPORTANT Most oven doors contain glass that can break. Spray cleaner on again at a later time. • You may scratch the grid. Use hot pads because the broiler pan is unplugged and all the interior oven racks are covered...
Complete Owner's Guide (English)
Page 27
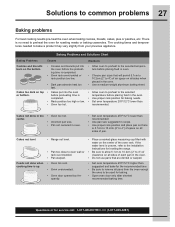
... sides when placed in oven. • Set oven temperature 25°F/12°C lower than recommended. • Use pan size suggested and bake for baking. • Open oven door only after shortest recommended baking time. Cakes not level. The cooking times and temperatures needed to bake a product may vary slightly from the oven except the ones to be used for the recommended time. • Be sure to preheat the oven for service call: 1-877-4ELECTROLUX (1-877...
... sides when placed in oven. • Set oven temperature 25°F/12°C lower than recommended. • Use pan size suggested and bake for baking. • Open oven door only after shortest recommended baking time. Cakes not level. The cooking times and temperatures needed to bake a product may vary slightly from the oven except the ones to be used for the recommended time. • Be sure to preheat the oven for service call: 1-877-4ELECTROLUX (1-877...

Complete Owner's Guide (English)
Page 28
... oven vent before starting oven. Contact cabinet maker to replace not work • Make sure the oven door is set properly. Oven light does • Burned-out or loose bulb. Follow the instructions under "Using the Self-Clean Feature". For example this list. Before you call : 1-877-4ELECTROLUX (1-877-435-3287) Place a level on the oven bottom. Replace cord/plug. • Controls are not the result of grease left on the oven rack. See baking for service, review...
... oven vent before starting oven. Contact cabinet maker to replace not work • Make sure the oven door is set properly. Oven light does • Burned-out or loose bulb. Follow the instructions under "Using the Self-Clean Feature". For example this list. Before you call : 1-877-4ELECTROLUX (1-877-435-3287) Place a level on the oven bottom. Replace cord/plug. • Controls are not the result of grease left on the oven rack. See baking for service, review...
Installation Instructions (English, Spanish, French)
Page 1
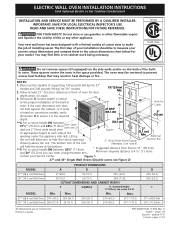
... of cutout sizes to hide the cutout openings showing above the unit. The first step of the built-in the space provided. Canada United States Do not remove spacers (if equipped) on the side walls and/or on convection models, verify dimension G to prevent excess heat buildup that may find little or no cabinet work being necessary. Base must be capable of oven for door...
... of cutout sizes to hide the cutout openings showing above the unit. The first step of the built-in the space provided. Canada United States Do not remove spacers (if equipped) on the side walls and/or on convection models, verify dimension G to prevent excess heat buildup that may find little or no cabinet work being necessary. Base must be capable of oven for door...
Installation Instructions (English, Spanish, French)
Page 3
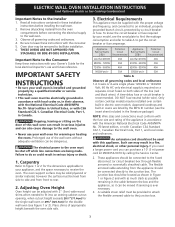
...) wide wood shims when needed to facilitate installation. 6. Adjusting Oven Height Oven height can be removed to fit into an existing cabinet cutout opening, when cutout height exceeds 281/8" (71.4cm) for the single wall oven or 49½" (125.7cm) for the local electrical inspector's use may be dangerous. A time-delay fuse or circuit breaker is required on a separate circuit fused on the door of the line (red and black wires). THESE OVENS ARE NOT APPROVED FOR STACKABLE...
...) wide wood shims when needed to facilitate installation. 6. Adjusting Oven Height Oven height can be removed to fit into an existing cabinet cutout opening, when cutout height exceeds 281/8" (71.4cm) for the single wall oven or 49½" (125.7cm) for the local electrical inspector's use may be dangerous. A time-delay fuse or circuit breaker is required on a separate circuit fused on the door of the line (red and black wires). THESE OVENS ARE NOT APPROVED FOR STACKABLE...
Installation Instructions (English, Spanish, French)
Page 7
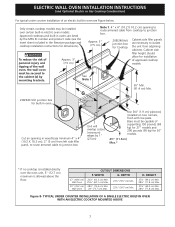
....7 cm) Min. ELECTRIC WALL OVEN INSTALLATION INSTRUCTIONS (and Optional Electric or Gas Cooktop Combination) For typical under counter installation of supporting 150 pounds (68 kg) for 27" models and 200 pounds (90 kg) for built-in oven. by mounting brackets. Approx. 3" (7.5 cm) 208/240Volt junction box for Cooktop Cabinet side filler panels are listed Note 1: 4" x 4" (10.2 X 10.2 cm) opening in the literature package and cooktop installation instructions for dimensions). Cabinet side filler height should allow for installation To reduce...
....7 cm) Min. ELECTRIC WALL OVEN INSTALLATION INSTRUCTIONS (and Optional Electric or Gas Cooktop Combination) For typical under counter installation of supporting 150 pounds (68 kg) for 27" models and 200 pounds (90 kg) for built-in oven. by mounting brackets. Approx. 3" (7.5 cm) 208/240Volt junction box for Cooktop Cabinet side filler panels are listed Note 1: 4" x 4" (10.2 X 10.2 cm) opening in the literature package and cooktop installation instructions for dimensions). Cabinet side filler height should allow for installation To reduce...
Installation Instructions (English, Spanish, French)
Page 8
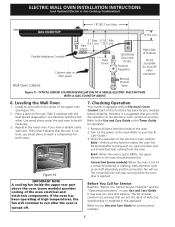
... models)-When the oven is turned off. 7. Figure 10 IMPORTANT NOTE A cooling fan inside of Cabinet (To be accessible for a convection baking or roasting, both elements cycle on the power to the oven (Refer to the Use and Care Guide or the Timer Guide for both ovens. Turn on and off valve operation) Figure 9 - It may save you have a double cavity wall oven. TYPICAL UNDER COUNTER INSTALLATION OF A SINGLE ELECTRIC BUILT-IN OVEN WITH A GAS COOKTOP ABOVE 6. Place a level on , open the door...
... models)-When the oven is turned off. 7. Figure 10 IMPORTANT NOTE A cooling fan inside of Cabinet (To be accessible for a convection baking or roasting, both elements cycle on the power to the oven (Refer to the Use and Care Guide or the Timer Guide for both ovens. Turn on and off valve operation) Figure 9 - It may save you have a double cavity wall oven. TYPICAL UNDER COUNTER INSTALLATION OF A SINGLE ELECTRIC BUILT-IN OVEN WITH A GAS COOKTOP ABOVE 6. Place a level on , open the door...
Product Specifications Sheet (English)
Page 1
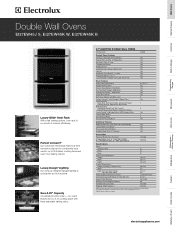
...ovens) Hidden Bake Element Electric Bake Element 1450 Watts Six-Pass Broil Element 3400 Watts Convection Element - 2500 Watts Cobalt Blue Interior Self-Clean Options with Door Lock Perfect Convect3® with three adjustable baking racks. 27" ELECTRIC DOUBLE WALL OVENS Configuration Double Control Panel Features IQ-Touch™ Electronic Oven Controls Yes Keypad Entry of cooking space with Variable 2-Speed Fans Cooking Modes - Luxury-Design® Lighting Our ramp-up to Front Door Corner) (with Dual 40W Halogen Bulbs Luxury-Glide® Racks Conventional Racks Convection Roasting...
...ovens) Hidden Bake Element Electric Bake Element 1450 Watts Six-Pass Broil Element 3400 Watts Convection Element - 2500 Watts Cobalt Blue Interior Self-Clean Options with Door Lock Perfect Convect3® with three adjustable baking racks. 27" ELECTRIC DOUBLE WALL OVENS Configuration Double Control Panel Features IQ-Touch™ Electronic Oven Controls Yes Keypad Entry of cooking space with Variable 2-Speed Fans Cooking Modes - Luxury-Design® Lighting Our ramp-up to Front Door Corner) (with Dual 40W Halogen Bulbs Luxury-Glide® Racks Conventional Racks Convection Roasting...


