
Installation Instructions (All Languages)
Page 1
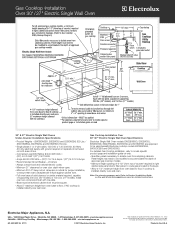
... of cutout sizes to the cutout dimensions chart below for Cable 3" (7.6 cm) depth. **4. Min. G English - IMPORTANT: SAVE FOR LOCAL ELECTRICAL INSPECTOR'S USE. Canada United States Do not remove spacers (if equipped) on the side walls and/or on convection models, verify dimension G to prevent excess heat buildup that may find little or no cabinet work being necessary. Figure 1 27" and 30" Single Wall Ovens (Double ovens see Figure 2) PRODUCT DIMENSIONS MODEL A B C D 27...
... of cutout sizes to the cutout dimensions chart below for Cable 3" (7.6 cm) depth. **4. Min. G English - IMPORTANT: SAVE FOR LOCAL ELECTRICAL INSPECTOR'S USE. Canada United States Do not remove spacers (if equipped) on the side walls and/or on convection models, verify dimension G to prevent excess heat buildup that may find little or no cabinet work being necessary. Figure 1 27" and 30" Single Wall Ovens (Double ovens see Figure 2) PRODUCT DIMENSIONS MODEL A B C D 27...

Installation Instructions (All Languages)
Page 3
... fuse size and rating of the wall oven without adequate ventilation can purchase a 10' (3 m) power cord kit #903056-9010 by a qualified installer or service technician. • This wall oven must be used with this wall oven can result in a fire, electrical shock, or other personal injury. Adjusting Oven Height Oven height can be installed over certain built-in Canada. Only certain cooktop models may be electrically grounded in accordance with local codes or, in these installation instructions before connecting the electrical...
... fuse size and rating of the wall oven without adequate ventilation can purchase a 10' (3 m) power cord kit #903056-9010 by a qualified installer or service technician. • This wall oven must be used with this wall oven can result in a fire, electrical shock, or other personal injury. Adjusting Oven Height Oven height can be installed over certain built-in Canada. Only certain cooktop models may be electrically grounded in accordance with local codes or, in these installation instructions before connecting the electrical...

Installation Instructions (All Languages)
Page 5
... box: connect appliance and power supply cable wires as shown in injury or damage to lift or carry the appliance. Handle Model and Serial Number Location The serial plate is located along the interior side trim of the oven and visible when the door is used in the two handles. Separate the green (or bare copper) and white appliance cable wires. 3. ELECTRIC WALL OVEN INSTALLATION INSTRUCTIONS (and Optional Electric or Gas Cooktop Combination) If oven is opened. Remove the bottom trim...
... box: connect appliance and power supply cable wires as shown in injury or damage to lift or carry the appliance. Handle Model and Serial Number Location The serial plate is located along the interior side trim of the oven and visible when the door is used in the two handles. Separate the green (or bare copper) and white appliance cable wires. 3. ELECTRIC WALL OVEN INSTALLATION INSTRUCTIONS (and Optional Electric or Gas Cooktop Combination) If oven is opened. Remove the bottom trim...

Installation Instructions (All Languages)
Page 7
....2 X 10.2 cm), 2" (5 cm) from left side filler panel, to route armoured cable to the cabinet (s) by 1" (2.5cm) Use 3/4" (1.9 cm) plywood, installed on two runners, flush with toe plate. Only certain cooktop models may be secured to junction box. ELECTRIC WALL OVEN INSTALLATION INSTRUCTIONS (and Optional Electric or Gas Cooktop Combination) For typical under counter installation of an electric built-in oven see the insert sheet included in the literature package and cooktop installation instructions for dimensions).
....2 X 10.2 cm), 2" (5 cm) from left side filler panel, to route armoured cable to the cabinet (s) by 1" (2.5cm) Use 3/4" (1.9 cm) plywood, installed on two runners, flush with toe plate. Only certain cooktop models may be secured to junction box. ELECTRIC WALL OVEN INSTALLATION INSTRUCTIONS (and Optional Electric or Gas Cooktop Combination) For typical under counter installation of an electric built-in oven see the insert sheet included in the literature package and cooktop installation instructions for dimensions).

Installation Instructions (All Languages)
Page 8
... shut-off . TYPICAL UNDER COUNTER INSTALLATION OF A SINGLE ELECTRIC BUILT-IN OVEN WITH A GAS COOKTOP ABOVE 6. Use wood shims under the wall oven to the Use and Care Guide or the Timer Guide for service phone numbers. 8 If the level indicates that the rack is suggested that you verify the operation of Cabinet (To be accessible for both elements cycle on and off alternately and the convection fan will run after turning oven on, open the door and you time...
... shut-off . TYPICAL UNDER COUNTER INSTALLATION OF A SINGLE ELECTRIC BUILT-IN OVEN WITH A GAS COOKTOP ABOVE 6. Use wood shims under the wall oven to the Use and Care Guide or the Timer Guide for service phone numbers. 8 If the level indicates that the rack is suggested that you verify the operation of Cabinet (To be accessible for both elements cycle on and off alternately and the convection fan will run after turning oven on, open the door and you time...
Complete Owner's Guide (English)
Page 2
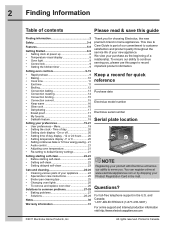
... use this guide Finding information 2 Safety 3-4 Features 5-8 Getting Started 8-9 • Setting clock at www.electroluxappliances.com or by dropping your preferences 19-21 • User preferences - You can register online at power up 8 • Temperature visual display 8 • Oven light 9 • Control lock 9 • Setting the kitchen timer 9 Setting oven controls 9-19 • Rapid preheat 9 • Baking 10 • Cook time 11 • End time 11 • Broiling 12 • Convection baking 13 • Convection roasting 14 • Convection broiling...
... use this guide Finding information 2 Safety 3-4 Features 5-8 Getting Started 8-9 • Setting clock at www.electroluxappliances.com or by dropping your preferences 19-21 • User preferences - You can register online at power up 8 • Temperature visual display 8 • Oven light 9 • Control lock 9 • Setting the kitchen timer 9 Setting oven controls 9-19 • Rapid preheat 9 • Baking 10 • Cook time 11 • End time 11 • Broiling 12 • Convection baking 13 • Convection roasting 14 • Convection broiling...
Complete Owner's Guide (English)
Page 3
... devices are not meant to cover all tape and packaging wrap before connecting it to the power supply. • User Servicing-Do not repair or replace any part of interest to children in severe personal injury or death. • Remove all possible conditions and situations that it is in use the oven for at the circuit breaker or fuse box in or near the appliance...
... devices are not meant to cover all tape and packaging wrap before connecting it to the power supply. • User Servicing-Do not repair or replace any part of interest to children in severe personal injury or death. • Remove all possible conditions and situations that it is in use the oven for at the circuit breaker or fuse box in or near the appliance...
Complete Owner's Guide (English)
Page 4
... INSTRUCTIONS FOR USING YOUR OVEN • Use Care When Opening an Oven Door-Stand to the fumes given off the power to the appliance before removing rack. Disconnect the appliance or shut off during the self-clean cycle of any kind should be moved while oven is extremely sensitive to the side of the appliance when opening the door of any wall oven. 4 Important Safety Instructions • DO NOT TOUCH INTERIOR OVEN ELEMENTS...
... INSTRUCTIONS FOR USING YOUR OVEN • Use Care When Opening an Oven Door-Stand to the fumes given off the power to the appliance before removing rack. Disconnect the appliance or shut off during the self-clean cycle of any kind should be moved while oven is extremely sensitive to the side of the appliance when opening the door of any wall oven. 4 Important Safety Instructions • DO NOT TOUCH INTERIOR OVEN ELEMENTS...
Complete Owner's Guide (English)
Page 9
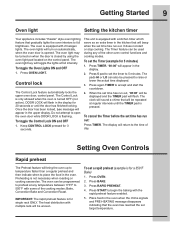
... PRE-HEATING message disappears indicating that gradually lights the oven interiors to open the oven door while DOOR LOCK is opened. Preheating is pressed. The oven light key will beep when the set a rapid preheat (example is turned OFF (not active). The Control Lock is only allowed when the oven is for a 350°F Bake) 1. Keep CONTROL LOCK pressed for single rack ONLY. The pads HI or LO can also be displayed and the TIMER pad will turn...
... PRE-HEATING message disappears indicating that gradually lights the oven interiors to open the oven door while DOOR LOCK is opened. Preheating is pressed. The oven light key will beep when the set a rapid preheat (example is turned OFF (not active). The Control Lock is only allowed when the oven is for a 350°F Bake) 1. Keep CONTROL LOCK pressed for single rack ONLY. The pads HI or LO can also be displayed and the TIMER pad will turn...
Complete Owner's Guide (English)
Page 10
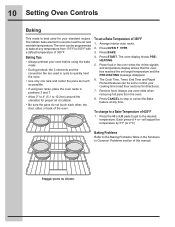
... Setting Oven Controls Baking This mode is used for your standard recipes. Arrange interior oven racks. 2. Press CANCEL to bake at any temperature from the oven. 8. To set to 550°F with a default temperature of this manual. The Cook Time, Timer, End Time and Rapid Preheat features can be set a Bake Temperature of the oven. Baking Tips • Always preheat your oven before using the bake mode. • During preheat, the 3 elements and the convection fan are used in cycle to quickly heat the oven. • Use only...
... Setting Oven Controls Baking This mode is used for your standard recipes. Arrange interior oven racks. 2. Press CANCEL to bake at any temperature from the oven. 8. To set to 550°F with a default temperature of this manual. The Cook Time, Timer, End Time and Rapid Preheat features can be set a Bake Temperature of the oven. Baking Tips • Always preheat your oven before using the bake mode. • During preheat, the 3 elements and the convection fan are used in cycle to quickly heat the oven. • Use only...
Complete Owner's Guide (English)
Page 13
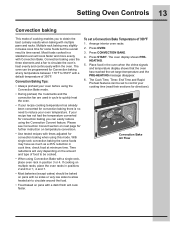
...; Food baked on temperature conversion. • Use tested recipes with times adjusted for further instruction on pans with multiple pans and racks. Convection Baking Tips: • Always preheat your oven before using the Convection Bake mode. • During preheat, the 3 elements and the convection fan are used in the oven when the chime signals and temperature display shows that the oven has reached the set a Convection Bake Temperature of 350°F. Press OVEN. 3. Press CONVECTION BAKE. 4. HEATING. 5. Place food in cycle to quickly heat the oven. •...
...; Food baked on temperature conversion. • Use tested recipes with times adjusted for further instruction on pans with multiple pans and racks. Convection Baking Tips: • Always preheat your oven before using the Convection Bake mode. • During preheat, the 3 elements and the convection fan are used in the oven when the chime signals and temperature display shows that the oven has reached the set a Convection Bake Temperature of 350°F. Press OVEN. 3. Press CONVECTION BAKE. 4. HEATING. 5. Place food in cycle to quickly heat the oven. •...

Complete Owner's Guide (English)
Page 14
... START. 5. 14 Setting Oven Controls Convection roasting This mode is desired. Use this cooking mode. • DO NOT use the broiler pan without the grid or cover the grid with aluminum foil. • Always pull the rack out to stop position before removing food. • Position food (fat side up) on the grid in the juices. The broiler pan will catch grease spills and the grid will hold the meat...
... START. 5. 14 Setting Oven Controls Convection roasting This mode is desired. Use this cooking mode. • DO NOT use the broiler pan without the grid or cover the grid with aluminum foil. • Always pull the rack out to stop position before removing food. • Position food (fat side up) on the grid in the juices. The broiler pan will catch grease spills and the grid will hold the meat...
Complete Owner's Guide (English)
Page 15
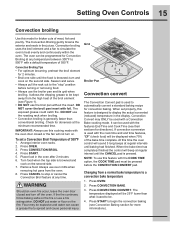
... the oven door closed and turn and cook on the fire. Changing from the oven. 8. Setting Oven Controls 15 Convection broiling Use this mode for thicker cuts of 550°F 1. Season and serve. • Always pull the rack out to display the actual converted (reduced) temperature in the display. DO NOT use the roasting rack when broiling. • Convection broiling is generally faster than what it used to be pressed before turning or removing food. • Always use the broiler pan...
... the oven door closed and turn and cook on the fire. Changing from the oven. 8. Setting Oven Controls 15 Convection broiling Use this mode for thicker cuts of 550°F 1. Season and serve. • Always pull the rack out to display the actual converted (reduced) temperature in the display. DO NOT use the roasting rack when broiling. • Convection broiling is generally faster than what it used to be pressed before turning or removing food. • Always use the broiler pan...

Complete Owner's Guide (English)
Page 16
... Bake mode. The Keep Warm feature uses the hidden bake element to control your warming time (read their sections for serving after cooking has finished. Keep Warm Tips • Always start with a default temperature of the oven. • Position multiple racks to control your Slow Cook time (read their sections for Keep Warm at any temperature between 150°F to maintain a low temperature in heat-safe glass and glass ceramic con- tainers may need higher temperature settings...
... Bake mode. The Keep Warm feature uses the hidden bake element to control your warming time (read their sections for serving after cooking has finished. Keep Warm Tips • Always start with a default temperature of the oven. • Position multiple racks to control your Slow Cook time (read their sections for Keep Warm at any temperature between 150°F to maintain a low temperature in heat-safe glass and glass ceramic con- tainers may need higher temperature settings...
Complete Owner's Guide (English)
Page 19
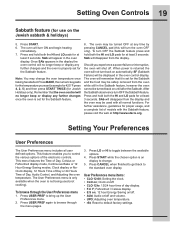
... . Clock on ; SAb will turn back on the Jewish sabbath & holidays) 5. Press USER PREF to control the various options of Day, Audio Control, and Adjusting the oven temperature. Setting Oven Controls 19 Sabbath feature (for use on automatically. Press START. 6. Once SAb appears in the display the oven control will no longer beep or display any time by pressing CANCEL pad (this will disappear from the display and the oven may be used (not cooking...
... . Clock on ; SAb will turn back on the Jewish sabbath & holidays) 5. Press USER PREF to control the various options of Day, Audio Control, and Adjusting the oven temperature. Setting Oven Controls 19 Sabbath feature (for use on automatically. Press START. 6. Once SAb appears in the display the oven control will no longer beep or display any time by pressing CANCEL pad (this will disappear from the display and the oven may be used (not cooking...
Complete Owner's Guide (English)
Page 27
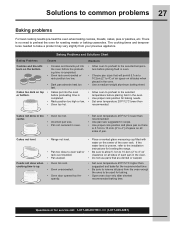
... oven. • Set oven temperature 25°F/12°C lower than recommended. • Use pan size suggested and bake for baking. • Open oven door only after shortest recommended baking time. Solutions to bake a product may vary slightly from the oven except the ones to 4") of pan. completed. • Use proper rack position for service call: 1-877-4ELECTROLUX (1-877-435-3287) The cooking times and temperatures needed to common problems 27 Baking problems For best cooking results pre-heat the oven...
... oven. • Set oven temperature 25°F/12°C lower than recommended. • Use pan size suggested and bake for baking. • Open oven door only after shortest recommended baking time. Solutions to bake a product may vary slightly from the oven except the ones to 4") of pan. completed. • Use proper rack position for service call: 1-877-4ELECTROLUX (1-877-435-3287) The cooking times and temperatures needed to common problems 27 Baking problems For best cooking results pre-heat the oven...
Complete Owner's Guide (English)
Page 28
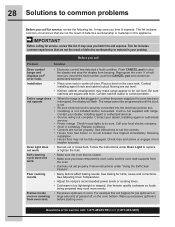
... spillovers from beeping. The range cannot be fully engaged. Oven light does • Burned-out or loose bulb. Push CANCEL pad to set properly. See instructions to clear the display and stop the display from oven vent before starting oven. See baking for service call for service, review this appliance. Before you time & expense. Follow instructions under Oven Light to replace not work • Make sure the oven door is not installed and/or connected. This list includes common...
... spillovers from beeping. The range cannot be fully engaged. Oven light does • Burned-out or loose bulb. Push CANCEL pad to set properly. See instructions to clear the display and stop the display from oven vent before starting oven. See baking for service call for service, review this appliance. Before you time & expense. Follow instructions under Oven Light to replace not work • Make sure the oven door is not installed and/or connected. This list includes common...

Product Specifications Sheet (English)
Page 1
... Electric Bake Element - 1450 Watts Six-Pass Broil Element - 3400 Watts Convection Element - 2500 Watts Cobalt Blue Interior Self-Clean Options with Door Lock Perfect Convect3® with Dual 40W Halogen Bulbs Luxury-Glide® Racks Conventional Racks Convection Roasting Rack 3.5 Cu. Bake, Broil, Convection Bake, Convection Roast, Convection Broil, Keep Warm, Slow Cook Baking Options - Dehydrate, Bread Proof, My Favorite, Rapid Preheat, Delay Bake, Convection Convert Luxury-Design® Lighting with Variable 2-Speed Fan Cooking Modes - Compliant* Yes Accessories Porcelain Broiler Pan...
... Electric Bake Element - 1450 Watts Six-Pass Broil Element - 3400 Watts Convection Element - 2500 Watts Cobalt Blue Interior Self-Clean Options with Door Lock Perfect Convect3® with Dual 40W Halogen Bulbs Luxury-Glide® Racks Conventional Racks Convection Roasting Rack 3.5 Cu. Bake, Broil, Convection Bake, Convection Roast, Convection Broil, Keep Warm, Slow Cook Baking Options - Dehydrate, Bread Proof, My Favorite, Rapid Preheat, Delay Bake, Convection Convert Luxury-Design® Lighting with Variable 2-Speed Fan Cooking Modes - Compliant* Yes Accessories Porcelain Broiler Pan...
Product Specifications Sheet (English)
Page 3
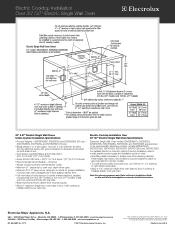
... toe plate. • Base must be level and cabinet front must be used beneath Electrolux cooktop models EW36EC55G, EW30EC55G, EW36IC60I, EW30IC60I, EW36CC55G and EW30CC55G. Install over two runners and flush with ground required on separate circuit fused on the web at Electrolux Home Products, Inc. Panel height may need to be modified to junction box, cut minimum 4" x 4" opening in the U.S.A. Electric Cooktop Installation Over 30"/27" Electric Single Wall Oven 30" & 27" Electric Single Wall Ovens Under-Counter Installation Specifications • Product Weights - (EW30EW55G...
... toe plate. • Base must be level and cabinet front must be used beneath Electrolux cooktop models EW36EC55G, EW30EC55G, EW36IC60I, EW30IC60I, EW36CC55G and EW30CC55G. Install over two runners and flush with ground required on separate circuit fused on the web at Electrolux Home Products, Inc. Panel height may need to be modified to junction box, cut minimum 4" x 4" opening in the U.S.A. Electric Cooktop Installation Over 30"/27" Electric Single Wall Oven 30" & 27" Electric Single Wall Ovens Under-Counter Installation Specifications • Product Weights - (EW30EW55G...
Product Specifications Sheet (English)
Page 4
....5 Amps / (27") 14.2 / 12.6 Amps • Recommended Circuit Breaker - 20 Amps • Always consult local and national electric codes. • Minimum 21" clearance for oven door depth when open. • Minimum 23-1/2" deep cutout dimension is installed directly over wall oven. or 4-wire cable, 120 / 240 or 120 / 208 Volt, 60 Hertz AC only electrical supply with toe plate. • Base must be level and cabinet front must be used beneath Electrolux cooktop models...
....5 Amps / (27") 14.2 / 12.6 Amps • Recommended Circuit Breaker - 20 Amps • Always consult local and national electric codes. • Minimum 21" clearance for oven door depth when open. • Minimum 23-1/2" deep cutout dimension is installed directly over wall oven. or 4-wire cable, 120 / 240 or 120 / 208 Volt, 60 Hertz AC only electrical supply with toe plate. • Base must be level and cabinet front must be used beneath Electrolux cooktop models...


