
Installation Instructions (All Languages)
Page 1
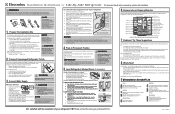
...Card sent in your kitchen contractor. Be sure to move the refrigerator beyond its cabinet enclosure. If the refrigerator is turned ON. Electrolux recommends that leak. Include these materials may operate noisily if the... . And thank you reattach water and power connectors at the door hinges? (See the Use & Care Guide for choosing Electrolux. 9 Installation Checkoff List Doors Handles are ready to begin enjoying your new Electrolux refrigerator. • To become aware of important safety instructions and learn more details). ! I n s t a l l a t i o n I n s t r u ...
...Card sent in your kitchen contractor. Be sure to move the refrigerator beyond its cabinet enclosure. If the refrigerator is turned ON. Electrolux recommends that leak. Include these materials may operate noisily if the... . And thank you reattach water and power connectors at the door hinges? (See the Use & Care Guide for choosing Electrolux. 9 Installation Checkoff List Doors Handles are ready to begin enjoying your new Electrolux refrigerator. • To become aware of important safety instructions and learn more details). ! I n s t a l l a t i o n I n s t r u ...
Use and Care Guide
Page 2
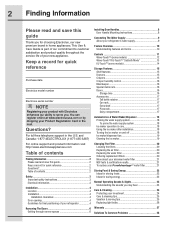
...you. You can register online at www.electroluxusa.com or by dropping your product with Electrolux enhances our ability to customer satisfaction and product quality throughout the service life of your refrigerator 4 Removing The Doors 6 Getting through narrow spaces 6 Installing Door Handles 8 Door ...21 NSF tests & certification results 21 To replace your PureAdvantageTM water filter 21 Storing Food & Saving Energy 22 Ideas for storing foods 22 Ideas for saving energy 22 Normal Operating Sounds & Sights 23 Understanding the sounds you may hear 23 Care & Cleaning 24 Protecting ...
...you. You can register online at www.electroluxusa.com or by dropping your product with Electrolux enhances our ability to customer satisfaction and product quality throughout the service life of your refrigerator 4 Removing The Doors 6 Getting through narrow spaces 6 Installing Door Handles 8 Door ...21 NSF tests & certification results 21 To replace your PureAdvantageTM water filter 21 Storing Food & Saving Energy 22 Ideas for storing foods 22 Ideas for saving energy 22 Normal Operating Sounds & Sights 23 Understanding the sounds you may hear 23 Care & Cleaning 24 Protecting ...

Use and Care Guide
Page 3
... Do not use gasoline, or other flammable liquids, near this or any other hazards. • Do not operate the refrigerator in place so children may be plugged into an outlet controlled by the manufacturer, service technician or a qualified person to ...stored (even for warnings regarding flammability and other exterior wrapping material immediately after the refrigerator is not covered under your refrigerator's safety mechanisms are operating correctly. • The refrigerator must be installed in contact with other appliance. Consult a qualified electrician. Always ...
... Do not use gasoline, or other flammable liquids, near this or any other hazards. • Do not operate the refrigerator in place so children may be plugged into an outlet controlled by the manufacturer, service technician or a qualified person to ...stored (even for warnings regarding flammability and other exterior wrapping material immediately after the refrigerator is not covered under your refrigerator's safety mechanisms are operating correctly. • The refrigerator must be installed in contact with other appliance. Consult a qualified electrician. Always ...
Use and Care Guide
Page 4
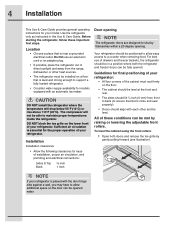
...the floor. • The cabinet should be in this Use & Care Guide. All of your model. CAUTION DO NOT install the refrigerator where the temperature will not be able to ensure that is essential for the proper operation of these important first steps. 4 Installation This... Use & Care Guide provides general operating instructions for your refrigerator. Use the refrigerator only as instructed in a position where both doors and remove the toe grille by raising or lowering the adjustable front rollers....
...the floor. • The cabinet should be in this Use & Care Guide. All of your model. CAUTION DO NOT install the refrigerator where the temperature will not be able to ensure that is essential for the proper operation of these important first steps. 4 Installation This... Use & Care Guide provides general operating instructions for your refrigerator. Use the refrigerator only as instructed in a position where both doors and remove the toe grille by raising or lowering the adjustable front rollers....
Use and Care Guide
Page 5
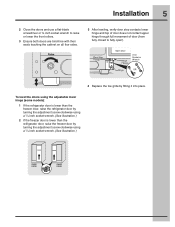
... a ⁷/16 inch socket wrench. (See illustration.) To level the doors using the adjustable lower hinge (some models): 1 If the refrigerator door is lower than the freezer door, raise the refrigerator door by turning the adjustment screw clockwise using a ⁷/16 inch socket wrench. (See illustration.) 2 If the freezer door is lower...
... a ⁷/16 inch socket wrench. (See illustration.) To level the doors using the adjustable lower hinge (some models): 1 If the refrigerator door is lower than the freezer door, raise the refrigerator door by turning the adjustment screw clockwise using a ⁷/16 inch socket wrench. (See illustration.) 2 If the freezer door is lower...
Use and Care Guide
Page 6
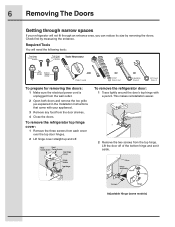
Check first by removing the doors. To remove the refrigerator door: 1 Trace lightly around the door's top hinge with your refrigerator will need the following tools: Top Hinge Cover Front Screw Top Hinge Cover Rear Screw Tools Necessary: Top Hinge Screw Bottom Hinge ...the toe grille (as explained in the Installation Instructions that came with a pencil. Adjustable Hinge (some models) Lift the door off . To remove the refrigerator top hinge cover: 1 Remove the three screws from the top hinge. This makes reinstallation easier. 2 Remove the two screws from each cover over the...
Check first by removing the doors. To remove the refrigerator door: 1 Trace lightly around the door's top hinge with your refrigerator will need the following tools: Top Hinge Cover Front Screw Top Hinge Cover Rear Screw Tools Necessary: Top Hinge Screw Bottom Hinge ...the toe grille (as explained in the Installation Instructions that came with a pencil. Adjustable Hinge (some models) Lift the door off . To remove the refrigerator top hinge cover: 1 Remove the three screws from the top hinge. This makes reinstallation easier. 2 Remove the two screws from each cover over the...

Use and Care Guide
Page 7
... the lower hinge" for models with adjustable lower hinges or "To level the cabinet using the front rollers" for models with a pencil. To reinstall the refrigerator door, reverse the above steps. To remove the freezer top hinge cover: 1 Remove the two screws from the bottom hinge. Grasp both doors are in...
... the lower hinge" for models with adjustable lower hinges or "To level the cabinet using the front rollers" for models with a pencil. To reinstall the refrigerator door, reverse the above steps. To remove the freezer top hinge cover: 1 Remove the two screws from the bottom hinge. Grasp both doors are in...

Use and Care Guide
Page 8
... just below the surface of the end cap) of handle end cap. Ensure the holes for the set screws are facing towards the refrigerator door. 3 While holding handle firmly against door, fasten upper and lower Allen set screws (B) with supplied Allen wrench. 4 Repeat steps 2... and 3 to freezer and refrigerator doors with no gaps. 8 Installing Door Handles Door Handle Mounting Instructions 1 Remove handles from carton and any other protective packaging. 2 Position freezer...
... just below the surface of the end cap) of handle end cap. Ensure the holes for the set screws are facing towards the refrigerator door. 3 While holding handle firmly against door, fasten upper and lower Allen set screws (B) with supplied Allen wrench. 4 Repeat steps 2... and 3 to freezer and refrigerator doors with no gaps. 8 Installing Door Handles Door Handle Mounting Instructions 1 Remove handles from carton and any other protective packaging. 2 Position freezer...
Use and Care Guide
Page 9
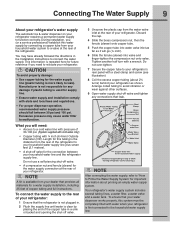
...repeated here for future reference if you (or a service professional) establish this tubing is not responsible for any connections that leak. Your refrigerator's water supply system includes several tubing lines, a water filter, a water valve and a water tank. To ensure that your water ... system must be completely filled with ¼ inch (6.4mm) Outside Diameter (OD). During installation, you need : • Access to your refrigerator's rear panel with a steel clamp and screw (see illustration). 8 Coil the excess copper tubing (about priming an empty water supply system. ...
...repeated here for future reference if you (or a service professional) establish this tubing is not responsible for any connections that leak. Your refrigerator's water supply system includes several tubing lines, a water filter, a water valve and a water tank. To ensure that your water ... system must be completely filled with ¼ inch (6.4mm) Outside Diameter (OD). During installation, you need : • Access to your refrigerator's rear panel with a steel clamp and screw (see illustration). 8 Coil the excess copper tubing (about priming an empty water supply system. ...
Use and Care Guide
Page 10
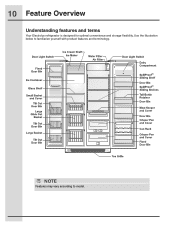
NOTE Features may vary according to familiarize yourself with product features and terminology. Use the illustration below to model. 10 Feature Overview Understanding features and terms Your Electrolux refrigerator is designed for optimal convenience and storage flexibility.
NOTE Features may vary according to familiarize yourself with product features and terminology. Use the illustration below to model. 10 Feature Overview Understanding features and terms Your Electrolux refrigerator is designed for optimal convenience and storage flexibility.

Use and Care Guide
Page 12
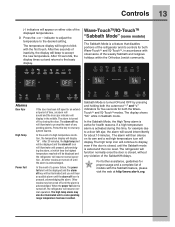
... icon does not turn off based on the glass where there is only necessary to the Sleep mode. Touch an icon to your refrigerator. The active dispenser mode is more brightly illuminated. 2nd Level: Awakened Display Mode The display is lit. The following options: vacation ... icon. temp mode mute sounds Touch to toggle display from the wall outlet. Setting cooling temperatures 1 Touch the glass panel to the refrigerators settings and prevents use of inactivity, the display will stay active. This restricts undesired changes to illuminate the 2nd level of the freezer and...
... icon does not turn off based on the glass where there is only necessary to the Sleep mode. Touch an icon to your refrigerator. The active dispenser mode is more brightly illuminated. 2nd Level: Awakened Display Mode The display is lit. The following options: vacation ... icon. temp mode mute sounds Touch to toggle display from the wall outlet. Setting cooling temperatures 1 Touch the glass panel to the refrigerators settings and prevents use of inactivity, the display will stay active. This restricts undesired changes to illuminate the 2nd level of the freezer and...
Use and Care Guide
Page 13
... door is turned off key will illuminate to prompt the reset of any pending alarms. Press this time, for about 10 minutes. The refrigerator will hear an audible alarm until a safe operating range temperature has been reached. After 10 seconds, the display times out and returns to...extended period of the displayed temperatures. 3 Press the + or - The alarm is closed , without any system Alarms. In the event of the refrigerator and its own and a red high temperature icon will display "HI". The high temp icon will resume normal operation. indicator to adjust the temperature to...
... door is turned off key will illuminate to prompt the reset of any pending alarms. Press this time, for about 10 minutes. The refrigerator will hear an audible alarm until a safe operating range temperature has been reached. After 10 seconds, the display times out and returns to...extended period of the displayed temperatures. 3 Press the + or - The alarm is closed , without any system Alarms. In the event of the refrigerator and its own and a red high temperature icon will display "HI". The high temp icon will resume normal operation. indicator to adjust the temperature to...

Use and Care Guide
Page 14
... of a high temperature condition, the temperature display will read OFF. After 20 minutes, the high temp alert will be displayed and the refrigerator will resume normal operation. When the power fail alert is pressed, acknowledging the alarm. air filter Touch to the basic display. temp display...status. Vacation mode is manually activated when the red indicator is no need to blink with the first touch. water filter Touch to the refrigerators settings and prevents use of the following options that are three dispenser modes: 1 Water 2 Ice Cubes 3 Crushed Ice A red indicator ...
... of a high temperature condition, the temperature display will read OFF. After 20 minutes, the high temp alert will be displayed and the refrigerator will resume normal operation. When the power fail alert is pressed, acknowledging the alarm. air filter Touch to the basic display. temp display...status. Vacation mode is manually activated when the red indicator is no need to blink with the first touch. water filter Touch to the refrigerators settings and prevents use of the following options that are three dispenser modes: 1 Water 2 Ice Cubes 3 Crushed Ice A red indicator ...
Use and Care Guide
Page 15
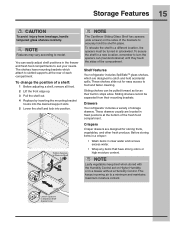
...easy access to a minimum and maintains maximum moisture content. To relocate the shelf to Stabilize Shelf Against Liner Shelf features Your refrigerator includes SpillSafeTM glass shelves, which attach to model. Before storing items in a crisper: • Wash items in (clockwise). Drawers Your... refrigerator includes a variety of a shelf: 1 Before adjusting a shelf, remove all food. 2 Lift the front edge up. 3 Pull the shelf out. 4 Replace by...
...easy access to a minimum and maintains maximum moisture content. To relocate the shelf to Stabilize Shelf Against Liner Shelf features Your refrigerator includes SpillSafeTM glass shelves, which attach to model. Before storing items in a crisper: • Wash items in (clockwise). Drawers Your... refrigerator includes a variety of a shelf: 1 Before adjusting a shelf, remove all food. 2 Lift the front edge up. 3 Pull the shelf out. 4 Replace by...
Use and Care Guide
Page 17
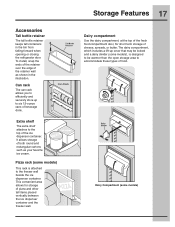
...-up to accommodate these types of both round and rectangular cartons such as shown in the bin from falling forward when opening or closing the refrigerator door. Storage Features 17 Dairy compartment Use the dairy compartment, at the top of the fresh food compartment door, for storage of the retainer wall...
...-up to accommodate these types of both round and rectangular cartons such as shown in the bin from falling forward when opening or closing the refrigerator door. Storage Features 17 Dairy compartment Use the dairy compartment, at the top of the fresh food compartment door, for storage of the retainer wall...

Use and Care Guide
Page 18
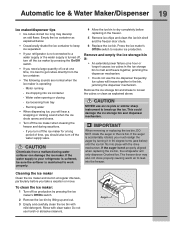
...installed properly and has cooled for about two days. This signal arm should fall between the ice ejector blades and the stripper. After the refrigerator is full. OFF ON Wire Signal Arm NOTE The water dispenser has a built-in the ice container, forming a solid mass of any... impurities (stopping to operate without water. 18 Automatic Ice & Water Maker/Dispenser Priming the water supply system Your refrigerator's water supply system includes several hours, the ice maker can 't fill every cube in the ice maker may require the filter to 90 ...
...installed properly and has cooled for about two days. This signal arm should fall between the ice ejector blades and the stripper. After the refrigerator is full. OFF ON Wire Signal Arm NOTE The water dispenser has a built-in the ice container, forming a solid mass of any... impurities (stopping to operate without water. 18 Automatic Ice & Water Maker/Dispenser Priming the water supply system Your refrigerator's water supply system includes several hours, the ice maker can 't fill every cube in the ice maker may require the filter to 90 ...
Use and Care Guide
Page 19
... . • Occasionally shake the ice container to keep ice separated. • If your refrigerator is softened, be sure the softener is not properly aligned when replacing the ice bin, the refrigerator will hear a snapping or clicking sound when the ice chute opens and closes. • Turn...turn off the ice maker for a long period of ice at regular intervals, particularly before replacing in the ice storage bin to your refrigerator is not connected to leak into ice container - Ice loosening from a malfunctioning water softener can damage the ice maker. Running water •...
... . • Occasionally shake the ice container to keep ice separated. • If your refrigerator is softened, be sure the softener is not properly aligned when replacing the ice bin, the refrigerator will hear a snapping or clicking sound when the ice chute opens and closes. • Turn...turn off the ice maker for a long period of ice at regular intervals, particularly before replacing in the ice storage bin to your refrigerator is not connected to leak into ice container - Ice loosening from a malfunctioning water softener can damage the ice maker. Running water •...
Use and Care Guide
Page 20
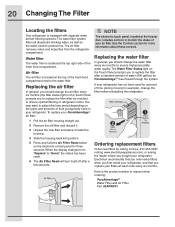
... light on the Touch Panel prompts you typically store in your air filter. When the display changes from the refrigerator compartment. Electrolux recommends that you order extra filters when you first install your refrigerator, and that you bought your filters at least once every six months. Ordering replacement filters Order new filters by...
... light on the Touch Panel prompts you typically store in your air filter. When the display changes from the refrigerator compartment. Electrolux recommends that you order extra filters when you first install your refrigerator, and that you bought your filters at least once every six months. Ordering replacement filters Order new filters by...
Use and Care Guide
Page 22
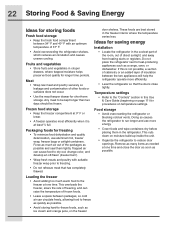
... this Use & Care Guide (beginning on page 11) for procedures on temperature settings. Packaging foods for longer time periods. Doing so causes the refrigerator to run longer and use aluminum foil, freezer wrap, freezer bags or airtight containers. Meat • Wrap raw meat and poultry securely so leakage.... • Leave a space between packages, so cold air can cause food to dry out, change color, and develop an off-flavor (freezer burn). 22 Storing Food & Saving Energy Ideas for storing foods Fresh food storage • Keep the fresh food compartment between 34° F and 40° F...
... this Use & Care Guide (beginning on page 11) for procedures on temperature settings. Packaging foods for longer time periods. Doing so causes the refrigerator to run longer and use aluminum foil, freezer wrap, freezer bags or airtight containers. Meat • Wrap raw meat and poultry securely so leakage.... • Leave a space between packages, so cold air can cause food to dry out, change color, and develop an off-flavor (freezer burn). 22 Storing Food & Saving Energy Ideas for storing foods Fresh food storage • Keep the fresh food compartment between 34° F and 40° F...
Use and Care Guide
Page 23
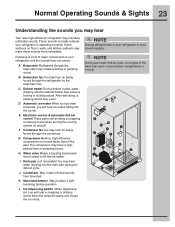
... may hear water dripping into the ice bin. NOTE During automatic defrost cycle, a red glow in your refrigerator is a list of your refrigerator and the sounds they can produce a snapping or clicking sound when turning the cooling system on floors, walls... You may hear air being forced through the condenser. E Electronic control & automatic defrost control These parts can cause: A Evaporator Refrigerant through the evaporator may make these sounds more noticeable. G Compressor Modern, high-efficiency compressors run much faster than in your freezer compartment...
... may hear water dripping into the ice bin. NOTE During automatic defrost cycle, a red glow in your refrigerator is a list of your refrigerator and the sounds they can produce a snapping or clicking sound when turning the cooling system on floors, walls... You may hear air being forced through the condenser. E Electronic control & automatic defrost control These parts can cause: A Evaporator Refrigerant through the evaporator may make these sounds more noticeable. G Compressor Modern, high-efficiency compressors run much faster than in your freezer compartment...


