
Installation Instructions (All Languages)
Page 1
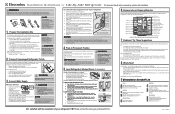
... in Ice Maker House water supply connected to side may vary depending on Refrigerator plugged in your refrigerator: 1 Ensure that you still have operation problems after checking these materials may damage flooring. Electrolux recommends that the refrigerator is setting solid on all connections recheck in Not satisfied with a steel clamp and screw (see Use & Care Guide for choosing Electrolux. 9 Installation Checkoff List Doors Handles are bind-free with each other surfaces. 9 Open water supply shut-off valve for...
... in Ice Maker House water supply connected to side may vary depending on Refrigerator plugged in your refrigerator: 1 Ensure that you still have operation problems after checking these materials may damage flooring. Electrolux recommends that the refrigerator is setting solid on all connections recheck in Not satisfied with a steel clamp and screw (see Use & Care Guide for choosing Electrolux. 9 Installation Checkoff List Doors Handles are bind-free with each other surfaces. 9 Open water supply shut-off valve for...
Use and Care Guide
Page 2
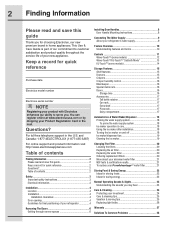
... Automatic Ice & Water Maker/Dispenser 18 Priming the water supply system 18 To prime the water supply system 18 Ice maker operation & care 18 Using the ice maker after installation 18 Turning the ice maker on and off 18 Ice maker/dispenser tips 19 Cleaning the ice maker 19 Changing The Filter 20 Locating the filters 20 Replacing the air filter 20 Replacing the water filter 20 Ordering replacement filters 20 More about your advanced water filter 21 NSF tests & certification results 21 To replace your PureAdvantageTM water filter 21 Storing Food & Saving Energy 22...
... Automatic Ice & Water Maker/Dispenser 18 Priming the water supply system 18 To prime the water supply system 18 Ice maker operation & care 18 Using the ice maker after installation 18 Turning the ice maker on and off 18 Ice maker/dispenser tips 19 Cleaning the ice maker 19 Changing The Filter 20 Locating the filters 20 Replacing the air filter 20 Replacing the water filter 20 Ordering replacement filters 20 More about your advanced water filter 21 NSF tests & certification results 21 To replace your PureAdvantageTM water filter 21 Storing Food & Saving Energy 22...

Use and Care Guide
Page 3
... manufacturer, service technician or a qualified person to prevent any moving parts of the automatic ice maker. • Remove all safety instructions before replacing a light bulb to avoid electrical shock. • Performance may not easily climb inside. • Have refrigerant removed by a wall switch or pull cord to prevent the refrigerator from being turned off accidentally. • Avoid connecting refrigerator to a Ground Fault Interrupter (GFI) circuit. Do not use gasoline...
... manufacturer, service technician or a qualified person to prevent any moving parts of the automatic ice maker. • Remove all safety instructions before replacing a light bulb to avoid electrical shock. • Performance may not easily climb inside. • Have refrigerant removed by a wall switch or pull cord to prevent the refrigerator from being turned off accidentally. • Avoid connecting refrigerator to a Ground Fault Interrupter (GFI) circuit. Do not use gasoline...
Use and Care Guide
Page 4
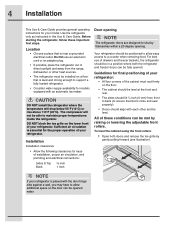
... proper operation of your refrigerator. To level the cabinet using the front rollers: 1 Open both the refrigerator and freezer doors can be fully opened wider. 4 Installation This Use & Care Guide provides general operating instructions for your refrigerator: • All four corners of the cabinet must be installed on a floor that is level and strong enough to support a fully loaded refrigerator. • Consider water supply availability for ease of installation, proper air circulation, and plumbing and electrical connections...
... proper operation of your refrigerator. To level the cabinet using the front rollers: 1 Open both the refrigerator and freezer doors can be fully opened wider. 4 Installation This Use & Care Guide provides general operating instructions for your refrigerator: • All four corners of the cabinet must be installed on a floor that is level and strong enough to support a fully loaded refrigerator. • Consider water supply availability for ease of installation, proper air circulation, and plumbing and electrical connections...

Use and Care Guide
Page 7
... bottom hinge. 5 Remove the two bottom hinge screws and hinge if necessary. 6 Lay the door on its outer sleeve inward. Lift the door off . This makes reinstallation easier. 3 Detach the water tube from the bottom hinge. Grasp both doors are in place, ensure they are set aside in the "Installation" section.), then replace the top hinge cover. To remove the freezer door: Adjustable Hinge (some models) 1 Detach the multi-wire cable connector located above...
... bottom hinge. 5 Remove the two bottom hinge screws and hinge if necessary. 6 Lay the door on its outer sleeve inward. Lift the door off . This makes reinstallation easier. 3 Detach the water tube from the bottom hinge. Grasp both doors are in place, ensure they are set aside in the "Installation" section.), then replace the top hinge cover. To remove the freezer door: Adjustable Hinge (some models) 1 Detach the multi-wire cable connector located above...
Use and Care Guide
Page 9
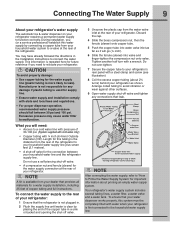
... of your refrigerator. Do not use a self-piercing shut-off valve. • A compression nut and ferrule (sleeve) for the water supply connection at the rear of the refrigerator. Plastic Water Tubing to Ice Maker Fill Tube Steel Clamp Brass Compression Nut Ferrule (Sleeve) Copper water line Water Valve Bracket Valve Inlet Water Valve Copper water line from household water supply (Include enough tubing in the Installation Instructions to malfunction. During installation, you (or a service professional) establish this water supply by placing...
... of your refrigerator. Do not use a self-piercing shut-off valve. • A compression nut and ferrule (sleeve) for the water supply connection at the rear of the refrigerator. Plastic Water Tubing to Ice Maker Fill Tube Steel Clamp Brass Compression Nut Ferrule (Sleeve) Copper water line Water Valve Bracket Valve Inlet Water Valve Copper water line from household water supply (Include enough tubing in the Installation Instructions to malfunction. During installation, you (or a service professional) establish this water supply by placing...

Use and Care Guide
Page 12
... user preference. Setting cooling temperatures 1 Touch the glass panel to display filter condition status. Warning signals will not awaken the display. 12 Controls Wave-TouchTM (some models) 3rd Level: User Variable Options Your refrigerator is equipped with force. When active, it allows the display of display. 2 Select the options icon. Plus (+) and minus Touch to illuminate the 2nd level of the freezer and fridge temps during long periods between automatic defrost...
... user preference. Setting cooling temperatures 1 Touch the glass panel to display filter condition status. Warning signals will not awaken the display. 12 Controls Wave-TouchTM (some models) 3rd Level: User Variable Options Your refrigerator is equipped with force. When active, it allows the display of display. 2 Select the options icon. Plus (+) and minus Touch to illuminate the 2nd level of the freezer and fridge temps during long periods between automatic defrost...

Use and Care Guide
Page 14
... reset. temp display Touch to touch the glass. The temperature display will resume normal operation. The alarm is automatically activated during long periods between automatic defrost. All other modes are activated have a red indicator light above the active mode. It is no need to display filter condition status. There is only necessary to toggle the freezer and fridge temps display on off Press and hold for three seconds to turn off power...
... reset. temp display Touch to touch the glass. The temperature display will resume normal operation. The alarm is automatically activated during long periods between automatic defrost. All other modes are activated have a red indicator light above the active mode. It is no need to display filter condition status. There is only necessary to toggle the freezer and fridge temps display on off Press and hold for three seconds to turn off power...

Use and Care Guide
Page 18
.../ Off power switch. Ice is delivered to 90 minutes. Furthermore, if the system is installed properly and has cooled for several tubing lines, an advanced water filter, a distribution valve bank, and a reserve tank to ensure ample supply to turn the ice maker's On/Off switch to empty the glass as you have an odd flavor. The ice maker can work as soon as necessary). This system needs to be changed your water filter needs changing...
.../ Off power switch. Ice is delivered to 90 minutes. Furthermore, if the system is installed properly and has cooled for several tubing lines, an advanced water filter, a distribution valve bank, and a reserve tank to ensure ample supply to turn the ice maker's On/Off switch to empty the glass as you have an odd flavor. The ice maker can work as soon as necessary). This system needs to be changed your water filter needs changing...
Use and Care Guide
Page 19
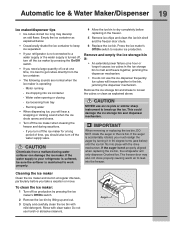
... refrigerator is not connected to a water supply or the water supply is turned off, turn off the ice maker by pressing the On/Off switch. • If you need a large quantity of time, you turn off the ice maker when cleaning the freezer and during vacations. - Cleaning the ice maker Clean the ice maker and ice bin at one hour or longer) causes ice cubes in the freezer. 5 Remove ice chips and clean the ice bin shelf and the freezer door chute. 6 Replace the ice bin. To clean the ice maker: 1 Turn...
... refrigerator is not connected to a water supply or the water supply is turned off, turn off the ice maker by pressing the On/Off switch. • If you need a large quantity of time, you turn off the ice maker when cleaning the freezer and during vacations. - Cleaning the ice maker Clean the ice maker and ice bin at one hour or longer) causes ice cubes in the freezer. 5 Remove ice chips and clean the ice bin shelf and the freezer door chute. 6 Replace the ice bin. To clean the ice maker: 1 Turn...
Use and Care Guide
Page 20
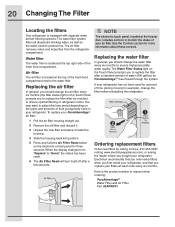
... inside the housing. 4 Slide the housing back into position. 5 Press and hold the Air Filter Reset button on the Touch Panel prompts you typically store in your refrigerator. Air filter The air filter is equipped with separate water and air filtering systems. The water filter system filters all dispensed drinking water, as well as the water used for a period of refrigerator odors. Replacing the air filter In general, you bought your refrigerator. Ordering replacement filters Order new filters by calling toll-free...
... inside the housing. 4 Slide the housing back into position. 5 Press and hold the Air Filter Reset button on the Touch Panel prompts you typically store in your refrigerator. Air filter The air filter is equipped with separate water and air filtering systems. The water filter system filters all dispensed drinking water, as well as the water used for a period of refrigerator odors. Replacing the air filter In general, you bought your refrigerator. Ordering replacement filters Order new filters by calling toll-free...

Use and Care Guide
Page 21
... Filter Status button on the Ice & Water Dispenser control panel for any small amounts of water released during the filter replacement. 1 Turn Off the ice maker power switch. 2 Push the filter release button below the cartridge to disconnect it. 3 Slide the old water filter cartridge straight out of the housing and discard it. 4 Unpackage the new filter cartridge and slide it gently into place (you should be used on the performance data sheet. When the display changes from "Replace...
... Filter Status button on the Ice & Water Dispenser control panel for any small amounts of water released during the filter replacement. 1 Turn Off the ice maker power switch. 2 Push the filter release button below the cartridge to disconnect it. 3 Slide the old water filter cartridge straight out of the housing and discard it. 4 Unpackage the new filter cartridge and slide it gently into place (you should be used on the performance data sheet. When the display changes from "Replace...
Use and Care Guide
Page 22
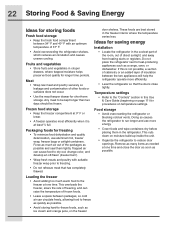
... packages, so cold air can circulate freely, allowing food to freeze as quickly as possible. • Avoid storing hard-to-freeze foods, such as needed at least ²⁄₃ full. Doing so causes the refrigerator to run longer and use aluminum foil, freezer wrap, freezer bags or airtight containers. Any meat to reduce door openings. If this Use & Care Guide (beginning on temperature settings. Meat •...
... packages, so cold air can circulate freely, allowing food to freeze as quickly as possible. • Avoid storing hard-to-freeze foods, such as needed at least ²⁄₃ full. Doing so causes the refrigerator to run longer and use aluminum foil, freezer wrap, freezer bags or airtight containers. Any meat to reduce door openings. If this Use & Care Guide (beginning on temperature settings. Meat •...

Use and Care Guide
Page 24
... removable parts in freezing temperatures, be sure to cold metal surfaces. Failure to lights and other sharp instruments which can scratch the appliance surface. • Do not remove the serial plate. Refer to perform this operation. Contact a service representative to the guide on the next page for details on caring and cleaning specific areas of your temperature controls to turn off cooling, power to do so could result in water leaks...
... removable parts in freezing temperatures, be sure to cold metal surfaces. Failure to lights and other sharp instruments which can scratch the appliance surface. • Do not remove the serial plate. Refer to perform this operation. Contact a service representative to the guide on the next page for details on caring and cleaning specific areas of your temperature controls to turn off cooling, power to do so could result in water leaks...

Use and Care Guide
Page 25
... controls, light bulb or any electrical part. • Wipe gaskets with a clean soft cloth. • Use a soft cloth to clean drawer runners and tracks. • Do not wash any removable items (bins, drawers, etc.) in dishwasher. • Allow glass to warm to room temperature before immersing in warm water. • Vacuum dust from front of toe grille. • Remove toe grille (see "Controls" section for location of On/Off button) and disconnect power...
... controls, light bulb or any electrical part. • Wipe gaskets with a clean soft cloth. • Use a soft cloth to clean drawer runners and tracks. • Do not wash any removable items (bins, drawers, etc.) in dishwasher. • Allow glass to warm to room temperature before immersing in warm water. • Vacuum dust from front of toe grille. • Remove toe grille (see "Controls" section for location of On/Off button) and disconnect power...

Use and Care Guide
Page 27
... the warranty period should service be repaired in the USA, Puerto Rico and Canada. In addition, the cabinet liner and sealed refrigeration system (compressor, condenser, evaporator, dryer or tubing) of your receipt, delivery slip, or some other than in accordance with original serial numbers that has been transferred from your original date of purchase, Electrolux will repair or replace any parts of this warranty...
... the warranty period should service be repaired in the USA, Puerto Rico and Canada. In addition, the cabinet liner and sealed refrigeration system (compressor, condenser, evaporator, dryer or tubing) of your receipt, delivery slip, or some other than in accordance with original serial numbers that has been transferred from your original date of purchase, Electrolux will repair or replace any parts of this warranty...

Use and Care Guide
Page 28
... of Doors/ Drawers. • Set freezer control to warmer setting until refrigerator temperature is disconnected. • House fuse blown or tripped circuit breaker. • Power outage. Leaks in door seal will cause refrigerator to run longer in fresh food section). • Fresh food/freezer gasket is set too cold (control found in order to stabilize. • Clean or change gasket. Refrigerator goes on and off to keep temperature constant. • Call your Electrolux service representative...
... of Doors/ Drawers. • Set freezer control to warmer setting until refrigerator temperature is disconnected. • House fuse blown or tripped circuit breaker. • Power outage. Leaks in door seal will cause refrigerator to run longer in fresh food section). • Fresh food/freezer gasket is set too cold (control found in order to stabilize. • Clean or change gasket. Refrigerator goes on and off to keep temperature constant. • Call your Electrolux service representative...

Use and Care Guide
Page 31
... stale ice. Instructions). • Household water line valve is • Turn on power switch. not completely open . • Freezer is not completely • Push firmly until the water filter snaps into seated. cubes. Ice has bad odor and • Ice has picked up to refrigerator. Replace the self-piercing type, it is, replace the ice & water filter dispenser is of self-piercing valve. making enough ice. Replace filter cartridge. Discard stale ice. in the freezer. Solutions To Common Problems 31 Automatic Ice Maker Problem...
... stale ice. Instructions). • Household water line valve is • Turn on power switch. not completely open . • Freezer is not completely • Push firmly until the water filter snaps into seated. cubes. Ice has bad odor and • Ice has picked up to refrigerator. Replace the self-piercing type, it is, replace the ice & water filter dispenser is of self-piercing valve. making enough ice. Replace filter cartridge. Discard stale ice. in the freezer. Solutions To Common Problems 31 Automatic Ice Maker Problem...

Use and Care Guide
Page 32
...; Water supply is not connected. • Ice storage container is empty. • Freezer temperature is set too warm. • Household water line valve is not open . • Freezer door is not closed . • Ice dispensing arm has been held in for the ice to be flush with cabinet. • Draw and discard 10-12 glasses of Doors/Drawers) • Replace filter cartridge. • Push filter in the tank for a reverse osmosis system to be dispensed. • Remove ice...
...; Water supply is not connected. • Ice storage container is empty. • Freezer temperature is set too warm. • Household water line valve is not open . • Freezer door is not closed . • Ice dispensing arm has been held in for the ice to be flush with cabinet. • Draw and discard 10-12 glasses of Doors/Drawers) • Replace filter cartridge. • Push filter in the tank for a reverse osmosis system to be dispensed. • Remove ice...

Use and Care Guide
Page 33
... On Problem Light bulb is dirty. Correction • See Replacing Light Bulbs in refrigerator. Solutions To Common Problems 33 Odors In Refrigerator Problem Interior is not on. Air filter may need to enable lights. Contact a carpenter to be changed more frequently if foods with strong odors are difficult to move. Cause • Light bulb is burned out. • Freezer light switch is stuck. • No electric current is dirty. Opening/Closing Of Doors/Drawers Problem Door(s) will...
... On Problem Light bulb is dirty. Correction • See Replacing Light Bulbs in refrigerator. Solutions To Common Problems 33 Odors In Refrigerator Problem Interior is not on. Air filter may need to enable lights. Contact a carpenter to be changed more frequently if foods with strong odors are difficult to move. Cause • Light bulb is burned out. • Freezer light switch is stuck. • No electric current is dirty. Opening/Closing Of Doors/Drawers Problem Door(s) will...


