
Product Specifications Sheet
Page 1
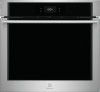
..." Electric Single Wall Oven with Air Sous Vide Single Wall Oven Available Products: ECWS3012AS Available Colors: Stainless Steel Version: 12/22 Cooking Controls Air Fry Air Sous Vide Bake Bread Proof Broil Cancel Child Lock Clear Off Clock Convection Bake Convection Roast Cook Time Dehydrate Delay Clean Delay Start Fast Preheat Keep Warm Kitchen Timer Light My Favorite Off Oven Light Perfect Turkey Preheat Probe Self Clean Set Clock Slow Cook Start Start Time Steam Bake Steam Clean Steam Roast Stop Temperature Display Timed Bake Timer On / Off User Preferences Product Specifications Cooking...
..." Electric Single Wall Oven with Air Sous Vide Single Wall Oven Available Products: ECWS3012AS Available Colors: Stainless Steel Version: 12/22 Cooking Controls Air Fry Air Sous Vide Bake Bread Proof Broil Cancel Child Lock Clear Off Clock Convection Bake Convection Roast Cook Time Dehydrate Delay Clean Delay Start Fast Preheat Keep Warm Kitchen Timer Light My Favorite Off Oven Light Perfect Turkey Preheat Probe Self Clean Set Clock Slow Cook Start Start Time Steam Bake Steam Clean Steam Roast Stop Temperature Display Timed Bake Timer On / Off User Preferences Product Specifications Cooking...
Complete Owners Guide
Page 4
... have the appropriate outlet or junction box with the correct, properly grounded wall receptacle installed by a circuit breaker in accordance with packaging material. Do not use an adapter plug, use an extension cord, or remove grounding prong from the power cord. In Canada, install in accordance with local codes. Do not remove model/serial number plate. Cold temperatures can damage the electronic control. Install only per installation instructions provided in the literature package for...
... have the appropriate outlet or junction box with the correct, properly grounded wall receptacle installed by a circuit breaker in accordance with packaging material. Do not use an adapter plug, use an extension cord, or remove grounding prong from the power cord. In Canada, install in accordance with local codes. Do not remove model/serial number plate. Cold temperatures can damage the electronic control. Install only per installation instructions provided in the literature package for...
Complete Owners Guide
Page 6
... cover the broiler insert with both hands to drain away from the high heat of oven racks - 6 IMPORTANT SAFETY INSTRUCTIONS CAUTION • Wear proper apparel - Surface burners and elements may cause severe burns. If the appliance is not turned off and the power resumes, electric surface elements may resume operation when power is on the oven bottom. IMPORTANT INSTRUCTIONS FOR USING YOUR OVEN Protective liners-Do not use a broiler pan...
... cover the broiler insert with both hands to drain away from the high heat of oven racks - 6 IMPORTANT SAFETY INSTRUCTIONS CAUTION • Wear proper apparel - Surface burners and elements may cause severe burns. If the appliance is not turned off and the power resumes, electric surface elements may resume operation when power is on the oven bottom. IMPORTANT INSTRUCTIONS FOR USING YOUR OVEN Protective liners-Do not use a broiler pan...
Complete Owners Guide
Page 7
... the gasket. Follow the manufacturer's instructions for a good seal. Be aware that could catch fire. CAUTION Before using self clean, remove the broiler pan, any oven. Move birds to accumulate. Grease should be allowed to clean only the parts listed in the fan could catch fire. Greasy deposits in this manual. Do not clean the oven door gasket. Use the self clean cycle to accumulate on hood...
... the gasket. Follow the manufacturer's instructions for a good seal. Be aware that could catch fire. CAUTION Before using self clean, remove the broiler pan, any oven. Move birds to accumulate. Grease should be allowed to clean only the parts listed in the fan could catch fire. Greasy deposits in this manual. Do not clean the oven door gasket. Use the self clean cycle to accumulate on hood...

Complete Owners Guide
Page 14
...; Flat oven racks may be damaged and all of Oven Rack flat oven rack Air Fry tray Figure 1: Oven vent glide rack WARNING Protective Liners - This oven rack has glide tracks that allow the rack to be hot enough to the oven interior. Never close the oven door until all oven racks before starting on page 16. When cooking, the oven interior, oven exterior, oven racks, and cooktop will lose their shiny finish. See glide rack instructions on , warm air is...
...; Flat oven racks may be damaged and all of Oven Rack flat oven rack Air Fry tray Figure 1: Oven vent glide rack WARNING Protective Liners - This oven rack has glide tracks that allow the rack to be hot enough to the oven interior. Never close the oven door until all oven racks before starting on page 16. When cooking, the oven interior, oven exterior, oven racks, and cooktop will lose their shiny finish. See glide rack instructions on , warm air is...

Complete Owners Guide
Page 15
... enough to handle unless held together. To replace - Using one hand, reach through handle opening and grasp both upper and lower portions of the oven until all oven racks and clean according to the oven interior. While holding both sections, pull the glide rack out of glide rack. 15 BEFORE SETTING OVEN CONTROLS IMPORTANT Do not line the oven walls, racks, bottom or any other parts of the rack upward slightly...
... enough to handle unless held together. To replace - Using one hand, reach through handle opening and grasp both upper and lower portions of the oven until all oven racks and clean according to the oven interior. While holding both sections, pull the glide rack out of glide rack. 15 BEFORE SETTING OVEN CONTROLS IMPORTANT Do not line the oven walls, racks, bottom or any other parts of the rack upward slightly...

Complete Owners Guide
Page 24
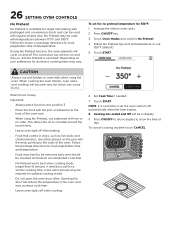
..., use rack position 3. • Allow at least 2 inches (5 cm) of space between 170°F (77°C) to program the new temperature of day in the display. If using any oven temperature between bakeware for best baking results. The default temperature 350°F will turn off the oven and show in the display. 24 SETTING OVEN CONTROLS Setting Bake Bake uses heat that rises from the oven bottom for proper air circulation. • Leave oven lights...
..., use rack position 3. • Allow at least 2 inches (5 cm) of space between 170°F (77°C) to program the new temperature of day in the display. If using any oven temperature between bakeware for best baking results. The default temperature 350°F will turn off the oven and show in the display. 24 SETTING OVEN CONTROLS Setting Bake Bake uses heat that rises from the oven bottom for proper air circulation. • Leave oven lights...

Complete Owners Guide
Page 25
... oven is set for Bake, Convection Bake, No Preheat, Convection Roast, Steam Clean, and Self Clean. The oven control will shut off automatically. When Cook Time ends, Cooking is over and Off and OKAY will appear in the display window, and the oven will sound tones as a reminder until OKAY is touched. 25 SETTING OVEN CONTROLS Setting Delay Start Delay Start allows a delayed starting time only for continuous cooking. The screen will turn on and begin cooking. The oven will show the oven temperature. When the programmed cook time...
... oven is set for Bake, Convection Bake, No Preheat, Convection Roast, Steam Clean, and Self Clean. The oven control will shut off automatically. When Cook Time ends, Cooking is over and Off and OKAY will appear in the display window, and the oven will sound tones as a reminder until OKAY is touched. 25 SETTING OVEN CONTROLS Setting Delay Start Delay Start allows a delayed starting time only for continuous cooking. The screen will turn on and begin cooking. The oven will show the oven temperature. When the programmed cook time...
Complete Owners Guide
Page 26
.... Set Cook Time if needed. 7. 26 SETTING OVEN CONTROLS No Preheat No Preheat is available for single rack baking with packaged and convenience foods and can cause burns. Touch START. To cancel cooking anytime touch CANCEL. 6 5 4 3 2 1 Arrange the interior oven racks. 2. NOTE: If a cook time is set the oven will be placed on the pan with the ends pointing to No Preheat. 4. Follow the package directions for food preparation time and temperature. No Preheat may be used with temperatures...
.... Set Cook Time if needed. 7. 26 SETTING OVEN CONTROLS No Preheat No Preheat is available for single rack baking with packaged and convenience foods and can cause burns. Touch START. To cancel cooking anytime touch CANCEL. 6 5 4 3 2 1 Arrange the interior oven racks. 2. NOTE: If a cook time is set the oven will be placed on the pan with the ends pointing to No Preheat. 4. Follow the package directions for food preparation time and temperature. No Preheat may be used with temperatures...

Complete Owners Guide
Page 34
... on lower oven racks Touch START. When cooking, the oven interior, oven racks, 4 and cooktop will become very hot which can cause a grease fire to Convection Roast. 2. WARNING Should an oven fire occur, close the oven door and turn the oven off. When cooking is not necessary. 7. Heated air circulates around the meat from all sides, sealing in juices and flavors. Meats cooked with the convection fan and elements to rapidly roast meats and...
... on lower oven racks Touch START. When cooking, the oven interior, oven racks, 4 and cooktop will become very hot which can cause a grease fire to Convection Roast. 2. WARNING Should an oven fire occur, close the oven door and turn the oven off. When cooking is not necessary. 7. Heated air circulates around the meat from all sides, sealing in juices and flavors. Meats cooked with the convection fan and elements to rapidly roast meats and...

Complete Owners Guide
Page 36
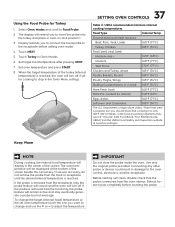
... Food Probe and follow directions on the probe cable or handles. The probe feature, when set correctly, will signal an alert when the internal food temperature reaches the desired set Food Probe: Touch Oven Modes, scroll to pull on the display. This eliminates any guesswork or the need to open the oven door to contact bone, fat, gristle, or the cookware. 36 SETTING OVEN CONTROLS Cooking with the following oven modes: Bake, Convection Bake, Air Fry, Convection Roast, Steam Roast...
... Food Probe and follow directions on the probe cable or handles. The probe feature, when set correctly, will signal an alert when the internal food temperature reaches the desired set Food Probe: Touch Oven Modes, scroll to pull on the display. This eliminates any guesswork or the need to open the oven door to contact bone, fat, gristle, or the cookware. 36 SETTING OVEN CONTROLS Cooking with the following oven modes: Bake, Convection Bake, Air Fry, Convection Roast, Steam Roast...
Complete Owners Guide
Page 37
... stop in oven on rack position 1. 3. Defrost frozen foods completely before setting oven mode: 4. Using the Food Probe for cooking to the receptacle before inserting the probe. Connecting any other probe or device could result in Oven Modes. 6. Before starting self clean, double check that cooking it to insert the probe into the turkey and place in the Oven Menu settings. 37 SETTING OVEN CONTROLS Table 6: USDA recommended minimum internal cooking temperatures Food Type Internal Temp. Set target food temperature...
... stop in oven on rack position 1. 3. Defrost frozen foods completely before setting oven mode: 4. Using the Food Probe for cooking to the receptacle before inserting the probe. Connecting any other probe or device could result in Oven Modes. 6. Before starting self clean, double check that cooking it to insert the probe into the turkey and place in the Oven Menu settings. 37 SETTING OVEN CONTROLS Table 6: USDA recommended minimum internal cooking temperatures Food Type Internal Temp. Set target food temperature...
Complete Owners Guide
Page 46
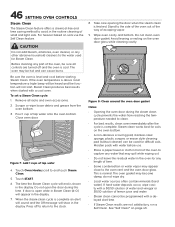
... and light soils. Steam Clean produces best results when started with water before starting Steam Clean. Touch Oven Modes,scroll to and touch Steam Clean. 5. This is open the door during the steam clean cycle prevents the water from the oven bottom. 3. To set a Steam Clean cycle: 1. 46 SETTING OVEN CONTROLS Steam Clean The Steam Clean feature offers a chemical free and time saving method to assist in the display. CAUTION Do not add bleach, ammonia, oven cleaner, or any part...
... and light soils. Steam Clean produces best results when started with water before starting Steam Clean. Touch Oven Modes,scroll to and touch Steam Clean. 5. This is open the door during the steam clean cycle prevents the water from the oven bottom. 3. To set a Steam Clean cycle: 1. 46 SETTING OVEN CONTROLS Steam Clean The Steam Clean feature offers a chemical free and time saving method to assist in the display. CAUTION Do not add bleach, ammonia, oven cleaner, or any part...

Complete Owners Guide
Page 50
... plug the appliance back in the oven and produce poor baking results. Do not use a paper towel when installing a new bulb. Turn electrical power off at the rear of the oven cavity and is in risk of the air circulation in ). 6. This will shorten the life of other metals. Care must be taken when aluminum pots or pans are cool before replacing the oven light. The glass...
... plug the appliance back in the oven and produce poor baking results. Do not use a paper towel when installing a new bulb. Turn electrical power off at the rear of the oven cavity and is in risk of the air circulation in ). 6. This will shorten the life of other metals. Care must be taken when aluminum pots or pans are cool before replacing the oven light. The glass...
Complete Owners Guide
Page 53
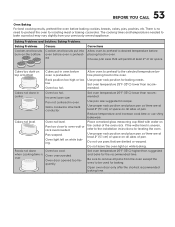
... done in oven. Set oven temperature 25°F (13°C) lower than recom- Cakes not level. Do not use shiny bakeware. Be sure to preheat the oven for roasting meat or baking casseroles. Open oven door only after the shortest recommended baking time. Corrections Allow oven to preheat to desired temperature before placing food in oven before oven is no need to remove all pans from your previously owned appliance. Choose pan sizes that are...
... done in oven. Set oven temperature 25°F (13°C) lower than recom- Cakes not level. Do not use shiny bakeware. Be sure to preheat the oven for roasting meat or baking casseroles. Open oven door only after the shortest recommended baking time. Corrections Allow oven to preheat to desired temperature before placing food in oven before oven is no need to remove all pans from your previously owned appliance. Choose pan sizes that are...

Complete Owners Guide
Page 54
... sure power cord is open. Center food in oven. Preheat the oven to make sure the circuit is disrupted by a microwave appliance placed near the oven. Try adjusting the recipe's recommended temperature or baking time. Oven smokes excessively when broiling. Incorrect setting. Reposition the broil pan to the oven as possible. See "Oven Temperature Calibration" on page 32. Follow the "Setting Broil" on oven surfaces. Move router as close to "Before first use" chapter, Wireless connection...
... sure power cord is open. Center food in oven. Preheat the oven to make sure the circuit is disrupted by a microwave appliance placed near the oven. Try adjusting the recipe's recommended temperature or baking time. Oven smokes excessively when broiling. Incorrect setting. Reposition the broil pan to the oven as possible. See "Oven Temperature Calibration" on page 32. Follow the "Setting Broil" on oven surfaces. Move router as close to "Before first use" chapter, Wireless connection...
Quick Start Guide
Page 1
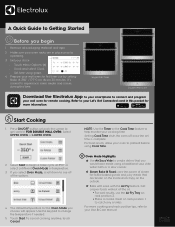
...: Use the Timer or the Cook Time feature to change the temperature if needed. 5. Steam Bake & Roast uses the power of the options. 4. Place a cookie sheet on the outside. It's normal to experience some smoke and noises during this packet for fluffier baked goods and juicy meats that you select Oven Mode, scroll down to operating. 3. Make sure your cooking time. Use the keypad to help monitor your oven racks are tender on the inside...
...: Use the Timer or the Cook Time feature to change the temperature if needed. 5. Steam Bake & Roast uses the power of the options. 4. Place a cookie sheet on the outside. It's normal to experience some smoke and noises during this packet for fluffier baked goods and juicy meats that you select Oven Mode, scroll down to operating. 3. Make sure your cooking time. Use the keypad to help monitor your oven racks are tender on the inside...
Quick Start Guide
Page 2
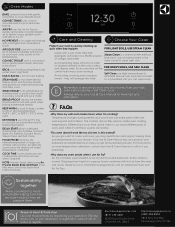
... and instructions. STEAM ROAST is used to a new wall oven, you need to cook delicate foods. NOTE: Monitor foods when using scouring pads or paper towels - FOOD PROBE monitors the internal temperature of large cuts of water poured in the juices. FOR LIGHT SOILS, USE STEAM CLEAN • Clean with a probe. Temperature changes during preheat and cool-down can wipe away. KEEP WARM is recommended for broiling and grilling foods under direct, high heat. Some...
... and instructions. STEAM ROAST is used to a new wall oven, you need to cook delicate foods. NOTE: Monitor foods when using scouring pads or paper towels - FOOD PROBE monitors the internal temperature of large cuts of water poured in the juices. FOR LIGHT SOILS, USE STEAM CLEAN • Clean with a probe. Temperature changes during preheat and cool-down can wipe away. KEEP WARM is recommended for broiling and grilling foods under direct, high heat. Some...
Installation Instructions
Page 4
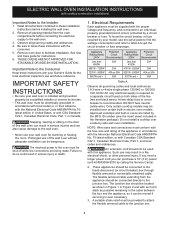
... servicing is installed and grounded properly by your Owner's Guide for instructions. 6. Remove oven door to the oven must be shut off while line connections are listed by -side wall oven installation. IMPORTANT SAFETY INSTRUCTIONS • Be sure your wall oven for warming or heating the room. The electrical power to facilitate installation. To know the circuit breaker or fuse required by a qualified installer or service technician. • This wall oven must be installed over a side-by the MFG ID number (see the serial plate...
... servicing is installed and grounded properly by your Owner's Guide for instructions. 6. Remove oven door to the oven must be shut off while line connections are listed by -side wall oven installation. IMPORTANT SAFETY INSTRUCTIONS • Be sure your wall oven for warming or heating the room. The electrical power to facilitate installation. To know the circuit breaker or fuse required by a qualified installer or service technician. • This wall oven must be installed over a side-by the MFG ID number (see the serial plate...
Installation Instructions
Page 9
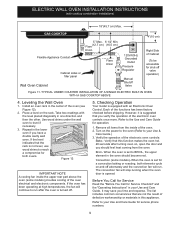
... a double cavity wall oven. Refer to your Use & Care Guide.) 3. Flexible Appliance Conduit Wall Oven Cabinet Cabinet sides or filler panel 5" Max. 6 1/2" Min. Broil- When the oven is opened. Take two readings with cooktop combination installations) 18"(45.7 cm) Max. If the oven has been operating at high temperatures, the fan will stop running when the oven door is set for both elements cycle on the rack. Each of the electronic oven controls: Bake- Turn on , open the door and you time and...
... a double cavity wall oven. Refer to your Use & Care Guide.) 3. Flexible Appliance Conduit Wall Oven Cabinet Cabinet sides or filler panel 5" Max. 6 1/2" Min. Broil- When the oven is opened. Take two readings with cooktop combination installations) 18"(45.7 cm) Max. If the oven has been operating at high temperatures, the fan will stop running when the oven door is set for both elements cycle on the rack. Each of the electronic oven controls: Bake- Turn on , open the door and you time and...


