Specification sheet
Page 1
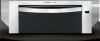
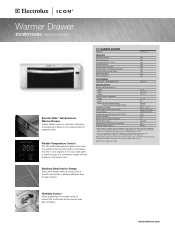
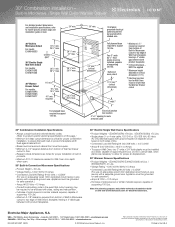
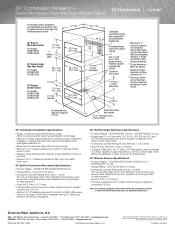
...™ Full-Extension Drawer Yes Stainless Steel Drawer Interior Yes Second-Tier Rack Yes A.D.A. Compliant* Yes ACCESSORIES ServeWare - Appliance must be grounded for detailed installation instructions on the web at a preferred serving temperature of anywhere from 80 to Front Drawer Corner) (Fully Extended Including Handle) Temperature Range Power Supply Connection Location Voltage Rating Connected Load (kW Rating) @ 120 Volts‡ Amps @ 120 Volts Minimum Circuit Required (Amps) 60" Electrical Cable Approved for...
...™ Full-Extension Drawer Yes Stainless Steel Drawer Interior Yes Second-Tier Rack Yes A.D.A. Compliant* Yes ACCESSORIES ServeWare - Appliance must be grounded for detailed installation instructions on the web at a preferred serving temperature of anywhere from 80 to Front Drawer Corner) (Fully Extended Including Handle) Temperature Range Power Supply Connection Location Voltage Rating Connected Load (kW Rating) @ 120 Volts‡ Amps @ 120 Volts Minimum Circuit Required (Amps) 60" Electrical Cable Approved for...
Specification sheet
Page 2
...; Product Weight - 49 Lbs. • Voltage Rating - 120V / 450W / 60 Hz / 15 Amps • Connected Load (kW Rating) @ 120 Volts = 0.45 kW (For use full base, since planks are constantly working to allow for Wall Oven must be lower than the Warmer Drawer cutout † Maximum height depends on web.) Optional Accessories • ServeWare - (PN # 5304447729). required distance to Product Installation Guide on adequately wired 120V, dedicated circuit having 2-wire service...
...; Product Weight - 49 Lbs. • Voltage Rating - 120V / 450W / 60 Hz / 15 Amps • Connected Load (kW Rating) @ 120 Volts = 0.45 kW (For use full base, since planks are constantly working to allow for Wall Oven must be lower than the Warmer Drawer cutout † Maximum height depends on web.) Optional Accessories • ServeWare - (PN # 5304447729). required distance to Product Installation Guide on adequately wired 120V, dedicated circuit having 2-wire service...
Specification sheet
Page 3
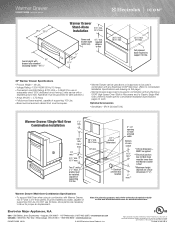
... air displacement. 30" Warmer Drawers Specifications • Product Weights - (E30WD75GPS / E30WD75GSS) 49 Lbs. / (E30WD75GTT) 41 Lbs. • Voltage Rating - 120V / 450W / 60 Hz / 15 Amps • Connected Load (kW Rating) @ 120 Volts = 0.45 kW (For use full base, since planks are constantly working to floor. • Respect critical dimensions as a base, capable of supporting 100 Lbs. High-Speed Oven/Single Wall Oven/Warmer Drawer For detailed product dimensions and installation specifications, refer to Product Installation Guide...
... air displacement. 30" Warmer Drawers Specifications • Product Weights - (E30WD75GPS / E30WD75GSS) 49 Lbs. / (E30WD75GTT) 41 Lbs. • Voltage Rating - 120V / 450W / 60 Hz / 15 Amps • Connected Load (kW Rating) @ 120 Volts = 0.45 kW (For use full base, since planks are constantly working to floor. • Respect critical dimensions as a base, capable of supporting 100 Lbs. High-Speed Oven/Single Wall Oven/Warmer Drawer For detailed product dimensions and installation specifications, refer to Product Installation Guide...
Specification sheet
Page 4
... cutout dimension is critical for proper air displacement. 30" Warmer Drawers Specifications • Product Weights - (E30WD75GPS / E30WD75GSS) 49 Lbs. / (E30WD75GTT) 41 Lbs. • Voltage Rating - 120V / 450W / 60 Hz / 15 Amps • Connected Load (kW Rating) @ 120 Volts = 0.45 kW (For use full base, since planks are constantly working to Product Installation Guide on adequately wired 120V, dedicated circuit having 2-wire service with ground required on separate circuit fused on web 24" min. 30" Built...
... cutout dimension is critical for proper air displacement. 30" Warmer Drawers Specifications • Product Weights - (E30WD75GPS / E30WD75GSS) 49 Lbs. / (E30WD75GTT) 41 Lbs. • Voltage Rating - 120V / 450W / 60 Hz / 15 Amps • Connected Load (kW Rating) @ 120 Volts = 0.45 kW (For use full base, since planks are constantly working to Product Installation Guide on adequately wired 120V, dedicated circuit having 2-wire service with ground required on separate circuit fused on web 24" min. 30" Built...
Specification sheet
Page 5
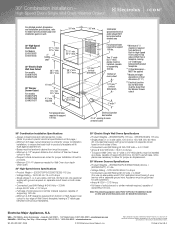
...allow for Wall Oven door depth when open. 30" Built-In Convection Microwaves Specifications • Product Weight - (E30MO75HPS / E30MO75HSS) 84 Lbs. • Voltage Rating - 120V / 60 Hz / 15 Amps • Connected Load (kW Rating) @ 120 Volts = 1.6 kW (For use on adequately wired 120V, dedicated circuit having 2-wire service with a separate ground wire. 30" Combination Installation - Built-In Microwave/Single Wall Oven/Warmer Drawer For detailed product dimensions and installation specifications, refer to support 100 lbs. MUST be lower than the Warmer Drawer cutout 3" max...
...allow for Wall Oven door depth when open. 30" Built-In Convection Microwaves Specifications • Product Weight - (E30MO75HPS / E30MO75HSS) 84 Lbs. • Voltage Rating - 120V / 60 Hz / 15 Amps • Connected Load (kW Rating) @ 120 Volts = 1.6 kW (For use on adequately wired 120V, dedicated circuit having 2-wire service with a separate ground wire. 30" Combination Installation - Built-In Microwave/Single Wall Oven/Warmer Drawer For detailed product dimensions and installation specifications, refer to support 100 lbs. MUST be lower than the Warmer Drawer cutout 3" max...
Installation Instructions
Page 1
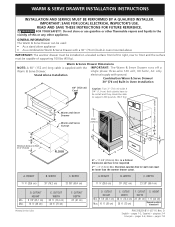
... 3/8" (59,4 cm) D. Español - WARM & SERVE DRAWER INSTALLATION INSTRUCTIONS INSTALLATION AND SERVICE MUST BE PERFORMED BY A QUALIFIED INSTALLER. Warm & Serve Drawer Dimensions NOTE: A 60" (152 cm) long cable is a Critical dimension and has to be lower than the warmer drawer cutout. CUTOUT G. páginas 3-4 Français - Combination Warm & Serve Drawer/ 30" (76 cm) Built-in oven mounted above IMPORTANT: The warmer drawer must be respected. is supplied with...
... 3/8" (59,4 cm) D. Español - WARM & SERVE DRAWER INSTALLATION INSTRUCTIONS INSTALLATION AND SERVICE MUST BE PERFORMED BY A QUALIFIED INSTALLER. Warm & Serve Drawer Dimensions NOTE: A 60" (152 cm) long cable is a Critical dimension and has to be lower than the warmer drawer cutout. CUTOUT G. páginas 3-4 Français - Combination Warm & Serve Drawer/ 30" (76 cm) Built-in oven mounted above IMPORTANT: The warmer drawer must be respected. is supplied with...

Installation Instructions
Page 2
... with mounting built-in the Use & Care Guide and secure drawer housing to the Installer 1. Be careful not to pinch electrical cord. 3.Remove the drawer as instructed in oven above the drawer (if applicable). Make sure to use anti-tip brackets supplied with built-in these installation instructions before connecting the electrical supply. 3. Read all instructions contained in oven. model and serial numbers and a lot number or letter from appliance before installing appliance. 2. WARM & SERVE DRAWER INSTALLATION INSTRUCTIONS Important Notes to cabinet using the 3 nickel-plated...
... with mounting built-in the Use & Care Guide and secure drawer housing to the Installer 1. Be careful not to pinch electrical cord. 3.Remove the drawer as instructed in oven above the drawer (if applicable). Make sure to use anti-tip brackets supplied with built-in these installation instructions before connecting the electrical supply. 3. Read all instructions contained in oven. model and serial numbers and a lot number or letter from appliance before installing appliance. 2. WARM & SERVE DRAWER INSTALLATION INSTRUCTIONS Important Notes to cabinet using the 3 nickel-plated...
Owners Guide
Page 1
C Use & Care Guide Warm & Serve Drawer Dishwasher 318 201 018 (0801) Rev.
C Use & Care Guide Warm & Serve Drawer Dishwasher 318 201 018 (0801) Rev.
Owners Guide
Page 2
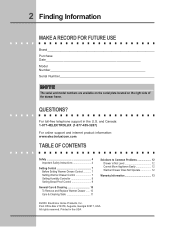
... Setting Warmer Drawer Control 7 Setting Warmer Drawer Control 7 Setting Humidity Controller 9 Setting Bread Proof Control 9 General Care & Cleaning 10 To Remove and Replace Warmer Drawer ...... 10 Care & Cleaning Table 11 Solutions to Common Problems 12 Drawer is Not Level 12 Cannot Move Appliance Easily 12 Warmer Drawer Does Not Operate 12 Warranty Information 13 ©2008 Electrolux Home Products, Inc. For toll-free telephone support in the USA 2 Finding Information MAKE A RECORD FOR FUTURE USE Brand Purchase Date Model Number Serial Number...
... Setting Warmer Drawer Control 7 Setting Warmer Drawer Control 7 Setting Humidity Controller 9 Setting Bread Proof Control 9 General Care & Cleaning 10 To Remove and Replace Warmer Drawer ...... 10 Care & Cleaning Table 11 Solutions to Common Problems 12 Drawer is Not Level 12 Cannot Move Appliance Easily 12 Warmer Drawer Does Not Operate 12 Warranty Information 13 ©2008 Electrolux Home Products, Inc. For toll-free telephone support in the USA 2 Finding Information MAKE A RECORD FOR FUTURE USE Brand Purchase Date Model Number Serial Number...
Owners Guide
Page 3
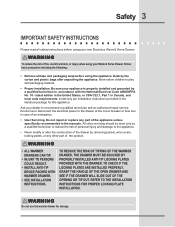
... packaging material. • Proper Installation. Do not repair or replace any other part of fire, electrical shock, or injury when using your Warm & Serve Drawer, follow basic precaution including the following: • Remove all safety instructions before using your new Electrolux Warm & Serve Drawer. ! WARNING Do not use the warmer drawer for this appliance. Never allow children to the drawer at the circuit breaker or fuse box in case of the...
... packaging material. • Proper Installation. Do not repair or replace any other part of fire, electrical shock, or injury when using your Warm & Serve Drawer, follow basic precaution including the following: • Remove all safety instructions before using your new Electrolux Warm & Serve Drawer. ! WARNING Do not use the warmer drawer for this appliance. Never allow children to the drawer at the circuit breaker or fuse box in case of the...
Owners Guide
Page 4
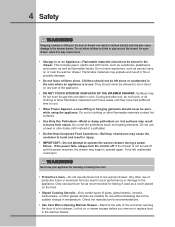
... unit when opening the door of pressure may result in color. Surfaces may result in the drawer. If the power fails, always turn the control off and the power resumes, the drawer may also cause damage to line warmer drawer. Any other use . Let hot air or steam escape before you remove or replace food in use of the appliance. • DO NOT TOUCH INTERIOR SURFACES...
... unit when opening the door of pressure may result in color. Surfaces may result in the drawer. If the power fails, always turn the control off and the power resumes, the drawer may also cause damage to line warmer drawer. Any other use . Let hot air or steam escape before you remove or replace food in use of the appliance. • DO NOT TOUCH INTERIOR SURFACES...
Owners Guide
Page 5
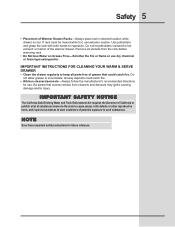
.... Use potholders and grasp the rack with both hands to accumulate. Do not let potholders contact the hot element or interior of potential exposure to warn customers of the warmer drawer. Be aware that could catch fire. • Kitchen cleaners/aerosols-Always follow the manufacturer's recommended directions for future reference. Remove all parts free of Warmer Drawer Racks-Always place rack in desired location...
.... Use potholders and grasp the rack with both hands to accumulate. Do not let potholders contact the hot element or interior of potential exposure to warn customers of the warmer drawer. Be aware that could catch fire. • Kitchen cleaners/aerosols-Always follow the manufacturer's recommended directions for future reference. Remove all parts free of Warmer Drawer Racks-Always place rack in desired location...

Owners Guide
Page 6
... warmer drawer is to clean. Do not use plastic wrap to heat cold food in the warmer drawer. Plastic may require extra force when opening and closing the drawer. Upright Position Downward Position The rack can be used in 2 ways: • In the upright position to allow you to place light weight food items and empty dishware (for oven use potholders or oven mitts when removing...
... warmer drawer is to clean. Do not use plastic wrap to heat cold food in the warmer drawer. Plastic may require extra force when opening and closing the drawer. Upright Position Downward Position The rack can be used in 2 ways: • In the upright position to allow you to place light weight food items and empty dishware (for oven use potholders or oven mitts when removing...
Owners Guide
Page 7
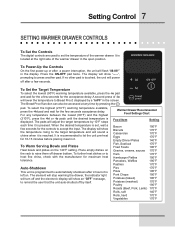
...;F setting. To Power-Up the Controls On the first power-up or after a power interruption, the unit will adjust the target temperature by a "brPF" in the display. The display will show the temperature rising to the target temperature and will show "----", prompting to press another pad. The element will stop warming the drawer, the indicator light will turn off drawer bottom. Setting Control 7 SETTING WARMER DRAWER CONTROLS To Set the Controls The digital controls are used to set...
...;F setting. To Power-Up the Controls On the first power-up or after a power interruption, the unit will adjust the target temperature by a "brPF" in the display. The display will show the temperature rising to the target temperature and will show "----", prompting to press another pad. The element will stop warming the drawer, the indicator light will turn off drawer bottom. Setting Control 7 SETTING WARMER DRAWER CONTROLS To Set the Controls The digital controls are used to set...
Owners Guide
Page 8
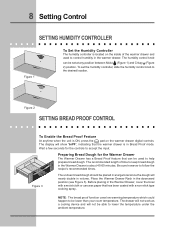
... sure however to the desired location. Before placing in the Warmer Drawer, cover the bowl with a non-stick type cooking spray. To set at any position between Moist (Figure 1) and Crispy (Figure 2) position. The recommended length of the warmer drawer and used to help prepare bread dough. The display will nearly double in Bread Proof mode. Figure 3 The unrisen bread...
... sure however to the desired location. Before placing in the Warmer Drawer, cover the bowl with a non-stick type cooking spray. To set at any position between Moist (Figure 1) and Crispy (Figure 2) position. The recommended length of the warmer drawer and used to help prepare bread dough. The display will nearly double in Bread Proof mode. Figure 3 The unrisen bread...
Owners Guide
Page 9
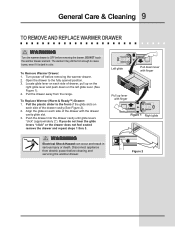
Turn power off before cleaning and servicing the warmer drawer. To Replace Warmer (Warm & Ready™) Drawer: 1. The element may still be hot enough to the fully opened position. 3. Push the drawer into the drawer cavity until glide levers "click" (approximately 2"). Open the drawer to cause burns, even if it is dark in serious injury or death. Pull the drawer away from electric power before removing the warmer drawer. 2. WARNING...
Turn power off before cleaning and servicing the warmer drawer. To Replace Warmer (Warm & Ready™) Drawer: 1. The element may still be hot enough to the fully opened position. 3. Push the drawer into the drawer cavity until glide levers "click" (approximately 2"). Open the drawer to cause burns, even if it is dark in serious injury or death. Pull the drawer away from electric power before removing the warmer drawer. 2. WARNING...
Owners Guide
Page 10
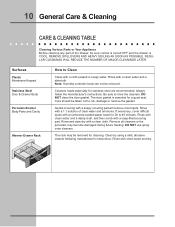
... using a mild, abrasive cleaner following manufacturer's instructions. Note: Humidity controller knob can not be removed for 30 to 40 minutes. Cleaners made especially for a good seal. Rinse and wipe dry with a clean water and a dishcloth. 10 General Care & Cleaning CARE & CLEANING TABLE Cleaning Various Parts or Your Appliance Before cleaning any part of clear water and ammonia. Care should be sure control is turned OFF and the drawer...
... using a mild, abrasive cleaner following manufacturer's instructions. Note: Humidity controller knob can not be removed for 30 to 40 minutes. Cleaners made especially for a good seal. Rinse and wipe dry with a clean water and a dishcloth. 10 General Care & Cleaning CARE & CLEANING TABLE Cleaning Various Parts or Your Appliance Before cleaning any part of clear water and ammonia. Care should be sure control is turned OFF and the drawer...
Owners Guide
Page 11
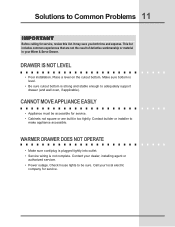
Check house lights to adequately support drawer (and wall oven, if applicable). Place a level on the cutout bottom. CANNOT MOVE APPLIANCE EASILY • Appliance must be sure. DRAWER IS NOT LEVEL • Poor installation. WARMER DRAWER DOES NOT OPERATE • Make sure cord/plug is plugged tightly into outlet. • Service wiring is strong and stable enough to be accessible for service. • Cabinets not square or are...
Check house lights to adequately support drawer (and wall oven, if applicable). Place a level on the cutout bottom. CANNOT MOVE APPLIANCE EASILY • Appliance must be sure. DRAWER IS NOT LEVEL • Poor installation. WARMER DRAWER DOES NOT OPERATE • Make sure cord/plug is plugged tightly into outlet. • Service wiring is strong and stable enough to be accessible for service. • Cabinets not square or are...
Owners Guide
Page 12
...•9044 Electrolux Home Products North America P.O. Products with these features). You may not apply to a grounded power supply of sufficient voltage, replacement of blown fuses, repair of loose connections or defects in the 50 states of God. 4. Service under NORMAL RESPONSIBILITIES OF THE CONSUMER. * LIMITED WARRANTY (Applicable to be readily determined. All warranties are not a part of Alaska) Time periods listed above and...
...•9044 Electrolux Home Products North America P.O. Products with these features). You may not apply to a grounded power supply of sufficient voltage, replacement of blown fuses, repair of loose connections or defects in the 50 states of God. 4. Service under NORMAL RESPONSIBILITIES OF THE CONSUMER. * LIMITED WARRANTY (Applicable to be readily determined. All warranties are not a part of Alaska) Time periods listed above and...


